


前言:
[前一篇文章]介绍了关于Android中Window体系的介绍,主要介绍的是View层的Window体系概念,但是想要深入了解Window在系统中的机制,WMS是绕不过去的坎。有句话说的好:AMS和WMS占据了Framework层的半壁江山,所以了解这两个概念对我们在日常开发中的性能优化或有想转Framework开发的都大有帮助。
笔者花了几天时间对WMS相关知识进行了整理。
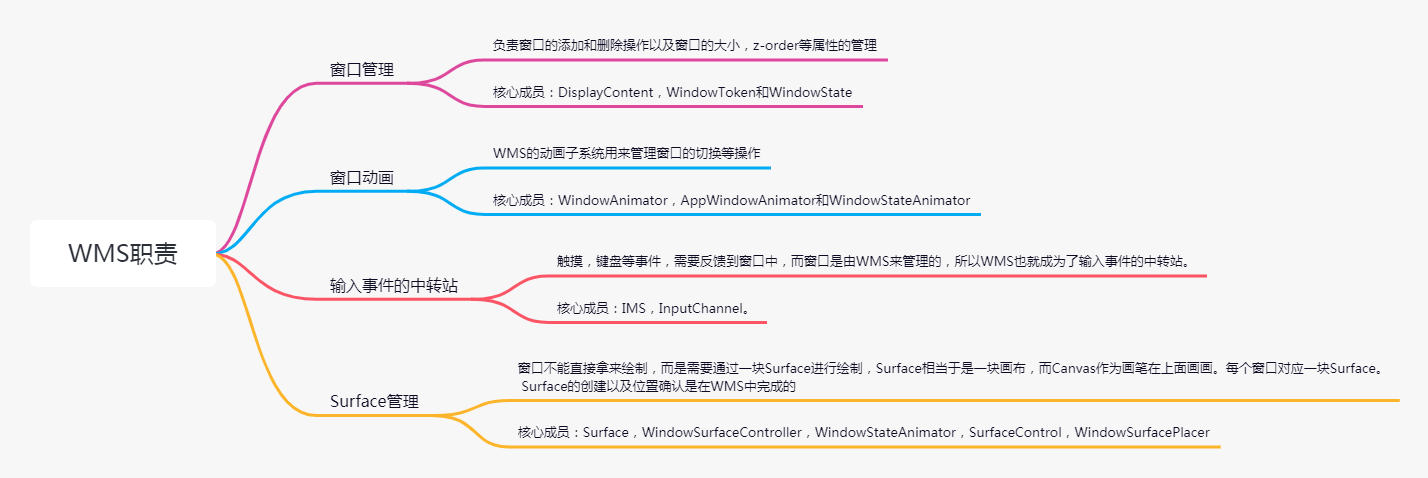
首先我们来说下WMS在系统中的几大职责
WMS中窗口容器树的概念
为了更好的讲解个个核心成员类,我们需要先来理清Window中的容器和树的概念。
容器:这个大家都熟悉,在WMS中通过继承WindowContainer类来实现容器机制:
而树就是说每个容器在作为父容器的时候,同时也可能是其他容器的子容器。
具体我们来看WindowContainer整体结构:
class WindowContainer<E extends WindowContainer> implements Comparable<WindowContainer> {
    ...
    private WindowContainer mParent = null;//1
    protected final WindowList<E> mChildren = new WindowList<E>();//2

}
注释1处mParent是当前WindowContainer容器的父容器
注释2处的mChildren是一个继承WindowContainer的集合对象,说明当前WindowContainer可能会有好几个子容器。
画个图来说明下这里面的关系:

有了容器的概念后下面按职责来介绍WMS
窗口管理:
窗口管理核心类介绍:
窗口管理使用到的DisplayContent,WindowToken和WindowState
DisplayContent:
用来管理一个逻辑屏上的所有窗口,有几个屏幕就会有几个DisplayContent。使用displayId来区分。
处于不同DisplayContent的两个窗口在布局、显示顺序以及动画处理上不会产生任何耦合。 因此,就这几个方面来说,DisplayContent就像一个孤岛,所有这些操作都可以在其内部独立执行。
DisplayContent类声明:
class DisplayContent extends WindowContainer<DisplayContent.DisplayChildWindowContainer>{
    // Mapping from a token IBinder to a WindowToken object on this display.
    private final HashMap<IBinder, WindowToken> mTokenMap = new HashMap();
}
1.DisplayContent的子容器是其内部类DisplayChildWindowContainer
2.DisplayContent内部使用:IBinder为key,WindowToken为value的键值对保存在HashMap中。
3.DisplayContent是在Window添加到WMS的时候初始化的:
WMS:
public int addWindow(Session session, ..){
    final DisplayContent displayContent = mRoot.getDisplayContentOrCreate(displayId);
    ..
}
mRoot是RootWindowContainer类型的对象,看名字就知道其是窗口容器的根。 说明在Window体系中,RootWindowContainer节点是容器最顶端的父容器。
class RootWindowContainer extends WindowContainer<DisplayContent> {
    DisplayContent getDisplayContentOrCreate(int displayId) {
        DisplayContent dc = getDisplayContent(displayId);
        if (dc == null) {
            final Display display = mService.mDisplayManager.getDisplay(displayId);
            if (display != null) {
                dc = createDisplayContent(display);
            }
        }
        return dc;
    }

   DisplayContent getDisplayContent(int displayId) {
      for (int i = mChildren.size() - 1; i >= 0; --i) {
          final DisplayContent current = mChildren.get(i);
           if (current.getDisplayId() == displayId) {
              return current;
           }
      }
      return null;
  }
}
其继承了WindowContainer,这里的DisplayContent是一个泛型声明,表示其子容器的类型是DisplayContent, 在getDisplayContent方法中也可知,其mChildren列表是DisplayContent的集合。这也变相的说明DisplayContent也是一个容器
WindowToken:
类声明:
class WindowToken extends WindowContainer<WindowState>
表明WindowToken也是子容器,其子容器是WindowState,所以WindowState也是一个容器。
WindowToken在窗口体系中有两个作用:
- 1.应用组件标识:将属于同一个应用组件的窗口组织在一起,这里的应用组件可以是:Activity、InputMethod、Wallpaper以及Dream。 WMS在对窗口的管理过程中:用WindowToken来指代一个应用组件。例如在进行窗口的Z-Order排序时,属于同一个WindowToken的窗口会被安排在一起。
- 2.令牌作用:WindowToken由应用组件或其管理者负责向WMS声明并持有,应用组件在需要更新窗口时,需要向WMS提供令牌表明自己的身份, 并且窗口的类型必须与所持有的WindowToken的类型一致。
但是系统窗口是个例外,并不需要提供token,WMS会隐式声明一个WindowToken。
那是不是说谁都可以添加系统窗口了呢?非也,在addWindow开始处就会调用下面代码:
mPolicy.checkAddPermission()
它要求客户端必须拥有SYSTEM_ALERT_WINDOW或INTERNAL_SYSTEM_WINDOW权限才能创建系统类型的窗口。
Window和WindowToken关系如下:

WindowState:
类声明:
class WindowState extends WindowContainer<WindowState>
表明WindowState也是一个WindowContainer容器,但是其子容器也是WindowState,一般窗口有子窗口SUB_WINDOW的情况下,WindowState才有子容器节点。
WindowState在WMS中表示一个Window窗口状态属性,其内部保存了一个Window所有的属性信息。
其与View以及WindowToken关系如下:

如何查看当前设备Window窗口状态命令?
adb shell dumpsys window windows
Window #9 Window{884cb45 u0 com.android.messaging/com.android.messaging.ui.conversationlist.ConversationListActivity}:
    mDisplayId=0 stackId=3 mSession=Session{f1b7b8e 4307:u0a10065} mClient=android.os.BinderProxy@a512fbc
    mOwnerUid=10065 mShowToOwnerOnly=true package=com.android.messaging appop=NONE
    mAttrs={(0,36)(828xwrap) gr=BOTTOM CENTER sim={adjust=pan forwardNavigation} ty=APPLICATION fmt=TRANSLUCENT wanim=0x7f130015
      fl=DIM_BEHIND ALT_FOCUSABLE_IM HARDWARE_ACCELERATED
      vsysui=LIGHT_STATUS_BAR LIGHT_NAVIGATION_BAR}
    Requested w=828 h=290 mLayoutSeq=220
    mBaseLayer=21000 mSubLayer=0    mToken=AppWindowToken{3f9efb8 token=Token{2b272cc ActivityRecord{55a41e u0 com.android.messaging/.ui.conversationlist.ConversationListActivity t8}}}
    mAppToken=AppWindowToken{3f9efb8 token=Token{2b272cc ActivityRecord{55a41e u0 com.android.messaging/.ui.conversationlist.ConversationListActivity t8}}}
...
下面笔者以窗口的添加操作为例讲解WMS的窗口管理
窗口的添加操作
public int addWindow(Session session, IWindow client, int seq,
        WindowManager.LayoutParams attrs, int viewVisibility, int displayId,
        Rect outContentInsets, Rect outStableInsets, Rect outOutsets,
        InputChannel outInputChannel) {
    ...
    int res = mPolicy.checkAddPermission(attrs, appOp);//1
    ...
    synchronized(mWindowMap) {


        final DisplayContent displayContent = mRoot.getDisplayContentOrCreate(displayId);//2

        if (type >= FIRST_SUB_WINDOW && type <= LAST_SUB_WINDOW) {
            parentWindow = windowForClientLocked(null, attrs.token, false);//3

        }
        ...
        WindowToken token = displayContent.getWindowToken(
                hasParent ? parentWindow.mAttrs.token : attrs.token);//4

        if (token == null) {
            final IBinder binder = attrs.token != null ? attrs.token : client.asBinder();
            token = new WindowToken(this, binder, type, false, displayContent,
                    session.mCanAddInternalSystemWindow);//5
        }
        ...
        final WindowState win = new WindowState(this, session, client, token, parentWindow,
                appOp[0], seq, attrs, viewVisibility, session.mUid,
                session.mCanAddInternalSystemWindow);//6
        ...
        mPolicy.adjustWindowParamsLw(win.mAttrs);//7
        ...
        if  (openInputChannels) {
            win.openInputChannel(outInputChannel);//8
        }
        ...
        mWindowMap.put(client.asBinder(), win);//9
        ...
        win.mToken.addWindow(win);//10
        ...
        displayContent.assignWindowLayers(false /* setLayoutNeeded */);//11

        //12
        if (focusChanged) {
            mInputMonitor.setInputFocusLw(mCurrentFocus, false /*updateInputWindows*/);
        }
        mInputMonitor.updateInputWindowsLw(false /*force*/);

    }
    ...
    return res;

}
注释1:检查当前Window的token等权限合法性
注释2:这在介绍DisplayContent已经说过,使用RootWindowContainer的子容器中获取一个DisplayContent,如果子容器集合中不存在,则去获取一个,并添加到child集合中
注释3:如果是Dialog等子窗口,则获取父窗口,没有就报找不到父窗口的异常。
注释4:使用attr.token去displayContent的键值对mTokenMap中获取对应的WindowToken,WindowToken中保存了一组Window。
注释5:如果4中WindowToken为null,则创建一个WindowToken,传入app层传入的attr.token以及displayContent对象,内部会将这个创建的WindowToken保存到displayContent中
注释6:创建一个WindowState,并传入所有关于Window相关的属性,这样WindowState在WMS中就是以一个Window性质存在了、WindowState构造过程中会将其添加到WindowToken中去。
注释7:根据mPolicy调整window的attr属性,mPolicy的实现类是PhoneManagerPolicy。
注释8:执行WindowState的openInputChannel,这里主要是打通和Input系统的通道,用于接收IMS的输入事件请求。
注释9:将客户端app层的Window对象和WindowState关联上,这样WMS就可以通过Window找到WMS中的WindowState对象、
注释10: win.mToken是前面创建的WindowToken对象,所以此处就是将WindowState加入到WindowToken的子容器集合中。
注释11:分配窗口的层级,这里的setLayoutNeeded参数为false,说明不需要进行Layout操作。
这里小结下addWindow方法: 主要就是创建了一个和Window一一对应的WindowState对象,并将WindowState插入到父容器WindowToken的子容器集合中,而WindowToken又保存在DisplayContent的键值对集合中。三种关系可以简单总结如下:

窗口动画
我们知道在Android内部有两种动画:Window切换移动动画以及app层的View的动画, 动画操作的是View而Window切换操作的是Surface,对不同层级的SurfaceControl进行操纵,会产生不同的动画效果, 注意区分。
我们这里涉及到的是Window切换移动动画:
但是不管是View的动画还是Window切换操作,对底层屏幕刷新来说都是针对不同帧动画来说,所以会涉及到VSync同步信号相关知识。
核心类:
WindowStateAnimator
类声明:
Keep track of animations and surface operations for a single WindowState.
用来管理一个Window的动画操作的,在WindowState构造方法中创建,说明每个Window窗口都对应一个WindowStateAnimator
WindowState(WindowManagerService service...){
    mWinAnimator = new WindowStateAnimator(this);
}
WindowAnimator:
   /**

    * Singleton class that carries out the animations and Surface operations in a separate task
    * on behalf of WindowManagerService.
      */
       public class WindowAnimator
看方法说明,这个类还是用于WMS中的窗口动画以及Surface操作的单例工具类,WMS将动画的工作都委托他来处理。其在WMS构造的时候创建了实例。
WindowAnimator(final WindowManagerService service) {
    mService = service;
    ..
    mWindowPlacerLocked = service.mWindowPlacerLocked;//1 这个类用于Surface的摆放
    AnimationThread.getHandler().runWithScissors(
            () -> mChoreographer = Choreographer.getSfInstance(), 0 /* timeout */);//2

```
mAnimationFrameCallback = frameTimeNs -> {//3
    synchronized (mService.mWindowMap) {
        mAnimationFrameCallbackScheduled = false;
    }
    animate(frameTimeNs);
};
```

}
注释1处创建了一个WindowSurfacePlacer对象,这个对象是用于Surface的摆放的操作,说明WindowAnimator还支持Surface的各种操作 注释2处使用AnimationThread线程进行Window的动画操作,AnimationThread内部使用的是HandlerThread机制,说明其内部也创建了一个异步消息处理机制。 注释3处mAnimationFrameCallback类型是Choreographer.FrameCallback。FrameCallback在这篇文章中有讲过,其就是给Choreographer设置一个回调,在Choreographer接收到 VSync信号时,在doFrame中触发这个回调,一般是用来监听帧率等操作。
而这里是在接收到doFrame的时候回调的是一个animate(frameTimeNs)动画处理的方法。animate函数执行流程很长,包括更新壁纸、转屏动画等逻辑均包含在其中。
那么mAnimationFrameCallback回调是什么时候注册到Choreographer中去的呢?
WindowAnimator的scheduleAnimation方法:
void scheduleAnimation() {
    if (!mAnimationFrameCallbackScheduled) {
        mAnimationFrameCallbackScheduled = true;
        mChoreographer.postFrameCallback(mAnimationFrameCallback);
    }
}
在外部需要进行动画的时候,就会优先scheduleAnimation,将mAnimationFrameCallback注册到Choreographer中去。
我们重点来看animate方法:这个方法内部有这么段代码
dc.updateWindowsForAnimator(this);
表示为了动画去更新Windows: 可以进入看看:
void updateWindowsForAnimator(WindowAnimator animator) {
    mTmpWindowAnimator = animator;
    forAllWindows(mUpdateWindowsForAnimator, true /* traverseTopToBottom */);
}
boolean forAllWindows(ToBooleanFunction<WindowState> callback, boolean traverseTopToBottom) {

```
...
final int count = mChildren.size();
for (int i = 0; i < count; i++) {
    final DisplayChildWindowContainer child = mChildren.get(i);
    if (child == mImeWindowsContainers && mService.mInputMethodTarget != null) {
        // In this case the Ime windows will be processed above their target so we skip
        // here.
        continue;
    }
    if (child.forAllWindows(callback, traverseTopToBottom)) {
        return true;
    }
}
...
return false;
```

}
forAllWindows方法会遍历整个容器树都去调用mUpdateWindowsForAnimator回调。 这个回调内部就会去执行winAnimator.stepAnimationLocked去更新Window的更新操作。 stepAnimationLocked,代表单步动画。这里面的操作大家自行查看也不难、
这里对动画做个小结: 通过在需要动画的时候,post一个FrameCallBack给Choreographer,在VSync信号到来的时候,会优先执行动画操作。动画回调内部会去遍历整个容器树模型,依次更改每个Window对应的Surface的状态。然后在绘制完成后,提交给SurfaceFlinger、
过程图示:

输入事件处理:
关于Input事件在这篇文章中已经有讲过。输入子系统从驱动文件中读取事件后,再封装提交给IMS,IMS再发送给WMS进行处理。
输入系统整体架构:

今天我们从WMS的角度来分析下输入事件:
核心类:
InputChannel
类声明:
/**

 * An input channel specifies the file descriptors used to send input events to
 * a window in another process.  It is Parcelable so that it can be sent
 * to the process that is to receive events.  Only one thread should be reading
 * from an InputChannel at a time.
 * @hide
   */
    public final class InputChannel implements Parcelable {
注释中说明了:InputChannel是一个使用文件描述符fd来发送input事件给其他进程的一个输入通道,且只有一个线程可以同时读取InputChannel中的数据,说明InputChannel是线程安全的。 其内部使用的是socket通讯。
前面在分析Window添加过程的时候说过在WMS的addWindow中会调用
win.openInputChannel(outInputChannel)

void openInputChannel(InputChannel outInputChannel) {
    ...
    String name = getName();
    InputChannel[] inputChannels = InputChannel.openInputChannelPair(name);//1
    mInputChannel = inputChannels[0];
    mClientChannel = inputChannels[1];
    mInputWindowHandle.inputChannel = inputChannels[0];
    if (outInputChannel != null) {
        mClientChannel.transferTo(outInputChannel);//2
        mClientChannel.dispose();
        mClientChannel = null;
    }
    ...
    mService.mInputManager.registerInputChannel(mInputChannel, mInputWindowHandle);//3
}
InputChannel.java:
public static InputChannel[] openInputChannelPair(String name) {
    ...
    return nativeOpenInputChannelPair(name);
}
android_view_InputChannel.cpp:
static jobjectArray android_view_InputChannel_nativeOpenInputChannelPair(JNIEnv* env...) {
    ...
    sp<InputChannel> serverChannel;
    sp<InputChannel> clientChannel;
    status_t result = InputChannel::openInputChannelPair(name, serverChannel, clientChannel);


```
jobjectArray channelPair = env->NewObjectArray(2, gInputChannelClassInfo.clazz, NULL);
jobject serverChannelObj = android_view_InputChannel_createInputChannel(env,
        std::make_unique<NativeInputChannel>(serverChannel));
jobject clientChannelObj = android_view_InputChannel_createInputChannel(env,
        std::make_unique<NativeInputChannel>(clientChannel));
...
env->SetObjectArrayElement(channelPair, 0, serverChannelObj);
env->SetObjectArrayElement(channelPair, 1, clientChannelObj);
return channelPair;
```

}

status_t InputChannel::openInputChannelPair(const String8& name,
        sp<InputChannel>& outServerChannel, sp<InputChannel>& outClientChannel) {
    int sockets[2];
    if (socketpair(AF_UNIX, SOCK_SEQPACKET, 0, sockets)) {
        ...
        return result;
    }
    ...
    outServerChannel = new InputChannel(serverChannelName, sockets[0]);
    outClientChannel = new InputChannel(clientChannelName, sockets[1]);
    return OK;
}
通过以上代码可以看出InputChannel使用的是sockets通讯,且WindowState的openInputChannel中注释1处:
InputChannel[] inputChannels = InputChannel.openInputChannelPair(name),
返回的inputChannels是一个服务端和客户端的输入通道数组 其中:
- 下标0:表示服务端的InputChannel
- 下标1:表示客户端的InputChannel
在注释3处registerInputChannel传入的是server端InputChannel给IMS。 而注释2处将client端的InputChannel与app端传入的outInputChannel关联起来了。
这样服务端在InputChannel就可以写入input事件,然后在app端的InputChannel就可以接受到数据了。 输入事件通讯模型如下:

Surface管理:
WMS负责创建Surface以及对Surface的摆放工作,之后将Surface提交给SurfaceFlinger进行合并。 在App层也创建了一个Surface对象,但是那个是空对象,用于WMS的填充。
Surface的创建:
Surface的创建在WMS中使用WindowStateAnimator代理创建,而WindowStateAnimator中又创建了一个WindowSurfaceController对Surface进行管理。
核心类:WindowSurfaceController
public WindowSurfaceController(SurfaceSession s, String name, int w, int h...){
	mSurfaceControl = new SurfaceControl(s, name, w, h, format, flags, windowType, ownerUid);
}
public SurfaceControl(SurfaceSession session, String name, ...){
	mNativeObject = nativeCreate(session, name, w, h, format, flags,...);
}
在其构造方法中创建了一个SurfaceControl,SurfaceControl最终进入native层,在native层创建了一个Surface,并返回native surface地址.实际在native层也是创建一个SurfaceControl
static jlong nativeCreate(JNIEnv* env, jclass clazz, jobject sessionObj,
        jstring nameStr, jint w, jint h, jint format, jint flags, jlong parentObject,
        jint windowType, jint ownerUid) {

    ```
    sp<SurfaceComposerClient> client(android_view_SurfaceSession_getClient(env, sessionObj));
    SurfaceControl *parent = reinterpret_cast<SurfaceControl*>(parentObject);
    sp<SurfaceControl> surface = client->createSurface(
            String8(name.c_str()), w, h, format, flags, parent, windowType, ownerUid);
    ...
    return reinterpret_cast<jlong>(surface.get());
    ```
}
那app层是什么时候发起WMS的Surface创建任务的? 看ViewRootImpl的relayoutWindow方法:
private int relayoutWindow(WindowManager.LayoutParams params..){
    int relayoutResult = mWindowSession.relayout(mWindow, mSeq, params...mSurface);
}
调用mWindowSession的relayout方法,并传入最后mSurface对象,这是空Surface,在WMS中会被填充返回 最终调用到WMS中的relayoutWindow。
public int relayoutWindow(Session session, IWindow client, int seq..){
    ...
    result = createSurfaceControl(outSurface, result, win, winAnimator);
}
private int createSurfaceControl(Surface outSurface, int result, WindowState win,
        WindowStateAnimator winAnimator) {

    ```
    WindowSurfaceController surfaceController;
    try {
        surfaceController = winAnimator.createSurfaceLocked(win.mAttrs.type, win.mOwnerUid);
    } finally {
        Trace.traceEnd(TRACE_TAG_WINDOW_MANAGER);
    }
    if (surfaceController != null) {
        surfaceController.getSurface(outSurface);//1
        if (SHOW_TRANSACTIONS) Slog.i(TAG_WM, "  OUT SURFACE " + outSurface + ": copied");
    }
    return result;
    ```

}
最终会调用WindowStateAnimator的createSurfaceLocked这个前面已经分析过了。 返回的surfaceController对象在注释1处调用getSurface(outSurface),将native层的Surface填充到App传递过来的outSurface 进入getSurface看看:
WindowSurfaceController.java
void getSurface(Surface outSurface) {
    outSurface.copyFrom(mSurfaceControl);
}
Surface.java
public void copyFrom(SurfaceControl other) {
    if (other == null) {
        throw new IllegalArgumentException("other must not be null");
    }

    ```
    long surfaceControlPtr = other.mNativeObject;
    if (surfaceControlPtr == 0) {
        throw new NullPointerException(
                "null SurfaceControl native object. Are you using a released SurfaceControl?");
    }
    long newNativeObject = nativeGetFromSurfaceControl(surfaceControlPtr);

    synchronized (mLock) {
        if (mNativeObject != 0) {
            nativeRelease(mNativeObject);
        }
        setNativeObjectLocked(newNativeObject);
    }
    ```

}
private void setNativeObjectLocked(long ptr) {
    if (mNativeObject != ptr) {
        mNativeObject = ptr;
    }
}
getSurface方法将WMS中创建的WindowSurfaceController中SurfaceControl对象的mNativeObject对象传递给新的Surface,并使用这个对象去native层获取一个新的NativeObject 赋值给当前Surface的mNativeObject,这样App层的Surface就获取到了WMS在native中创建的SurfaceControl对象,可以在app层操作native层的Surface了。
那么为什么谷歌要绕这么大圈来创建Surface呢?直接在App层去创建不就可以了么?
个人见解谷歌是希望统一管理Surface而不是单独让某个应用持有,且Surface的摆放操作等都是得由WMS进行处理,所以就直接让WMS去创建,然后返回给App层去绘制Surface操作。
Surface的摆放:
Surface在创建之后还需要进行屏幕位置的确认,那这个在哪里操作呢?
核心类:WindowSurfacePlacer
WMS在构造的时候就创建了WindowSurfacePlacer对象。这个对象主要用来给Surface进行位置的定位、
定位到WindowSurfacePlacer的performSurfacePlacement方法,这个方法可以说是WMS最核心的方法,其负责了所有窗口的摆放工作:如何显示?显示在屏幕什么位置?区域大小等。 这些将在确认后,下发给SurfaceFlinger进行处理。
WMS中任何窗口状态发生改变都会触发该方法,整个方法进行容器树的遍历,确认窗口可见性等。
final void performSurfacePlacement(boolean force) {

    ```
    int loopCount = 6;
    do {
        mTraversalScheduled = false;
        performSurfacePlacementLoop();
        loopCount--;
    } while (mTraversalScheduled && loopCount > 0);
    ```

}

private void performSurfacePlacementLoop() {
    ...
    mInLayout = true;
    mService.mRoot.performSurfacePlacement(recoveringMemory);
    mInLayout = false;
    if (mService.mRoot.isLayoutNeeded()) {
        if (++mLayoutRepeatCount < 6) {
            requestTraversal();
        } else {
            Slog.e(TAG, "Performed 6 layouts in a row. Skipping");
            mLayoutRepeatCount = 0;
        }
    } else {
        mLayoutRepeatCount = 0;
    }
}
performSurfacePlacement最终会调用到mService.mRoot.performSurfacePlacement, mService.mRoot.performSurfacePlacement中最终会执行到对窗口容器树做以下遍历操作,中间代码跳转太多,就略过了。 主要做了下面三件事:
-
1.DisplayContent的mPerformLayout操作:计算所有DisplayFrame以及WindowFrame的大小和位置
private final Consumer<WindowState> mPerformLayout = w -> {
    ...
    mService.mPolicy.layoutWindowLw(w, null);
    ...
}
mPolicy = PhoneManagerPolicy
PhoneManagerPolicy.java
public void layoutWindowLw(WindowState win, WindowState attached) {
    //这里面都是对不同给的Window的位置进行确认
    computeFrameLw(....);//这个方法会计算所有DisplayFrame以及WindowFrame的大小和位置
}
-
2.DisplayContent的mApplySurfaceChangesTransaction操作:
private final Consumer<WindowState> mApplySurfaceChangesTransaction = w -> {
    ..前面一大推处理
    winAnimator.setSurfaceBoundariesLocked(mTmpRecoveringMemory /* recoveringMemory */);
  }
  winAnimator = WindowStateAnimator
  WindowStateAnimator.java

  void setSurfaceBoundariesLocked(final boolean recoveringMemory) {
    calculateSurfaceBounds(w, attrs);//1
    mSurfaceResized = mSurfaceController.setSizeInTransaction(
                      mTmpSize.width(), mTmpSize.height(), recoveringMemory);//2
    ...
    mSurfaceController.setPositionInTransaction((float) Math.floor(posX),
                      (float) Math.floor(posY), recoveringMemory);//3

}
注释1处计算Surface的size大小,然后在注释2处使用mSurfaceController设置到native层的SurfaceController对象中, 注释3处在计算好位置后,也使用mSurfaceController设置到native层的SurfaceController对象中。 这样就将Surface在屏幕中给的位置以及大小都确认下来了、
-
3.WindowStateAnimator的commitFinishDrawingLocked();提交事务
boolean commitFinishDrawingLocked() {

    ```
    mDrawState = READY_TO_SHOW;
    boolean result = false;
    final AppWindowToken atoken = mWin.mAppToken;
    if (atoken == null || atoken.allDrawn || mWin.mAttrs.type == TYPE_APPLICATION_STARTING) {
        result = mWin.performShowLocked();
    }
    return result;
    ```

}

boolean performShowLocked() {
    final int drawState = mWinAnimator.mDrawState;
    if ((drawState == HAS_DRAWN || drawState == READY_TO_SHOW)
            && mAttrs.type != TYPE_APPLICATION_STARTING && mAppToken != null) {
        mAppToken.onFirstWindowDrawn(this, mWinAnimator);
    }

    ```
    if (mWinAnimator.mDrawState != READY_TO_SHOW || !isReadyForDisplay()) {
        return false;
    }

    logPerformShow("Showing ");

    mService.enableScreenIfNeededLocked();
    mWinAnimator.applyEnterAnimationLocked();

    mWinAnimator.mDrawState = HAS_DRAWN;
    mService.scheduleAnimationLocked();//1

    if (mHidden) {
        mHidden = false;
        final DisplayContent displayContent = getDisplayContent();
        //2
        for (int i = mChildren.size() - 1; i >= 0; --i) {
            final WindowState c = mChildren.get(i);
            if (c.mWinAnimator.mSurfaceController != null) {
                c.performShowLocked();
            }
        }
    }
    ```

    }
performShowLocked方法中有大量的对窗口状态的判断: 窗口的显示过程共有五个状态:
-
NO_SURFACE:
在创建WindowState后的默认状态,表示当前窗口还创没有执行relayout()方法创建Surface;
-
DRAW_PENDING:
执行relayout()方法后,创建完成Surface后的状态,表示等待绘制;
-
COMMIT_DRAW_PENDING:
窗口Surface上完成绘制后的状态,执行WindowStateAnimator#finishDrawingLocked()方法设置,表示已经完成绘制,等待下次刷帧进行提交;
-
READY_TO_SHOW:
表示窗口已经绘制完成并且完成提交,此时如果该窗口的兄弟窗口全部完成绘制且满足显示要求,则直接进行HAS_DRAWN的转变完成显示,否则等待其他兄弟窗口完成绘制后,再进行HAS_DRAWN转变;-
-
HAS_DRAWN:表示该窗口正式显示;
在注释2处又对窗口容器树进行了遍历:都指向performShowLocked方法 在注释1处调用了WMS的scheduleAnimationLocked方法,如果你还有印象,在前面分析窗口动画的时候说过,scheduleAnimationLocked方法会将动画帧回调FrameCallback设置到Choreographer中去。 然后在VSYNC信号到来的时候,指向CallBack动画回调、最后执行animate
private void animate(long frameTimeNs) {
    //..
    for (int i = 0; i < numDisplays; i++) {
        final int displayId = mDisplayContentsAnimators.keyAt(i);
        final DisplayContent dc = mService.mRoot.getDisplayContentOrCreate(displayId);
        ...
        dc.prepareWindowSurfaces();
}
void prepareWindowSurfaces() {
    forAllWindows(mPrepareWindowSurfaces, false / traverseTopToBottom */);
}

private final Consumer<WindowState> mPrepareWindowSurfaces =
        w -> w.mWinAnimator.prepareSurfaceLocked(true);

void prepareSurfaceLocked(final boolean recoveringMemory) {
    boolean prepared = mSurfaceController.prepareToShowInTransaction(mShownAlpha,..);//1

    ```
    mSurfaceController.setLayer(mAnimLayer);//2

    showSurfaceRobustlyLocked()//3
    ```

}
private boolean showSurfaceRobustlyLocked() {
    final Task task = mWin.getTask();
    if (task != null && StackId.windowsAreScaleable(task.mStack.mStackId)) {
        mSurfaceController.forceScaleableInTransaction(true);
    }

```
boolean shown = mSurfaceController.showRobustlyInTransaction();
    if (!shown)
        return false;

    if (mWin.mTurnOnScreen) {
        if (DEBUG_VISIBILITY) Slog.v(TAG, "Show surface turning screen on: " + mWin);
        mWin.mTurnOnScreen = false;
        mAnimator.mBulkUpdateParams |= SET_TURN_ON_SCREEN;
    }
    return true;
    ```

}
最终在showSurfaceRobustlyLocked中调mSurfaceController.showRobustlyInTransaction()方法进行Surface的提交给SurfaceFlinger进行合成并显示在屏幕上。
可以看到Surface的size,postion以及状态管理,提交执行等操作还是一个比较繁琐的过程。
时序图如下:

总结
本篇文章笔者通过对WMS的责任进行划分,并分别对几个责任进行了较为详细的讲解。
希望这篇文章对你有帮助。如果你想了解更多关于Framework的知识请关注我、
笔者公众号:“小余的自习室”
参考文章:
Android R WindowManagerService模块(1) WMS整体架构及启动过程


 1958
1958


 被折叠的 条评论
为什么被折叠?
被折叠的 条评论
为什么被折叠?
 到【灌水乐园】发言


