


在介绍Window在Activity启动中的创建流程时,我先简单的说明一下Activity的启动流程,Activity的启动是通过函数startActivity(Intent intent)启动的。如果简单的归纳成一张示意图:
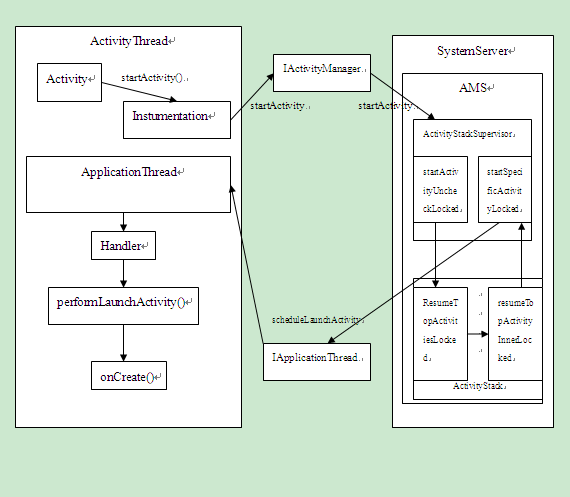
Activity启动流程至onCreate为止
这样我们就可以很清晰的明白了Activity在OnCreate()启动之前的流程。从上面的示意图我们可以清晰的知道整个流程最终是通过Handler处理消息,最后在PerformLaunchActivity()中完成所有的动作。
在这里我们看源码同时可以发现在perfromLaunchActivity中调用了attach方法就会创建Activity依赖的PhoneWindow。
让我们看看Activity.java中attach是如何写的:
 final void attach(Context context, ActivityThread aThread,
            Instrumentation instr, IBinder token, int ident,
            Application application, Intent intent, ActivityInfo info,
            CharSequence title, Activity parent, String id,
            NonConfigurationInstances lastNonConfigurationInstances,
            Configuration config, IVoiceInteractor voiceInteractor) {
        attachBaseContext(context);

        mFragments.attachActivity(this, mContainer, null);

        mWindow = PolicyManager.makeNewWindow(this);
        mWindow.setCallback(this);
        mWindow.setOnWindowDismissedCallback(this);
        mWindow.getLayoutInflater().setPrivateFactory(this);
        if (info.softInputMode != WindowManager.LayoutParams.SOFT_INPUT_STATE_UNSPECIFIED) {
            mWindow.setSoftInputMode(info.softInputMode);
        }
        if (info.uiOptions != 0) {
            mWindow.setUiOptions(info.uiOptions);
        }
        mUiThread = Thread.currentThread();

        mMainThread = aThread;
        mInstrumentation = instr;
        mToken = token;
        mIdent = ident;
        mApplication = application;
        mIntent = intent;
        mComponent = intent.getComponent();
        mActivityInfo = info;
        mTitle = title;
        mParent = parent;
        mEmbeddedID = id;
        mLastNonConfigurationInstances = lastNonConfigurationInstances;
        if (voiceInteractor != null) {
            if (lastNonConfigurationInstances != null) {
                mVoiceInteractor = lastNonConfigurationInstances.voiceInteractor;
            } else {
                mVoiceInteractor = new VoiceInteractor(voiceInteractor, this, this,
                        Looper.myLooper());
            }
        }

        mWindow.setWindowManager(
                (WindowManager)context.getSystemService(Context.WINDOW_SERVICE),
                mToken, mComponent.flattenToString(),
                (info.flags & ActivityInfo.FLAG_HARDWARE_ACCELERATED) != 0);
        if (mParent != null) {
            mWindow.setContainer(mParent.getWindow());
        }
        mWindowManager = mWindow.getWindowManager();
        mCurrentConfig = config;
    }
在上面的方法中,系统会创建Activity所属的Window对象并且为其设置回调接口,Window对象的创建是通过PolicyManager.makeNewWindow(this)创建的。我们先看看PolicyManager中是如何创建Window的:
 private static final IPolicy sPolicy;
  private static final String POLICY_IMPL_CLASS_NAME =
        "com.android.internal.policy.impl.Policy";
  static {
        // Pull in the actual implementation of the policy at run-time
        try {
            Class policyClass = Class.forName(POLICY_IMPL_CLASS_NAME);
            sPolicy = (IPolicy)policyClass.newInstance();
        } catch (ClassNotFoundException ex) {
            throw new RuntimeException(
                    POLICY_IMPL_CLASS_NAME + " could not be loaded", ex);
        } catch (InstantiationException ex) {
            throw new RuntimeException(
                    POLICY_IMPL_CLASS_NAME + " could not be instantiated", ex);
        } catch (IllegalAccessException ex) {
            throw new RuntimeException(
                    POLICY_IMPL_CLASS_NAME + " could not be instantiated", ex);
        }
    }

  public static Window makeNewWindow(Context context) {
        return sPolicy.makeNewWindow(context);
    }
在这里返回了接口类型IPolicy,此时这个接口是工厂模式,通过反射来实例化不同的Window(这里使用了策略模式)。此时创建的Window就是PhoneWinow。
    public Window makeNewWindow(Context context) {
        return new PhoneWindow(context);
    }
接着phonewindow将会回调window中的我们常见的处理view事件的函数如:dispatchTouch,onDetachFromWindow,onAttachedToWindow等等。
到这里Activity就附属上了Window了。
我们继续看看PhoneWindow中的setContentView函数,这个是我们用来填充Activity布局的方法。
    @Override
    public void setContentView(int layoutResID) {
        // Note: FEATURE_CONTENT_TRANSITIONS may be set in the process of installing the window
        // decor, when theme attributes and the like are crystalized. Do not check the feature
        // before this happens.
        if (mContentParent == null) {
            installDecor();
        } else if (!hasFeature(FEATURE_CONTENT_TRANSITIONS)) {
            mContentParent.removeAllViews();
        }

        if (hasFeature(FEATURE_CONTENT_TRANSITIONS)) {
            final Scene newScene = Scene.getSceneForLayout(mContentParent, layoutResID,
                    getContext());
            transitionTo(newScene);
        } else {
            mLayoutInflater.inflate(layoutResID, mContentParent);
        }
        final Callback cb = getCallback();
        if (cb != null && !isDestroyed()) {
            cb.onContentChanged();
        }
    }
上面这段代码主要做的事情有3个:
1.如果没有DecorView则创建一个新的:
方法installDecor()中:
if (mDecor == null) {
            mDecor = generateDecor();
            mDecor.setDescendantFocusability(ViewGroup.FOCUS_AFTER_DESCENDANTS);
            mDecor.setIsRootNamespace(true);
            if (!mInvalidatePanelMenuPosted && mInvalidatePanelMenuFeatures != 0) {
                mDecor.postOnAnimation(mInvalidatePanelMenuRunnable);
            }
        }
protected DecorView generateDecor() {
return new DecorView(getContext(), -1);
}上面 generateDecor()返回了一个DecorView实例。
2.将View添加到DecorView的mContentParent中:
调用generateLayout(mDecor)创建新的布局:
View in = mLayoutInflater.inflate(layoutResource, null);
        decor.addView(in, new ViewGroup.LayoutParams(MATCH_PARENT, MATCH_PARENT));
        mContentRoot = (ViewGroup) in;

        ViewGroup contentParent = (ViewGroup)findViewById(ID_ANDROID_CONTENT);
上面这个函数是在太长,不便于贴出来,但是里面大部分都是对WindowFeature,版本号,自定义view时主题进行判断,最后再加载这个布局文件。
最后再Activity变化是调用的主题。
3.回调Activity的onContentChanged方法通知Activity视图已经改变了。
 final Callback cb = getCallback();
        if (cb != null && !isDestroyed()) {
            cb.onContentChanged();
        }
我们发现这个Callback最终是实现在Activity这个类中:
public void onContentChanged() {
    }
这个回调函数是空的,也就是说当添加一个DecorView到了mContentParent之后,可以通知Activity做相应的处理,在子Activity中实现一个这个处理。
这个时候,还没有结束,现在的Activity是不可视的,只有在执行了onResume之后,才可视。换句话说,WindowManager才去添加视图。
我们看看onResume是怎么执行,我们根据之前的流程图就发现,Activity的启动,登录的工作最后会到Handler中完成,我们去看看handler,你会发现登录Activity(onCreate,onStart,onResume)全部都在performLaunchActivity方法中最后会通过Instruation类去调用Activity中onCreate,onStart,onResume方法。在其中调用了handleResumeActivity()方法。
我们去handleResumeActivity里面看看:
    final void handleResumeActivity(IBinder token,
            boolean clearHide, boolean isForward, boolean reallyResume) {
        // If we are getting ready to gc after going to the background, well
        // we are back active so skip it.
        unscheduleGcIdler();
        mSomeActivitiesChanged = true;

        // TODO Push resumeArgs into the activity for consideration
        ActivityClientRecord r = performResumeActivity(token, clearHide);

        if (r != null) {
            final Activity a = r.activity;

            if (localLOGV) Slog.v(
                TAG, "Resume " + r + " started activity: " +
                a.mStartedActivity + ", hideForNow: " + r.hideForNow
                + ", finished: " + a.mFinished);

            final int forwardBit = isForward ?
                    WindowManager.LayoutParams.SOFT_INPUT_IS_FORWARD_NAVIGATION : 0;

            // If the window hasn't yet been added to the window manager,
            // and this guy didn't finish itself or start another activity,
            // then go ahead and add the window.
            boolean willBeVisible = !a.mStartedActivity;
            if (!willBeVisible) {
                try {
                    willBeVisible = ActivityManagerNative.getDefault().willActivityBeVisible(
                            a.getActivityToken());
                } catch (RemoteException e) {
                }
            }
            if (r.window == null && !a.mFinished && willBeVisible) {
                r.window = r.activity.getWindow();
                View decor = r.window.getDecorView();
                decor.setVisibility(View.INVISIBLE);
                ViewManager wm = a.getWindowManager();
                WindowManager.LayoutParams l = r.window.getAttributes();
                a.mDecor = decor;
                l.type = WindowManager.LayoutParams.TYPE_BASE_APPLICATION;
                l.softInputMode |= forwardBit;
                if (a.mVisibleFromClient) {
                    a.mWindowAdded = true;
                    wm.addView(decor, l);
                }

            // If the window has already been added, but during resume
            // we started another activity, then don't yet make the
            // window visible.
            } else if (!willBeVisible) {
                if (localLOGV) Slog.v(
                    TAG, "Launch " + r + " mStartedActivity set");
                r.hideForNow = true;
            }

            // Get rid of anything left hanging around.
            cleanUpPendingRemoveWindows(r);

            // The window is now visible if it has been added, we are not
            // simply finishing, and we are not starting another activity.
            if (!r.activity.mFinished && willBeVisible
                    && r.activity.mDecor != null && !r.hideForNow) {
                if (r.newConfig != null) {
                    if (DEBUG_CONFIGURATION) Slog.v(TAG, "Resuming activity "
                            + r.activityInfo.name + " with newConfig " + r.newConfig);
                    performConfigurationChanged(r.activity, r.newConfig);
                    freeTextLayoutCachesIfNeeded(r.activity.mCurrentConfig.diff(r.newConfig));
                    r.newConfig = null;
                }
                if (localLOGV) Slog.v(TAG, "Resuming " + r + " with isForward="
                        + isForward);
                WindowManager.LayoutParams l = r.window.getAttributes();
                if ((l.softInputMode
                        & WindowManager.LayoutParams.SOFT_INPUT_IS_FORWARD_NAVIGATION)
                        != forwardBit) {
                    l.softInputMode = (l.softInputMode
                            & (~WindowManager.LayoutParams.SOFT_INPUT_IS_FORWARD_NAVIGATION))
                            | forwardBit;
                    if (r.activity.mVisibleFromClient) {
                        ViewManager wm = a.getWindowManager();
                        View decor = r.window.getDecorView();
                        wm.updateViewLayout(decor, l);
                    }
                }
                r.activity.mVisibleFromServer = true;
                mNumVisibleActivities++;
                if (r.activity.mVisibleFromClient) {
                    r.activity.makeVisible();
                }
            }

            if (!r.onlyLocalRequest) {
                r.nextIdle = mNewActivities;
                mNewActivities = r;
                if (localLOGV) Slog.v(
                    TAG, "Scheduling idle handler for " + r);
                Looper.myQueue().addIdleHandler(new Idler());
            }
            r.onlyLocalRequest = false;

            // Tell the activity manager we have resumed.
            if (reallyResume) {
                try {
                    ActivityManagerNative.getDefault().activityResumed(token);
                } catch (RemoteException ex) {
                }
            }

        } else {
            // If an exception was thrown when trying to resume, then
            // just end this activity.
            try {
                ActivityManagerNative.getDefault()
                    .finishActivity(token, Activity.RESULT_CANCELED, null, false);
            } catch (RemoteException ex) {
            }
        }
    }
我从源码中得到的信息是:
首先通过IPC的方法,透过AMS去访问ActiviyStack,再通过匹配的句柄(token)来返回是否被显示出来,也就是上面的标志位willBeVisible。
当window没有创建,且允许显示,并且Activity此时没有被停止时,运行下面这段:
if (r.window == null && !a.mFinished && willBeVisible) {
                r.window = r.activity.getWindow();
                View decor = r.window.getDecorView();
                decor.setVisibility(View.INVISIBLE);
                ViewManager wm = a.getWindowManager();
                WindowManager.LayoutParams l = r.window.getAttributes();
                a.mDecor = decor;
                l.type = WindowManager.LayoutParams.TYPE_BASE_APPLICATION;
                l.softInputMode |= forwardBit;
                if (a.mVisibleFromClient) {
                    a.mWindowAdded = true;
                    wm.addView(decor, l);
                }
如果window创建了,顶层DecorView不为空,也没有启动另一个activity,则运行下面这一段:
if (!r.activity.mFinished && willBeVisible
                    && r.activity.mDecor != null && !r.hideForNow) {
                if (r.newConfig != null) {
                    if (DEBUG_CONFIGURATION) Slog.v(TAG, "Resuming activity "
                            + r.activityInfo.name + " with newConfig " + r.newConfig);
                    performConfigurationChanged(r.activity, r.newConfig);
                    freeTextLayoutCachesIfNeeded(r.activity.mCurrentConfig.diff(r.newConfig));
                    r.newConfig = null;
                }
                if (localLOGV) Slog.v(TAG, "Resuming " + r + " with isForward="
                        + isForward);
                WindowManager.LayoutParams l = r.window.getAttributes();
                if ((l.softInputMode
                        & WindowManager.LayoutParams.SOFT_INPUT_IS_FORWARD_NAVIGATION)
                        != forwardBit) {
                    l.softInputMode = (l.softInputMode
                            & (~WindowManager.LayoutParams.SOFT_INPUT_IS_FORWARD_NAVIGATION))
                            | forwardBit;
                    if (r.activity.mVisibleFromClient) {
                        ViewManager wm = a.getWindowManager();
                        View decor = r.window.getDecorView();
                        wm.updateViewLayout(decor, l);
                    }
                }
                r.activity.mVisibleFromServer = true;
                mNumVisibleActivities++;
                if (r.activity.mVisibleFromClient) {
                    r.activity.makeVisible();
接着再调用makeVisible方法,来显示view和window:
void makeVisible() {
        if (!mWindowAdded) {
            ViewManager wm = getWindowManager();
            wm.addView(mDecor, getWindow().getAttributes());
            mWindowAdded = true;
        }
        mDecor.setVisibility(View.VISIBLE);
    }
这样就大致上完成了onResume的时候,Window和view的显示流程,也就办到了和用户交互的目的了。
用一张图来显示整个流程:
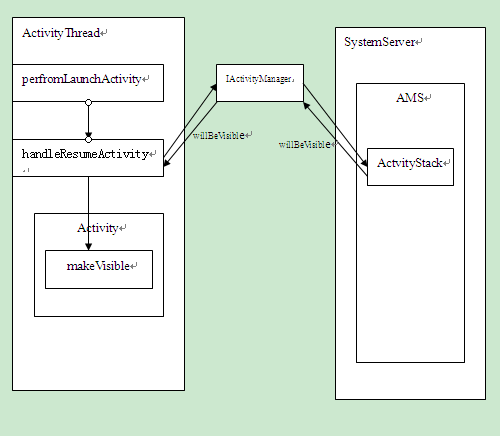
Resume的显示流程
到这里大致的理清楚了Activity启动过程以及这个过程中Window是如何创建和附属的。
在这里依旧感谢任玉刚大神的android开发探索艺术,让我从错误的思路中走出来。


 2374
2374

 被折叠的 条评论
为什么被折叠?
被折叠的 条评论
为什么被折叠?
 到【灌水乐园】发言


