


全网最详细的安装配置Nginx

目录
1、 安装环境依赖
yum -y install gcc gcc-c++ automake pcre pcre-devel zlib zlib-devel openssl-devel
2、 下载Nginx包
mkdir /export/server  #创建存放安装包的文件
cd /export/server    #进入文件中
wget http://nginx.org/download/nginx-1.16.1.tar.gz #通过wget命令下载Nginx包
3、编译Nginx
tar -zxvf nginx-1.16.1.tar.gz  #解压安装包
#编译Nginx
./configure  --with-http_ssl_module
./configure --with-stream
./configure  --with-http_ssl_module --with-stream
./configure
4、安装Nginx
make && make install
5、启动Nginx
cd /usr/local/nginx/sbin
./nginx      #启动Nginx
6、配置Nginx
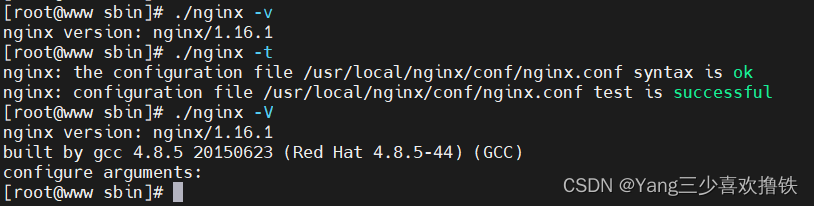
cd /usr/local/nginx/sbin
./nginx -v   #查看Nginx版本
./nginx -t  #检查配置文件是否正确
./nginx -V  #查看安装时配置
#输出实例
#补充Nginx常用命令
cd /usr/local/nginx/sbin
./nginx -s reload   #重新载入配置文件
./nginx -s reopen  #重启Nginx
./nginx -s stop  #停止Nginx
#查看Nginx进程
ps -ef | grep nginx #查看Nginx进程
kill pad    #杀死相关进程

7、了解Nginx服务的主配置文件 nginx.conf
#全局配置
#user nobody; 					#运行用户,若编译时未指定则默认为 nobody
worker_processes 1; 			#工作进程数量,可配置成服务器内核数 * 2
#error_log logs/error.log; 		#错误日志文件的位置
#pid logs/nginx.pid; 			#PID 文件的位置
#I/O事件配置
events {
use epoll; #使用 epoll 模型,2.6及以上版本的系统内核,建议使用epoll模型以提高性能
worker_connections 1024; #每个进程处理 1024个连接 (可以修改)
}
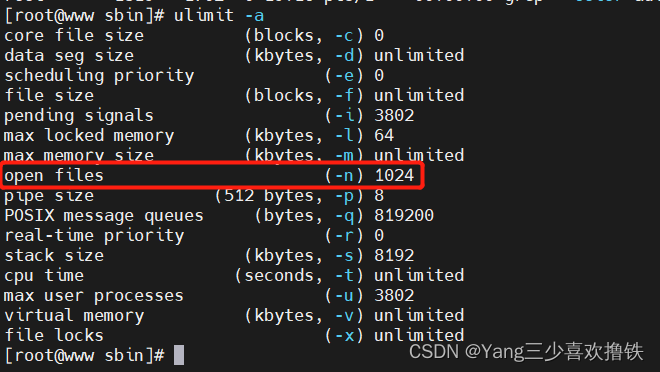
#如提高每个进程的连接数还需执行“ulimit -n 65535”命令临时修改本地每个进程可以同时打开的最大文件数。
#在Linux平台上,在进行高并发TCP连接处理时,最高的并发数量都要受到系统对用户单一进程同时可打开文件数量的限制(这是因为系统为每个TCP连接都要创建一个socket句柄,每个socket句柄同时也是一个文件句柄)。
#可使用ulimit -a命令查看系统允许当前用户进程打开的文件数限制.
#HTTP配置
http {
	##文件扩展名与文件类型映射表
    include       mime.types;

	##默认文件类型
    default_type  application/octet-stream;

	##日志格式设定
    #log_format  main  '$remote_addr - $remote_user [$time_local] "$request" '
    #                  '$status $body_bytes_sent "$http_referer" '
    #                  '"$http_user_agent" "$http_x_forwarded_for"';

	##访问日志位置
    #access_log  logs/access.log  main;

	##支持文件发送(下载)
    sendfile        on;
 	##此选项允许或禁止使用socke的TCP_CORK的选项(发送数据包前先缓存数据),此选项仅在使用sendfile的时候使用
    #tcp_nopush     on;

	##连接保持超时时间,单位是秒
    #keepalive_timeout  0;
    keepalive_timeout  65;

	##gzip模块设置,设置是否开启gzip压缩输出
    #gzip  on;

##Web 服务的监听配置
server {
	##监听地址及端口
	listen 80;
	##站点域名,可以有多个,用空格隔开
	server_name www.ygy.com;

	##网页的默认字符集
	charset utf-8;

	##根目录配置
	location / {

		##网站根目录的位置/usr/local/nginx/html
		root html;

		##默认首页文件名
		index index.html index.htm;
	}

	##内部错误的反馈页面
	error_page 500 502 503 504 /50x.html;
	##错误页面配置
	location = /50x.html {
		root html;
	}
}
}
#日志配置
$remote_addr与$http_x_forwarded_for用以记录客户端的ip地址;
$remote_user:用来记录客户端用户名称;
$time_local: 用来记录访问时间与时区;
$request: 用来记录请求的url与http协议;
$status: 用来记录请求状态;成功是200,
$body_bytes_sent :记录发送给客户端文件主体内容大小;
$http_referer:用来记录从那个页面链接访问过来的;
$http_user_agent:记录客户浏览器的相关信息;

通常web服务器放在反向代理的后面,这样就不能获取到客户的IP地址了,通过$remote_add拿到的IP地址是反向代理服务器的iP地址。反向代理服务器在转发请求的http头信息中,可以增加x_forwarded_for信息,用以记录原有客户端的IP地址和原来客户端的请求的服务器地址。

location常见配置指令,root、alias、proxy_pass

root(根路径配置):请求www.lic.com/test,会返回文件/usr/local/nginx/html/test/index.html

alias(别名配置):请求www.lic.com/test,会返回文件/usr/local/nginx/html/index.html
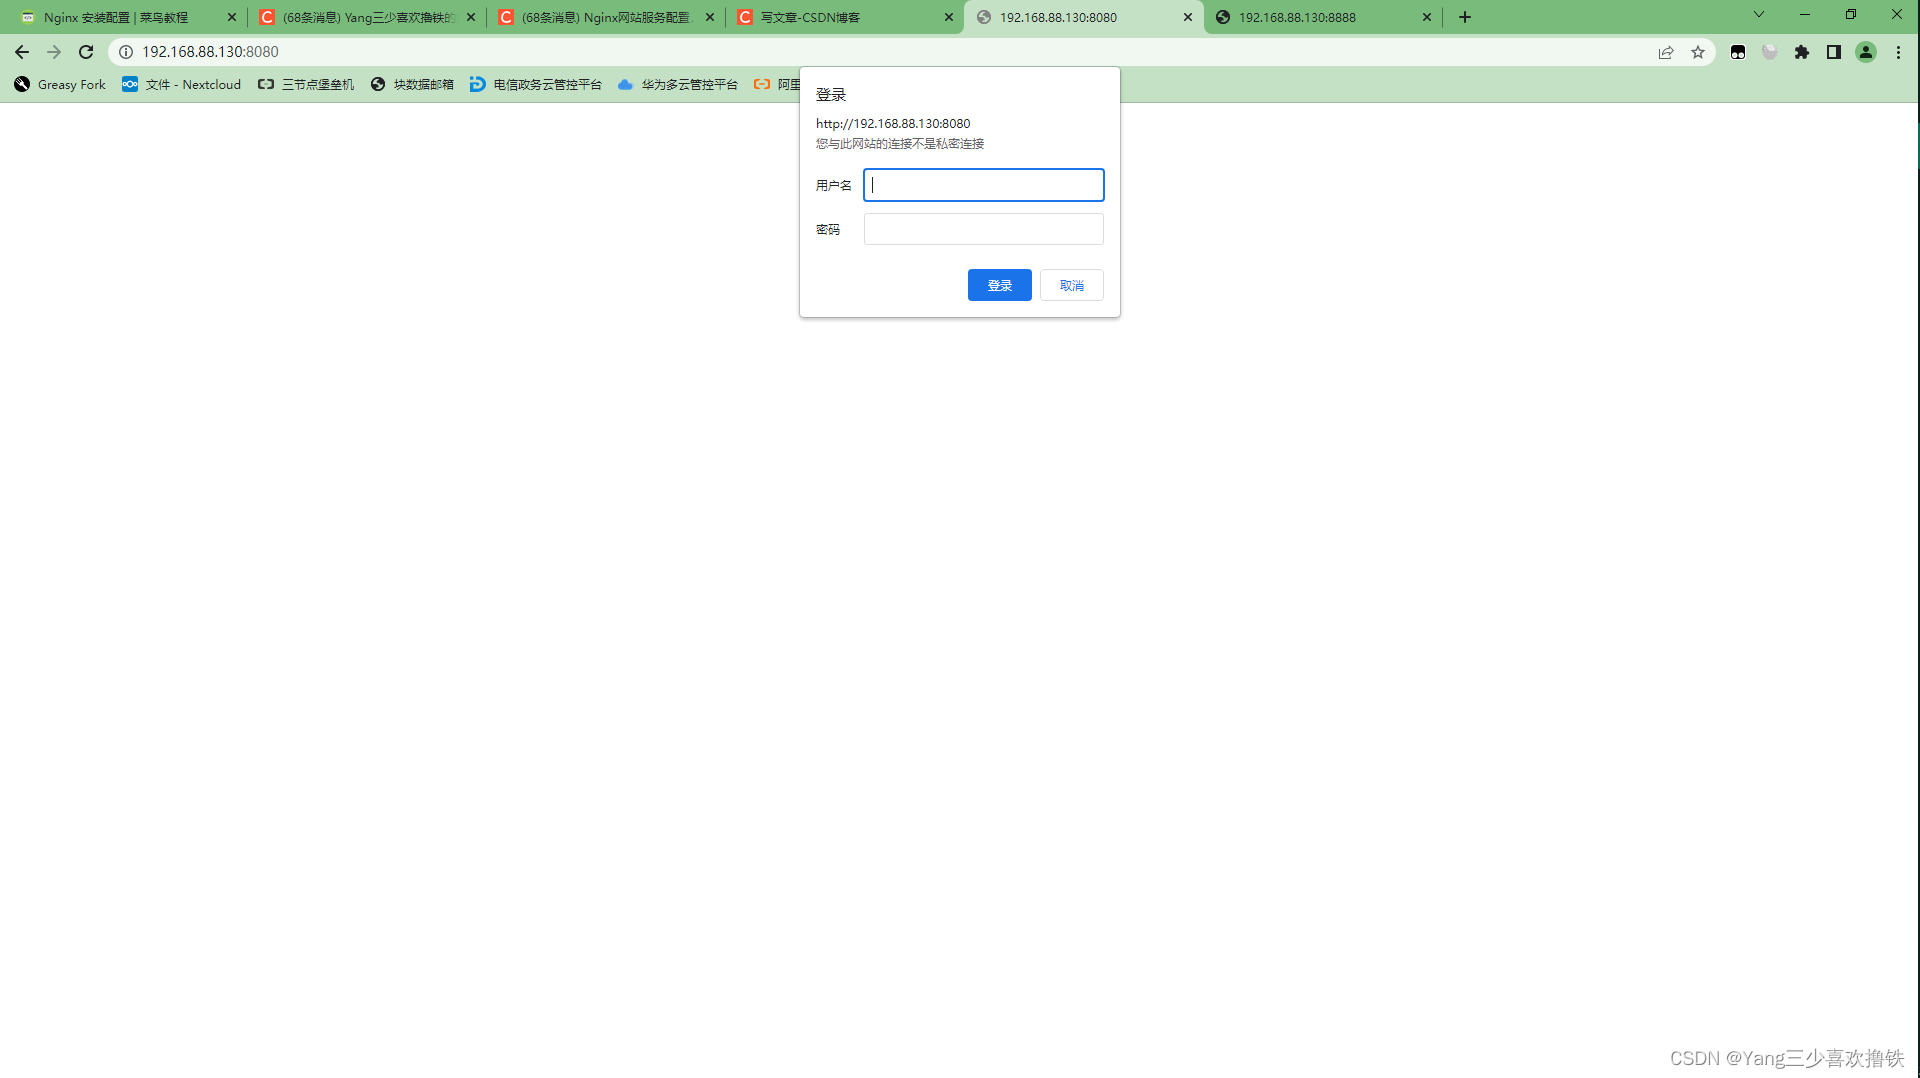
8、基于授权的访问控制
#生成用户密码认证文件
yum install -y httpd-tools
htpasswd -c /usr/local/nginx/passwd.db zhojl
chown nginx /usr/local/nginx/passwd.db
chmod 400 /usr/local/nginx/passwd.db
#修改主配置文件相对应目录,添加认证配置项
vim /usr/local/nginx/conf/nginx.conf
......
	server {
		location / {
			......
			##添加认证配置##
			auth_basic "secret";
			auth_basic_user_file /usr/local/nginx/passwd.db;
		}
	}
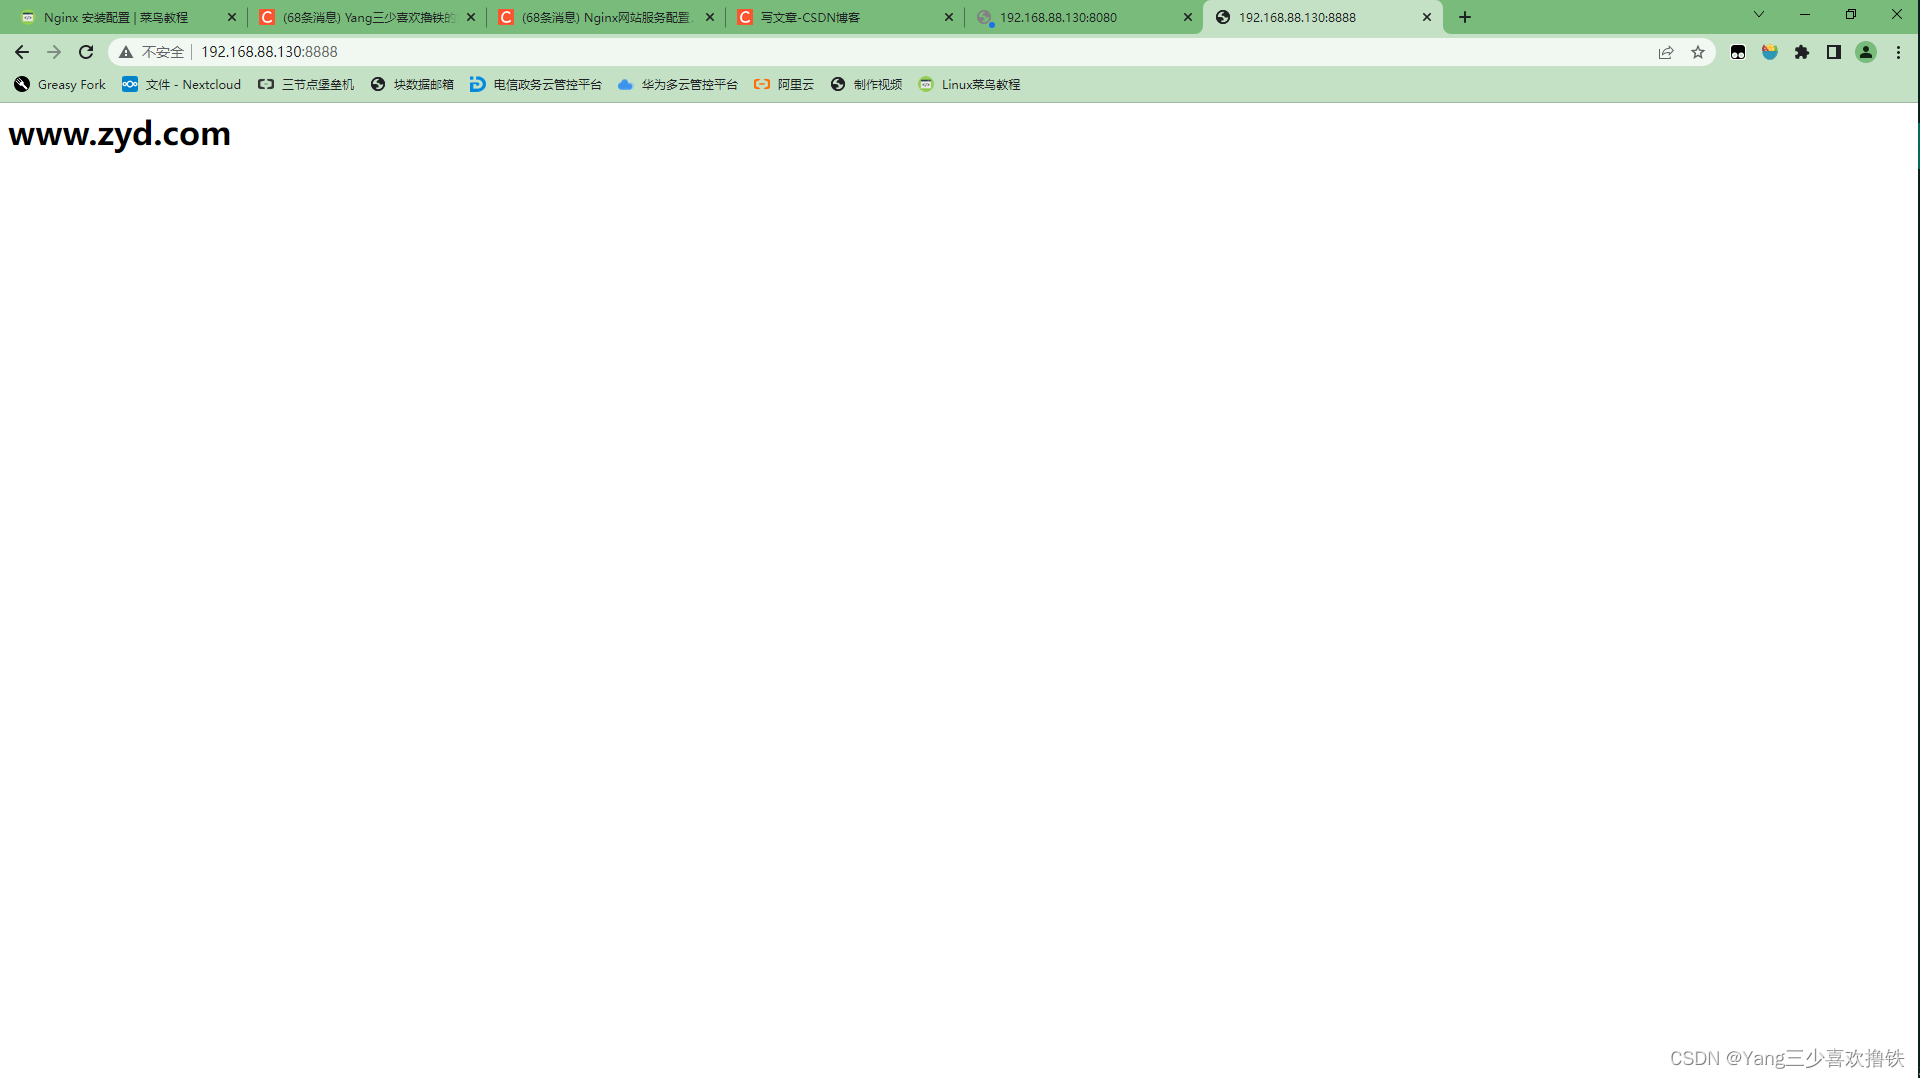
9、基于IP和端口的访问控制
#创建网页内容存放的地方
mkdir -p /var/www/html/ygy
mkdir -p /var/www/html/zyd
#配置网页
echo "<h1>www.ygy.com</h1>" > /var/www/html/ygy/index.html
echo "<h1>www.zyd.com</h1>" > /var/www/html/zyd/index.html
#配置nginx.conf
vim /usr/local/nginx/conf/nginx.conf  #进入nginx.conf文件
listen    192.168.88.130:8080;    #设置监听8080端口和对应的ip
server_name  www.ygy.com;         #配置对应的域名

listen 192.168.88.130:8888;    #设置监听8888端口和对应的ip
server_name www.zyd.com;       #配置对应的域名
#亲测配置示例
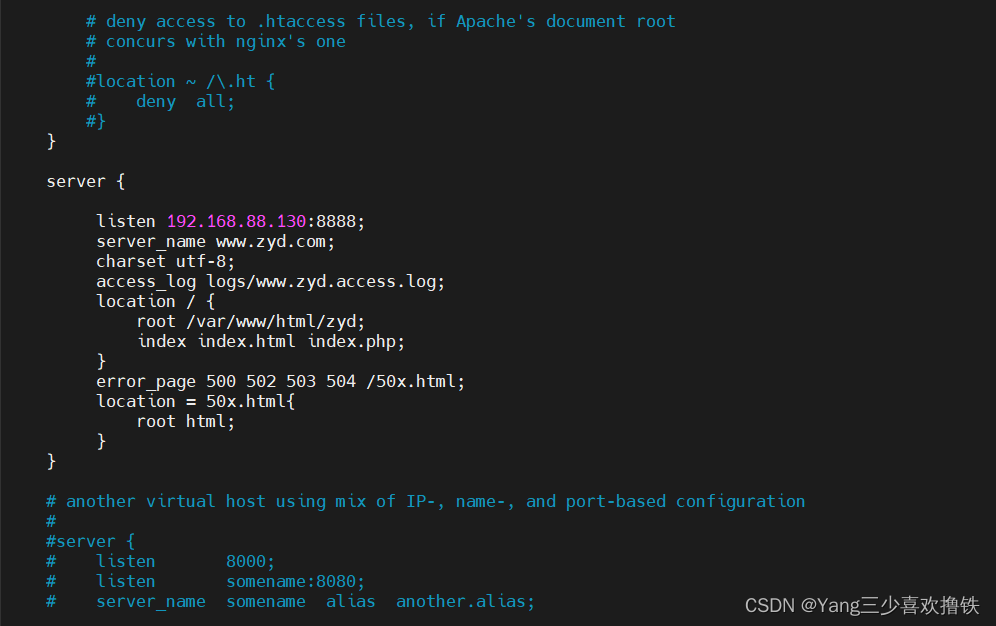
#修改hosts文件
vim /etc/hosts

#配置完后,输入htttp://192.168.88.130:8080
#输入在第8节、基于授权的访问控制创建的用户名和密码
#输入http://192.168.88.130:8888
10、补充,在配置Nginx过程中遇到的错误以及解决办法
#1、启动Nginx报错:nginx: [emerg] bind() to 0.0.0.0:80 failed (98: Address already in use)
#启动Nginx报错
nginx: [emerg] bind() to 0.0.0.0:80 failed (98: Address already in use)
#解决办法1
ps -ef|grep nginx
kill pad
#解决办法2
cd /usr/local/nginx/sbin
./nginx -s stop #停止Nginx
./nginx   #启动Nginx
#2、使用./nginx -s reload重新读取配置文件报错:nginx: [error] open() “/usr/local/nginx/logs/nginx.pid” failed (2: No such file or directory)
#输入./nginx -s stop或者./nginx -s reload报错
nginx: [error] open() “/usr/local/nginx/logs/nginx.pid” failed (2: No such file or directory)
#解决办法
[root@localhost nginx]# /usr/local/nginx/sbin/nginx -c /usr/local/nginx/conf/nginx.conf
#3、在浏览器中输入ip登录失败
#解决办法
#1、进入C:\Windows\System32\drivers\etc路径下
#2、修改配置hosts文件
192.168.88.130 www.ygy.com
192.168.88.131 node2
192.168.88.132 node3


 4541
4541


 被折叠的 条评论
为什么被折叠?
被折叠的 条评论
为什么被折叠?
 到【灌水乐园】发言


