


提示:文章写完后,目录可以自动生成,如何生成可参考右边的帮助文档
文章目录
前言
个人学习笔记,仅供参考!欢迎指正!
一、Java Microbenchmark Harness(JMH)
1.简介
是Java用来做基准测试的一个工具,该工具由OpenJDK提供并维护,测试结果可信度高。
2.官网
JMH官网:http://openjdk.java.net/projects/code-tools/jmh/
3.创建JMH测试
- 创建Maven项目,添加依赖:
   <?xml version="1.0" encoding="UTF-8"?>
   <project xmlns="http://maven.apache.org/POM/4.0.0"
            xmlns:xsi="http://www.w3.org/2001/XMLSchema-instance"
            xsi:schemaLocation="http://maven.apache.org/POM/4.0.0 http://maven.apache.org/xsd/maven-4.0.0.xsd">
       <modelVersion>4.0.0</modelVersion>

       <properties>
           <project.build.sourceEncoding>UTF-8</project.build.sourceEncoding>
           <encoding>UTF-8</encoding>
           <java.version>1.8</java.version>
           <maven.compiler.source>1.8</maven.compiler.source>
           <maven.compiler.target>1.8</maven.compiler.target>
       </properties>

       <groupId>mashibing.com</groupId>
       <artifactId>HelloJMH2</artifactId>
       <version>1.0-SNAPSHOT</version>

       <dependencies>
           <!-- https://mvnrepository.com/artifact/org.openjdk.jmh/jmh-core -->
           <dependency>
               <groupId>org.openjdk.jmh</groupId>
               <artifactId>jmh-core</artifactId>
               <version>1.21</version>
           </dependency>

           <!-- https://mvnrepository.com/artifact/org.openjdk.jmh/jmh-generator-annprocess -->
           <dependency>
               <groupId>org.openjdk.jmh</groupId>
               <artifactId>jmh-generator-annprocess</artifactId>
               <version>1.21</version>
               <scope>test</scope>
           </dependency>
       </dependencies>

   </project>
-
idea安装JMH插件 JMH plugin v1.0.3
-
由于用到了注解,打开运行程序注解配置
compiler -> Annotation Processors -> Enable Annotation Processing
-
定义需要测试类PS (ParallelStream)
import java.util.ArrayList;
import java.util.List;
import java.util.Random;

public class PS {
    static List<Integer> nums = new ArrayList<>();
    static {
        Random r = new Random();
        for (int i = 0; i < 10000; i++) nums.add(1000000 + r.nextInt(1000000));
    }
    static void foreach() {
        nums.forEach(v->isPrime(v));
    }
    static void parallel() {
        nums.parallelStream().forEach(PS::isPrime);
    }
    static boolean isPrime(int num) {
        for(int i=2; i<=num/2; i++) {
            if(num % i == 0) return false;
        }
        return true;
    }
}
- 写单元测试:
public class PSTest {

    @Benchmark
    @Warmup(iterations = 1,time = 3)
    @Fork(5)
    @BenchmarkMode(Mode.Throughput)
    @Measurement(iterations = 1,time = 3)
    public void testForEach() {
        PS.foreach();
    }
}
- 运行测试类,如果遇到下面的错误:
   ERROR: org.openjdk.jmh.runner.RunnerException: ERROR: Exception while trying to acquire the JMH lock (C:\WINDOWS\/jmh.lock): C:\WINDOWS\jmh.lock (拒绝访问。), exiting. Use -Djmh.ignoreLock=true to forcefully continue.
   	at org.openjdk.jmh.runner.Runner.run(Runner.java:216)
   	at org.openjdk.jmh.Main.main(Main.java:71)
这个错误是因为JMH运行需要访问系统的TMP目录,解决办法是:
打开RunConfiguration -> Environment Variables -> include system environment viables
- 阅读测试报告
4.JMH中的基本概念
-
Warmup
预热,由于JVM中对于特定代码会存在优化(本地化),预热对于测试结果很重要 -
Mesurement
总共执行多少次测试 -
Timeout
-
Threads
线程数,由fork指定 -
Benchmark mode
基准测试的模式 -
Benchmark
测试哪一段代码
5.官方样例
二、Disruptor
1.介绍
主页:http://lmax-exchange.github.io/disruptor/
源码:https://github.com/LMAX-Exchange/disruptor
GettingStarted: https://github.com/LMAX-Exchange/disruptor/wiki/Getting-Started
api: http://lmax-exchange.github.io/disruptor/docs/index.html
maven: https://mvnrepository.com/artifact/com.lmax/disruptor
2.Disruptor的特点
对比ConcurrentLinkedQueue : 链表实现
JDK中没有ConcurrentArrayQueue
Disruptor是数组实现的
无锁,高并发,使用环形Buffer,直接覆盖(不用清除)旧的数据,降低GC频率
实现了基于事件的生产者消费者模式(观察者模式)
3.RingBuffer
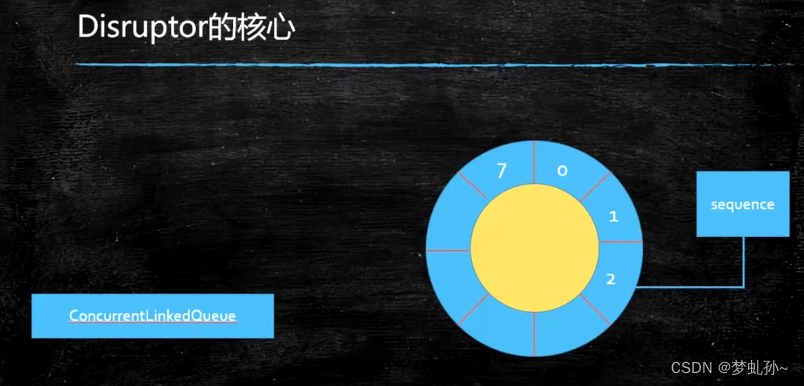
环形队列
RingBuffer的序号,指向下一个可用的元素
采用数组实现,没有首尾指针
对比ConcurrentLinkedQueue,用数组实现的速度更快
假如长度为8,当添加到第12个元素的时候在哪个序号上呢?用12%8决定
当Buffer被填满的时候到底是覆盖还是等待,由Producer决定
长度设为2的n次幂,利于二进制计算,例如:12%8 = 12 & (8 - 1) pos = num & (size -1)
4.Disruptor开发步骤
- 定义Event - 队列中需要处理的元素
public class LongEvent {
    private long value;

    public long getValue() {
        return value;
    }
    public void setValue(long value) {
        this.value = value;
    }
    @Override
    public String toString() {
        return "LongEvent{" +
                "value="+value+
                "}";
    }
}
- 定义Event工厂,用于填充队列
import com.lmax.disruptor.EventFactory;

public class LongEventFactory implements EventFactory<LongEvent> {
    @Override
    public LongEvent newInstance() {
        return new LongEvent();
    }
}
这里牵扯到效率问题:disruptor初始化的时候,会调用Event工厂,对ringBuffer进行内存的提前分配
GC产频率会降低
- 定义EventHandler(消费者),处理容器中的元素
import com.lmax.disruptor.EventHandler;

public class LongEventHandler implements EventHandler<LongEvent> {
    /**
     *
     * @param event
     * @param sequence
     * @param endOfBatch
     * @throws Exception
     */
    public static long count = 0;

    public void onEvent(LongEvent event, long sequence, boolean endOfBatch) throws Exception {
        count++;
        System.out.println("["+Thread.currentThread().getName()+"]"+event+"序号:"+sequence);
    }
}
- Main01:官方例程:
import com.lmax.disruptor.RingBuffer;
import com.lmax.disruptor.dsl.Disruptor;
import java.util.concurrent.Executors;

public class Main01 {
    public static void main(String[] args) {

        //The factory for the event
        LongEventFactory factory = new LongEventFactory();

        // Specify the size of the ring buffer,must be power of 2
        int ringBufferSize = 1024;

        //Construct the Disruptor
        Disruptor<LongEvent> disruptor = new Disruptor<LongEvent>(factory, ringBufferSize, Executors.defaultThreadFactory());

        //Construct the handler
        disruptor.handleEventsWith(new LongEventHandler());

        //Start the Disruptor ,start all threads running
        disruptor.start();

        // Get the ring buffer from the Disruptor to be used for publishing
        RingBuffer<LongEvent> ringBuffer = disruptor.getRingBuffer();

        //官方例程
        long sequence = ringBuffer.next(); // Grab the next sequence
        try{
            LongEvent event = ringBuffer.get(sequence);// Get the entry in the Disruptor
            event.setValue(8888L); //Fill with data
        }finally {
            ringBuffer.publish(sequence);
        }

    }
}
- 进行封装过后的例子:
修改Main程序并写一个生产者来生产任务,其他同4中相同===》LongEventProducer:
import com.lmax.disruptor.RingBuffer;

import java.nio.ByteBuffer;

public class LongEventProducer {
    private final RingBuffer<LongEvent> ringBuffer;

    public LongEventProducer(RingBuffer<LongEvent> ringBuffer) {
        this.ringBuffer = ringBuffer;
    }
    public void onData(ByteBuffer buffer) {
        long sequence = ringBuffer.next();
        try {
            LongEvent event = ringBuffer.get(sequence);
            event.setValue(buffer.getLong(0));
        } finally {
            ringBuffer.publish(sequence);
        }
    }
}
Main02:
import com.lmax.disruptor.RingBuffer;
import com.lmax.disruptor.dsl.Disruptor;

import java.nio.ByteBuffer;
import java.util.concurrent.Executors;

public class Main02 {
    public static void main(String[] args) {

        //The factory for the event
        LongEventFactory factory = new LongEventFactory();

        // Specify the size of the ring buffer,must be power of 2
        int ringBufferSize = 1024;

        //Construct the Disruptor
        Disruptor<LongEvent> disruptor = new Disruptor<LongEvent>(factory, ringBufferSize, Executors.defaultThreadFactory());

        //Construct the handler
        disruptor.handleEventsWith(new LongEventHandler());

        //Start the Disruptor ,start all threads running
        disruptor.start();

        // Get the ring buffer from the Disruptor to be used for publishing
        RingBuffer<LongEvent> ringBuffer = disruptor.getRingBuffer();

        LongEventProducer producer = new LongEventProducer(ringBuffer);
        ByteBuffer bb = ByteBuffer.allocate(8);
        for(long l = 0; l<100; l++) {
            bb.putLong(0, l);
            producer.onData(bb);
            try {
                Thread.sleep(100);
            } catch (InterruptedException e) {
                e.printStackTrace();
            }
        }
        disruptor.shutdown();
    }
}
- 使用Translator的方式:
其他不变与5相同,Producer修改:
import com.lmax.disruptor.EventTranslatorOneArg;
import com.lmax.disruptor.RingBuffer;
import java.nio.ByteBuffer;

public class LongEventProducer {
    private final RingBuffer<LongEvent> ringBuffer;

    private static final EventTranslatorOneArg<LongEvent, ByteBuffer> TRANSLATOR = new EventTranslatorOneArg<LongEvent, ByteBuffer>() {
        @Override
        public void translateTo(LongEvent event, long sequence, ByteBuffer bb) {
            event.setValue(bb.getLong(0));
        }
    };
    public LongEventProducer(RingBuffer<LongEvent> ringBuffer) {
        this.ringBuffer = ringBuffer;
    }
    public void onData(ByteBuffer buffer) {
        ringBuffer.publishEvent(TRANSLATOR, buffer);
    }
}
这一步是为了为java8的lambda表达式做准备,Translator也可以使用多参数的方式。
- 使用Lambda的方式:可以使代码简化很多,只需下面两部分即可:
Event:
public class LongEvent {
    private long value;
    public long getValue() {
        return value;
    }
    public void setValue(long value) {
        this.value = value;
    }
    @Override
    public String toString() {
        return "LongEvent{" +
                "value="+value+
                "}";
    }
}
Main:
import com.lmax.disruptor.RingBuffer;
import com.lmax.disruptor.dsl.Disruptor;
import com.lmax.disruptor.util.DaemonThreadFactory;

import java.nio.ByteBuffer;

public class Main {

    public static void handleEvent(LongEvent event, long sequence, boolean endOfBatch)
    {
        System.out.println("["+Thread.currentThread().getName()+"]"+event+"序号:"+sequence);
    }

    public static void translate(LongEvent event, long sequence, ByteBuffer buffer)
    {
        event.setValue(buffer.getLong(0));
    }

    public static void main(String[] args) throws Exception
    {
        // Specify the size of the ring buffer, must be power of 2.
        int bufferSize = 1024;

        // Construct the Disruptor
        Disruptor<LongEvent> disruptor = new Disruptor<>(LongEvent::new, bufferSize, DaemonThreadFactory.INSTANCE);

        // Connect the handler
        disruptor.handleEventsWith(Main::handleEvent);

        // Start the Disruptor, starts all threads running
        disruptor.start();

        // Get the ring buffer from the Disruptor to be used for publishing.
        RingBuffer<LongEvent> ringBuffer = disruptor.getRingBuffer();

        ByteBuffer bb = ByteBuffer.allocate(8);
        for (long l = 0; true; l++)
        {
            bb.putLong(0, l);
            ringBuffer.publishEvent(Main::translate, bb);
            Thread.sleep(1000);
        }
    }
}
5.ProducerType生产者线程模式
ProducerType有两种模式 Producer.MULTI和Producer.SINGLE
默认是MULTI,表示在多线程模式下产生sequence
如果确认是单线程生产者,那么可以指定SINGLE,效率会提升
如果是多个生产者(多线程),但模式指定为SINGLE,会出什么问题呢?
6.等待策略
1,(常用)BlockingWaitStrategy:通过线程阻塞的方式,等待生产者唤醒,被唤醒后,再循环检查依赖的sequence是否已经消费。
2,BusySpinWaitStrategy:线程一直自旋等待,可能比较耗cpu
3,LiteBlockingWaitStrategy:线程阻塞等待生产者唤醒,与BlockingWaitStrategy相比,区别在signalNeeded.getAndSet,如果两个线程同时访问一个访问waitfor,一个访问signalAll时,可以减少lock加锁次数.
4,LiteTimeoutBlockingWaitStrategy:与LiteBlockingWaitStrategy相比,设置了阻塞时间,超过时间后抛异常。
5,PhasedBackoffWaitStrategy:根据时间参数和传入的等待策略来决定使用哪种等待策略
6,TimeoutBlockingWaitStrategy:相对于BlockingWaitStrategy来说,设置了等待时间,超过后抛异常
7,(常用)YieldingWaitStrategy:尝试100次,然后Thread.yield()让出cpu
8,(常用)SleepingWaitStrategy : sleep
7.消费者的指定
我们来看多个消费者怎么指定,默认的情况下只有一个消费者,你想要有多个消费者的时候也非常简单,看下面代码我定义了两个消费者h1、h2,disruptor.handleEventsWith(h1,h2)这里面是一个可变参数,所以你要想有多个消费者的时候就往里装,多个消费者是位于多个线程里面的。
import java.util.concurrent.*;
import com.lmax.disruptor.SleepingWaitStrategy;
import com.lmax.disruptor.dsl.Disruptor;
import com.lmax.disruptor.RingBuffer;
import com.lmax.disruptor.dsl.ProducerType;

public class Main06_MultiConsumer{
    public static void main(String[] args) throws Exception{

        //the factory for the event
        LongEventFactory factory = new LongEventFactory();

        //Specify the of the ring buffer,must be power of 2.
        int bufferSize = 1024;

        //Construct the Disruptor
        Disruptor<LongEvent> disruptor = new Disruptor<>(factory,bufferSize, Executors.defaultThreadFactory(), ProducerType.MULTI,new SleepingWaitStrategy());

        //Connect the handlers
        LongEventHandler h1 = new LongEventHandler();
        LongEventHandler h2 = new LongEventHandler();
        disruptor.handleEventsWith(h1,h2);

        //Start the Disruptor,start all threads running
        disruptor.start();

        //Get the ring buffer form the Disruptor to be used for publishing.
        RingBuffer<LongEvent> ringBuffer = disruptor.getRingBuffer();

        //========================================================================
        final int threadCount = 10;
        CyclicBarrier barrier=new CyclicBarrier(threadCount);
        ExecutorService service = Executors.newCachedThreadPool();
        for(long i=0; i<threadCount; i++){
            final long threadNum = i;
            service.submit(()->{
                System.out.printf("Thread %s ready to start!\n",threadNum);
                try{
                    barrier.await();
                }catch(InterruptedException e){
                    e.printStackTrace();
                }catch(BrokenBarrierException e){
                    e.printStackTrace();
                }

                for(int j=0; j<10;j++){
                    ringBuffer.publishEvent((event,sequence)->{
                        event.set(threadNum);
                        System.out.println("生产了"+threadNum);
                    });
                }
            });
        }

        service.shutdown();
        //disruptor.shutdown();
        TimeUnit.SECONDS.sleep(3);
        System.out.println(LongEventHandler.count);
    }
}
8.消费者异常处理
默认:disruptor.setDefaultExceptionHandler()
覆盖:disruptor.handleExceptionFor().with()
看下面代码,这这里方法里写了一个EventHandler是我们的消费者,在消费者里打印了event之后马上抛出了异常,当我们消费者出现异常之后你不能让整个线程停下来,有一个消费者出了异常那其他的消费者就不干活了,肯定不行。handleExceptionsFor为消费者指定Exception处理器 (h1).with后面是我们的ExceptionHandler出了异常之后该怎么办进行处理,重写三个方法,第一个是当产生异常的时候在这很简单直接打印出来了;第二个是handleOnStart如果启动的时候出异常;第三个handleOnShutdown你该怎么处理。
import com.lmax.disruptor.EventHandler;
import com.lmax.disruptor.ExceptionHandler;
import com.lmax.disruptor.RingBuffer;
import com.lmax.disruptor.SleepingWaitStrategy;
import com.lmax.disruptor.dsl.Disruptor;
import com.lmax.disruptor.dsl.ProducerType;

import java.util.concurrent.*;

public class Main07_ExceptionHandler{
    public static void main(String[] args) throws InterruptedException {

        //the factory for the event
        LongEventFactory factory = new LongEventFactory();

        //Specify the of the ring buffer,must be power of 2.
        int bufferSize = 1024;

        //Construct the Disruptor
        Disruptor<LongEvent> disruptor = new Disruptor<>(factory,bufferSize, Executors.defaultThreadFactory(), ProducerType.MULTI,new SleepingWaitStrategy());

        //Connect the handlers
        EventHandler h1 = (event, sequence, end)->{
            System.out.println(event);
            throw new Exception("消费者出异常");
        };
        disruptor.handleEventsWith(h1);

        disruptor.handleExceptionsFor(h1).with(new ExceptionHandler<LongEvent>(){
            @Override
            public void handleEventException(Throwable throwable,long l,LongEvent longEvent){
                throwable.printStackTrace();
            }

            @Override
            public void handleOnStartException(Throwable throwable){
                System.out.println("Exception Start to Handle!");
            }

            @Override
            public void handleOnShutdownException(Throwable throwable){
                System.out.println("Exception End to Handle!");
            }
        });

        //Start the Disruptor,start all threads running
        disruptor.start();

        //Get the ring buffer form the Disruptor to be used for publishing.
        RingBuffer<LongEvent> ringBuffer = disruptor.getRingBuffer();

        //========================================================================
        final int threadCount = 1;
        CyclicBarrier barrier=new CyclicBarrier(threadCount);
        ExecutorService service = Executors.newCachedThreadPool();
        for(long i=0; i<threadCount; i++){
            final long threadNum = i;
            service.submit(()->{
                System.out.printf("Thread %s ready to start!\n",threadNum);
                try{
                    barrier.await();
                }catch(InterruptedException e){
                    e.printStackTrace();
                }catch(BrokenBarrierException e){
                    e.printStackTrace();
                }

                for(int j=0; j<10;j++){
                    ringBuffer.publishEvent((event,sequence)->{
                        event.set(threadNum);
                        System.out.println("生产了"+threadNum);
                    });
                }
            });
        }

        service.shutdown();
        //disruptor.shutdown();
        TimeUnit.SECONDS.sleep(3);
        System.out.println(LongEventHandler.count);
    }
}
总结
disruptor是一个环,然后这个环有多个生产者可以往里头生产,由于它是环形的设计效率会非常的高,我们写程序的时候是这样写的,首先你自己定义好Event消息的格式,然后定义消息工厂,消息工厂是用来初始化整个环的时候相应的一些位置上各种各样不同的消息先把它new出来,new出来之后先占好空间,我们在生产的时候只需要把这个位置上这个默认的这块空间拿出来往里头填值,填好值之后消费者就可以往里头消费了,消费完了生产者就可以继续往里头生产了,如果说你生产者消费的比较快,消费着消费的比较慢,满了怎么办,就是用各种各样的等待策略,消费者出了问题之后可以用ExceptionHandler来进行处理。


 6万+
6万+


 被折叠的 条评论
为什么被折叠?
被折叠的 条评论
为什么被折叠?
 到【灌水乐园】发言


