


本文分析了从点击桌面上的app图标开始到app主页面显示的过程。
一、启动流程概述
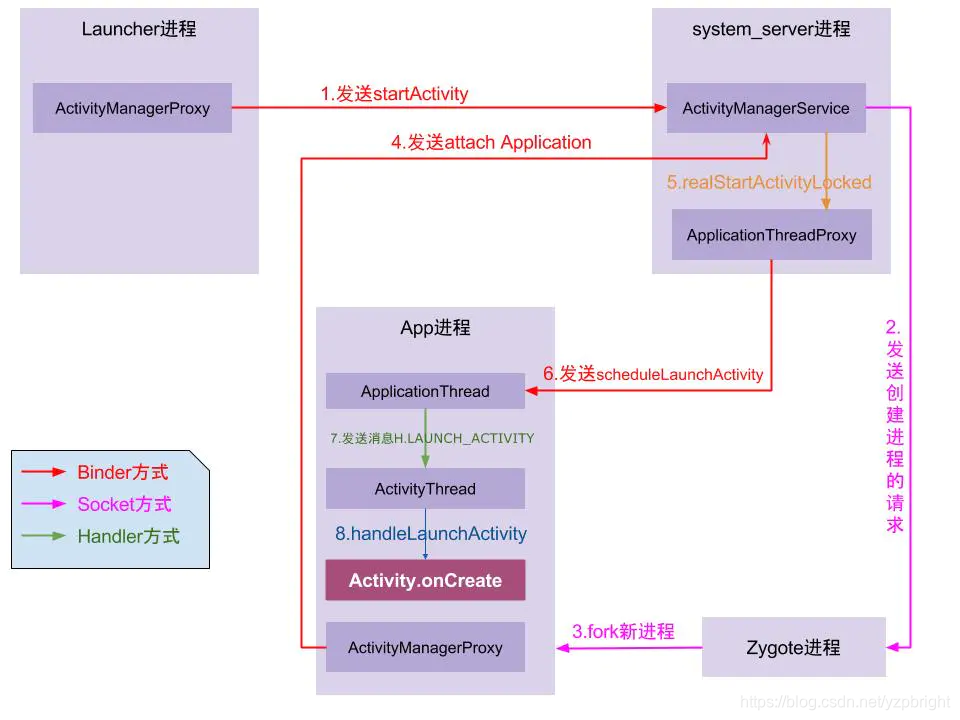
上面的一些列步骤简单介绍了一个APP启动到主页面显示的过程:
①点击桌面App图标,Launcher进程通过Binder IPC向system_server进程发起startActivity请求;
②system_server进程接收到请求后,向zygote进程发送创建进程的请求;
③Zygote进程fork出一个新的子进程,即App进程;
④App进程,通过Binder IPC向sytem_server进程发起attachApplication请求;
⑤system_server进程在收到请求后,进行一系列准备工作后,再通过binder IPC向App进程发送scheduleLaunchActivity请求;
⑥App进程的ApplicationThread在收到请求后,通过handler向主线程发送LAUNCH_ACTIVITY消息;
⑦主线程在收到LAUNCH_ACTIVITY消息后,通过发射机制创建目标Activity,并回调Activity.onCreate()等方法。
⑧到此,App便正式启动,开始进入Activity生命周期,执行完onCreate/onStart/onResume方法,UI渲染结束后便可以看到App的主界面。
二、相关的理论基础
1.zygote进程
zygote进程由init进程fork出来,所有app进程都是由zygote进程fork出来。
每一个App
- 都是一个单独的进程
- 都拥有一个独立的Dalvik虚拟机实例
2.system_server进程
system_server进程由zygote进程fork出来,这个进程运行着大量的系统服务,比如
ActivityManagerService、PackageManagerService、WindowManagerService等等
3.ActivityManagerService
简称AMS,继承自IActivityManager.Stub。在SystemServer进程开启的时候,就会初始化ActivityManagerServic。在Android系统中,任何一个Activity的启动都是由AMS和应用程序进程(主要通过ActivityThread)相互配合来完成的。AMS统一调度系统中所有进程的Activity启动。
AMS的作用:
- 如果想打开一个App的话,需要AMS去通知zygote进程。
- 除此之外,所有的Activity的启动、暂停、关闭都需要AMS来控制,所以我们说,AMS负责系统中所有Activity的生命周期。
4.Launcher
Launcher本质上也是一个应用程序,也是继承自Activity。
packages/apps/Launcher2/src/com/android/launcher2/Launcher.java
/**
 * Default launcher application.
 */
public final class Launcher extends Activity
        implements View.OnClickListener, OnLongClickListener, LauncherModel.Callbacks,
                   View.OnTouchListener {
    static final String TAG = "Launcher";

   ...//其他代码

}
5.Instrumentation
每个Activity都持有Instrumentation对象的一个引用,但是整个进程只会存在一个Instrumentation对象。
Instrumentation这个类里面的方法大多数和Application和Activity有关,这个类就是负责Application和Activity的初始化以及生命周期。
6.ActivityThread
7.ApplicationThread
ApplicationThread是ActivityThread的内部类
private class ApplicationThread extends IApplicationThread.Stub {

  ...//其他代码

}
App的启动以及Activity的显示都需要AMS的控制,app进程便需要和AMS进行通信,而这个通信是双向的。
1.当app进程调用AMS的方法时,app进程是client端,AMS是server端。
使用ActivityManagerProxy和ActivityManagerService进行通信。

ActivityManagerProxy和ActivityManagerService都实现了IActivityManager接口,提供了一样的函数原型,使用户感觉调用Server端的方法像调用本进程的方法一样。
2.当AMS调用app进程的方法时,AMS是client端,app进程是server端。
使用ApplicationThreadProxy和ApplicationThread进行通信。

ApplicationThreadProxy和ApplicationThread都实现了IApplicationThread接口。
8.Binder通信

ATP: ApplicationThreadProxy
AT: ApplicationThread
AMP: ActivityManagerProxy
AMS: ActivityManagerService
①system_server进程中调用startProcessLocked()方法,该方法最终通过socket方式,将需要创建新进程的消息告知Zygote进程,并阻塞等待Socket返回新创建进程的pid;
②Zygote进程接收到system_server发送过来的消息, 则通过fork()方法,将zygote自身进程复制生成一个新的App进程,并将ActivityThread相关的资源加载到App进程,这个进程可能是用于承载activity等组件;
③App进程向servicemanager查询system_server进程中的AMS,获取相对应的Client端,也就是AMP,有了这一对binder通信的c/s对,那么App进程便可以通过binder机制向进程system_server发送请求,即attachApplication();
④system_server进程接收到相应binder请求后,经过多次调用,利用ATP通过binder机制向App进程发送请求, 即bindApplication;
system_server拥有ATP/AMS,每一个新创建的进程都会有一个相应的AT/AMP,从而可以进行跨进程相互通信。
三、启动流程详述
新建App进程
桌面本身就是个Activity,这个Activity叫Launcher,桌面上的一个个App图标就是这些App的快捷方式,当用户点击App图标时会产生点击事件,执行onClick()方法:
//Launcher.java


	 /**
	     * Launches the intent referred by the clicked shortcut.
	     *
	     * @param v The view representing the clicked shortcut.
	     */
	public void onClick(View v) {

	 	  ...//其他代码

	      Object tag = v.getTag();
	      if (tag instanceof ShortcutInfo) {
	          // Open shortcut
	          final Intent intent = ((ShortcutInfo) tag).intent;
	          int[] pos = new int[2];
	          v.getLocationOnScreen(pos);
	          intent.setSourceBounds(new Rect(pos[0], pos[1],
	                  pos[0] + v.getWidth(), pos[1] + v.getHeight()));

	          boolean success = startActivitySafely(v, intent, tag);

	          if (success && v instanceof BubbleTextView) {
	              mWaitingForResume = (BubbleTextView) v;
	              mWaitingForResume.setStayPressed(true);
	          }
	      } else if (tag instanceof FolderInfo) {

	      ...//其他代码

	}
如果产生点击事件的View的Tag是ShortcutInfo(即应用的快捷方式),就会取得ShortcutInfo中保存的Intent,然后执行startActivitySafely()方法,最终会执行startActivity()方法:
//Launcher.java

    boolean startActivity(View v, Intent intent, Object tag) {
        intent.addFlags(Intent.FLAG_ACTIVITY_NEW_TASK);

        try {
            // Only launch using the new animation if the shortcut has not opted out (this is a
            // private contract between launcher and may be ignored in the future).
            boolean useLaunchAnimation = (v != null) &&
                    !intent.hasExtra(INTENT_EXTRA_IGNORE_LAUNCH_ANIMATION);
            UserHandle user = (UserHandle) intent.getParcelableExtra(ApplicationInfo.EXTRA_PROFILE);
            LauncherApps launcherApps = (LauncherApps)
                    this.getSystemService(Context.LAUNCHER_APPS_SERVICE);
            if (useLaunchAnimation) {
                ActivityOptions opts = ActivityOptions.makeScaleUpAnimation(v, 0, 0,
                        v.getMeasuredWidth(), v.getMeasuredHeight());
                if (user == null || user.equals(android.os.Process.myUserHandle())) {
                    // Could be launching some bookkeeping activity
                    startActivity(intent, opts.toBundle());
                } else {
                    launcherApps.startMainActivity(intent.getComponent(), user,
                            intent.getSourceBounds(),
                            opts.toBundle());
                }
            } else {
                if (user == null || user.equals(android.os.Process.myUserHandle())) {
                    startActivity(intent);
                } else {
                    launcherApps.startMainActivity(intent.getComponent(), user,
                            intent.getSourceBounds(), null);
                }
            }
            return true;
        } catch (SecurityException e) {

            ...//其他代码

        }
        return false;
    }
这里会有多用户场景的判断,分析单用户场景的即可,继续调用startActivity()方法,最终会调用Activity类的startActivityForResult()方法:
//Activity.java

public void startActivityForResult(@RequiresPermission Intent intent, int requestCode,
            @Nullable Bundle options) {
        if (mParent == null) {
            options = transferSpringboardActivityOptions(options);
            Instrumentation.ActivityResult ar =
                mInstrumentation.execStartActivity(
                    this, mMainThread.getApplicationThread(), mToken, this,
                    intent, requestCode, options);

			...//其他代码


    }
关键的是调用Instrumentation的execStartActivity()方法:
//Instrumentation.java

    public ActivityResult execStartActivity(Context who, IBinder contextThread, IBinder token, String target,
        Intent intent, int requestCode, Bundle options) {
        IApplicationThread whoThread = (IApplicationThread) contextThread;

		...//其他代码

        try {
            intent.migrateExtraStreamToClipData();
            intent.prepareToLeaveProcess(who);
            //whoThread是Launcher进程的ApplicationThread
            int result = ActivityManager.getService()
                .startActivity(whoThread, who.getBasePackageName(), intent,
                        intent.resolveTypeIfNeeded(who.getContentResolver()),
                        token, target, requestCode, 0, null, options);
            checkStartActivityResult(result, intent);
        } catch (RemoteException e) {
            throw new RuntimeException("Failure from system", e);
        }
        return null;
    }
这里会调用ActivityManager.getService()方法获取AMS的代理对象(ActivityManagerProxy),可以看下ActivityManagerProxy的代码:
class ActivityManagerProxy implements IActivityManager
{
    public ActivityManagerProxy(IBinder remote)
    {
        mRemote = remote;
    }

    public IBinder asBinder()
    {
        return mRemote;
    }

    public int startActivity(IApplicationThread caller, String callingPackage, Intent intent,
            String resolvedType, IBinder resultTo, String resultWho, int requestCode,
            int startFlags, ProfilerInfo profilerInfo, Bundle options) throws RemoteException {
        // 创建两个Parcel对象,data用于传输启动Activity需要的数据,
        // reply用于获取启动Activity操作执行完成后系统返回的响应
        Parcel data = Parcel.obtain();
        Parcel reply = Parcel.obtain();
        data.writeInterfaceToken(IActivityManager.descriptor);
        // caller就是Launcher提供的ApplicationThread(也就是前面提到的whoThread)
        data.writeStrongBinder(caller != null ? caller.asBinder() : null);
        // 记录启动新Activity的应用的包名,也就是Launcher的包名
        data.writeString(callingPackage);
        intent.writeToParcel(data, 0);
        data.writeString(resolvedType);
        // 将resultTo这个IBinder对象写入data中,实际写入的就是前面的参数——IBinder token
        data.writeStrongBinder(resultTo);
        data.writeString(resultWho);
        data.writeInt(requestCode);
        data.writeInt(startFlags);
        if (profilerInfo != null) {
            data.writeInt(1);
            profilerInfo.writeToParcel(data, Parcelable.PARCELABLE_WRITE_RETURN_VALUE);
        } else {
            data.writeInt(0);
        }
        if (options != null) {
            data.writeInt(1);
            options.writeToParcel(data, 0);
        } else {
            data.writeInt(0);
        }
        mRemote.transact(START_ACTIVITY_TRANSACTION, data, reply, 0);
        reply.readException();
        int result = reply.readInt();
        reply.recycle();
        data.recycle();
        return result;
    }

	...//其他代码

}
然后调用ActivityManagerProxy的的startActivity()方法,通过binder机制最终会跨进程调用AMS的startActivity()方法:
//ActivityManagerService.java

    @Override
    public final int startActivity(IApplicationThread caller, String callingPackage,
            Intent intent, String resolvedType, IBinder resultTo, String resultWho, int requestCode,
            int startFlags, ProfilerInfo profilerInfo, Bundle bOptions) {
        return startActivityAsUser(caller, callingPackage, intent, resolvedType, resultTo,
                resultWho, requestCode, startFlags, profilerInfo, bOptions,
                UserHandle.getCallingUserId());
    }
会调用startActivityAsUser()方法:
//ActivityManagerService.java

 public final int startActivityAsUser(IApplicationThread caller, String callingPackage,
            Intent intent, String resolvedType, IBinder resultTo, String resultWho, int requestCode,
            int startFlags, ProfilerInfo profilerInfo, Bundle bOptions, int userId,
            boolean validateIncomingUser) {
        enforceNotIsolatedCaller("startActivity");

        userId = mActivityStartController.checkTargetUser(userId, validateIncomingUser,
                Binder.getCallingPid(), Binder.getCallingUid(), "startActivityAsUser");

        // TODO: Switch to user app stacks here.
        return mActivityStartController.obtainStarter(intent, "startActivityAsUser")
                .setCaller(caller)
                .setCallingPackage(callingPackage)
                .setResolvedType(resolvedType)
                .setResultTo(resultTo)
                .setResultWho(resultWho)
                .setRequestCode(requestCode)
                .setStartFlags(startFlags)
                .setProfilerInfo(profilerInfo)
                .setActivityOptions(bOptions)
                .setMayWait(userId)
                .execute();

    }
mActivityStartController.obtainStarter()方法返回的是一个ActivityStarter对象,然后进行参数设置后执行它的的execute()方法,后面会经过一系列方法调用,这里就不一一详细分析了:
ActivityStarter.execute()
ActivityStarter.startActivity()
ActivityStarter.startActivityUnchecked()
ActivityStackSupervisor.resumeFocusedStackTopActivityLocked()
ActivityStack.resumeTopActivityUncheckedLocked()
ActivityStack.resumeTopActivityInnerLocked()
//ActivityStack.java

private boolean resumeTopActivityInnerLocked(ActivityRecord prev, ActivityOptions options) {

  	...//其他代码

	if (mResumedActivity != null) {
         if (DEBUG_STATES) Slog.d(TAG_STATES, "resumeTopActivityLocked: Pausing " + mResumedActivity);
         pausing |= startPausingLocked(userLeaving, false, next, false); //暂停当前resumed状态的Activity
    }

    mStackSupervisor.startSpecificActivityLocked(next, true, true); //启动新的Activity

	...//其他代码

}
最终调用了ActivityStackSupervisor的startSpecificActivityLocked()方法,看下该方法:
//ActivityStackSupervisor.java

    void startSpecificActivityLocked(ActivityRecord r, boolean andResume, boolean checkConfig) {
        // Is this activity's application already running?
        ProcessRecord app = mService.getProcessRecordLocked(r.processName,
                r.info.applicationInfo.uid, true);

        getLaunchTimeTracker().setLaunchTime(r);

        if (app != null && app.thread != null) {
            try {
                if ((r.info.flags&ActivityInfo.FLAG_MULTIPROCESS) == 0
                        || !"android".equals(r.info.packageName)) {
                    // Don't add this if it is a platform component that is marked
                    // to run in multiple processes, because this is actually
                    // part of the framework so doesn't make sense to track as a
                    // separate apk in the process.
                    app.addPackage(r.info.packageName, r.info.applicationInfo.longVersionCode,
                            mService.mProcessStats);
                }
                realStartActivityLocked(r, app, andResume, checkConfig);
                return;
            } catch (RemoteException e) {
                Slog.w(TAG, "Exception when starting activity "
                        + r.intent.getComponent().flattenToShortString(), e);
            }

            // If a dead object exception was thrown -- fall through to
            // restart the application.
        }

        mService.startProcessLocked(r.processName, r.info.applicationInfo, true, 0,
                "activity", r.intent.getComponent(), false, false, true);
    }
startSpecificActivityLocked()方法中,会做一个activity所属的application是否在running的判断。
有两种情况:
application is already running:执行realStartActivityLocked()方法
application is not already running:执行mService.startProcessLocked()方法(mService就是AMS)
这里是第一次启动App,所以执行mService.startProcessLocked()方法:
//ActivityManagerService.java

	...//其他代码

    private final boolean startProcessLocked(ProcessRecord app, String hostingType,
            String hostingNameStr, boolean disableHiddenApiChecks, String abiOverride) {

			...//其他代码

	        // Start the process.  It will either succeed and return a result containing
            // the PID of the new process, or else throw a RuntimeException.
            final String entryPoint = "android.app.ActivityThread";

            return startProcessLocked(hostingType, hostingNameStr, entryPoint, app, uid, gids,
                    runtimeFlags, mountExternal, seInfo, requiredAbi, instructionSet, invokeWith,
                    startTime);

		...//其他代码

	}

    private boolean startProcessLocked(String hostingType, String hostingNameStr, String entryPoint,
            ProcessRecord app, int uid, int[] gids, int runtimeFlags, int mountExternal,
            String seInfo, String requiredAbi, String instructionSet, String invokeWith,
            long startTime) {


			...//其他代码

			final ProcessStartResult startResult = startProcess(hostingType, entryPoint, app,
			                        uid, gids, runtimeFlags, mountExternal, seInfo, requiredAbi, instructionSet,
			                        invokeWith, startTime);

			 ...//其他代码

    }

    private ProcessStartResult startProcess(String hostingType, String entryPoint,
            ProcessRecord app, int uid, int[] gids, int runtimeFlags, int mountExternal,
            String seInfo, String requiredAbi, String instructionSet, String invokeWith,
            long startTime) {

			 ...//其他代码

		    else {
                startResult = Process.start(entryPoint,
                        app.processName, uid, uid, gids, runtimeFlags, mountExternal,
                        app.info.targetSdkVersion, seInfo, requiredAbi, instructionSet,
                        app.info.dataDir, invokeWith,
                        new String[] {PROC_START_SEQ_IDENT + app.startSeq});
            }
            checkTime(startTime, "startProcess: returned from zygote!");

			 ...//其他代码

    }
上述代码中定义了启动新进程的entryPoint是"android.app.ActivityThread"。
最终会调用Process.start()方法:
//Process.java

    public static final ProcessStartResult start(final String processClass,
                                  final String niceName,
                                  int uid, int gid, int[] gids,
                                  int runtimeFlags, int mountExternal,
                                  int targetSdkVersion,
                                  String seInfo,
                                  String abi,
                                  String instructionSet,
                                  String appDataDir,
                                  String invokeWith,
                                  String[] zygoteArgs) {
        return zygoteProcess.start(processClass, niceName, uid, gid, gids,
                    runtimeFlags, mountExternal, targetSdkVersion, seInfo,
                    abi, instructionSet, appDataDir, invokeWith, zygoteArgs);
    }
会调用ZygoteProcess的start()方法,ZygoteProcess.start()方法会fork出新进程,"android.app.ActivityThread"作为入口点。ActivityThread在main()方法里会依次调用Looper.prepareMainLooper()和Looper.loop()来开启消息循环。
方法调用的时序图

简化的流程

①App发起进程:当从桌面启动应用,则发起进程便是Launcher所在进程;当从某App内启动远程进程,则发起进程便是该App进程。发起进程先通过binder发送消息给system_server进程;
②system_server进程:调用Process.start()方法,通过socket向zygote进程发送创建新进程的请求;
③zygote进程:在ZygoteInit的main()方法中会执行zygoteServer.runSelectLoop()方法,进入循环体内,当有客户端连接时便会执行ZygoteConnection的processOneCommand()方法,该方法会执行Zygote.forkAndSpecialize()从而fork出新的进程,然后执行handleChildProc()方法,新进程会调用ActivityThread.main()方法
绑定Application
上面创建进程后,执行ActivityThread.main()方法:
//ActivityThread.java

public static void main(String[] args) {

		 ...//其他代码

        Looper.prepareMainLooper();

        // Find the value for {@link #PROC_START_SEQ_IDENT} if provided on the command line.
        // It will be in the format "seq=114"
        long startSeq = 0;
        if (args != null) {
            for (int i = args.length - 1; i >= 0; --i) {
                if (args[i] != null && args[i].startsWith(PROC_START_SEQ_IDENT)) {
                    startSeq = Long.parseLong(
                            args[i].substring(PROC_START_SEQ_IDENT.length()));
                }
            }
        }
        ActivityThread thread = new ActivityThread();
        thread.attach(false, startSeq);

        if (sMainThreadHandler == null) {
            sMainThreadHandler = thread.getHandler();
        }

        if (false) {
            Looper.myLooper().setMessageLogging(new LogPrinter(Log.DEBUG, "ActivityThread"));
        }

        // End of event ActivityThreadMain.
        Trace.traceEnd(Trace.TRACE_TAG_ACTIVITY_MANAGER);
        Looper.loop();

        throw new RuntimeException("Main thread loop unexpectedly exited");
    }
调用attach()方法:
//ActivityThread.java

private void attach(boolean system, long startSeq) {

 		...//其他代码

	  final IActivityManager mgr = ActivityManager.getService();
      try {
            mgr.attachApplication(mAppThread, startSeq);
        } catch (RemoteException ex) {
            throw ex.rethrowFromSystemServer();
        }

	 ...//其他代码


}
调用mgr的attachApplication()方法,mgr就是ActivityManagerProxy对象,最终会通过binder机制跨进程调用AMS的attachApplication()方法:
//ActivityManagerService.java

    @Override
    public final void attachApplication(IApplicationThread thread, long startSeq) {
        synchronized (this) {
            int callingPid = Binder.getCallingPid();
            final int callingUid = Binder.getCallingUid();
            final long origId = Binder.clearCallingIdentity();
            attachApplicationLocked(thread, callingPid, callingUid, startSeq);
            Binder.restoreCallingIdentity(origId);
        }
    }
调用attachApplicationLocked()方法:
//ActivityManagerService.java

private final boolean attachApplicationLocked(IApplicationThread thread,
            int pid, int callingUid, long startSeq) {

	 ...//其他代码

	  thread.bindApplication(processName, appInfo, providers,
                        app.instr.mClass,
                        profilerInfo, app.instr.mArguments,
                        app.instr.mWatcher,
                        app.instr.mUiAutomationConnection, testMode,
                        mBinderTransactionTrackingEnabled, enableTrackAllocation,
                        isRestrictedBackupMode || !normalMode, app.persistent,
                        new Configuration(getGlobalConfiguration()), app.compat,
                        getCommonServicesLocked(app.isolated),
                        mCoreSettingsObserver.getCoreSettingsLocked(),
                        buildSerial, isAutofillCompatEnabled);

     ...//其他代码

		// See if the top visible activity is waiting to run in this process...
        if (normalMode) {
            try {
                if (mStackSupervisor.attachApplicationLocked(app)) {
                    didSomething = true;
                }
            } catch (Exception e) {
                Slog.wtf(TAG, "Exception thrown launching activities in " + app, e);
                badApp = true;
            }
        }

}
thread是ApplicationThreadProxy对象,即调用ApplicationThreadProxy的bindApplication()方法,最终会通过binder机制跨进程调用ApplicationThread(ActivityThread的内部类)的bindApplication()方法:
//ActivityThread.java

public final void bindApplication(String processName, ApplicationInfo appInfo,
                List<ProviderInfo> providers, ComponentName instrumentationName,
                ProfilerInfo profilerInfo, Bundle instrumentationArgs,
                IInstrumentationWatcher instrumentationWatcher,
                IUiAutomationConnection instrumentationUiConnection, int debugMode,
                boolean enableBinderTracking, boolean trackAllocation,
                boolean isRestrictedBackupMode, boolean persistent, Configuration config,
                CompatibilityInfo compatInfo, Map services, Bundle coreSettings,
                String buildSerial, boolean autofillCompatibilityEnabled) {


	 ...//其他代码

	 sendMessage(H.BIND_APPLICATION, data);

	 ...//其他代码

}
该方法会通过ActivityThread的H对象mH(即一个Handler对象),发送一个BIND_APPLICATION的消息到消息队列中,之后会由handleMessage()接收:
//ActivityThread.java

public void handleMessage(Message msg) {
    if (DEBUG_MESSAGES) Slog.v(TAG, ">>> handling: " + codeToString(msg.what));
    switch (msg.what) {
        case BIND_APPLICATION:
            Trace.traceBegin(Trace.TRACE_TAG_ACTIVITY_MANAGER, "bindApplication");
            AppBindData data = (AppBindData)msg.obj;
            handleBindApplication(data);
            Trace.traceEnd(Trace.TRACE_TAG_ACTIVITY_MANAGER);
            break;

 ...//其他代码
最终通过handleBindApplication()方法处理该BIND_APPLICATION消息:
//ActivityThread.java

private void handleBindApplication(AppBindData data) {

 	...//其他代码

		  try {
            // If the app is being launched for full backup or restore, bring it up in
            // a restricted environment with the base application class.
            app = data.info.makeApplication(data.restrictedBackupMode, null);

 	...//其他代码

}
data是AppBindData对象,info是LoadedApk对象,即调用LoadedApk的makeApplication()方法:
//LoadedApk.java

    public Application makeApplication(boolean forceDefaultAppClass,
            Instrumentation instrumentation) {

        ...//其他代码

        app = mActivityThread.mInstrumentation.newApplication(cl, appClass, appContext);

 	    ...//其他代码

        instrumentation.callApplicationOnCreate(app);

 	    ...//其他代码

        return app;
    }
该方法会通过Instrumentation创建Application对象app,然后执行instrumentation.callApplicationOnCreate(app)进行Application的OnCreate()方法的调用。
方法调用的时序图

简化的流程

启动Activity
前面分析ActivityManagerService的attachApplicationLocked()方法时
//ActivityManagerService.java

private final boolean attachApplicationLocked(IApplicationThread thread,
            int pid, int callingUid, long startSeq) {

	 ...//其他代码

	  thread.bindApplication(processName, appInfo, providers,
                        app.instr.mClass,
                        profilerInfo, app.instr.mArguments,
                        app.instr.mWatcher,
                        app.instr.mUiAutomationConnection, testMode,
                        mBinderTransactionTrackingEnabled, enableTrackAllocation,
                        isRestrictedBackupMode || !normalMode, app.persistent,
                        new Configuration(getGlobalConfiguration()), app.compat,
                        getCommonServicesLocked(app.isolated),
                        mCoreSettingsObserver.getCoreSettingsLocked(),
                        buildSerial, isAutofillCompatEnabled);

     ...//其他代码

		// See if the top visible activity is waiting to run in this process...
        if (normalMode) {
            try {
                if (mStackSupervisor.attachApplicationLocked(app)) {
                    didSomething = true;
                }
            } catch (Exception e) {
                Slog.wtf(TAG, "Exception thrown launching activities in " + app, e);
                badApp = true;
            }
        }

}
方法里面主要两个步骤,在执行完 thread.bindApplication() 进行绑定Application后,会执行mStackSupervisor.attachApplicationLocked(app),看下ActivityStackSupervisor的attachApplicationLocked():
//frameworks/base/services/core/java/com/android/server/am/ActivityStackSupervisor.java
    boolean attachApplicationLocked(ProcessRecord app) throws RemoteException {
        final String processName = app.processName;
        boolean didSomething = false;
        for (int displayNdx = mActivityDisplays.size() - 1; displayNdx >= 0; --displayNdx) {
            final ActivityDisplay display = mActivityDisplays.valueAt(displayNdx);
            for (int stackNdx = display.getChildCount() - 1; stackNdx >= 0; --stackNdx) {
                final ActivityStack stack = display.getChildAt(stackNdx);
                if (!isFocusedStack(stack)) {
                    continue;
                }
                stack.getAllRunningVisibleActivitiesLocked(mTmpActivityList);
                final ActivityRecord top = stack.topRunningActivityLocked();
                final int size = mTmpActivityList.size();
                for (int i = 0; i < size; i++) {
                    final ActivityRecord activity = mTmpActivityList.get(i);
                    if (activity.app == null && app.uid == activity.info.applicationInfo.uid
                            && processName.equals(activity.processName)) {
                        try {
                            if (realStartActivityLocked(activity, app,
                                    top == activity /* andResume */, true /* checkConfig */)) {
                                didSomething = true;
                            }
                        } catch (RemoteException e) {
                            Slog.w(TAG, "Exception in new application when starting activity "
                                    + top.intent.getComponent().flattenToShortString(), e);
                            throw e;
                        }
                    }
                }
            }
        }
        if (!didSomething) {
            ensureActivitiesVisibleLocked(null, 0, !PRESERVE_WINDOWS);
        }
        return didSomething;
    }
会调用realStartActivityLocked()方法,最终会调用ApplicationThreadProxy的scheduleLaunchActivity()方法,通过Binder机制跨进程调用ApplicationThread的scheduleLaunchActivity()方法,该方法调用ActivityThread的sendMessage()方法发送一个LAUNCH_ACTIVITY消息到消息队列中,最终通过ActivityThread的handleLaunchActivity()方法来处理该消息:
//ActivityThread.java


    @Override
    public Activity handleLaunchActivity(ActivityClientRecord r,
            PendingTransactionActions pendingActions, Intent customIntent) {

	 ...//其他代码

	 final Activity a = performLaunchActivity(r, customIntent);

 	 ...//其他代码

}
会调用performLaunchActivity()方法:
//ActivityThread.java


    /**  Core implementation of activity launch. */
    private Activity performLaunchActivity(ActivityClientRecord r, Intent customIntent) {

       ...//其他代码

       java.lang.ClassLoader cl = appContext.getClassLoader();
       activity = mInstrumentation.newActivity(cl, component.getClassName(), r.intent);


		...//其他代码

        activity.attach(appContext, this, getInstrumentation(), r.token,
                        r.ident, app, r.intent, r.activityInfo, title, r.parent,
                        r.embeddedID, r.lastNonConfigurationInstances, config,
                        r.referrer, r.voiceInteractor, window, r.configCallback);

        ...//其他代码

        mInstrumentation.callActivityOnCreate(activity, r.state, r.persistentState);

		...//其他代码

    }
该方法会执行mInstrumentation.newActivity()创建Activity对象activity,然后调用attach()方法绑定activity所需的各种变量,接着执行mInstrumentation.callActivityOnCreate()方法,该方法会调用Activity的OnCreate()方法。
方法调用的时序图

简化的流程

Android 9.0版本引入了ClientLifecycleManager和ClientTransactionHandler相关类来辅助管理Activity生命周期,因此这部分源码也做了许多改动,但是整体流程变化不大。基于Android 9.0源码分析Activity生命周期的调用过程可以参考这篇文章 Activity的启动过程
总结
相关文件已经上传到github:https://github.com/helloyzp/Android-APP-Startup-Process-Analysis
参考:
一个APP从启动到主页面显示经历了哪些过程?
Android App启动流程详解
源码分析-Activity的启动流程
源码分析 — ActivityThread(一)之main()的调用 (Android应用进程的孵化)
源码分析 — ActivityThread(二)之相关类的分析
AMS启动的上半段,从Activty的startActivty启动Activity过程
AMS启动的下半段,AMS 到 Zygote fork进程到ActivityThread
Android9.0源码学习 - Launcher Activity(一)
Android9.0源码学习 - Launcher Activity(二)
https://www.androidos.net.cn/android/9.0.0_r8/xref/packages/apps/Launcher2/src/com/android/launcher2/Launcher.java
https://www.androidos.net.cn/android/9.0.0_r8/xref/frameworks/base/core/java/android/content/pm/LauncherApps.java
https://www.androidos.net.cn/android/9.0.0_r8/xref/frameworks/base/services/core/java/com/android/server/pm/LauncherAppsService.java
https://www.androidos.net.cn/android/9.0.0_r8/xref/frameworks/base/core/java/android/app/ActivityManagerInternal.java
https://www.androidos.net.cn/android/9.0.0_r8/xref/frameworks/base/services/core/java/com/android/server/am/ActivityStarter.java
https://www.androidos.net.cn/android/9.0.0_r8/xref/frameworks/base/services/core/java/com/android/server/am/ActivityStackSupervisor.java
https://www.androidos.net.cn/android/9.0.0_r8/xref/frameworks/base/services/core/java/com/android/server/am/ActivityStack.java
https://www.androidos.net.cn/android/9.0.0_r8/xref/frameworks/base/core/java/android/os/ZygoteProcess.java
https://www.androidos.net.cn/android/9.0.0_r8/xref/frameworks/base/core/java/android/os/Process.java


 821
821


 被折叠的 条评论
为什么被折叠?
被折叠的 条评论
为什么被折叠?
 到【灌水乐园】发言


