


本文主要是讲解如何实现一个完整的AIDL HAL层的例子,包括aidl文件的编写、service的实现、测试用例的实现、开机启动以及编译过程中和运行时的错误如何解决。此文不讲解AIDL的原理,具体原理的了解请参考官方资料:https://source.android.com/docs/core/architecture/aidl?hl=zh-cn
生成中间库
创建code路径:vendor/xxxx/proprietary/hardware/interfaces/helloworld
在上面的目录下创建子路径:aidl/vendor/hardware/helloworld
创建Android.bp和IHelloWorld.aidl,文件位置如下:
1.	vendor/xxxx/proprietary/hardware/interfaces/helloworld$ tree
2.	.
3.	└── aidl
4.	    ├── Android.bp
5.	    └── vendor
6.	        └── hardware
7.	            └── helloworld
8.	                └── IHelloWorld.aidl
Android.bp内容:
1.	aidl_interface {
2.	    name: "vendor.hardware.helloworld",
3.	    vendor_available: true,
4.	    srcs: ["vendor/hardware/ helloworld /*.aidl"],
5.	    stability: "vintf",
6.	    owner: "yezhiqiang",
7.	    backend: {
8.	        java: {
9.	            enabled: true,
10.	            platform_apis: true,
11.	        },
12.	        ndk: {
13.	            enabled: true,
14.	        },
15.	        cpp: {
16.	            enabled: true,
17.	        },
18.	    },
19.	}
IHelloWorld.aidl内容:
1.	package vendor.hardware.helloworld;
2.
3.	@VintfStability
4.	interface IHelloWorld {
5.	        void sayWhat(String what);
6.	}
尝试编译:mmm vendor/xxxx/proprietary/hardware/interfaces/helloworld/aidl/
发生错误如下:
FAILED: out/soong/.intermediates/vendor/xxxx/proprietary/hardware/interfaces/helloworld/aidl/vendor.hardware.helloworld-api/checkapi_current.timestamp
echo "API dump for the current version of AIDL interface vendor.hardware.helloworld does not exist." && echo Run "m vendor.hardware.helloworld-update-api", or add "unstable: true" to the build rule for the interface if it does not need to be versioned && false # hash of input list: e3b0c44298fc1c149afbf4c8996fb92427ae41e4649b934ca495991b7852b855
API dump for the current version of AIDL interface vendor.hardware.helloworld does not exist.
Run m vendor.hardware.helloworld-update-api, or add unstable: true to the build rule for the interface if it does not need to be versioned
虽然出错,但此时已经在out目录下创建了部分目录:
1.	//out/soong/.intermediates/vendor/xxxx/proprietary/hardware/interfaces/helloworld/aidl/
2.	vendor.hardware.helloworld-api/
3.	vendor.hardware.helloworld-V1-java/
根据提示,需要执行命令:m vendor.hardware.helloworld-update-api
成功时打印如下信息:
[100% 13/13] //vendor/xxxx/proprietary/hardware/interfaces/helloworld/aidl:vendor.hardware.helloworld-api Making AIDL API of vendor.hardware.helloworld as version c 此时,会在aidl_api/vendor.hardware.helloworld/目录下生成current及其内部的内容。
回过头来,再次执行:
mmm vendor/xxxx/proprietary/hardware/interfaces/helloworld/aidl/,编译成功。
此时发现out目录下生成了很多目录:

那么执行到这一步,其实在out目录下已经生成了binder的各种类型的源文件以及各种IBinder库了。
编写services
创建default目录及相应服务程序,文件列表如下:
vendor/xxxx/proprietary/hardware/interfaces/helloworld/aidl/default$ tree
.
├── Android.bp
├── HelloWorld.cpp
├── HelloWorld.h
├── service.cpp
├── vendor.hardware.helloworld-service.rc
└── vendor.hardware.helloworld-service.xml
Android.bp内容:
1.	cc_binary {
2.	    name: "vendor.hardware.helloworld-service",
3.	    relative_install_path: "hw",
4.	    init_rc: ["vendor.hardware.helloworld-service.rc"],
5.	    vintf_fragments: ["vendor.hardware.helloworld-service.xml"],
6.	    vendor: true,
7.	    srcs: [
8.	        "service.cpp",
9.	        "HelloWorld.cpp",
10.	    ],
11.	    shared_libs: [
12.	        "vendor.hardware.helloworld-V1-ndk_platform",
13.	         "liblog",
14.	        "libbase",
15.	        "libbinder_ndk",
16.	    ],
17.	}
HelloWorld.h内容:
1.	#pragma once
2.
3.	#include <aidl/vendor/hardware/helloworld/BnHelloWorld.h>
4.
5.	namespace aidl {
6.	namespace vendor {
7.	namespace hardware {
8.	namespace helloworld {
9.	class HelloWorld : public BnHelloWorld {
10.	public:
11.	    HelloWorld() = default;
12.
13.	    ::ndk::ScopedAStatus  sayWhat(const std::string& in_what);
14.	};
15.
16.
17.	}  // namespace helloworld
18.	}  // namespace hardware
19.	}  // namespace vendor
20.	}  // namespace aidl
HelloWorld.cpp内容:
1.	#include "HelloWorld.h"
2.	#include <iostream>
3.	#include <log/log.h>
4.
5.	namespace aidl {
6.	namespace vendor {
7.	namespace hardware {
8.	namespace helloworld {
9.
10.	::ndk::ScopedAStatus HelloWorld::sayWhat(const std::string& in_what) {
11.	    ALOGI("client say:%s.", in_what.c_str());
12.
13.	    return ::ndk::ScopedAStatus::ok();
14.	}
15.
16.	}  // namespace helloworld
17.	}  // namespace hardware
18.	}  // namespace vendor
19.	}  // namespace aidl
service.cpp内容:
1.	#include <android-base/logging.h>
2.	#include <android/binder_manager.h>
3.	#include <android/binder_process.h>
4.
5.	#include "HelloWorld.h"
6.
7.	using ::aidl::vendor::hardware::helloworld::HelloWorld;
8.
9.	int main() {
10.	    ABinderProcess_setThreadPoolMaxThreadCount(0);
11.	    std::shared_ptr<HelloWorld> hello = ndk::SharedRefBase::make<HelloWorld>();
12.
13.	    const std::string instance = std::string() + HelloWorld::descriptor + "/default";
14.	    binder_status_t status = AServiceManager_addService(hello->asBinder().get(), instance.c_str());
15.	    CHECK(status == STATUS_OK);
16.
17.	    ABinderProcess_joinThreadPool();
18.	    return -1; // Should never be reached
19.	}
vendor.hardware.helloworld-service.rc内容:
1.	service vendor_helloworld_default /vendor/bin/hw/vendor.hardware.helloworld-service
2.	    class hal
3.	    user root
4.	    group root
vendor.hardware.helloworld-service.xml内容:
1.	<manifest version="1.0" type="device">
2.	    <hal format="aidl">
3.	        <name>vendor.hardware.helloworld</name>
4.	        <version>1</version>
5.	        <interface>
6.	            <name>IHelloWorld</name>
7.	            <instance>default</instance>
8.	        </interface>
9.	    </hal>
10.	</manifest>
解决启动问题
验证service能否正常启动,将如下文件分别push入系统:
1.	//push to vendor/lib/
2.	vendor.hardware.helloworld-V1-ndk_platform.so
3.	//push to vendor/etc/vintf/manifest
4.	vendor.hardware.helloworld-service.xml
5.	//push to vendor/etc/init/
6.	vendor.hardware.helloworld-service.rc
7.	//push to vendor/bin/hw/
8.	vendor.hardware.helloworld-service
手动执行./vendor/bin/hw/vendor.hardware.helloworld-service,报错如下:
1.	05-16 10:10:34.484   208   208 E servicemanager: Could not find vendor.hardware.hw.IHelloWorld/default in the VINTF manifest.
2.	05-16 10:10:34.484  4696  4696 F vendor.hardware.helloworld-service: Check failed: status == STATUS_OK
3.	--------- beginning of crash
4.	05-16 10:10:34.484  4696  4696 F libc    : Fatal signal 6 (SIGABRT), code -1 (SI_QUEUE) in tid 4696 (vendor.hardware), pid 4696 (vendor.hardware)
5.	05-16 10:10:34.500  4701  4701 I crash_dump32: obtaining output fd from tombstoned, type: kDebuggerdTombstoneProto
6.	05-16 10:10:34.501   258   258 I tombstoned: received crash request for pid 4696
7.	05-16 10:10:34.501  4701  4701 I crash_dump32: performing dump of process 4696 (target tid = 4696)
8.	05-16 10:10:34.520  4701  4701 F DEBUG   : *** *** *** *** *** *** *** *** *** *** *** *** *** *** *** ***
9.	05-16 10:10:34.520  4701  4701 F DEBUG   : Build fingerprint: 'Xxxxx/xx_evb_xxxx/xx_evb_xxxx:12/SQ1D.220205.004/eng.E00023.20240314.110003:userdebug/release-keys'
10.	05-16 10:10:34.520  4701  4701 F DEBUG   : Revision: '0'
11.	05-16 10:10:34.520  4701  4701 F DEBUG   : ABI: 'arm'
12.	05-16 10:10:34.520  4701  4701 F DEBUG   : Timestamp: 2024-05-16 10:10:34.503272142+0800
13.	05-16 10:10:34.521  4701  4701 F DEBUG   : Process uptime: 0s
14.	05-16 10:10:34.521  4701  4701 F DEBUG   : Cmdline: ./vendor.hardware.helloworld-service
15.	05-16 10:10:34.521  4701  4701 F DEBUG   : pid: 4696, tid: 4696, name: vendor.hardware  >>> ./vendor.hardware.helloworld-service <<<
16.	05-16 10:10:34.521  4701  4701 F DEBUG   : uid: 0
17.	05-16 10:10:34.521  4701  4701 F DEBUG   : signal 6 (SIGABRT), code -1 (SI_QUEUE), fault addr --------
18.	05-16 10:10:34.521  4701  4701 F DEBUG   : Abort message: 'Check failed: status == STATUS_OK '
19.	05-16 10:10:34.521  4701  4701 F DEBUG   :     r0  00000000  r1  00001258  r2  00000006  r3  ffa26c50
20.	05-16 10:10:34.521  4701  4701 F DEBUG   :     r4  ffa26c64  r5  ffa26c48  r6  00001258  r7  0000016b
21.	05-16 10:10:34.521  4701  4701 F DEBUG   :     r8  ffa26c50  r9  ffa26c60  r10 ffa26c80  r11 ffa26c70
22.	05-16 10:10:34.521  4701  4701 F DEBUG   :     ip  00001258  sp  ffa26c20  lr  f41fee69  pc  f41fee7c
23.	05-16 10:10:34.521  4701  4701 F DEBUG   : backtrace:
24.	05-16 10:10:34.521  4701  4701 F DEBUG   :       #00 pc 00038e7c  /apex/com.android.runtime/lib/bionic/libc.so (abort+172) (BuildId: 6fe5d03094b6a4257b4dce75d0d315fe)
25.	05-16 10:10:34.521  4701  4701 F DEBUG   :       #01 pc 000048fb  /system/lib/liblog.so (__android_log_default_aborter+6) (BuildId: 7e7368d7d9eae3d9600145f485b59ddc)
26.	05-16 10:10:34.522  4701  4701 F DEBUG   :       #02 pc 0000ef17  /apex/com.android.vndk.v31/lib/libbase.so (android::base::LogMessage::~LogMessage()+238) (BuildId: 817e26a81d950aec834317a5a87d17db)
27.	05-16 10:10:34.522  4701  4701 F DEBUG   :       #03 pc 000021f5  /vendor/bin/hw/vendor.hardware.helloworld-service (main+360) (BuildId: 7e9de488a3879701621129888c474439)
28.	05-16 10:10:34.522  4701  4701 F DEBUG   :       #04 pc 0003244b  /apex/com.android.runtime/lib/bionic/libc.so (__libc_init+54) (BuildId: 6fe5d03094b6a4257b4dce75d0d315fe)
出现上述问题的根本原因是:未将我们生成的接口添加入兼容性矩阵中。找到vendor自己客制化的兼容性矩阵文件:manifest.xml或compatibility_matrix.xml。
例如:
1.	device/xxxx/common/products/tv/manifest/manifest.xml
2.	或
3.	device/xxxx/yyyy/manifest/compatibility_matrix.xml
4.	device/xxxx/yyyy/manifest/manifest.xml
将如下内容添加到xml文件中:
1.	<!-- device/xxxx/common/products/tv/manifest/manifest.xml -->
2.	    <hal format="aidl">
3.	        <name>vendor.hardware.helloworld</name>
4.	        <version>1</version>
5.	        <interface>
6.	            <name>IHelloWorld</name>
7.	            <instance>default</instance>
8.	        </interface>
9.	    </hal>
整编系统,重新烧写super img。再次运行service即可正常启动。
开机自启动service
创建domain,否则开机不会被init进程启动。
在device/xxxx/common/sepolicy/目录下创建:hal_helloworld_default.te文件,添加内容如下:
1.	//device/xxxx/common/sepolicy/hal_helloworld_default.te
2.	type hal_helloworld_default, domain;
3.	type hal_helloworld_default_exec, exec_type, vendor_file_type, file_type;
4.	init_daemon_domain(hal_helloworld_default)
在file_context文件中添加内容:
1.	//device/xxxx/common/sepolicy/file_contexts
2.	/vendor/bin/hw/vendor\.hardware\.helloworld-service    u:object_r:hal_helloworld_default_exec:s0
整编系统,重新烧写super img。重新启动系统抓取log,检查并解决剩余的selinux问题。Log中会有如下错误:
1.	Line 4765: 08-08 16:08:21.780   353   353 W vendor.hardware: type=1400 audit(0.0:6): avc: denied { call } for scontext=u:r:hal_helloworld_default:s0 tcontext=u:r:servicemanager:s0 tclass=binder permissive=0
2.	Line 4766: 08-08 16:08:21.784   353   353 W vendor.hardware: type=1400 audit(0.0:7): avc: denied { call } for scontext=u:r:hal_helloworld_default:s0 tcontext=u:r:servicemanager:s0 tclass=binder permissive=0
针对上述错误为hal_helloworld_default添加访问规则:
1.	//device/xxxx/common/sepolicy/hal_helloworld_default.te
2.	type hal_helloworld_default, domain;
3.	type hal_helloworld_default_exec, exec_type, vendor_file_type, file_type;
4.	init_daemon_domain(hal_helloworld_default)
5.
6.	allow hal_helloworld_default servicemanager:binder { call };
解决完上述selinux问题后,又会出现其他selinux错误,例如:
1.	Line 5117: 08-08 16:08:21.908   356   356 W vendor.hardware: type=1400 audit(0.0:6): avc: denied { transfer } for scontext=u:r:vendor_helloworld_default:s0 tcontext=u:r:servicemanager:s0 tclass=binder permissive=0
2.	08-08 16:08:21.958   207   207 E SELinux : avc:  denied  { add } for pid=358 uid=0 name=vendor.hardware.hw.IHelloWorld/default scontext=u:r:vendor_helloworld_default:s0 tcontext=u:object_r:default_android_service:s0 tclass=service_manager permissive=0
按部就班继续添加规则即可,最终内容如下:
1.	//device/xxxx/common/sepolicy/hal_helloworld_default.te
2.	hal_attribute(helloworld);
3.
4.	type hal_helloworld_default, domain;
5.	hal_server_domain(hal_helloworld_default, hal_helloworld)
6.
7.	type hal_helloworld_default_exec, exec_type, vendor_file_type, file_type;
8.	init_daemon_domain(hal_helloworld_default)
9.
10.	allow hal_helloworld_default servicemanager:binder { call transfer };
11.	add_service(hal_helloworld_default, hal_helloworld_service);
12.
13.	//device/xxxx/common/sepolicy/file_contexts
14.	/vendor/bin/hw/vendor\.hardware\.helloworld-service     u:object_r:hal_helloworld_default_exec:s0
15.
16.	//device/xxxx/common/sepolicy/service_contexts
17.	vendor.hardware.helloworld.IHelloWorld/default      u:object_r:hal_helloworld_service:s0
18.
19.	//device/xxxx/common/sepolicy/service.te
20.	type hal_helloworld_service, vendor_service, service_manager_type;
整编系统,重新烧写super img,push入系统,可以看到vendor.hardware.helloworld-service已经可以自启动了。
编写测试程序
在目录中分别创建文件:
1.	//vendor/xxxx/proprietary/hardware/interfaces/helloworld/aidl/test
2.	.
3.	├── Android.bp
4.	└── main.cpp
Android.bp内容:
1.	//vendor/xxxx/proprietary/hardware/interfaces/helloworld/aidl/test/Android.bp
2.	cc_binary {
3.	    name: "helloworld-test",
4.	    vendor: true,
5.	    srcs: [
6.	        "main.cpp",
7.	    ],
8.	    shared_libs: [
9.	        "vendor.hardware.helloworld-V1-ndk_platform",
10.	        "libutils",
11.	        "libcutils",
12.	        "liblog",
13.	        "libbase",
14.	        "libbinder_ndk",
15.	    ],
16.	}
main.cpp内容:
1.	//vendor/xxxx/proprietary/hardware/interfaces/helloworld/aidl/test/main.cpp
2.	#include <iostream>
3.
4.	#include <android/binder_manager.h>
5.	#include <android/binder_process.h>
6.	#include <aidl/vendor/hardware/helloworld/IHelloWorld.h>
7.
8.	using aidl::vendor::hardware::helloworld::IHelloWorld;
9.
10.	int main() {
11.	    std::cout << "client: hello world test begin =>" << std::endl;
12.
13.	    std::shared_ptr<IHelloWorld> hello = IHelloWorld::fromBinder(::ndk::SpAIBinder(AServiceManager_getService("vendor.hardware.helloworld.IHelloWorld/default")));
14.	    if (hello == nullptr) {
15.	        std::cout << "client: get service error..." << std::endl;
16.	        return -1;
17.	    }
18.
19.	    std::cout << "client: say 'hello China.'" << std::endl;
20.	    hello->sayWhat("hello China");
21.
22.	    std::cout << "client: hello world test end <=" << std::endl;
23.	    return 0;
24.	}
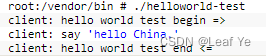
编译测试模块push入系统并执行。
Client shell端口打印如下:
Server的log通过logcat抓取,可以看到:
![]()


 451
451

 被折叠的 条评论
为什么被折叠?
被折叠的 条评论
为什么被折叠?
 到【灌水乐园】发言


