


1、WPF基础简介
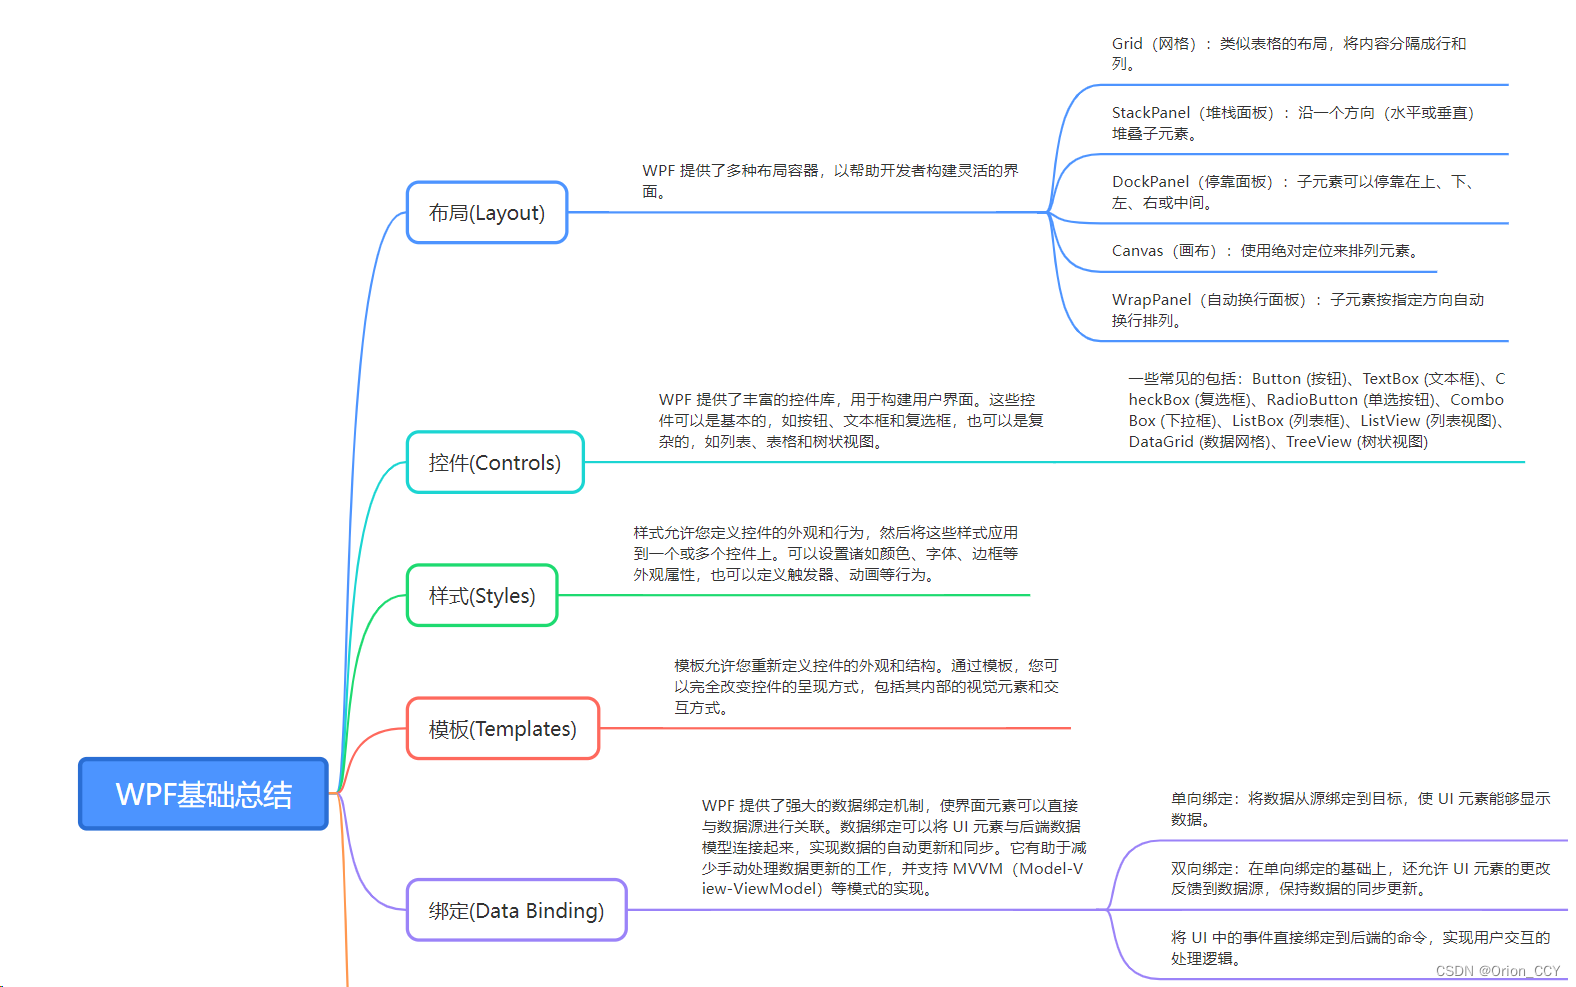
WPF(Windows Presentation Foundation)是微软开发的用于构建 Windows 应用程序的框架。它提供了丰富的图形用户界面(GUI)功能,使开发者能够创建具有高度定制化、现代化外观和丰富交互的应用程序。下图是对WPF概念的简单分类和总结。
为了方便读者尽可能快速的对WPF相关核心概念有一个大致理解,特意制作了以下思维脑图,方便读者阅读、理解。
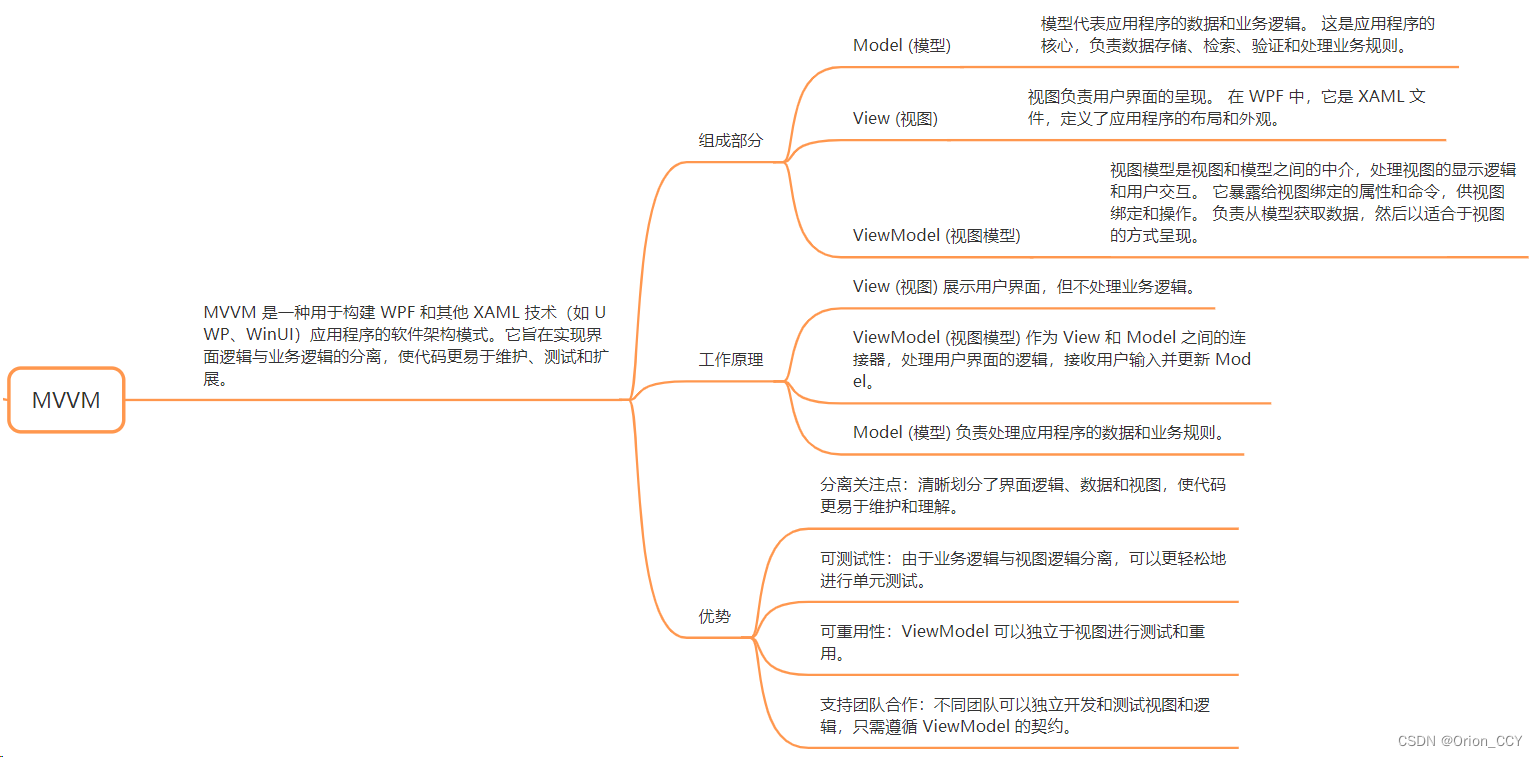
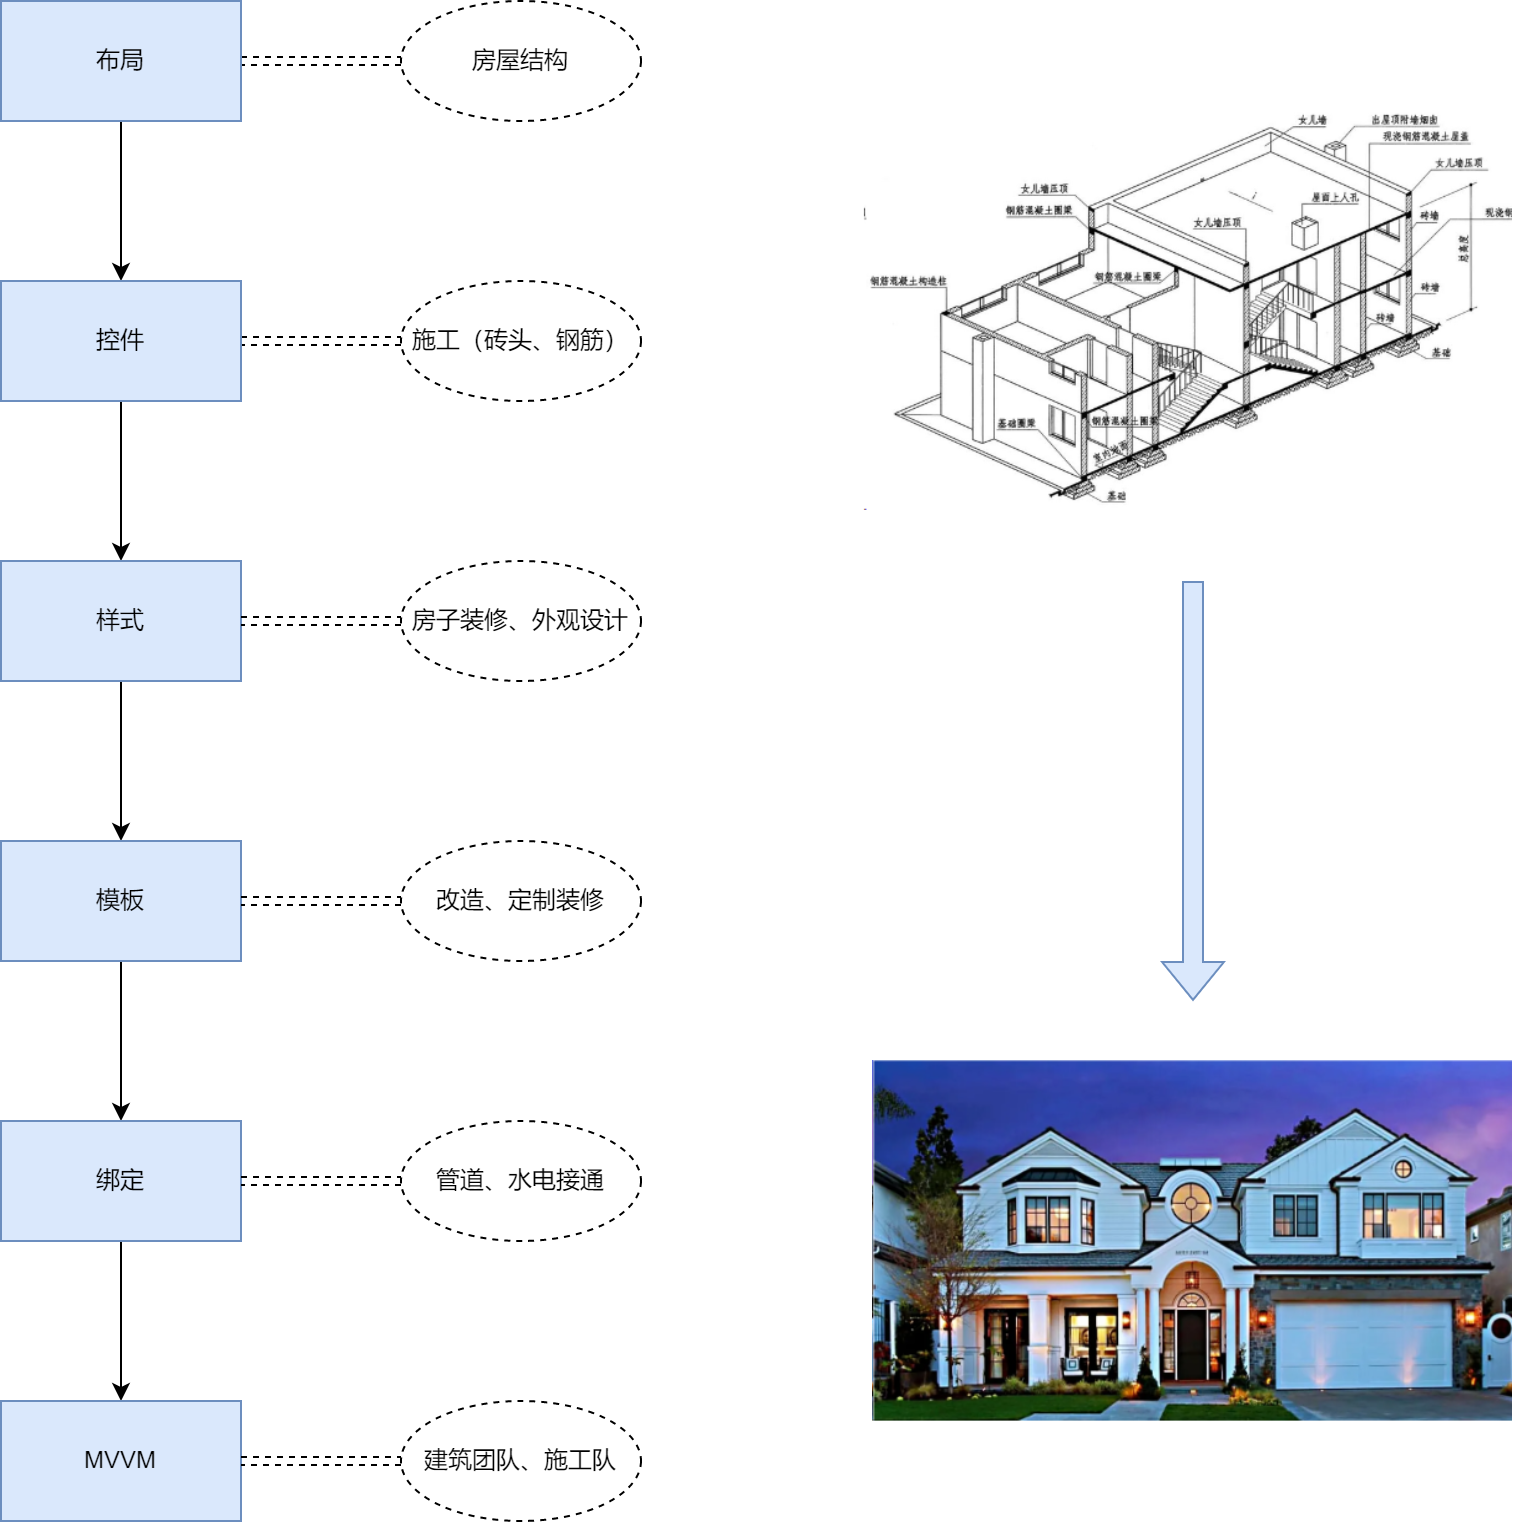
对于初次接触WPF的读者而言,如果您看了上面关于WPF核心概念的思维脑图,仍然对各个概念所扮演的角色产生困惑,不妨看一下下面这幅图的阐释,希望能对您有所帮助。
下图将WPF应用程序的开发比喻为建房子,各个核心概念扮演着各自的角色。
**备注:**如读者需要对WPF控件的相关内容有一个详细的理解请参考博文《WPF学习笔记_01》,链接如https://blog.csdn.net/zeroCCY/article/details/135016286?spm=1001.2014.3001.5501
下面内容将详细讲解WPF样式和模板的相关内容,希望对各位读者有所帮助。
2、WPF样式
WPF(Windows Presentation Foundation)样式是一种定义控件外观的方式,它允许你为应用程序中的控件创建一致的外观和行为。样式可以包含诸如背景、边框、字体、颜色等视觉属性的定义,使得你可以轻松地应用于多个控件,确保整个应用程序具有统一的外观和风格。
为方便读者理解,特举出简单示例代码如下
<Window x:Class="TestWpf01.MainWindow"
        xmlns="http://schemas.microsoft.com/winfx/2006/xaml/presentation"
        xmlns:x="http://schemas.microsoft.com/winfx/2006/xaml"
        xmlns:d="http://schemas.microsoft.com/expression/blend/2008"
        xmlns:mc="http://schemas.openxmlformats.org/markup-compatibility/2006"
        xmlns:local="clr-namespace:TestWpf01"
        mc:Ignorable="d"
        Title="MainWindow" Height="450" Width="800">
    <Window.Resources>
        <Style x:Key="ButtonStyle" TargetType="Button">
            <Setter Property="FontSize" Value="18"></Setter>
            <Setter Property="Foreground" Value="White"></Setter>
            <Setter Property="Background" Value="Red"></Setter>
            <Setter Property="Content" Value="Button1"></Setter>
            <Style.Triggers>
                <!--样式触发器,当鼠标悬停时改变按钮的背景色-->
                <Trigger Property="IsMouseOver" Value="True">
                    <Setter Property="Background" Value="LightGreen"></Setter>
                </Trigger>
            </Style.Triggers>

        </Style>

    </Window.Resources>
    <Grid>
        <StackPanel>
            <Button Style="{StaticResource ButtonStyle}" ></Button>
            <Button Style="{StaticResource ButtonStyle}" Content="Button2"></Button>
            <Button Style="{StaticResource ButtonStyle}" Content="Button3"></Button>

        </StackPanel>

    </Grid>
</Window>
其中:
(1)Key 属性:
x:Key 属性用于为样式定义一个唯一的键。这个键可以用于在其他控件中引用这个样式。
(2)TargetType 属性:
TargetType 属性指定了这个样式所适用的控件类型。在上面的例子中,TargetType=“Button” 表示这个样式适用于 Button 控件。
(3)Setter 元素:
Setter 元素用于定义控件的属性以及属性的值。在上面的例子中,通过 Setter 元素设置了 Button 的前景色、背景色和字体大小。
(4)应用样式:
要将样式应用于控件,可以使用 Style 属性和 StaticResource 引用定义好的样式:
(5)触发器:
样式也可以包含触发器,根据控件的不同状态改变外观。例如,鼠标悬停或按下按钮时的样式变化。
(6)控件模板:
除了属性外,样式还可以包含控件模板(Template),用于定义控件的外观和布局。
总的来说,WPF 样式为开发者提供了一种方便的方式来定义和管理控件的外观,使得应用程序的界面更易于维护和统一。
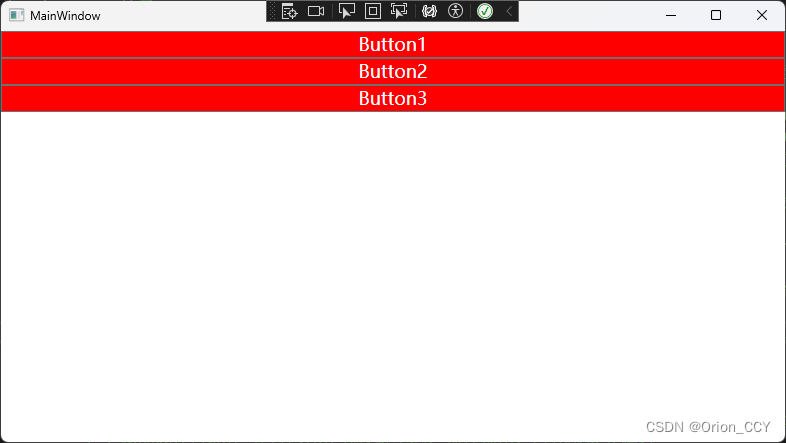
鼠标放置在Button2上面就会呈现下图所示窗口

在这个例子中,当鼠标悬停在按钮上时,触发器会检测按钮的 IsMouseOver 属性,如果为 True,则会应用触发器中定义的属性变化,即改变按钮的背景色为 LightGreen。当鼠标移出按钮区域时,背景色会恢复为初始值Red。
3、WPF模板
在 WPF 中,模板是一种强大的工具,用于自定义控件的外观和行为。WPF 提供了两种主要类型的模板:控件模板(ControlTemplate)和数据模板(DataTemplate)。
3.1 控件模板
控件模板允许您重新定义控件的外观和行为,包括控件的视觉元素和交互方式。使用控件模板,可以完全改变控件的外观,使其呈现出自定义的视觉效果。
结构和组成部分:
(1)TargetType:指定模板要应用的控件类型。
(2)Visual Tree:控件模板通常由嵌套的 XAML 元素组成,用于构建控件的视觉结构。
(3)触发器(Triggers):允许在特定条件下更改控件的外观。
为方便读者理解,特举出简单示例代码如下:
<Window x:Class="TestWpf02_Templates.MainWindow"
xmlns="http://schemas.microsoft.com/winfx/2006/xaml/presentation"
xmlns:x="http://schemas.microsoft.com/winfx/2006/xaml"
xmlns:d="http://schemas.microsoft.com/expression/blend/2008"
xmlns:mc="http://schemas.openxmlformats.org/markup-compatibility/2006"
xmlns:local="clr-namespace:TestWpf02_Templates"
mc:Ignorable="d"
Title="MainWindow" Height="450" Width="800">
<Window.Resources>
<ControlTemplate x:Key="CustomButtonTemplate" TargetType="Button">
<Border x:Name="Border" Background="LightGreen" BorderBrush="DarkBlue" BorderThickness="2" CornerRadius="5">
<TextBlock Text="{TemplateBinding Content}" HorizontalAlignment="Center" VerticalAlignment="Center" Foreground="White" FontSize="14"></TextBlock>
</Border>
<ControlTemplate.Triggers>
<Trigger Property="IsMouseOver" Value="True">
<Setter TargetName="Border" Property="Background" Value="Red"></Setter>
</Trigger>
<Trigger Property="IsPressed" Value="True">
<Setter TargetName="Border" Property="Background" Value="Bisque"></Setter>
</Trigger>
</ControlTemplate.Triggers>
</ControlTemplate>
</Window.Resources>
<Grid>
<StackPanel Background="Gray" Margin="10,10,10,10">
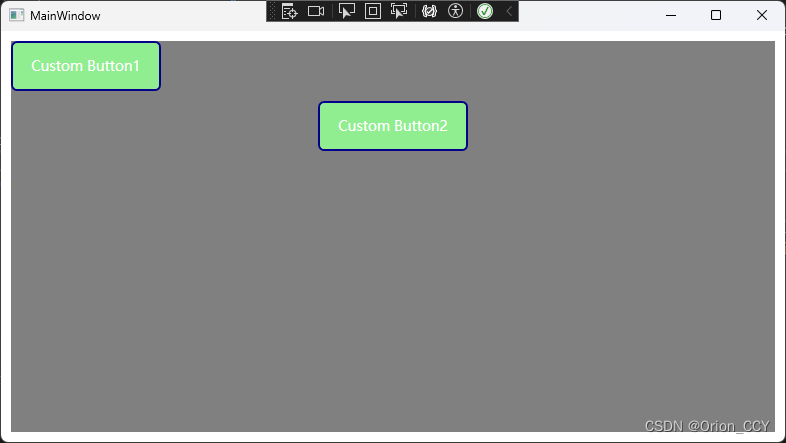
<Button Content="Custom Button1" Template="{StaticResource CustomButtonTemplate}" Width="150" Height="50" HorizontalAlignment="Left"></Button>
<Button Margin="10,10,10,10" Content="Custom Button2" Template="{StaticResource CustomButtonTemplate}" Width="150" Height="50" ></Button>
</StackPanel>
</Grid>
</Window>
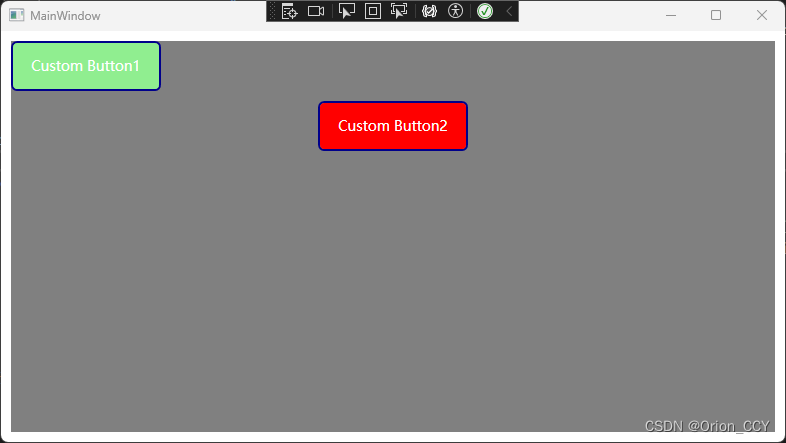
此示例中,CustomButtonTemplate 是一个自定义按钮的控件模板。它使用 Border 和 TextBlock 元素来定义按钮的外观,并使用触发器定义鼠标悬停和按下时的不同样式。
鼠标放在Button2上悬停结果展示如下
3.2 数据模板
数据模板用于定义数据的呈现方式,通常在控件(如列表框或表格)中用于显示数据项的外观。数据模板定义了如何呈现特定类型的数据。
为方便理解,下面举出应用数据模板的示例并详细解释整个过程。详细步骤及过程如下:
第一步:定义数据模型
定义了一个简单的数据模型 Person,它具有 Name 和 Age 属性,并实现了 INotifyPropertyChanged 接口,以便在属性更改时通知界面更新。
using System;
using System.Collections.Generic;
using System.ComponentModel;
using System.Linq;
using System.Text;
using System.Threading.Tasks;

namespace TestWpf02_DataTemplate
{
    public class Person: INotifyPropertyChanged
    {
        private string name;
        private int age;

        public string Name
        {
            get { return name; }
            set
            {
                name = value;
                OnPropertyChanged("Name");
            }
        }

        public int Age
        {
            get { return age; }
            set
            {
                age = value;
                OnPropertyChanged("Age");
            }
        }

        public event PropertyChangedEventHandler PropertyChanged;
        protected void OnPropertyChanged(string propertyName)
        {
            PropertyChanged?.Invoke(this, new PropertyChangedEventArgs(propertyName));
        }
    }

}
对Person类部分代码作出如下解释:
        public event PropertyChangedEventHandler PropertyChanged;

        protected void OnPropertyChanged(string propertyName)
        {
            PropertyChanged?.Invoke(this, new PropertyChangedEventArgs(propertyName));
        }
这段代码实际上是用于实现 INotifyPropertyChanged 接口的一部分,该接口用于通知界面或其他部分,特定属性的值已更改,从而触发相应的更新操作。
(1)“PropertyChanged ”事件是 INotifyPropertyChanged 接口的一部分。当属性值更改时,类会触发此事件。
(2)“OnPropertyChanged” 方法用于触发 PropertyChanged 事件。通常情况下,此方法会在属性的 setter 中被调用,以便在属性更改时通知任何监听者。
(3)“Invoke(this, new PropertyChangedEventArgs(propertyName)) ”行通过触发事件,并传递属性名称来告知任何订阅了此事件的对象,特定属性的值已经更改。
(4)“PropertyChanged?. ”这部分是 null 条件运算符,确保在事件未被订阅的情况下不会导致空引用异常。如果 PropertyChanged 事件有订阅者,则调用 Invoke 方法通知这些订阅者属性值已更改。
在实际编码中,当需要在属性更改时通知相关组件或界面进行更新时,这段代码通常用于实现数据绑定和响应式 UI 更新。
第二步:创建 XAML 界面
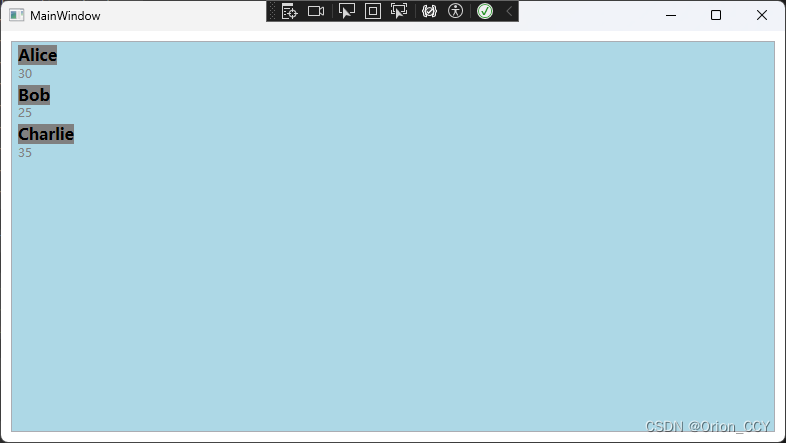
在 XAML 文件中创建了 MainWindow 窗口,并放置了一个 ListBox 控件。该 ListBox 用于显示 Person 对象的集合,其数据源绑定到 People 属性。
在 ListBox 中使用了 ItemTemplate,这是数据模板的一部分,用于定义如何呈现每个 Person 对象。在这个示例中,ItemTemplate 是一个简单的 StackPanel,包含两个 TextBlock 控件,分别显示人员的姓名和年龄。
<Window x:Class="TestWpf02_DataTemplate.MainWindow"
        xmlns="http://schemas.microsoft.com/winfx/2006/xaml/presentation"
        xmlns:x="http://schemas.microsoft.com/winfx/2006/xaml"
        xmlns:d="http://schemas.microsoft.com/expression/blend/2008"
        xmlns:mc="http://schemas.openxmlformats.org/markup-compatibility/2006"
        xmlns:local="clr-namespace:TestWpf02_DataTemplate"
        mc:Ignorable="d"
        Title="MainWindow" Height="450" Width="800">

    <Grid>
        <ListBox ItemsSource="{Binding People}" Margin="10" Background="LightBlue">
            <ListBox.ItemTemplate>
                <DataTemplate>
                    <StackPanel >
                        <TextBlock Text="{Binding Name}" FontWeight="Bold" FontSize="16" Background="Gray"/>
                        <TextBlock Text="{Binding Age}" Foreground="Gray"/>
                    </StackPanel>
                </DataTemplate>
            </ListBox.ItemTemplate>
        </ListBox>

    </Grid>
</Window>
第三步:连接数据模型和数据源
在 MainWindow.xaml.cs 中,MainWindow 类的构造函数初始化了一个 ObservableCollection 类型的 People 属性,并为其添加了几个 Person 对象作为示例数据。
通过设置窗口的 DataContext 属性为 this,将 MainWindow 作为数据上下文,从而使 XAML 中的数据绑定能够访问到窗口的属性和数据。
using System;
using System.Collections.Generic;
using System.Collections.ObjectModel;
using System.Linq;
using System.Text;
using System.Threading.Tasks;
using System.Windows;
using System.Windows.Controls;
using System.Windows.Data;
using System.Windows.Documents;
using System.Windows.Input;
using System.Windows.Media;
using System.Windows.Media.Imaging;
using System.Windows.Navigation;
using System.Windows.Shapes;

namespace TestWpf02_DataTemplate
{
    /// <summary>
    /// Interaction logic for MainWindow.xaml
    /// </summary>
    public partial class MainWindow : Window
    {
        public ObservableCollection<Person> People { get; set; }
        public MainWindow()
        {
            InitializeComponent();

            DataContext = this;

            // 假设在窗口加载时初始化数据源
            People = new ObservableCollection<Person>
            {
                new Person { Name = "Alice", Age = 30},
                new Person { Name = "Bob", Age = 25 },
                new Person { Name = "Charlie", Age = 35 }
            };
        }
    }
}
实现结果如下:
4、扩展(WPF实战)
如果您已经看到这里,恭喜您已经对WPF有了初步的理解与学习,为了进一步巩固,可以在上面基础上尝试设计如下操作界面:
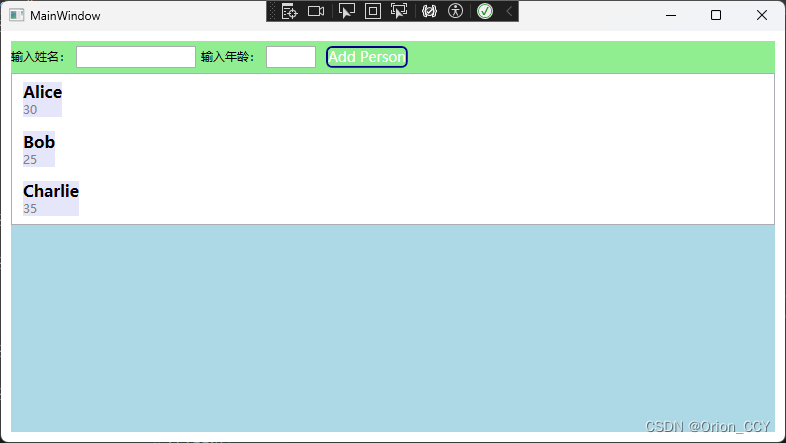
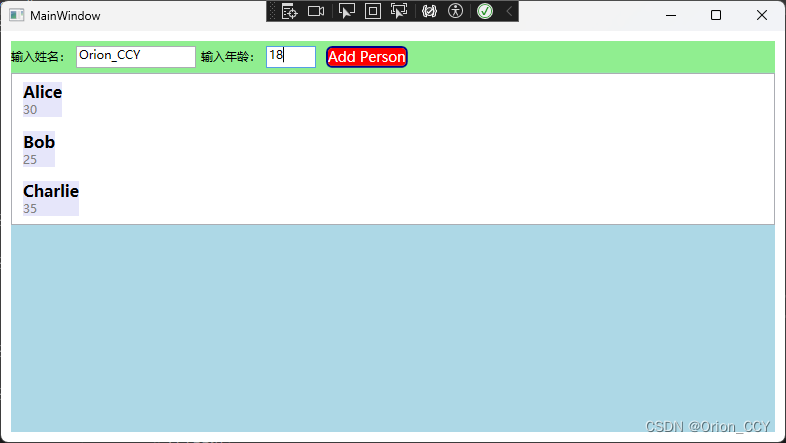
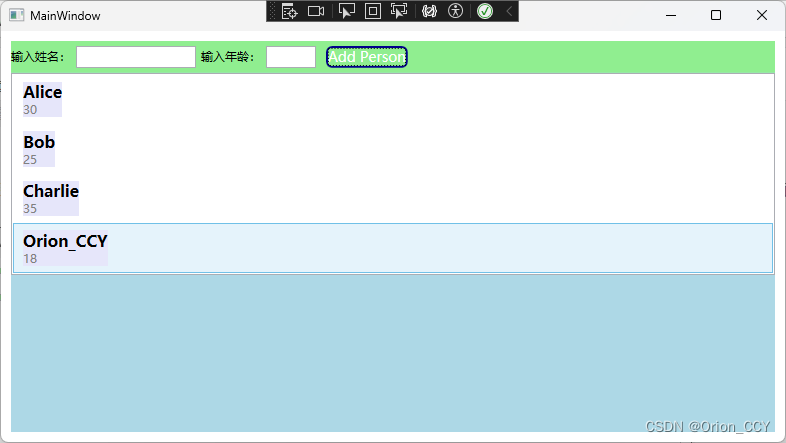
如果你顺利的实现了如上界面及相应功能,恭喜你,对于WPF应用程序设计,可以十分肯定的说,你入门了!!!
前路任重道远,让学习成为一种态度!!!(与君共勉)
最后。如果你实现起来确实有些困难,特附上完整代码供您参考,希望能对你的WPF学习有所帮助。
XAML文件:
<Window x:Class="TestWpf02_DataTemplate.MainWindow"
        xmlns="http://schemas.microsoft.com/winfx/2006/xaml/presentation"
        xmlns:x="http://schemas.microsoft.com/winfx/2006/xaml"
        xmlns:d="http://schemas.microsoft.com/expression/blend/2008"
        xmlns:mc="http://schemas.openxmlformats.org/markup-compatibility/2006"
        xmlns:local="clr-namespace:TestWpf02_DataTemplate"
        mc:Ignorable="d"
        Title="MainWindow" Height="450" Width="800">

    <Window.Resources>

        <Style x:Key="TextBlockStyle" TargetType="TextBlock">
            <Setter Property="Background" Value="Lavender"></Setter>
            <Style.Triggers>
                <!--样式触发器,当鼠标悬停时改变按钮的背景色-->
                <Trigger Property="IsMouseOver" Value="True">
                    <Setter Property="Background" Value="LightGreen"></Setter>
                </Trigger>
            </Style.Triggers>
        </Style>

        <ControlTemplate x:Key="CustomButtonTemplate" TargetType="Button">
            <Border x:Name="Border" Background="LightGreen" BorderBrush="DarkBlue" BorderThickness="2" CornerRadius="5">
                <TextBlock Text="{TemplateBinding Content}" HorizontalAlignment="Center" VerticalAlignment="Center" Foreground="White" FontSize="14"></TextBlock>
            </Border>
            <ControlTemplate.Triggers>
                <Trigger Property="IsMouseOver" Value="True">
                    <Setter TargetName="Border"  Property="Background" Value="Red"></Setter>
                </Trigger>
                <Trigger Property="IsPressed" Value="True">
                    <Setter TargetName="Border" Property="Background" Value="Bisque"></Setter>
                </Trigger>
            </ControlTemplate.Triggers>

        </ControlTemplate>
    </Window.Resources>

    <Grid>
        <StackPanel Margin="10" Background="LightBlue">
            <StackPanel Orientation="Horizontal" Background="LightGreen" VerticalAlignment="Center">
                <TextBlock Text="输入姓名:"  VerticalAlignment="Center"></TextBlock>
                <TextBox x:Name="txtName" Width="120" Margin="5"  />
                <TextBlock Text="输入年龄:" VerticalAlignment="Center"></TextBlock>
                <TextBox x:Name="txtAge" Width="50" Margin="5" />
                <Button Content="Add Person" Click="AddPerson_Click" Margin="5" Template="{StaticResource CustomButtonTemplate}"/>
            </StackPanel>

            <ListBox ItemsSource="{Binding People}">
                <ListBox.ItemTemplate>
                    <DataTemplate>
                        <StackPanel Margin="5">
                            <TextBlock Text="{Binding Name}" FontWeight="Bold" FontSize="16" Style="{StaticResource TextBlockStyle}"/>
                            <TextBlock Text="{Binding Age}" Foreground="Gray" Style="{StaticResource TextBlockStyle}" />
                        </StackPanel>
                    </DataTemplate>
                </ListBox.ItemTemplate>
            </ListBox>
        </StackPanel>

    </Grid>
</Window>
MainWindow.xaml.cs
using System;
using System.Collections.Generic;
using System.Collections.ObjectModel;
using System.Linq;
using System.Text;
using System.Threading.Tasks;
using System.Windows;
using System.Windows.Controls;
using System.Windows.Data;
using System.Windows.Documents;
using System.Windows.Input;
using System.Windows.Media;
using System.Windows.Media.Imaging;
using System.Windows.Navigation;
using System.Windows.Shapes;

namespace TestWpf02_DataTemplate
{
    /// <summary>
    /// Interaction logic for MainWindow.xaml
    /// </summary>
    public partial class MainWindow : Window
    {
        /// <summary>
        /// // ObservableCollection 用于实时更新数据
        /// </summary>
        public ObservableCollection<Person> People { get; set; }

        public MainWindow()
        {
            InitializeComponent();

            DataContext = this;

            // 假设在窗口加载时初始化数据源
            People = new ObservableCollection<Person>
            {
                new Person { Name = "Alice", Age = 30},
                new Person { Name = "Bob", Age = 25 },
                new Person { Name = "Charlie", Age = 35 }
            };
        }

        // ObservableCollection 用于实时更新数据


        // 添加新 Person 对象到数据源中
        private void AddPerson_Click(object sender, RoutedEventArgs e)
        {
            if (!string.IsNullOrEmpty(txtName.Text) && int.TryParse(txtAge.Text, out int age))
            {
                People.Add(new Person { Name = txtName.Text, Age = age });
                txtName.Text = ""; // 清空输入框
                txtAge.Text = "";
            }
            else
            {
                MessageBox.Show("Please enter valid Name and Age.");
            }
        }
    }
}
Person.cs
using System;
using System.Collections.Generic;
using System.ComponentModel;
using System.Linq;
using System.Text;
using System.Threading.Tasks;

namespace TestWpf02_DataTemplate
{
    public class Person: INotifyPropertyChanged
    {
        private string name;
        private int age;

        public string Name
        {
            get { return name; }
            set
            {
                name = value;
                OnPropertyChanged("Name");
            }
        }

        public int Age
        {
            get { return age; }
            set
            {
                age = value;
                OnPropertyChanged("Age");
            }
        }


        public event PropertyChangedEventHandler PropertyChanged;

        protected void OnPropertyChanged(string propertyName)
        {
            PropertyChanged?.Invoke(this, new PropertyChangedEventArgs(propertyName));
        }
    }


}


 3094
3094

 被折叠的 条评论
为什么被折叠?
被折叠的 条评论
为什么被折叠?
 到【灌水乐园】发言


