


在使用TabHost实现底部导航栏时,底部导航栏的三个导航按钮无法在布局文件里进行定制,比如设置点击时的颜色、字体的大小及颜色等,这里提供了一个解决办法,就是在代码里进行定制。
思路是在Activity里给TabHost添加了分页后,在给导航栏TabWidget的导航按钮逐个添加特效(必须先添加分页,然后才能定制按钮,添加了一个分页,才会生成一个按钮)。
下面是布局文件activity_main.xml,包含了TabHost,里面有三个只显示了文字的分页
<RelativeLayout xmlns:android="http://schemas.android.com/apk/res/android"
    xmlns:tools="http://schemas.android.com/tools"
    android:id="@+id/container"
    android:layout_width="match_parent"
    android:layout_height="wrap_content"
    android:orientation="vertical"
    tools:context="com.plan.MainActivity"
    tools:ignore="MergeRootFrame" >

    <TabHost
        android:id="@android:id/tabhost"
        android:layout_width="fill_parent"
        android:layout_height="fill_parent"
        android:layout_alignParentLeft="true"
        android:layout_alignParentTop="true" >

        <LinearLayout
            android:layout_width="match_parent"
            android:layout_height="fill_parent"
            android:orientation="vertical" >

            <FrameLayout
                android:id="@android:id/tabcontent"
                android:layout_width="match_parent"
                android:layout_height="fill_parent"
                android:layout_weight="0.8" >

                <LinearLayout
                    android:id="@+id/tab1"
                    android:layout_width="match_parent"
                    android:layout_height="match_parent"
                    android:orientation="vertical" >

                    <TextView
                        android:id="@+id/textView1"
                        android:layout_width="wrap_content"
                        android:layout_height="wrap_content"
                        android:text="tab1" />

                </LinearLayout>

                <LinearLayout
                    android:id="@+id/tab2"
                    android:layout_width="match_parent"
                    android:layout_height="match_parent"
                    android:orientation="vertical" >
                    <TextView
                        android:id="@+id/textView2"
                        android:layout_width="wrap_content"
                        android:layout_height="wrap_content"
                        android:text="tab2" />
                </LinearLayout>

                <LinearLayout
                    android:id="@+id/tab3"
                    android:layout_width="match_parent"
                    android:layout_height="match_parent"
                    android:orientation="vertical" >
                    <TextView
                        android:id="@+id/textView3"
                        android:layout_width="wrap_content"
                        android:layout_height="wrap_content"
                        android:text="tab3" />
                </LinearLayout>
            </FrameLayout>

            <TabWidget
                android:id="@android:id/tabs"
                android:layout_width="match_parent"
                android:layout_height="wrap_content" >
            </TabWidget>
        </LinearLayout>
    </TabHost>

</RelativeLayout>
下面是MainActivity里的代码:
package com.aiplan_03;

import android.app.ActivityGroup;
import android.graphics.Color;
import android.os.Bundle;
import android.util.Log;
import android.widget.TabHost;
import android.widget.TabWidget;
import android.widget.TextView;

public class MainActivity extends ActivityGroup {

    TabHost mTabHost = null;
    TabWidget mTabWidget = null;        //TabWidget控件
    @Override
    protected void onCreate(Bundle savedInstanceState) {
        super.onCreate(savedInstanceState);
        setContentView(R.layout.activity_main);
         mTabHost = (TabHost) findViewById(android.R.id.tabhost);
         mTabHost.setup(this.getLocalActivityManager());
         //获取导航按钮控件
         mTabWidget = mTabHost.getTabWidget();
         //添加分页1
         mTabHost.addTab(mTabHost.newTabSpec("button1").setContent(
                    R.id.tab1).setIndicator("btn1"));
         //添加分页2
         mTabHost.addTab(mTabHost.newTabSpec("button2").setContent(
                    R.id.tab2).setIndicator("btn2"));
         //添加分页3
         mTabHost.addTab(mTabHost.newTabSpec("button3").setContent(
                    R.id.tab3).setIndicator("btn3"));
         Log.d("按钮数",Integer.toString(mTabWidget.getChildCount()));
         //逐个按钮添加特效
         for(int i=0;i<mTabWidget.getChildCount();i++){
             //换字体颜色
             TextView tv = (TextView)
                     mTabWidget.getChildAt(i).findViewById(android.R.id.title);
             tv.setTextColor(Color.rgb(255, 255, 255));
             //设置背景图
             mTabWidget.getChildAt(i).setBackgroundResource(
                     R.drawable.tabwidget_selector);
         }

    }
}
把导航按钮的字体换成了白色,给导航按钮的背景添加了一个selector选择器,下面是选择器代码:
tabwidget_selector.xml,需放到drawable文件夹下
<?xml version="1.0" encoding="utf-8"?>
<selector xmlns:android="http://schemas.android.com/apk/res/android" >
    <item
    android:state_selected="false"
    android:drawable="@color/tabwidget_unselected"
     />
    <item
    android:state_selected="true"
    android:drawable="@color/tabwidget_selected" />

</selector>
里面用到了两个颜色,下面是color.xml,需放到values文件夹下
<resources xmlns:android="http://schemas.android.com/apk/res/android">
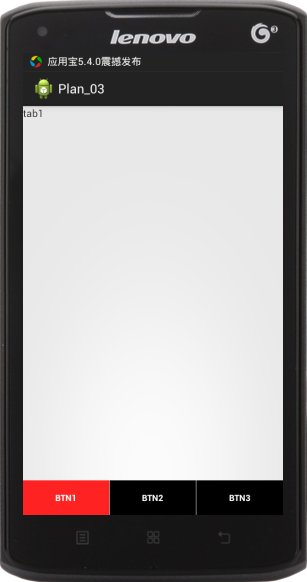
<color name="tabwidget_selected">#ff2222</color>
<color name="tabwidget_unselected">#000000</color>
</resources>最后的效果图如下:


 1346
1346

 被折叠的 条评论
为什么被折叠?
被折叠的 条评论
为什么被折叠?
 到【灌水乐园】发言


