


通过上面4篇LoaderManager的学习,我们可能已经熟悉了LoaderManager。可能第四篇学习时,我们会感觉好有点小吃力。
所以我们现在从最基础的Demo练习。先不自定义Loader,先实现一个简单的小Demo。
##通过Fragment加载通讯录中所有人
因为好长时间没用过Fragment了,今天重新练练Fragment。
###1、自定义Fragment
//CursorLoaderFragment实现LoaderManager.LoaderCallbacks<Cursor>接口
public class CursorLoaderFragment extends Fragment implements LoaderManager.LoaderCallbacks<Cursor>{

	private static final int LOADER_ID = 100;
	private LoaderManager lm;
	private SimpleCursorAdapter adapter;
	private List<String> datas = null;
	private String[] from;
	private int[] to;
	@Override
	//在onCreate中初始化我们需要用到的数据
	public void onCreate(Bundle savedInstanceState) {
		// TODO Auto-generated method stub
		super.onCreate(savedInstanceState);
		lm = getActivity().getLoaderManager();
		lm.initLoader(LOADER_ID, null, this);
		from = new String[] {ContactsContract.Contacts.DISPLAY_NAME};
		to = new int[]{R.id.data};
		//在这里我们先把Cursor为null
		adapter = new SimpleCursorAdapter(getActivity(), R.layout.simplecursor, null, from, to, 0);
	}

	//在onCreateView中加载自定义的Fragment的View只显示名字的ListView
	@Override
	public View onCreateView(LayoutInflater inflater, ViewGroup container,
			Bundle savedInstanceState) {
		View view = inflater.inflate(R.layout.fragment_listview, null);
		ListView listView = (ListView) view.findViewById(R.id.listview);
		listView.setAdapter(adapter);
		return view;
	}

	@Override
	public void onDestroy() {
		// TODO Auto-generated method stub
		super.onDestroy();
		lm.destroyLoader(LOADER_ID);
	}

	@Override
	//LoaderManager将会在它第一次创建Loader的时候调用该方法
	public Loader<Cursor> onCreateLoader(int id, Bundle args) {
		// TODO Auto-generated method stub
		String[] projection = {ContactsContract.Contacts._ID,ContactsContract.Contacts.DISPLAY_NAME};
		return new CursorLoader(getActivity(), ContactsContract.Contacts.CONTENT_URI, projection,
				null, null, null);
	}

	@Override
	//Loader创建完毕将自动调用
	public void onLoadFinished(Loader<Cursor> loader, Cursor data) {
		// TODO Auto-generated method stub
		if(LOADER_ID == loader.getId()){
			//SimpleCursorAdapter中把之前的OldCursor(null)交换为现在的data
			adapter.swapCursor(data);
		}
	}

	@Override
	//当Loader中的数据被重置时,将被调用。
	public void onLoaderReset(Loader<Cursor> loader) {
		// TODO Auto-generated method stub
		//数据被重置时,将Cursor置为null
		adapter.swapCursor(null);
	}
}
###2、Fragment的布局
<?xml version="1.0" encoding="utf-8"?>
<LinearLayout xmlns:android="http://schemas.android.com/apk/res/android"
    android:layout_width="match_parent"
    android:layout_height="match_parent"
    android:orientation="vertical" >
    <ListView
        android:layout_width="match_parent"
        android:layout_height="match_parent"
        android:id="@+id/listview"
        />
</LinearLayout>
###3、Adapter中添加的布局
<?xml version="1.0" encoding="utf-8"?>
<LinearLayout xmlns:android="http://schemas.android.com/apk/res/android"
    android:layout_width="match_parent"
    android:layout_height="match_parent"
    android:orientation="vertical" >
    <TextView
        android:layout_width="match_parent"
        android:layout_height="wrap_content"
        android:id="@+id/data"
        />

</LinearLayout>
###4、Activity布局
<LinearLayout xmlns:android="http://schemas.android.com/apk/res/android"
    xmlns:tools="http://schemas.android.com/tools"
    android:layout_width="match_parent"
    android:layout_height="match_parent"
    android:orientation="vertical"
    >
	<FrameLayout
	    android:layout_width="match_parent"
	    android:layout_height="match_parent"
	    android:id="@+id/content"
	    />

</LinearLayout>
###5、Activity
public class MainActivity extends Activity {

	private static final String TAG = "LOADER";
	private FragmentManager fragmentManager;
	private Fragment fragment;
	@Override
	protected void onCreate(Bundle savedInstanceState) {
		super.onCreate(savedInstanceState);
		setContentView(R.layout.activity_main);
		fragmentManager = getFragmentManager();
		fragment = new CursorLoaderFragment();
		fragmentManager.beginTransaction().replace(R.id.content, fragment, TAG).commit();
	}
}
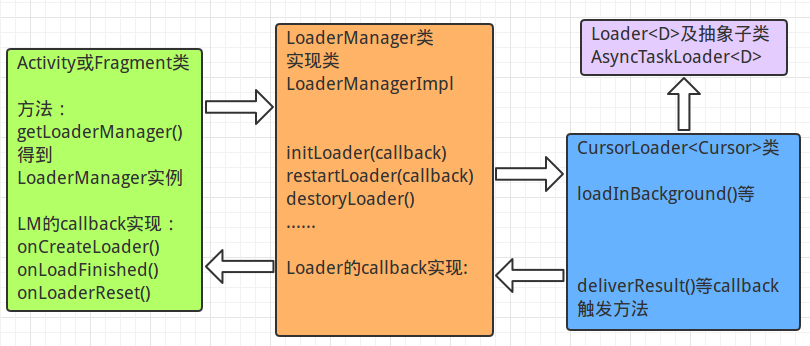
通过上面的实例分析用一张图来介绍Activity/Fragment与LoaderManager、LoaderManager与Loader之间的关系:
###下面我们将从源码的角度来分析Activity/Fragment是如何通过生命周期来管理Cursor。


 567
567

 被折叠的 条评论
为什么被折叠?
被折叠的 条评论
为什么被折叠?
 到【灌水乐园】发言


