Command 命令模式,将一个请求封装为一个对象,从而使你可用不同的请求对客户进行参数化;对请求排除或记录请求日志,以及支持可撤消的操作。也称为动作(Action),事务(Transaction)。
命令模式是通过将请求本身变成一个对象来使工具箱对象可向未指定的应用对象提出请求。这个对象可被存储并像其它对象一样被传递。这一模式的关键是一个抽象的 Command 类,它定义了一个执行操作的接口。其最简单的形式是一个抽象的 Execute 操作。具体的 Command 子类将接收者作为一个实例变量,并实现 Execute 操作,指定接收者采用的动作。而接收者有执行该请求所需的具体信息。
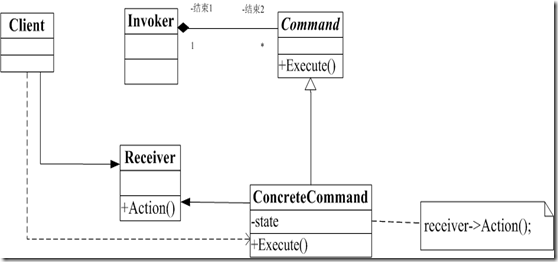
Command 命令模式的通用结构如下:
Command 模式中,将请求的接收者(处理者)放到 Command 具体子类 ConcreteCommand 中,当请求到来时(Invoker 发出 Invoke 消息激活 Command),ConcreteCommand 将处理请求交给 Receiver 对象进行处理。
参与者:
Command:声明执行操作的接口。
ConcreteCommand:将一个接收者相应的操作绑定于一个动作。调用接收者相应的操作,以实现 Execute。
Client:创建一个具体命令对象并设定它的接收者。
Invoker:要求该命令执行这个请求。
Receiver:知道如何实施与执行一个请求相关的操作。任何类都可能作为一个接收者。
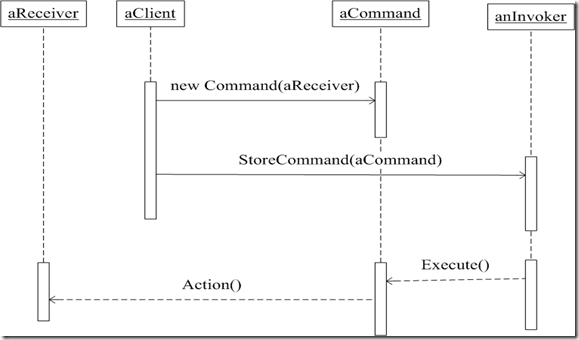
Client 创建一个 ConcreteCommand 对象并指定它的 Receiver 对象。某 Invoker 对象存储该 ConcreteCommand 对象。该 Invoker 通过调用 Command 对象的 Execute 操作来提交一个请求。若该命令是可撤消的,ConcreteCommand就在执行 Execute 操作之前存储当前状态以用于取消该命令。ConcreteCommand 对象对调用它的 Receiver 的一些操作以执行该请求。
如下序列图展示了这些对象间的交互:
Command 模式将调用操作的对象与知道如何实现该操作的对象解耦。Command 是头等的对象。它们可以像其它的对象一样被操纵和扩展。你可以将多个命令装配成一个复合命令,一般来说,复合命令是 Composite 模式的一个实例。增加新的 Command 很容易,因为这无需改变已有的类。
实现 Command 模式时应注意:
1.一个命令对象应达到何种智能程度,一个极端是它仅确定一个接收者和执行该请求的动作。另一个极端是它自己实现所有功能,根本不需额外的接收者对象。
2.支持取消和重做,这时 ConcreteCommand 类可能需要存储额外的状态信息,包括:1)接收者对象,它真正执行处理该请求的各操作。2)接收者上执行操作的参数。3)如果处理请求的操作会改变接收者对象中的某些值,那么这些值必须先存储起来,接收者还必须提供一些操作,以使该命令可将接收者恢复到它先前的状态。若应用只支持一次取消操作,那么只需要存储最近一次执行的命令。而若要支持多级的取消和重做,就需要有一个已被执行命令的历史列表(history list)。
3.避免取消操作过程中的错误积累,这里可以使用 Memento 模式来让该 Command 访问这些信息而不暴露其它对象的内部信息。
4.使用 C++ 模板,对(1)不能被取消(2)不需要参数的命令,我们可以使用 C++ 模板来实现,这样可以避免为每一种动作和接收者都创建一个 Command 子类。
Command 命令模式代码示例:
1: #pragma once
2: #include <iostream>
3: #include <list>
4: #include <algorithm>
5:
6: // 抽象的 Command 类是这一模式的关键,它定义了一个执行操作的接口
7: // 最简单的形式是一个抽象的 Execute 操作
8: // 具体的 Command 类(子类 ConcreteCommand)将接收者作为其一个实例变量,
9: // 并实现 Execute 操作,指定接收者采取的动作。而接收者有执行请求所需的具体信息
10: class Command
11: {
12: public:
13: virtual ~Command() {}
14:
15: virtual void Execute() = 0;
16: };
17:
18: //接收者,知道如何实施与执行一个请求相关的操作
19: //任何类都可能作为一个接收者
20: class Receiver
21: {
22: public:
23: virtual void Action()
24: {
25: std::cout << "Receiver Action!" << std::endl;
26: }
27: };
28:
29: //Invoker 要求该命令执行这个请求
30: class Invoker
31: {
32: public:
33: Invoker(Command *pCommand)
34: : m_pCommand(pCommand){ }
35:
36: ~Invoker()
37: {
38: delete m_pCommand;
39: m_pCommand = NULL;
40: }
41:
42: void Invoke()
43: {
44: if (NULL != m_pCommand)
45: {
46: m_pCommand->Execute();
47: }
48: }
49: private:
50: Command *m_pCommand;
51: };
52:
53: //具体的 Command 子类,将一个接收者绑定于一个动作
54: //调用接收者相应的操作,以实现 Execute.
55: class ConcreateComand : public Command
56: {
57: public:
58: ConcreateComand(Receiver* pReceiver)
59: : m_pReceiver(pReceiver){ }
60:
61: virtual ~ConcreateComand()
62: {
63: delete m_pReceiver;
64: m_pReceiver = NULL;
65: }
66:
67: //调用接收者相应的操作,以实现 Execute()
68: virtual void Execute()
69: {
70: if (NULL != m_pReceiver)
71: {
72: m_pReceiver->Action();
73: }
74:
75: std::cout << "Execute by ConcreateComand!" << std::endl;
76: }
77:
78: private:
79: Receiver* m_pReceiver; //接收者
80: };
81:
82:
83: //
84: //使用 C++ 模板,对于1)不能被取消;2)不需要参数的命令;我们可以使用 C++ 模板来实现
85: //这样可以避免为每一种动作和接收者都创建一个 Command 子类
86: //
87: //对于简单的不能取消和不需参数的命令,可以用一个类模板来参数化该命令的接收者
88: //我们将这些命令定义一个模板子类 SimpleCommand. 用 Receiver 类型参数化 SimpleCommand
89: //并维护一个接收者对象和一个动作之间的绑定,而这一动作是用指向一个成员函数的指针存储的
90: template<typename Receiver>
91: class SimpleCommand : public Command
92: {
93: public:
94: //函数指针
95: //Receiver::* MyAction 类成员函数指针
96: //MyAction 现在是指针类 Receiver 成员函数的函数指针
97: //可以通过 MyAction 调用 Receiver 的成员函数
98: //为了避免名称混淆,我这里将 Action 改成了 Action
99: //实际中应该写成 Receiver::*Action 这样可以使接口看起来一致
100: typedef void (Receiver::* MyAction)();
101:
102: //构造器存储接收者和相应实例变量中的动作
103: SimpleCommand(Receiver* r, MyAction a)
104: : _receiver(r), _action(a) { }
105:
106: virtual ~SimpleCommand()
107: {
108: delete _receiver;
109: _receiver = NULL;
110: }
111:
112: //Execute 实施接收者的这个动作
113: virtual void Execute()
114: {
115: //用指向类成员函数的函数指针进行调用
116: (_receiver->*_action)();
117: std::cout << "Execute by SimpleCommand!" << std::endl;
118: }
119: private:
120: MyAction _action;
121: Receiver* _receiver;
122: };
123: //为创建一个调用 MyClass 类的一个实例上的 Action 的 Command 对象,仅需如下代码:
124: //MyClass* receiver = new MyClass;
125: //...
126: //Command* aCommand = new SimpleCommand<MyClass>(receiver, &MyClass::Action);
127: //.... aCommand->Execute();
128: //关于类成员指针,如下示例:
129: /*
130: #include <iostream>
131: using namespace std;
132: class A {
133: public:
134: A() : i(1), j(2) { }
135: void f(){ cout << "A::f()!" << endl; }
136: int i;
137: int j;
138: };
139: int main()
140: {
141: int A::*pa; //类成员数据指针,pa 是指向类 A 数据成员的指针
142: void (A::*pf)(); //类成员函数指针,pf 是指向类 A 成员函数的函数指针
143: A a;
144: pa = &A::j; //pa 指向了类 A 的数据成员 j
145: pf = &A::f; //pf 指向了类 A 的成员函数 f
146: (a.*pf)(); //用类成员函数指针调用类 A 的对象 a 的函数 f()
147: int m = a.*pa;
148: cout << m << endl;
149:
150: return 0;
151: } //*/
152:
153:
154: //
155: //以上这一方案仅适用于简单命令,更复杂的命令不仅要维护它们的接收者,而且还要
156: //登记参数有时还要保存用于取消操作的状态。这时就需要定义一个 Command 的子类
157: //MacroCommand 管理一个命令序列(复合命令,一般来说是一个 Composite 模式的实例),
158: //它提供了增加和删除子命令的操作。这里不需要显式的接收者,因为这些子命令已经
159: //定义了它们各自的接收者。
160: class MacroCommand : public Command
161: {
162: public:
163: MacroCommand() : _cmds(new pList) { }
164: virtual ~MacroCommand()
165: {
166: std::list<Command*>::iterator iter1, iter2, temp;
167:
168: for(iter1 = _cmds->begin(), iter2 = _cmds->end(); iter1 != iter2;)
169: {
170: temp = iter1;
171: ++iter1;
172: delete *temp;
173: }
174: _cmds->clear();
175:
176: delete _cmds;
177: _cmds = NULL;
178: }
179:
180: virtual void Add(Command* c)
181: {
182: //std::cout << "Test Add()" << std::endl;
183: _cmds->push_back(c);
184: }
185:
186: virtual void Remove(Command* c)
187: {
188: std::list<Command*>::iterator result;
189: result = std::find(_cmds->begin(), _cmds->end(), c);
190:
191: if(result != _cmds->end())
192: {
193: delete *result;
194: _cmds->erase(result);
195: }
196: }
197:
198: //遍历所有的子命令并调用其各自的 Execute 操作
199: virtual void Execute()
200: {
201: std::list<Command*>::iterator iter;
202:
203: for(iter = _cmds->begin(); iter != _cmds->end(); ++iter)
204: {
205: (*iter)->Execute();
206: std::cout << "Execute by MacroCommand!" << std::endl;
207: }
208: }
209:
210: private:
211: typedef std::list<Command*> pList;
212: pList* _cmds;
213: //std::list<Command*>* _cmds;
214: };
215:
//test
1:
2: #include "Command.h"
3:
4: int main()
5: {
6: //1.
7: //1.Client 创建一个 ConcreteCommand 对象并指定它的 Receiver 对象
8: //2.某 Invoker 对象存储该 ConcreteCommand 对象
9: Receiver* pReceiver1 = new Receiver();
10: Command* pCommand1 = new ConcreateComand(pReceiver1);
11:
12: //
13: //3.该 Invoker 通过调用 Command 对象的 Execute 操作来提交一个请求
14: //4.ConcreteCommand 对象调用它的 Receiver 的一些操作以执行该请求
15: Invoker* pInvoker1 = new Invoker(pCommand1);
16: pInvoker1->Invoke();
17:
18: delete pInvoker1;
19:
20: //2.
21: std::cout << std::endl << "Test for SimpleCommand:" << std::endl;
22: //测试 SimpleCommand,即不能取消和不需参数的命令
23: //直接使用 Receiver, 只为演示
24: Receiver* pReceiver2 = new Receiver;
25: Command* pCommand2 = new SimpleCommand<Receiver>(pReceiver2, &Receiver::Action);
26: pCommand2->Execute();
27: delete pCommand2;
28:
29:
30: //3.
31: std::cout << std::endl << "Test for MacroCommand:" << std::endl;
32: //测试 MacroCommand,命令序列
33: MacroCommand* macroCommand = new MacroCommand;
34:
35: Command* pCommand3 = new ConcreateComand(new Receiver);
36: Command* pCommand4 = new ConcreateComand(new Receiver());
37: Command* pCommand5 = new SimpleCommand<Receiver>(new Receiver, &Receiver::Action);
38:
39: macroCommand->Add(pCommand3);
40: macroCommand->Add(pCommand4);
41: macroCommand->Add(pCommand5);
42:
43: macroCommand->Execute();
44:
45: delete macroCommand;
46:
47: return EXIT_SUCCESS;
48: }
从最直观的角度来看,命令模式就是一个函数对象:一个作为对象的函数。通过将函数封装为对象,就能够以参数的形式将其传递给其它函数或者对象,告诉它们在履行请求的过程中执行特定的操作。可以说,命令模式是携带行为信息的信使。
命令模式的主要特点是允许向一个函数或者对象传递一个想要的动作。如上述的 MacroCommand 将一系列想一起执行的动作集进行排队,依次执行。简单的实现不需要 Receiver 和 Invoker,参考如下代码:
1: #include <iostream>
2: #include <vector>
3: using namespace std;
4:
5: class Command {
6: public:
7: virtual void execute() = 0;
8: };
9:
10: class Hello : public Command {
11: public:
12: void execute() { cout << "Hello "; }
13: };
14:
15: class World : public Command {
16: public:
17: void execute() { cout << "World! "; }
18: };
19:
20: class IAm : public Command {
21: public:
22: void execute() { cout << "I'm the command pattern!"; }
23: };
24:
25: // An object that holds commands:
26: class Macro {
27: vector<Command*> commands;
28: public:
29: void add(Command* c) { commands.push_back(c); }
30: void run() {
31: vector<Command*>::iterator it = commands.begin();
32: while(it != commands.end())
33: {
34: (*it++)->execute();
35: }
36: }
37: };
38:
39: int main() {
40: Macro macro;
41: macro.add(new Hello);
42: macro.add(new World);
43: macro.add(new IAm);
44: macro.run();
45:
46: cout << endl;
47:
48: return EXIT_SUCCESS;
49: }
//form Thinking in C++ volume 2
采用并发(concurrency)技术的原因之一是为了更容易地掌握事件驱动编程(event-driven programming),在事件驱动方式的编程中,这些事件出现的地方是不可预料的。例如,当程序正在执行一个操作时,用户按下“退出”按钮并且希望程序能够快速响应。
使用并发的论据是它能够防止程序中代码段间的耦合。也就是说,如果运行一个独立的线程用以监视退出按钮,程序的“正常”操作无需知道有关退出按钮或者其它需要监视的操作。
这是一个解耦问题,我们可以用命令模式来避免它。每个“正常”的操作必须周期性地调用一个函数来检查事件的状态,而通过命令模式,这些“正常”操作不需要知道有关它们所检查的事件的任何信息,也就是说它们已经与事件处理代码分享开来。代码示例如下:
1:
2: #include <iostream>
3: #include <vector>
4: #include <string>
5: #include <ctime>
6: #include <cstdlib>
7: using namespace std;
8:
9: // Framework for running tasks:
10: // Command
11: class Task
12: {
13: public:
14: virtual void operation() = 0;
15: };
16:
17: //MacroCommand
18: class TaskRunner
19: {
20: private:
21: static vector<Task*> tasks;
22: TaskRunner() { } // Make it a Singleton
23: static TaskRunner tr;
24: public:
25: static void add(Task& t)
26: {
27: tasks.push_back(&t);
28: }
29: static void run()
30: {
31: vector<Task*>::iterator it = tasks.begin();
32: while(it != tasks.end())
33: {
34: (*it++)->operation();
35: }
36: }
37: private:
38: //Singleton
39: TaskRunner& operator=(TaskRunner&);
40: TaskRunner(const TaskRunner&);
41: };
42:
43: TaskRunner TaskRunner::tr;
44: vector<Task*> TaskRunner::tasks;
45:
46: // 事件模仿器
47: // EventSimulator 创建一个随机延迟时间,所以当周期性的调用函数
48: // fired() 时,在某个随机时间段,其返回结果从 true 到 flase 变化
49: // EventSimulator 对象在类 Button 中使用,模拟在某个不可预知的时间段用户事件发生的动作
50: class EventSimulator
51: {
52: private:
53: clock_t creation;
54: clock_t delay;
55: public:
56: EventSimulator() : creation(clock())
57: {
58: delay = CLOCKS_PER_SEC/4 * (rand() % 20 + 1);
59: cout << "delay = " << delay << endl;
60: }
61: bool fired() {
62: return clock() > creation + delay;
63: }
64: };
65:
66: // 应该是 Receiver 的角色
67: // Something that can produce asynchronous events:
68: // 按钮,能够产生异步事件
69: class Button
70: {
71: private:
72: bool pressed;
73: string id;
74: EventSimulator e; // for test, 按下按钮,则产生一个异步事件
75: public:
76: Button(string name) : pressed(false), id(name) { }
77: void press()
78: {
79: pressed = true;
80: }
81: bool isPressed()
82: {
83: if(e.fired())
84: press(); // 模仿事件
85: return pressed;
86: }
87: friend ostream& operator<<(ostream& os, const Button& b)
88: {
89: return os << b.id;
90: }
91: };
92:
93: // ConcreteCommand
94: // The Command object
95: class CheckButton : public Task
96: {
97: private:
98: Button& button;
99: bool handled;
100: public:
101: CheckButton(Button & b) : button(b), handled(false) { }
102: void operation()
103: {
104: if(button.isPressed() && !handled)
105: {
106: cout << button << " pressed" << endl;
107: handled = true;
108: }
109: }
110: };
111:
112: // The procedures that perform the main processing.
113: // These need to be occasionally "interrupted" in order
114: // to check the state of the buttons or other events:
115: void procedure1() {
116: // Perform procedure1 operations here.
117: // ...
118: TaskRunner::run(); // Check all events
119: }
120:
121: void procedure2() {
122: // Perform procedure2 operations here.
123: // ...
124: TaskRunner::run(); // Check all events
125: }
126:
127: void procedure3() {
128: // Perform procedure3 operations here.
129: TaskRunner::run(); // Check all events
130: }
131:
132: int main()
133: {
134: srand(time(0)); // Randomize
135:
136: Button b1("Button 1"), b2("Button 2"), b3("Button 3");
137:
138: //ConcreteCommand
139: CheckButton cb1(b1), cb2(b2), cb3(b3);
140:
141: //MacroCommand
142: TaskRunner::add(cb1);
143: TaskRunner::add(cb2);
144: TaskRunner::add(cb3);
145:
146: cout << "Control-C to exit" << endl;
147:
148: while(true)
149: {
150: procedure1();
151: procedure2();
152: procedure3();
153: }
154:
155: return EXIT_SUCCESS;
156: }


 2271
2271

 被折叠的 条评论
为什么被折叠?


