


基于STM32的经过封装的DSP库
设计目标
本DSP库(下称“本库”)目的在于提供基于STM32各个芯片版本的统一的DSP处理框架,提供了基本的FIR函数运算、基于MATLAB生成系数的IIR实时滤波和FFT及其相关数据处理算法(如寻峰算法)的封装,可应用于快速验证和竞赛开发。
使用方法
本库主要包含了3个部分:FIR和窗函数生成、实时IIR滤波器以及FFT数据处理。
FIR和窗函数生成
窗函数的相关生成函数
// MyLibs/dsp/dsp_lib.h

// Windows
float64_t dsp_windows_func_hamming(int N, int n);
float64_t dsp_windows_func_nuttall(int N, int n);
float64_t dsp_windows_func_guassian(int N, int n);

/**
 * @param win_buffer Buffer of the window.
 * @param length Length of the window.
 * @param normal_factor Normalize factor.
 * @param windows_func Function to generate windows, whose N is the stage, n is index of the buffer. Users can also define this function by themselves.
 *
 * @return 0-succeed, other-failed.
 */
int dsp_gen_window(float32_t *win_buffer, unsigned int length,
                   float32_t normal_factor, float64_t (*windows_func)(int N, int n));
dsp_windows_func_xxx()函数族都是窗生成的元函数,用于传入到dsp_gen_window()函数的windows_func参数当中。一个具体的用例如下:
dsp_gen_window(adc1_fir_core, FIR_CORE_LEN, 1, dsp_windows_func_nuttall);
可见,将函数名dsp_windows_func_nuttall传入到dsp_gen_window()函数的windows_func参数当中,即可在adc1_fir_core中生成一个长度为FIR_CORE_LEN的Nuttall窗。
FIR带通卷积核生成函数
// MyLibs/dsp/dsp_lib.h

/**
 * @param fir_core Buffer of the FIR core.
 * @param stage Length of the FIR core.
 * @param sample_rate Sample rate of ADC.
 * @param lowpass_freq Low pass frequency.
 * @param highpass_freq High pass frequency.
 * @param normal_factor Normalize factor.
 * @param windows_func Function to generate windows, whose N is the stage, n is index of the buffer. Users can also define this function by themselves.
 *
 * @return 0-succeed, other-failed.
 */
int dsp_fir_gen_bandpass(float32_t *fir_core, unsigned int stage,
                         unsigned int sample_rate, float32_t lowpass_freq, float32_t highpass_freq,
                         float32_t normal_factor, float32_t (*windows_func)(int N, int n));
需要注意的是,dsp_fir_gen_bandpass()函数也具有windows_func参数,dsp_windows_func_xxx()函数族还可以传入到dsp_fir_gen_bandpass()函数的windows_func参数当中作为窗函数设计FIR滤波器的窗函数。
卷积器函数
// MyLibs/dsp/dsp_lib.h

/**
 * @param data_buf Data buffer to be peoceed
 * @param data_buf_len Length of data buffer
 * @param conv_core Convolution core
 * @param conv_core_len Length of convolution core
 * @param result_buf Convolution result
 *
 * @return 0-succeed
 */
int dsp_conv(float32_t *data_buf, unsigned int data_buf_len, float32_t *conv_core, unsigned int conv_core_len,
             float32_t *result_buf);
这个没什么好说的,无非就是数据缓冲区、卷积核和结果缓冲区。需要注意的是,结果缓冲区的长度必须与数据缓冲区一致。
卷积器存在的问题是,result_buf中后conv_core_len的数据只能为零,因为卷积到后面已经没有足够的数据支撑卷积核继续后移了。例如,如果需要用128长度的卷积核卷积4096长度的数据,那么result_buf[0]到result_buf[4096-128-1=3967]都是有数据的,从
result_buf[3968]到result_buf[4095]都将会是0。因此,在这种情况下建议将数据长度改为4096+128=4224,那就可以保证result_buf[0]到result_buf[4095]都是有数据的。
实时IIR滤波器
这一部分的示例可以在RealtimeIIR代码仓库中获取。
// MyLibs/dsp/dsp_lib.h

// IIR
/**
 * @attention Must be called in main() to initialize IIR.
 *
 * @return 0-succeed
 */
int dsp_iir_init(void);

/**
 * @param in_data Data in
 * @param num_array IIR numerator array generated by MATLAB
 * @param den_array IIR denominator array generated by MATLAB
 * @param gain_array IIR gain array generated by MATLAB
 * @param n Nth second-order junction
 *
 * @return data proceed
 */
float64_t dsp_iir_direct2_stage2_signal(float64_t in_data,
                                        float64_t num_array[MWSPT_NSEC][3], float64_t den_array[MWSPT_NSEC][3],
                                        float64_t gain_array[MWSPT_NSEC], int n);

/**
 * @param adc_buf ADC buffer (in 16 bit unsigned integer)
 * @param dac_buf DAC buffer (in 16 bit unsigned integer)
 * @param iir_buf IIR buffer (in float 64 bit)
 * @param buf_len ADC and DAC buffer length
 * @param adc_range ADC range, etc 4096 (12 bit resolution)
 * @param dac_range DAC range, etc 4096 (12 bit resolution)
 * @param num_array IIR numerator array generated by MATLAB
 * @param den_array IIR denominator array generated by MATLAB
 * @param gain_array IIR gain array generated by MATLAB
 * @param loop 0-Half DMA interrupt, 1-All DMA interrupt
 * @param iir_scale IIR scale calibration
 * @param iir_ds_offset IIR dc offset calibration
 * @param f_bypass 0-IIR mode, else-bypass mode
 *
 * @return 0-succeed
 */
int dsp_iir_direct2_buffer(uint16_t *adc_buf, uint16_t *dac_buf, float64_t *iir_buf, unsigned int buf_len, unsigned int adc_range, unsigned int dac_range,
                           float64_t num_array[MWSPT_NSEC][3], float64_t den_array[MWSPT_NSEC][3],
                           float64_t gain_array[MWSPT_NSEC], int loop, float64_t iir_scale, float64_t iir_ds_offset, int f_bypass);
实时IIR滤波器由3个函数构成:dsp_iir_init(),dsp_iir_direct2_stage2_signal()和dsp_iir_direct2_buffer()。这三个函数分别实现了IIR初始化和IIR运算的功能。
这个实时IIR使用MATLAB生成的直接2型(规范型)参数,参数示例如下:
//RealtimeIIR/Core/Src/main.c

float64_t iir_gain[MWSPT_NSEC] = {0.1479319166642,
                                  0.1479319166642,
                                  0.1379740250476,
                                  0.1379740250476};
float64_t iir_num[MWSPT_NSEC][3] = {
    {1, 0, -1},
    {1, 0, -1},
    {1, 0, -1},
    {1, 0, -1}};
float64_t iir_den[MWSPT_NSEC][3] = {
    {1, -1.296745107959, 0.8680665882751},
    {1, -1.664042619622, 0.9083401555428},
    {1, -1.472080716991, 0.7641628927908},
    {1, -1.311673946232, 0.7273600282429}};
其中,iir_gain数组为增益参数,iir_num为分子系数,iir_den为分母系数。每一组系数(如{1, -1.296745107959, 0.8680665882751})都对应了一个二阶节,MWSPT_NSEC常量用于定义滤波器的阶数,其取值为滤波器阶数的一半,定义如下:
// MyLibs/dsp/dsp_lib.h

#define MWSPT_NSEC 4
现在的示例是一个8阶的IIR滤波器,经过实测,H723在500KHz采样率下最高可以进行8阶IIR实时运算。
下面演示一下从MATLAB生成滤波器系数的方法。首先打开MATLAB,从APP中选择“滤波器设计”:

打开滤波器设计工具之后,界面如下:
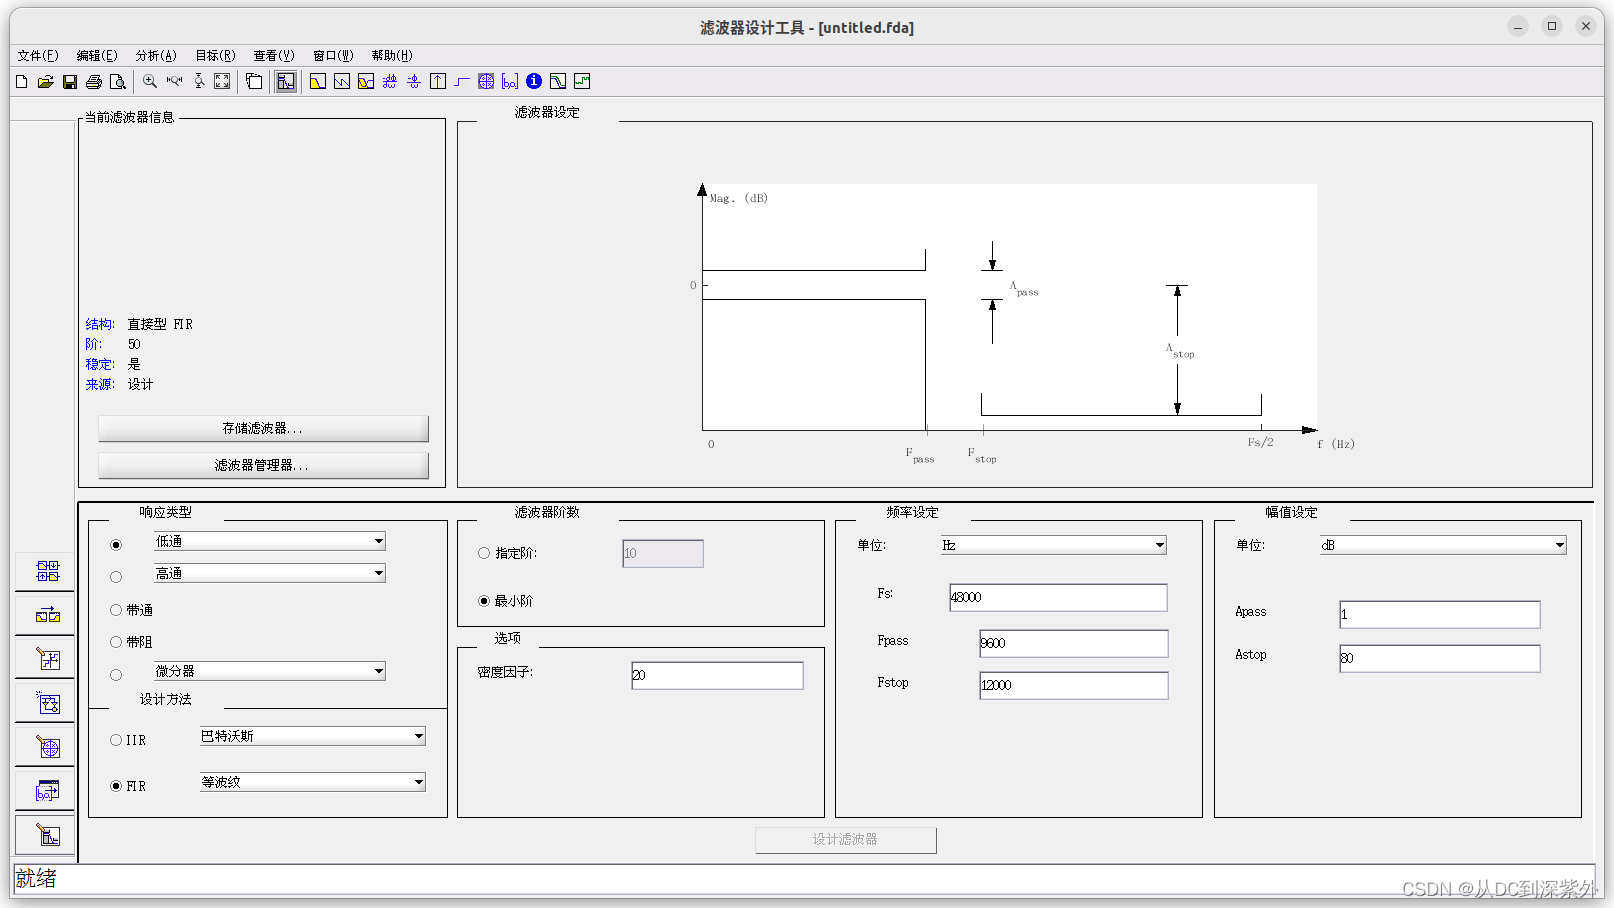
左侧边栏选择最下面的“滤波器设计”面板,在“响应类型”中可以选择五种方法,分别生成5种不同的滤波器;“设计方法”选择IIR,此处选择巴特沃斯作为演示案例,当然也可以选切比雪夫或者其它类型的滤波器,但是必须确保点击“设计滤波器”之后,“当前滤波器信息”的“结构”一项是“直接II型,二阶节”。
滤波器阶数选择“指定阶”,可指定为8阶及以下(因为ST的芯片最高就支持算到8阶)。其余比如频率响应和幅值设定可以按照实际情况进行修改。最后点击“设计滤波器”,并选择顶部栏“目标”后点击“生成C头文件”。这时候就会弹出以下界面:
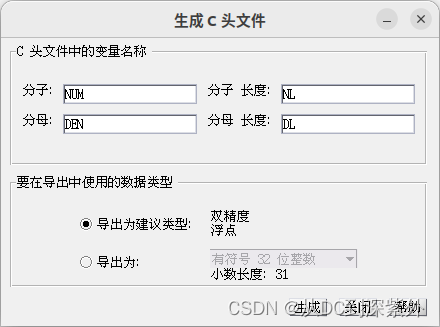
直接点击“生成”,选择一个合适的位置保存系数文件。生成的系数文件内容如下:
/*
 * Filter Coefficients (C Source) generated by the Filter Design and Analysis Tool
 * Generated by MATLAB(R) 23.2 and Signal Processing Toolbox 23.2.
 * Generated on: 25-Apr-2024 16:54:09
 */

/*
 * 离散时间 IIR 滤波器(实数)
 * ----------------
 * 滤波器结构  : 直接 II 型,二阶节
 * 节数     : 4
 * 稳定     : 是
 * 线性相位   : 否
 */

/* General type conversion for MATLAB generated C-code  */
#include "tmwtypes.h"
/*
 * Expected path to tmwtypes.h
 * /tools/MATLAB/R2023b/extern/include/tmwtypes.h
 */
#define MWSPT_NSEC 9
const int NL[MWSPT_NSEC] = {1, 3, 1, 3, 1, 3, 1, 3, 1};
const real64_T NUM[MWSPT_NSEC][3] = {
    {0.3536403595448, 0, 0},
    {1, 2, 1},
    {0.2723410159937, 0, 0},
    {1, 2, 1},
    {0.2315918963455, 0, 0},
    {1, 2, 1},
    {0.2142431986495, 0, 0},
    {1, 2, 1},
    {1, 0, 0}};
const int DL[MWSPT_NSEC] = {1, 3, 1, 3, 1, 3, 1, 3, 1};
const real64_T DEN[MWSPT_NSEC][3] = {
    {1, 0, 0},
    {1, -0.2623224310114, 0.6768838691906},
    {1, 0, 0},
    {1, -0.202016414279, 0.2913804782539},
    {1, 0, 0},
    {1, -0.1717896377271, 0.09815722310915},
    {1, 0, 0},
    {1, -0.1589207656324, 0.01589356023025},
    {1, 0, 0}};
我们分别提取出NUM数组和DEN数组的1、3、5、7行元素,作为我们的分子数组iir_num和iir_den;提取出NUM[0][0]、NUM[2][0]、NUM[4][0]和NUM[6][0]作为iir_gain数组的内容,并将我们的MWSPT_NSEC改为4。具体示例如下:
#define MWSPT_NSEC 4
const float64_t iir_num[MWSPT_NSEC][3] = {
    {1, 2, 1},
    {1, 2, 1},
    {1, 2, 1},
    {1, 2, 1}};
const float64_t iir_den[MWSPT_NSEC][3] = {
    {1, -0.2623224310114, 0.6768838691906},
    {1, -0.202016414279, 0.2913804782539},
    {1, -0.1717896377271, 0.09815722310915},
    {1, -0.1589207656324, 0.01589356023025}};
const float64_t iir_gain[MWSPT_NSEC] = {
    0.3536403595448,
    0.2723410159937,
    0.2315918963455,
    0.2142431986495};
这样就完成了一个IIR实时滤波器的系数生成工作了。
dsp_iir_direct2_stage2_signal()函数是单次IIR滤波。这个函数已经封装在dsp_iir_direct2_buffer()中,一般不进行调用。
dsp_iir_direct2_buffer()函数需要在ADC的DMA中断时调用,具体用例如下:
// RealtimeIIR/Core/Src/stm32h7xx_it.c

void HAL_ADC_ConvHalfCpltCallback(ADC_HandleTypeDef *hadc)
{

  if (hadc == &hadc1)
  {
    dsp_iir_direct2_buffer(adc1_buf, dac1_buf, iir_buf, ADC_BUF_LEN, 65536, 4096,
                           iir_num, iir_den, iir_gain, 0, IIR_SCALE_FACTOR, IIR_DC_OFFSET, 0);
  }

  if (hadc == &hadc2)
  {
  }

  if (hadc == &hadc3)
  {
  }

  // printf("1\n");

  return;
}

void HAL_ADC_ConvCpltCallback(ADC_HandleTypeDef *hadc)
{
  if (hadc == &hadc1)
  {
    dsp_iir_direct2_buffer(adc1_buf, dac1_buf, iir_buf, ADC_BUF_LEN, 65536, 4096,
                           iir_num, iir_den, iir_gain, 1, IIR_SCALE_FACTOR, IIR_DC_OFFSET, 0);
  }

  if (hadc == &hadc2)
  {
  }

  if (hadc == &hadc3)
  {
  }

  // printf("2\n");

  return;
}
需要注意的是,loop参数在半中断时应当设置为0,在全中断时应当设置为1;同时,ADC必须处于循环DMA采样模式。
FFT及其数据处理
这一部分的示例可以在FFTAnalysis代码仓库中获取。
// MyLibs/dsp/dsp_lib.h

/**
 * @param adc_buf ADC buffer (in 16 bit unsigned integer)
 * @param adc_quan_range ADC quantatitive range, etc 4096 (12 bit reolution)
 * @param adc_voltage_range ADC voltage range, etc 3.3
 * @param adc_buf_len ADC buffer length
 * @param fft_mag_result FFT magnitude result
 * @param fft_pha_result FFT phase result
 *
 * @return 0-succeed, 1-failed
 */
int dsp_fft_get_magnitude_phase(uint16_t *adc_buf, unsigned int adc_quan_range, float32_t adc_voltage_range, unsigned int adc_buf_len,
                                float32_t *fft_mag_result, float32_t *fft_pha_result);

/**
 * @param fft_mag_array FFT magnitude array
 * @param fft_mag_array_len Length of FFT magnitude array
 * @param conv_core Convolution core for pre-processing
 * @param conv_core_len Length of convolution core
 * @param peaks Peaks result buffer
 * @param peak_max_num Maximum length of peak buffer
 * @param peak_threshold Thershold of peaks
 *
 * @return Number of peaks
 */
unsigned int dsp_fft_peak_search(float32_t *fft_mag_array, unsigned fft_mag_array_len,
                                 float32_t *conv_core, unsigned int conv_core_len,
                                 unsigned int *peaks, unsigned int peak_max_num, float32_t peak_threshold);

/**
 * @param fft_mag_array FFT magnitude array
 * @param fft_mag_array_len Length of FFT magnitude array
 * @param conv_core Convolution core for pre-processing
 * @param conv_core_len Length of convolution core
 * @param threshold_step Step of increasement of threshold
 *
 * @return Type of wave (enum WAVE_TYPE)
 */
int dsp_fft_wave_recognize(float32_t *fft_mag_array, unsigned fft_mag_array_len,
                           float32_t *conv_core, unsigned int conv_core_len,
                           float32_t threshold_step);
需要说明的是,dsp_fft_get_magnitude_phase()函数的fft_mag_result数组需要具有adc_buf_len的长度,因为这个数组在一定程度上充当了缓冲器;而fft_pha_result数组只需要具有adc_buf_len一半的长度。但是实际上经过函数的处理之后,这俩都是单边谱,也就是有效的数据长度都只有adc_buf_len一半的长度。
具体用例如下:
// FFTAnalysis/UserCodes/hmi_calbacks.c

#define ADC_BUF_LEN 4096

unsigned short int adc1_buf[ADC_BUF_LEN];
unsigned short int adc2_buf[ADC_BUF_LEN];
unsigned short int dac1_buf[ADC_BUF_LEN];
unsigned short int dac2_buf[ADC_BUF_LEN];
int first_run = 1;

void *hmi_callbacks_page1_button2(void)
{
    float32_t fft_adc1_buffer[ADC_BUF_LEN] = {0};
    float32_t fft_adc2_buffer[ADC_BUF_LEN] = {0};

    float32_t fir_adc1_fir_result[ADC_BUF_LEN] = {0};
    float32_t fft_adc1_mag_result[ADC_BUF_LEN / 2] = {0};
    float32_t fft_adc1_pha_result[ADC_BUF_LEN / 2] = {0};

    float32_t fir_adc2_fir_result[ADC_BUF_LEN] = {0};
    float32_t fft_adc2_mag_result[ADC_BUF_LEN / 2] = {0};
    float32_t fft_adc2_pha_result[ADC_BUF_LEN / 2] = {0};

    HAL_ADC_Start_DMA(&hadc1, (uint32_t *)adc1_buf, ADC_BUF_LEN);
    HAL_ADC_Start_DMA(&hadc2, (uint32_t *)adc2_buf, ADC_BUF_LEN);

    HAL_TIM_Base_Start_IT(&htim8);

    while (adc1_con_flag == 0)
        __asm("nop");
    adc1_con_flag = 0;
    // printf("ADC1 completed. %d %d %d\n", adc1_buf[0], adc1_buf[ADC_BUF_LEN / 2], adc1_buf[ADC_BUF_LEN - 1]);

    while (adc2_con_flag == 0)
        __asm("nop");
    adc2_con_flag = 0;
    // printf("ADC2 completed. %d %d %d\n", adc2_buf[0], adc2_buf[ADC_BUF_LEN / 2], adc2_buf[ADC_BUF_LEN - 1]);

    HAL_TIM_Base_Stop(&htim8);

   ...

    // FFT
    dsp_fft_get_magnitude_phase(adc1_buf, 65536, 3.3, ADC_BUF_LEN, fft_adc1_mag_result, fft_adc1_pha_result);
    dsp_fft_get_magnitude_phase(adc2_buf, 65536, 3.3, ADC_BUF_LEN, fft_adc2_mag_result, fft_adc2_pha_result);
    // printf("FFT finished.\n");

   ...

    unsigned int peaks[10] = {0};
    unsigned int peaks_num = dsp_fft_peak_search(fft_adc1_mag_result, ADC_BUF_LEN / 2, fft_fir_core, FIR_CORE_LEN,
                                                 peaks, 10, 1);

    printf("Peaks: %d\n", peaks_num);
    for (int i = 0; i < peaks_num; ++i)
    {
        printf("Peak: %d\n", peaks[i]);
    }

    int wave_type = dsp_fft_wave_recognize(fft_adc1_mag_result, ADC_BUF_LEN / 2, fft_fir_core, FIR_CORE_LEN, 0.1);
    switch (wave_type)
    {
    case DSP_WAVE_TYPE_SINE:
        printf("DSP_WAVE_TYPE_SINE\n");
        break;

    case DSP_WAVE_TYPE_TRIANGULAR:
        printf("DSP_WAVE_TYPE_TRIANGULAR\n");
        break;

    case DSP_WAVE_TYPE_SQUARE:
        printf("DSP_WAVE_TYPE_SQUARE\n");
        break;

    default:
        printf("DSP_WAVE_TYPE_UNKNOWN\n");
        break;
    }

    ...

    return NULL;
}
dsp_fft_get_magnitude_phase()函数可以通过ADC采样的数据获取到FFT的幅度和相位数组;将幅度数组传入到dsp_fft_peak_search()函数中就可以获得最多前peak_max_num个峰值,传入到dsp_fft_wave_recognize()函数中就可以进行波形识别(目前支持正弦波、方波和三角波)。需要注意的是,这个寻峰算法具有一点性能问题,不是特别稳定。
需要注意的是,dsp_fft_peak_search()函数获取的不是前peak_max_num个最大峰值,而是满足peak_threshold阈值条件的前peak_max_num个频率的峰值。如果需要获取前peak_max_num个最大峰值,可以参考dsp_fft_wave_recognize()函数的实现细节。


 2万+
2万+


 被折叠的 条评论
为什么被折叠?
被折叠的 条评论
为什么被折叠?
 到【灌水乐园】发言


