


 本文介绍了如何在已有深度学习环境中,通过conda-pack和Linux命令打包迁移,然后使用gunicorn和Flask构建高并发API服务,详细描述了Dockerfile的构建过程以及项目的部署和接口测试方法。
此项目的是基于已有深度学习环境进行迁移,利用gunicorn+flask+docker的形式进行模型部署,实现模型的高并发。
代码结构如下:
├── Dockerfile
├── keras_MuLabelClass.tar.gz     -------服务器上打包好的环境
├── Miniconda3-py37_4.11.0-Linux-x86_64.sh ----------conda
├── multi-label-classification-event.tar    ----------镜像
├── multi-label-classification-event-type   ----------源码
├── multi-label-classification-event-type.tar.gz  ----------打包的源码
└── requirements.txt
1、深度学习环境迁移
1.1、基于conda-pack算法环境打包
迁出机器安装打包工具
pip install conda-pack
安装好之后打包需要迁出的环境(-n 之后为 虚拟环境名字 -o 之后为打包出来的文件名)
conda pack -n keras_MuLabelClass -o keras_MuLabelClass.tar.gz
迁入机器部分——解压、部署环境
迁入mkdir /.../miniconda3/envs/keras_MuLabelClass
tar -xzf keras_MuLabelClass.tar.gz
conda activate keras_MuLabelClass
1.2、基于linux命令的算法环境打包
直接把/xxxx/anaconda/envs 下的keras_MuLabelClass打包压缩即可
zip -r  pytorch_cpu.zip /xxxx/miniconda/envs/keras_MuLabelClass
将pyenv.zip 拷贝到另外一个系统上并解压到目录下/xxxx/anaconda/envs/
unzip -d /xxxx/miniconda/envs/keras_MuLabelClass.zip
2、gunicorn_conf.py
# Sample Gunicorn configuration file.

#
# Server socket
#
#   bind - The socket to bind.
#
#       A string of the form: 'HOST', 'HOST:PORT', 'unix:PATH'.
#       An IP is a valid HOST.
#
#   backlog - The number of pending connections. This refers
#       to the number of clients that can be waiting to be
#       served. Exceeding this number results in the client
#       getting an error when attempting to connect. It should
#       only affect servers under significant load.
#
#       Must be a positive integer. Generally set in the 64-2048
#       range.
#

bind = '0.0.0.0:3114' #监听内网端口6799
backlog = 1024

#
# Worker processes
#
#   workers - The number of worker processes that this server
#       should keep alive for handling requests.
#
#       A positive integer generally in the 2-4 x $(NUM_CORES)
#       range. You'll want to vary this a bit to find the best
#       for your particular application's work load.
#
#   worker_class - The type of workers to use. The default
#       sync class should handle most 'normal' types of work
#       loads. You'll want to read
#       http://docs.gunicorn.org/en/latest/design.html#choosing-a-worker-type
#       for information on when you might want to choose one
#       of the other worker classes.
#
#       A string referring to a Python path to a subclass of
#       gunicorn.workers.base.Worker. The default provided values
#       can be seen at
#       http://docs.gunicorn.org/en/latest/settings.html#worker-class
#
#   worker_connections - For the eventlet and gevent worker classes
#       this limits the maximum number of simultaneous clients that
#       a single process can handle.
#
#       A positive integer generally set to around 1000.
#
#   timeout - If a worker does not notify the master process in this
#       number of seconds it is killed and a new worker is spawned
#       to replace it.
#
#       Generally set to thirty seconds. Only set this noticeably
#       higher if you're sure of the repercussions for sync workers.
#       For the non sync workers it just means that the worker
#       process is still communicating and is not tied to the length
#       of time required to handle a single request.
#
#   keepalive - The number of seconds to wait for the next request
#       on a Keep-Alive HTTP connection.
#
#       A positive integer. Generally set in the 1-5 seconds range.
#

workers = 3  ### 并行工作进程数
worker_class = 'sync'# 工作模式协程使用sync模式,还可以使用gevent 模式,默认的是sync模式
worker_connections = 1000 # 设置最大并发量
timeout = 121 #超时
keepalive = 2

#
#   spew - Install a trace function that spews every line of Python
#       that is executed when running the server. This is the
#       nuclear option.
#
#       True or False
#

spew = False

#
# Server mechanics
#
#   daemon - Detach the main Gunicorn process from the controlling
#       terminal with a standard fork/fork sequence.
#
#       True or False
#
#   raw_env - Pass environment variables to the execution environment.
#
#   pidfile - The path to a pid file to write
#
#       A path string or None to not write a pid file.
#
#   user - Switch worker processes to run as this user.
#
#       A valid user id (as an integer) or the name of a user that
#       can be retrieved with a call to pwd.getpwnam(value) or None
#       to not change the worker process user.
#
#   group - Switch worker process to run as this group.
#
#       A valid group id (as an integer) or the name of a user that
#       can be retrieved with a call to pwd.getgrnam(value) or None
#       to change the worker processes group.
#
#   umask - A mask for file permissions written by Gunicorn. Note that
#       this affects unix socket permissions.
#
#       A valid value for the os.umask(mode) call or a string
#       compatible with int(value, 0) (0 means Python guesses
#       the base, so values like "0", "0xFF", "0022" are valid
#       for decimal, hex, and octal representations)
#
#   tmp_upload_dir - A directory to store temporary request data when
#       requests are read. This will most likely be disappearing soon.
#
#       A path to a directory where the process owner can write. Or
#       None to signal that Python should choose one on its own.
#

daemon = False # 设置守护进程,将进程交给supervisor管理
raw_env = [
    'DJANGO_SECRET_KEY=something',
    'SPAM=eggs',
]
pidfile = None
umask = 0
user = None
group = None
tmp_upload_dir = None

#
#   Logging
#
#   logfile - The path to a log file to write to.
#
#       A path string. "-" means log to stdout.
#
#   loglevel - The granularity of log output
#
#       A string of "debug", "info", "warning", "error", "critical"


#
# 设置访问日志和错误信息日志路径
errorlog = '-'
loglevel = 'info'
accesslog = '-'
access_log_format = '%(h)s %(l)s %(u)s %(t)s "%(r)s" %(s)s %(b)s "%(f)s" "%(a)s"'

#
# Process naming
#
#   proc_name - A base to use with setproctitle to change the way
#       that Gunicorn processes are reported in the system process
#       table. This affects things like 'ps' and 'top'. If you're
#       going to be running more than one instance of Gunicorn you'll
#       probably want to set a name to tell them apart. This requires
#       that you install the setproctitle module.
#
#       A string or None to choose a default of something like 'gunicorn'.
#

proc_name = None

#
# Server hooks
#
#   post_fork - Called just after a worker has been forked.
#
#       A callable that takes a server and worker instance
#       as arguments.
#
#   pre_fork - Called just prior to forking the worker subprocess.
#
#       A callable that accepts the same arguments as after_fork
#
#   pre_exec - Called just prior to forking off a secondary
#       master process during things like config reloading.
#
#       A callable that takes a server instance as the sole argument.
#

def post_fork(server, worker):
    server.log.info("Worker spawned (pid: %s)", worker.pid)

def pre_fork(server, worker):
    pass

def pre_exec(server):
    server.log.info("Forked child, re-executing.")

def when_ready(server):
    server.log.info("Server is ready. Spawning workers")

def worker_int(worker):
    worker.log.info("worker received INT or QUIT signal")

    ## get traceback info
    import threading, sys, traceback
    id2name = {th.ident: th.name for th in threading.enumerate()}
    code = []
    for threadId, stack in sys._current_frames().items():
        code.append("\n# Thread: %s(%d)" % (id2name.get(threadId,""),
            threadId))
        for filename, lineno, name, line in traceback.extract_stack(stack):
            code.append('File: "%s", line %d, in %s' % (filename,
                lineno, name))
            if line:
                code.append("  %s" % (line.strip()))
    worker.log.debug("\n".join(code))

def worker_abort(worker):
    worker.log.info("worker received SIGABRT signal")
3、dockerfile构建
From centos:centos7

# miniconda
ADD Miniconda3-py37_4.11.0-Linux-x86_64.sh /opt/
RUN cd opt && bash Miniconda3-py37_4.11.0-Linux-x86_64.sh -b -u -p $HOME/miniconda


# keras_MuLabelClass env
RUN mkdir /root/miniconda/envs/keras_MuLabelClass
ADD keras_MuLabelClass.tar.gz /root/miniconda/envs/keras_MuLabelClass
RUN $HOME/miniconda/bin/conda init && sed -i '$a\conda activate keras_MuLabelClass' /root/.bashrc

ADD multi-label-classification-event-type.tar.gz /root/
RUN rm -rf /opt/*

WORKDIR /root/multi-label-classification-event-type/
RUN yum -y install vim
#/root/miniconda/envs/keras_MuLabelClass/lib/python3.7/site-packages/keras/engine

RUN rm -rf /root/miniconda/envs/keras_MuLabelClass/lib/python3.7/site-packages/keras/engine/saving.py

RUN mv saving.py /root/miniconda/envs/keras_MuLabelClass/lib/python3.7/site-packages/keras/engine
RUN chmod +x ApiSever.py
CMD ["gunicorn", "-c", "./gunicorn_conf.py", "ApiSever:app"]

EXPOSE 3114
4、项目部署
docker run -it -d --name njdmultilabel_v3 -p 3114:3114 --restart=always -v ....../scene_classification_v3:/MdMultiLabel njdmultilabel:v3 /bin/sh -c 'python3 ApiSever.py'
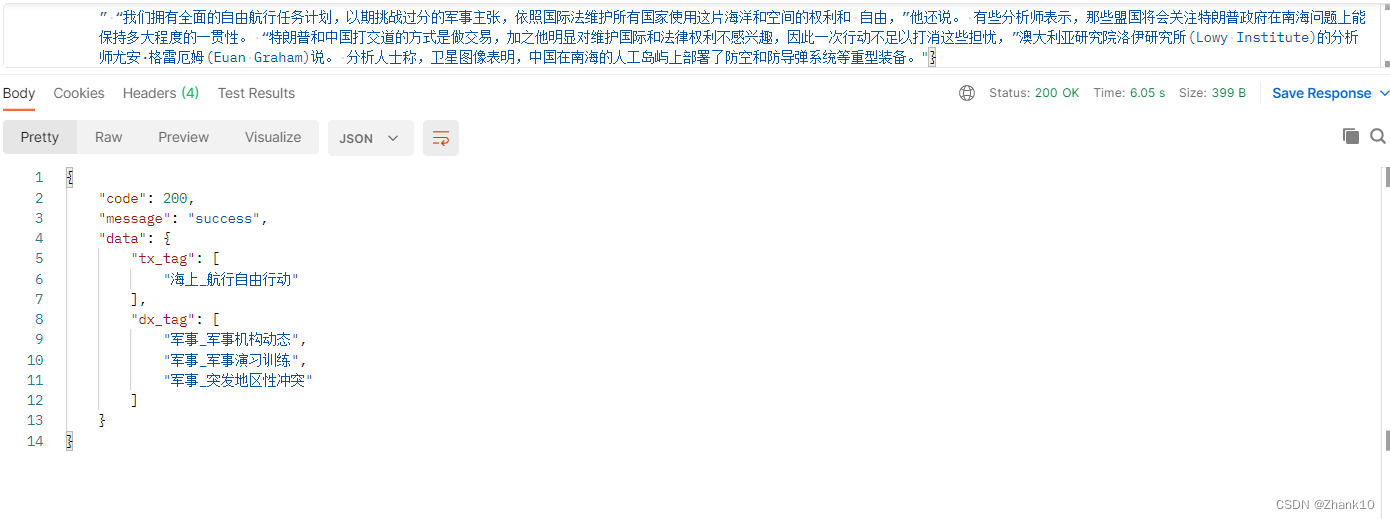
5、接口测试


 433
433


 被折叠的 条评论
为什么被折叠?
被折叠的 条评论
为什么被折叠?
 到【灌水乐园】发言


