上一篇介绍了guava的使用,实现了项目第一个需求定期清理cache数据,第二个需求,我们需要在缓存被移除的时候,得到通知产生回调,并做一些额外处理工作。这个时候RemovalListener就派上用场了。
下面是获得所有数据改变的监听
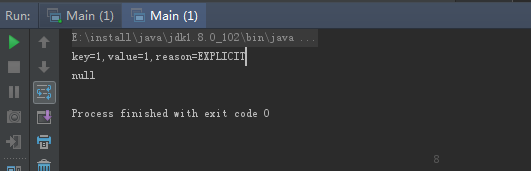
public class Main { private static class MyRemovalListener implements RemovalListener<Integer, Integer> { @Override public void onRemoval(RemovalNotification<Integer, Integer> notification) { String tips = String.format("key=%s,value=%s,reason=%s" , notification.getKey(), notification.getValue(), notification.getCause()); System.out.println(tips); } } public static void main(String[] args) { Cache<Integer, Integer> cache = CacheBuilder.newBuilder().removalListener(new MyRemovalListener()).build(); cache.put(1 , 1 ); cache.invalidate(1 ); System.out.println(cache.getIfPresent(1 )); } }
使用invalidate()清除缓存数据之后,注册的回调被触发了。
下面是只有主动删除数据使的回调
public class CacheConnection {

  public static RemovalListener<String, Connection> myRemovalListener = new RemovalListener<String, Connection>(){
    @Override
    public void onRemoval(RemovalNotification<String, Connection> notification) {
        String tips = String.format("key=%s,value=%s,reason=%s in myRemovalListener", notification.getKey(), notification.getValue(), notification.getCause());
        System.out.println(tips);
        //when expireAfterAccess to do
        if (notification.getCause().equals("EXPIRED") && notification.getValue() != null) {
          try {
            notification.getValue().close();
          } catch (SQLException e) {
            System.out.printf("Exception in myRemovalListener:\n");
            e.printStackTrace();
          }

          System.out.printf("Remove %s in cacheConnection", notification.getKey());
        }

    }
  };

  public static Cache<String, Connection> cacheConnection = CacheBuilder.newBuilder()
      //设置cache的初始大小为20000,要合理设置该值
      .initialCapacity(20000)
      //设置并发数为5,即同一时间最多只能有5个线程往cache执行写入操作
      .concurrencyLevel(100)
      //设置cache中的数据在600秒没有被读写将自动删除
      .expireAfterAccess(600, TimeUnit.SECONDS)
      //设置监听,当出现自动删除时的回调
      .removalListener(myRemovalListener)
      //构建cache实例
      .build();

  public static Connection getCache(String key)  {
    try {
      Connection var = cacheConnection.getIfPresent(key);
      return var;
    } catch (Exception e) {
      // TODO: handle exception
      System.out.println("the value of cacheConnection is null");
      e.printStackTrace();
      return null;
    }
  }

   public static void putCache(String key, Connection value) {
     cacheConnection.put(key, value);
   }


}
RemovalNotification中包含了缓存的key、value以及被移除的原因RemovalCause。通过源码可以看出,移除原因与容量管理方式是相对应的。下面是具体的消息
public enum RemovalCause { EXPLICIT { @Override boolean wasEvicted() { return false ; } }, REPLACED { @Override boolean wasEvicted() { return false ; } }, COLLECTED { @Override boolean wasEvicted() { return true ; } }, EXPIRED { @Override boolean wasEvicted() { return true ; } }, SIZE { @Override boolean wasEvicted() { return true ; } }; abstract boolean wasEvicted(); }
监听器使用很简单,有几个特点需要注意下:
1、默认情况下,监听器方法是被同步调用的(在移除缓存的那个线程中执行)。如果监听器方法比较耗时,会导致调用者线程阻塞时间变长。下面这段代码,由于监听器执行需要2s,所以main线程调用invalidate()要2s后才能返回。
public class Main { private static class MyRemovalListener implements RemovalListener<Integer, Integer> { @Override public void onRemoval(RemovalNotification<Integer, Integer> notification) { String tips = String.format("key=%s,value=%s,reason=%s" , notification.getKey(), notification.getValue(), notification.getCause()); System.out.println(tips); try { Thread.sleep(2000 ); } catch (InterruptedException e) { e.printStackTrace(); } } } public static void main(String[] args) { final Cache<Integer, Integer> cache = CacheBuilder.newBuilder().removalListener( new MyRemovalListener()).build(); cache.put(1 , 1 ); cache.put(2 , 2 ); System.out.println("main...begin." ); cache.invalidate(1 ); System.out.println("main...over." ); } }
解决这个问题的方法是:使用异步监听RemovalListeners.asynchronous(RemovalListener, Executor)。
public class Main { private static class MyRemovalListener implements RemovalListener<Integer, Integer> { @Override public void onRemoval(RemovalNotification<Integer, Integer> notification) { String tips = String.format("key=%s,value=%s,reason=%s" , notification.getKey(), notification.getValue(), notification.getCause()); System.out.println(tips); try { Thread.sleep(2000 ); } catch (InterruptedException e) { e.printStackTrace(); } } } public static void main(String[] args) { RemovalListener<Integer, Integer> async = RemovalListeners.asynchronous(new MyRemovalListener(), Executors.newSingleThreadExecutor()); final Cache<Integer, Integer> cache = CacheBuilder.newBuilder().removalListener(async).build(); cache.put(1 , 1 ); cache.put(2 , 2 ); System.out.println("main...begin." ); cache.invalidate(1 ); System.out.println("main...over." ); } }
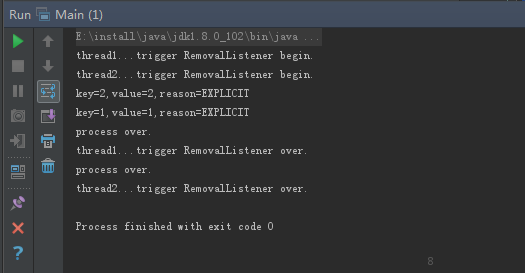
2、创建cache的时候只能添加1个监听器,这个监听器对象会被多个线程共享,所以如果监听器需要操作共享资源,那么一定要做好同步控制。下面这段代码可以看出:2个线程会交替执行监听器的发方法。
public class Main { private static class MyRemovalListener implements RemovalListener<Integer, Integer> { @Override public void onRemoval(RemovalNotification<Integer, Integer> notification) { String tips = String.format("key=%s,value=%s,reason=%s" , notification.getKey(), notification.getValue(), notification.getCause()); System.out.println(tips); try { Thread.sleep(2000 ); } catch (InterruptedException e) { e.printStackTrace(); } System.out.println("process over." ); } } public static void main(String[] args) { final Cache<Integer, Integer> cache = CacheBuilder.newBuilder().removalListener( new MyRemovalListener()).build(); cache.put(1 , 1 ); cache.put(2 , 2 ); new Thread( new Runnable() { @Override public void run() { System.out.println("thread1...trigger RemovalListener begin." ); cache.invalidate(1 ); System.out.println("thread1...trigger RemovalListener over." ); } }).start(); new Thread( new Runnable() { @Override public void run() { System.out.println("thread2...trigger RemovalListener begin." ); cache.invalidate(2 ); System.out.println("thread2...trigger RemovalListener over." ); } }).start(); } }
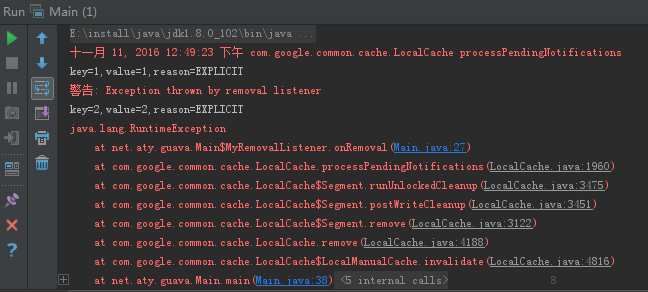
3、监听器中抛出的任何异常,在被记录到日志后,会被guava丢弃,不会导致监听器不可用。下面这段代码可以看到:监听器中抛出的异常只是被记录了(打印到了控制台),并没有导致JVM退出,之后缓存被移除一样可以再次触发。
public class Main { private static class MyRemovalListener implements RemovalListener<Integer, Integer> { @Override public void onRemoval(RemovalNotification<Integer, Integer> notification) { String tips = String.format("key=%s,value=%s,reason=%s" , notification.getKey(), notification.getValue(), notification.getCause()); System.out.println(tips); throw new RuntimeException(); } } public static void main(String[] args) { final Cache<Integer, Integer> cache = CacheBuilder.newBuilder().removalListener( new MyRemovalListener()).build(); cache.put(1 , 1 ); cache.put(2 , 2 ); cache.invalidate(1 ); cache.invalidate(2 ); } }


 3980
3980

 被折叠的 条评论
为什么被折叠?
被折叠的 条评论
为什么被折叠?
 到【灌水乐园】发言


