


1、KNN分类算法
KNN分类算法(K-Nearest-Neighbors Classification),又叫K近邻算法,是一个概念极其简单,而分类效果又很优秀的分类算法。
他的核心思想就是,要确定测试样本属于哪一类,就寻找所有训练样本中与该测试样本“距离”最近的前K个样本,然后看这K个样本大部分属于哪一类,那么就认为这个测试样本也属于哪一类。简单的说就是让最相似的K个样本来投票决定。
这里所说的距离,一般最常用的就是多维空间的欧式距离。这里的维度指特征维度,即样本有几个特征就属于几维。
KNN示意图如下所示。(图片来源:百度百科http://baike.baidu.com/view/1485833.htm?from_id=3479559&type=syn&fromtitle=knn&fr=aladdin)
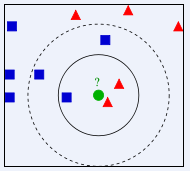
上图中要确定测试样本绿色属于蓝色还是红色。
显然,当K=3时,将以1:2的投票结果分类于红色;而K=5时,将以3:2的投票结果分类于蓝色。
kNN算法的计算步骤如下所示:
1)计算已知类别数据集中的点与当前点之间的距离;
2)按照距离递增次序排序;
3)选取与当前点距离最小的k个点;
4)确定前k个点所在类别的出现频率;
5)返回前k个点出现频率最高的类别作为当前点的预测分类。
2、python实现
python实现kNN有两种方法,一种是自己根据kNN算法的定义编写函数来完成,根据机器学习实战这本书中的思路,以手写字符的识别为例,用python实现kNN算法。除了给出手写字符的识别,我们还给出了一个小的测试程序,方便进行手工验算体会kNN的运算过程。新建一个名为kNN.py的文件,写入如下代码:
from numpy import *
import operator
import os
import sys
# coding=utf-8
# classify using kNN

#kNN的测试程序
# create a dataset which contains 4 samples with 2 classes
def createDataSet():
	# create a matrix: each row as a sample
	group = array([[1.0, 0.9], [1.0, 1.0], [0.1, 0.2], [0.0, 0.1]])
	labels = ['A', 'A', 'B', 'B'] # four samples and two classes
	return group, labels

def kNNClassify(newInput, dataSet, labels, k):
	numSamples = dataSet.shape[0] # shape[0] stands for the num of row

	## step 1: calculate Euclidean distance
	# tile(A, reps): Construct an array by repeating A reps times
	# the following copy numSamples rows for dataSet
	diff = tile(newInput, (numSamples, 1)) - dataSet # Subtract element-wise
	squaredDiff = diff ** 2 # squared for the subtract
	squaredDist = sum(squaredDiff, axis = 1) # sum is performed by row
	distance = squaredDist ** 0.5

	## step 2: sort the distance
	# argsort() returns the indices that would sort an array in a ascending order
	sortedDistIndices = argsort(distance)

	classCount = {} # define a dictionary (can be append element)
	for i in xrange(k):
		## step 3: choose the min k distance
		voteLabel = labels[sortedDistIndices[i]]

		## step 4: count the times labels occur
		# when the key voteLabel is not in dictionary classCount, get()
		# will return 0
		classCount[voteLabel] = classCount.get(voteLabel, 0) + 1

	## step 5: the max voted class will return
	maxCount = 0
	for key, value in classCount.items():
		if value > maxCount:
			maxCount = value
			maxIndex = key

	return maxIndex

# convert image to vector
def  img2vector(filename):
 	rows = 32
 	cols = 32
 	imgVector = zeros((1, rows * cols))
 	fileIn = open(filename)
 	for row in xrange(rows):
 		lineStr = fileIn.readline()
 		for col in xrange(cols):
 			imgVector[0, row * 32 + col] = int(lineStr[col]) #the picture in fact consist of a serious of numbers,so just read it wil be ok
 	return imgVector

# load dataSet
def loadDataSet():
	## step 1: Getting training set
	print "---Getting training set..."
	dataSetDir = 'D:/python/kNN/'
	# dataSetDir can also get easily in such way,when move the file location the exe can still works
	#dataSetDir=sys.path[0]
	trainingFileList = os.listdir(dataSetDir + 'trainingDigits') # load the training set
	numSamples = len(trainingFileList)                       #get the number of training samples

	train_x = zeros((numSamples, 1024))
	train_y = []
	for i in xrange(numSamples):
		filename = trainingFileList[i]

		# get train_x
		train_x[i, :] = img2vector(dataSetDir + 'trainingDigits/%s' % filename)

		# get label from file name such as "1_18.txt"
		label = int(filename.split('_')[0]) # return 1
		train_y.append(label)

	## step 2: Getting testing set
	print "---Getting testing set..."
	testingFileList = os.listdir(dataSetDir + 'testDigits') # load the testing set
	numSamples = len(testingFileList)
	test_x = zeros((numSamples, 1024))
	test_y = []
	for i in xrange(numSamples):
		filename = testingFileList[i]

		# get train_x
		test_x[i, :] = img2vector(dataSetDir + 'testDigits/%s' % filename)

		# get label from file name such as "1_18.txt"
		label = int(filename.split('_')[0]) # return 1
		test_y.append(label)

	return train_x, train_y, test_x, test_y

# test hand writing class
def testHandWritingClass():
	## step 1: load data
	print "step 1: load data..."
	train_x, train_y, test_x, test_y = loadDataSet()

	## step 2: training...
	print "step 2: training..."
	pass

	## step 3: testing
	print "step 3: testing..."
	numTestSamples = test_x.shape[0]
	matchCount = 0
	for i in xrange(numTestSamples):
		predict = kNNClassify(test_x[i], train_x, train_y, 3)
		if predict == test_y[i]:
			matchCount += 1
	accuracy = float(matchCount) / numTestSamples

	## step 4: show the result
	print "step 4: show the result..."
print 'The classify accuracy is: %.2f%%' % (accuracy * 100)import kNN
from numpy import *
#1.test few numbers
dataSet, labels = kNN.createDataSet()
testX = array([1.2, 1.1])
k = 3
outputLabel = kNN.kNNClassify(testX, dataSet, labels, 3)
print "Your input is:", testX, "and classified to class: ", outputLabel
testX = array([0.1, 0.3])
outputLabel = kNN.kNNClassify(testX, dataSet, labels, 3)
print "Your input is:", testX, "and classified to class: ", outputLabel
#2.test handwriting
kNN.testHandWritingClass()以电影分类数据为例
| 电影名称 | 打斗次数 | 接吻次数 | 电影类型 |
|
California Man
| 3 | 104 | Romance |
|
He’s Not Really into Dudes
| 2 | 100 | Romance |
|
Beautiful Woman
| 1 | 81 | Romance |
|
Kevin Longblade
| 101 | 10 | Action |
|
Robo Slayer 3000
| 99 | 5 | Action |
|
Amped II
| 98 | 2 | Action |
| 未知 | 18 | 90 | Unknown |
利用sklearn模块,进行kNN分类的代码如下:
#coding=utf-8
import numpy as np
from sklearn import neighbors
knn = neighbors.classification.KNeighborsClassifier()
data = np.array([[3,104],[2,100],[1,81],[101,10],[99,5],[98,2]]) #create input data into arrays
print data
labels = np.array([1,1,1,2,2,2])
train=knn.fit(data,labels)
print train   #get the informatino of the classifier
result=knn.predict([18,90])
print result
参考文章;
1. http://blog.csdn.net/zouxy09/article/details/16955347
2. http://blog.csdn.net/zhaoyl03/article/details/8666906
3. http://blog.csdn.net/lsldd/article/details/41357931


 388
388

 被折叠的 条评论
为什么被折叠?
被折叠的 条评论
为什么被折叠?
 到【灌水乐园】发言


