


原文链接:https://www.cnblogs.com/zhaotianff/p/17387496.html
以前都在用InstallShield制作安装包,基本需求是能满足的,但也有一些缺点:
1、界面不能完全定制
2、不能直接调用代码里的功能
平常使用一些其它软件,觉得安装界面挺炫的,类似下面这种。

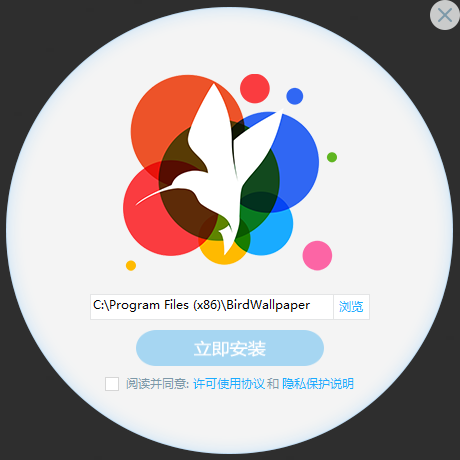
其实安装的过程主要就是解压文件,注册文件等。所以想自己封装一个简易的安装工具,实现界面的完全定制。
使用.Net Framework开发安装包美中不足的就是需要依赖.Net Framework Runtime ,像上面这种不知道是用什么技术开发的,完全不需要依赖任何运行时。
好在Windows 10及以上版本都自带了.Net Framework。
我这里主要实现以下基本安装包功能
1、释放文件
2、安装依赖
3、注册COM组件
4、创建桌面快捷方式/开机启动
5、创建控制面板卸载程序项
6、安装进度及状态显示
效果如下:

释放文件
这里我直接将需要释放的文件压缩成zip文件,然后放到工程的资源文件中去。通过解压 到指定路径的形式来完成释放功能。
主要用到ZipArchive类
这里的fileBuffer就是资源里的压缩包
代码如下:
 1   using (MemoryStream ms = new MemoryStream(fileBuffer))
 2                 {
 3                     var zipArchive = new ZipArchive(ms);
 4
 5                     foreach (var item in zipArchive.Entries)
 6                     {
 7                         //创建文件夹操作
 8
 9                         //文件判断操作
10
11                         //解压
12                         item.ExtractToFile(destFileName, true);
13
14                       }
15                     }
16                 }
安装依赖
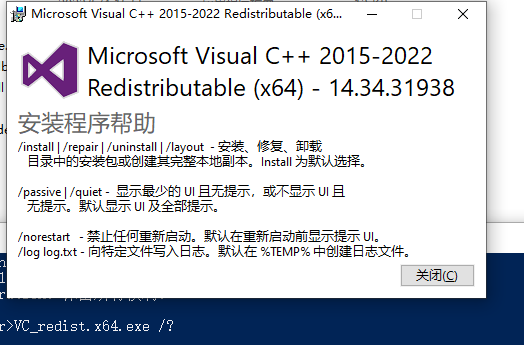
这里主要借助依赖库安装程序自身的命令行参数来完成。
像Microsoft Visual C++ 2015-2022 Redistributable (x64) ,可以通过/install /passive来进行直接安装。
一般来说大部分的依赖库可以通过 参数 /?进行查看
如果是 .msi格式的安装包 ,可以直接通过msiexec.exe来进行安装。可以参考https://www.cnblogs.com/zhaotianff/p/11558602.html
注册COM组件
直接调用regsvr32.exe /s执行安静注册即可
1 System.Diagnostics.Process.Start("regsvr32.exe", dllPath + " /s");
创建桌面快捷方式/开机启动
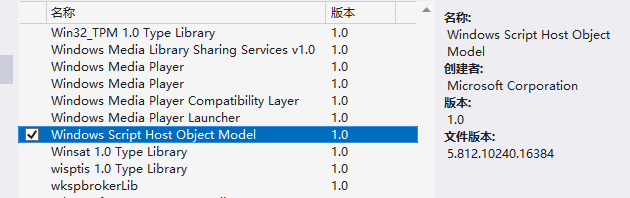
创建桌面快捷方式需要用到一个COM组件Windows Script Host Object。在项目中直接引用 即可
使用代码如下:
这里的exePath就是程序释放到的路径 如D:\install\xxx.exe
shotcutPath就是快捷方式的路径,如 C:\User\xx\Desktop\xxx.lnk
 1      private static void InternalCreateShortcut(string exePath, string shotcutPath)
 2         {
 3             try
 4             {
 5                 WshShell shell = new WshShell();
 6                 var exeName = System.IO.Path.GetFileNameWithoutExtension(exePath);
 7                 IWshShortcut shortcut = (IWshShortcut)shell.CreateShortcut(shortcutPath);
 8                 shortcut.TargetPath = exePath;  //目标路径
 9                 shortcut.WorkingDirectory = System.IO.Path.GetDirectoryName(exePath); //工作目录
10                 shortcut.WindowStyle = 1;
11                 shortcut.Description = exeName;  //描述
12                 shortcut.IconLocation = exePath + ",0";  //图标位置
13                 shortcut.Arguments = ""; //启动参数
14                 shortcut.Save();
15             }
16             catch (Exception ex)
17             {
18
19             }
20         }
创建开机自启,
直接使用上面的函数,将lnk创建到 shell:Startup路径即可。
1 var shortcutPath = Environment.GetFolderPath(Environment.SpecialFolder.Startup) + "\\" + exeName + ".lnk";
创建控制面板卸载程序项
这里主要对注册表进行操作
计算机\HKEY_LOCAL_MACHINE\SOFTWARE\Microsoft\Windows\CurrentVersion\Uninstall
增加一个GUID项,代表产品ID。
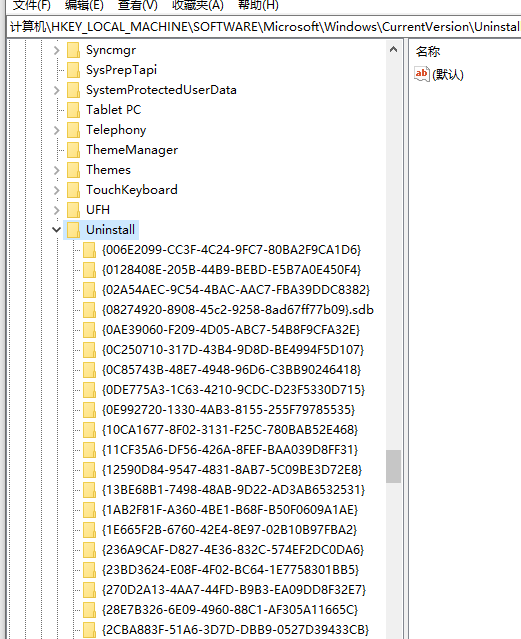
然后在项下增加图中所示的键值
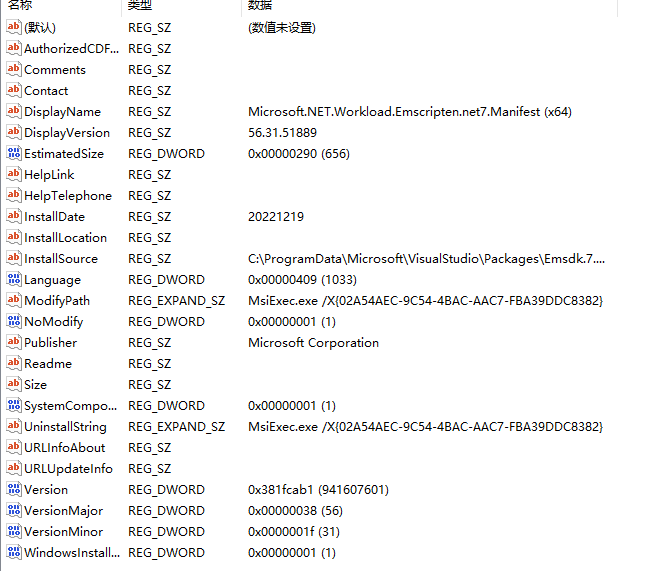
这里只需要增加一些常用的属性即可。上图是微软的安装程序创建的,我是直接参考上图创建。
完整的属性可以参考 Properties (Windows Installer) - Win32 apps | Microsoft Learn
我这里定义的数据结构如下:
     public class SetupProperty
      {
          public string ProductId => "{C8997941-26F4-4E38-A5BD-D6306F0A8FC2}";  //我的产品ID
          public string Comments => "描述";
          public string Contact => "";
          public string DisplayIcon => System.Reflection.Assembly.GetExecutingAssembly().Location;
          public string DisplayName => "控制面板显示名称";
          public string DisplayVersion => VersionUtil.GetVersionString();
          public int EstimatedSize { get; set; }
          public string HelpLink => "";
          public string InstallDate => DateTime.Now.ToString();
          public string InstallLocation { get; set; }
          public string InstallSource { get; set; }
          public string UninstallString { get; set; }
          public string Publisher => "发布者";
      }
创建代码如下:
     public void CreateUninstallInRegistry(SetupProperty setupProperty)
          {
                  try
                  {
                      var productKey = Microsoft.Win32.Registry.LocalMachine.CreateSubKey($"SOFTWARE\\Microsoft\\Windows\\CurrentVersion\\Uninstall\\{setupProperty.ProductId}");

                      foreach (var property in setupProperty.GetType().GetProperties())
                      {
                          if (property.Name == nameof(setupProperty.ProductId))
                              continue;

                          if (property.Name == nameof(setupProperty.EstimatedSize))
                          {
                              productKey.SetValue(property.Name, property.GetValue(setupProperty), Microsoft.Win32.RegistryValueKind.DWord);
                          }
                          else
                          {
                              productKey.SetValue(property.Name, property.GetValue(setupProperty), Microsoft.Win32.RegistryValueKind.String);
                          }
                      }
                  }
                  catch
                  {

                  }
          }
创建完成后就可以在控制面板看到自己添加的新项目。
这里需要注意的的UninstallString这个值就是在控制面板点击卸载时,系统执行的操作。文末的如何制作卸载程序这部分会说明如何设置UninstallString。
安装进度及状态显示
界面上放置一个progressbar,将每个阶段划分一定的比例,然后再计算tick,显示到progressbar上即可。
如何制作卸载程序
像微软的msi安装包安装后,都会缓存在
C:\ProgramData\Package Cache\{ProductId}\Installers
一些应用软件的msi安装包会缓存 在
C:\Users\x\AppData\Local\Downloaded Installations
之所以要缓存 ,因为后面卸载是需要用到这些安装包的,这里不做详细介绍,可以自行查找资料了解。
我这里也在安装完成后,将安装包缓存在C:\Users\x\AppData\Local\Downloaded Installations目录下。
然后在程序中增加一个卸载的命令行参数判断
    public enum SetupType
      {
          Install,
          UnInstall
      }


   public partial class App : Application
      {
          public static SetupType SetupType = SetupType.Install;

          protected override void OnStartup(StartupEventArgs e)
          {
              base.OnStartup(e);

              if (e.Args.Length > 0 && e.Args[0].ToUpper() == nameof(SetupType.UnInstall).ToUpper())
                  SetupType = SetupType.UnInstall;
          }
      }
当程序以uninstall参数启动时,执行卸载。
在删除依赖库时,依旧是通过程序的命令行参数或msiexec来执行卸载。
像Microsoft Visual C++ 2015-2022 Redistributable (x64) 的卸载参数是/uninstall /passive
msiexec.exe的卸载参数是/uninstall {0} /qn
所以我们在安装完成后在设置注册表项的UninstallString键值时,需要设置为带uninstall的值。
假设产品id是{02A54AEC-9C54-4BAC-AAC7-FBA39DDC8381},安装程序的名称为setup.exe,UninstallString就设置为"C:\Users\x\AppData\Local\Downloaded Installations\setup.exe uninstall"
这样在控制面板中就能正确卸载。
最后需要注意的就是,像注册COM,创建注册表都是需要管理员权限 的,可以将程序设置为管理员权限运行。
示例代码
GitHub - zhaotianff/CustomInstaller: Simple custom installer
//还有一个64位系统下32位软件的注册表路径
HKEY_LOCAL_MACHINE\SOFTWARE\Wow6432Node\Microsoft\Windows\CurrentVersion\Uninstall


 765
765

 被折叠的 条评论
为什么被折叠?
被折叠的 条评论
为什么被折叠?
 到【灌水乐园】发言


