


大家好,我是杂烩君。
嵌入式大杂烩周记主要是一些实用项目学习分享,每周一篇,每篇一个主题。
内容主要来源于我们之前收集的资料:
https://gitee.com/zhengnianli/EmbedSummary
本期主角:sys/queue.h
queue.h是Linux、FreeBSD中的一个头文件。
FreeBSD:FreeBSD 是一种类 UNIX操作系统。
这是一个很实用的头文件,因为这个头文件里全是宏定义操作,所以其不仅可以使用在Linux/嵌入式Linux项目中,也可以使用在单片机项目中,我也是因为在我们的单片机项目中看到,才知道有这么一个头文件的。我觉得挺实用的,与大家分享。
它使用宏实现了如下数据结构:
-
SLIST:单向无尾链表
-
LIST:双向无尾链表
-
STAILQ:单向有尾链表(可作队列使用)
-
TAILQ:双向有尾链表(可作队列使用)
所有的数据结构都支持如下功能:
-
在链表头插入节点
-
在任意节点后插入节点
-
删除节点
-
遍历节点
我们可以在Linux系统的如下路径中找到这个头文件:
/usr/include/sys/queue.h
也可以通过如下网址查看:
https://code.woboq.org/userspace/glibc/misc/sys/queue.h.html
sys/queue.h的使用
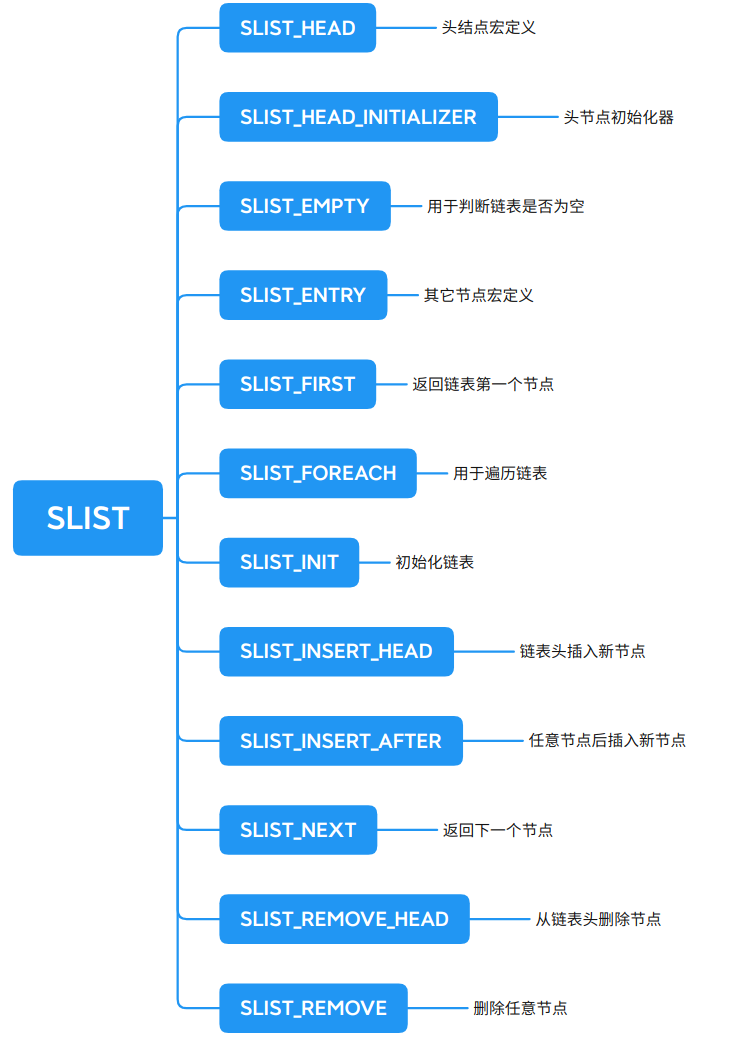
下面我们基于SLIST来演示其使用。
SLIST相关宏定义:
/*
 * Singly-linked List definitions.
 */
#define SLIST_HEAD(name, type)         \
struct name {                   \
 struct type *slh_first; /* first element */        \
}

#define SLIST_HEAD_INITIALIZER(head)       \
 { NULL }

#define SLIST_ENTRY(type)          \
struct {              \
 struct type *sle_next; /* next element */     \
}

/*
 * Singly-linked List functions.
 */
#define SLIST_INIT(head) do {         \
 (head)->slh_first = NULL;         \
} while (/*CONSTCOND*/0)

#define SLIST_INSERT_AFTER(slistelm, elm, field) do {   \
 (elm)->field.sle_next = (slistelm)->field.sle_next;   \
 (slistelm)->field.sle_next = (elm);       \
} while (/*CONSTCOND*/0)

#define SLIST_INSERT_HEAD(head, elm, field) do {    \
 (elm)->field.sle_next = (head)->slh_first;     \
 (head)->slh_first = (elm);         \
} while (/*CONSTCOND*/0)

#define SLIST_REMOVE_HEAD(head, field) do {      \
 (head)->slh_first = (head)->slh_first->field.sle_next;  \
} while (/*CONSTCOND*/0)

#define SLIST_REMOVE(head, elm, type, field) do {    \
 if ((head)->slh_first == (elm)) {       \
  SLIST_REMOVE_HEAD((head), field);      \
 }               \
 else {              \
  struct type *curelm = (head)->slh_first;    \
  while(curelm->field.sle_next != (elm))     \
   curelm = curelm->field.sle_next;     \
  curelm->field.sle_next =        \
      curelm->field.sle_next->field.sle_next;    \
 }               \
} while (/*CONSTCOND*/0)

#define SLIST_FOREACH(var, head, field)       \
 for((var) = (head)->slh_first; (var); (var) = (var)->field.sle_next)

/*
 * Singly-linked List access methods.
 */
#define SLIST_EMPTY(head) ((head)->slh_first == NULL)
#define SLIST_FIRST(head) ((head)->slh_first)
#define SLIST_NEXT(elm, field) ((elm)->field.sle_next)
下面我们通过实例来操作。
首先,创建链表头节点、其它节点结构体,用到SLIST_HEAD与SLIST_ENTRY这两个宏定义:
#define ELEM_TYPE int

/* 链表节点 */
typedef struct node
{
    ELEM_TYPE data;
    SLIST_ENTRY(node) field;
}node_st;

/* 链表头 */
typedef SLIST_HEAD(head, node) head_st;
链表数据域类型我们定义为int,field表示的是指针域。
① 创建一个头结点:
/* 创建链表头节点并初始化 */
head_st *head = (head_st *)malloc(sizeof(head_st));
SLIST_INIT(head);
头节点:不存任何数据的空节点,通常作为链表的第一个节点。
② 在链表头部分别插入节点node1、node2:
/* 头插法插入一个节点node1 */
node_st *node1 = (node_st *)malloc(sizeof(node_st));
node1->data = 1;
SLIST_INSERT_HEAD(head, node1, field);

/* 头插法插入一个节点node2 */
node_st *node2 = (node_st *)malloc(sizeof(node_st));
node2->data = 2;
SLIST_INSERT_HEAD(head, node2, field);
头指针:永远指向链表第一个节点的位置。
SLIST_INSERT_HEAD是从链表头部插入节点,新节点总是从头结点之后插入。
③ 在链表节点node2之后插入节点node3:
node_st *node3 = (node_st *)malloc(sizeof(node_st));
node3->data = 3;
SLIST_INSERT_AFTER(node2, node3, field);
SLIST_INSERT_AFTER是从指定节点slistelm之后插入新节点elm。
④ 遍历链表:
node_st *tmp_elm;
SLIST_FOREACH(tmp_elm, head, field)
{
 printf("%d ", tmp_elm->data);
}
输出为tmp_elm,访问tmp_elm即可。
⑤ 删除某个节点node2
SLIST_REMOVE(head, node2, node, field);
free(node2);
node2 = NULL;
⑥ 销毁整个链表
while (!SLIST_EMPTY(head))
{
    node_st *p = SLIST_FIRST(head);
    SLIST_REMOVE_HEAD(head, field);
    free(p);
    p = NULL;
}
free(head);
head = NULL;
完整测试代码:
#include <stdio.h>
#include <stdlib.h>
#include <sys/queue.h>

#define ELEM_TYPE int

/* 链表节点 */
typedef struct node
{
    ELEM_TYPE data;
    SLIST_ENTRY(node) field;
}node_st;

/* 链表头 */
typedef SLIST_HEAD(head, node) head_st;

int main(void)
{
    /* 创建链表头节点并初始化 */
    head_st *head = (head_st *)malloc(sizeof(head_st));
    SLIST_INIT(head);

    /* 头插法插入一个节点node1 */
    node_st *node1 = (node_st *)malloc(sizeof(node_st));
    node1->data = 1;
    SLIST_INSERT_HEAD(head, node1, field);

    /* 头插法插入一个节点node2 */
    node_st *node2 = (node_st *)malloc(sizeof(node_st));
    node2->data = 2;
    SLIST_INSERT_HEAD(head, node2, field);

    /* 遍历打印当前链表节点 */
    printf("list:\n");
    node_st *tmp_elm;
    SLIST_FOREACH(tmp_elm, head, field)
    {
        printf("%d ", tmp_elm->data);
    }
    printf("\n");

    /* 尾插法插入一个节点node3 */
    printf("insert node3:\n");
    node_st *node3 = (node_st *)malloc(sizeof(node_st));
    node3->data = 3;
    SLIST_INSERT_AFTER(node2, node3, field);
    SLIST_FOREACH(tmp_elm, head, field)
    {
        printf("%d ", tmp_elm->data);
    }
    printf("\n");

    /* 删除node2 */
    printf("delete node2:\n");
    SLIST_REMOVE(head, node2, node, field);
    free(node2);
    node2 = NULL;
    SLIST_FOREACH(tmp_elm, head, field)
    {
        printf("%d ", tmp_elm->data);
    }
    printf("\n");

    /* 销毁链表 */
    while (!SLIST_EMPTY(head))
    {
        node_st *p = SLIST_FIRST(head);
        SLIST_REMOVE_HEAD(head, field);
        free(p);
        p = NULL;
    }
    free(head);
    head = NULL;

    return 0;
}
编译、运行:
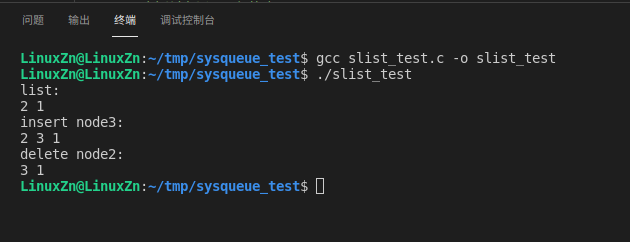
运行结果与我们上面分析的一致。
本次我们只分享queue.h里最简单的数据结构。其它几种数据结构的使用例子及相关宏说明可以通过man命令查看。
man是Linux下的帮助命令。
我们输入 man queue 即可查到queue.h的相关说明:
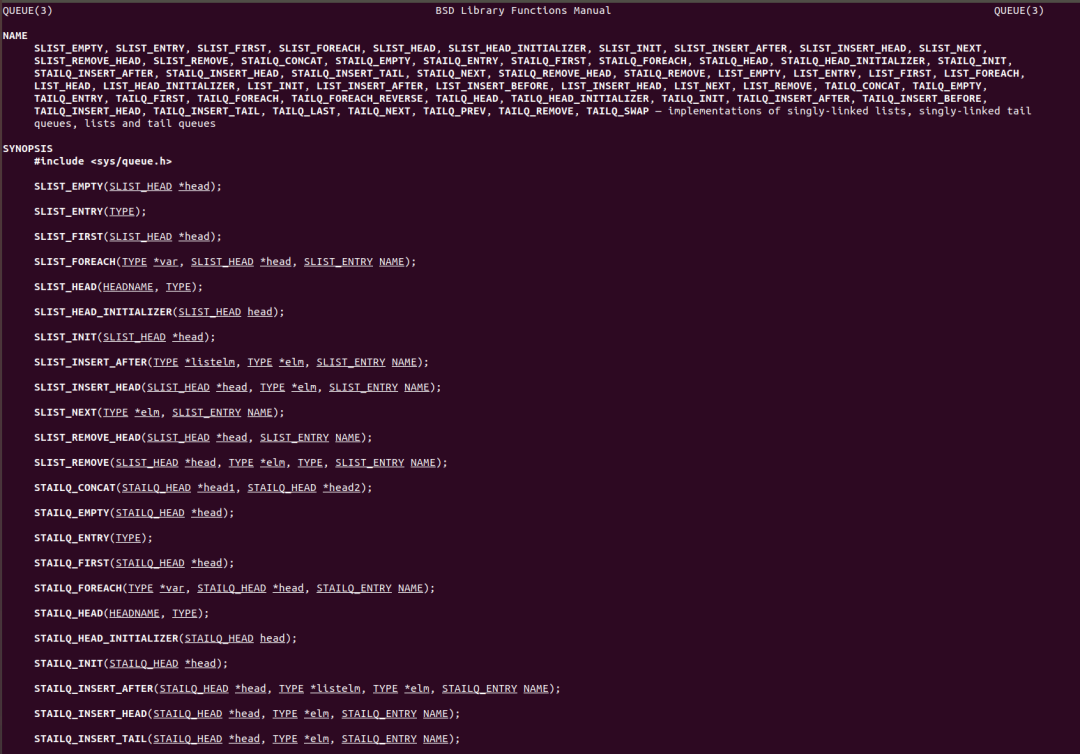
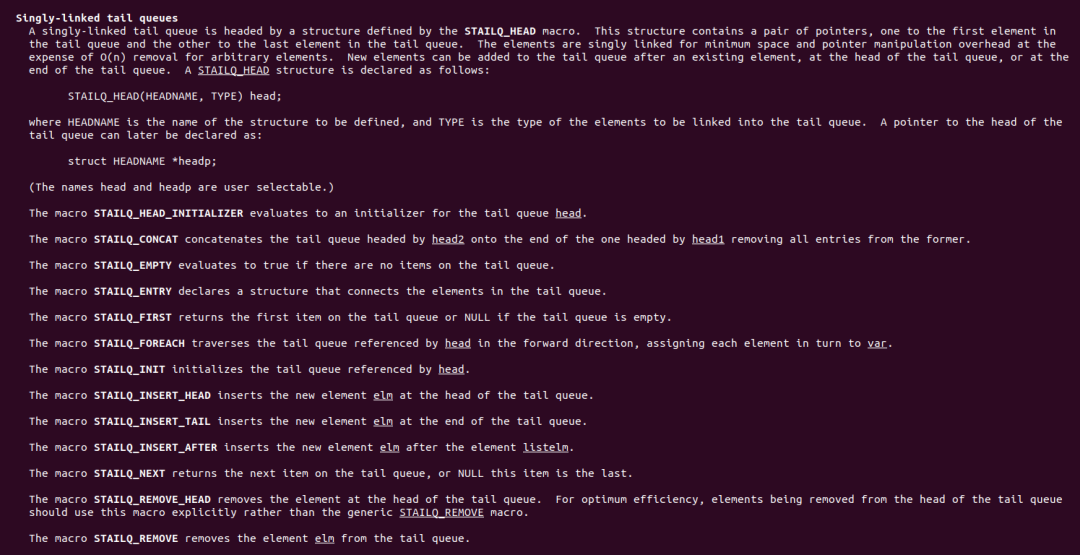
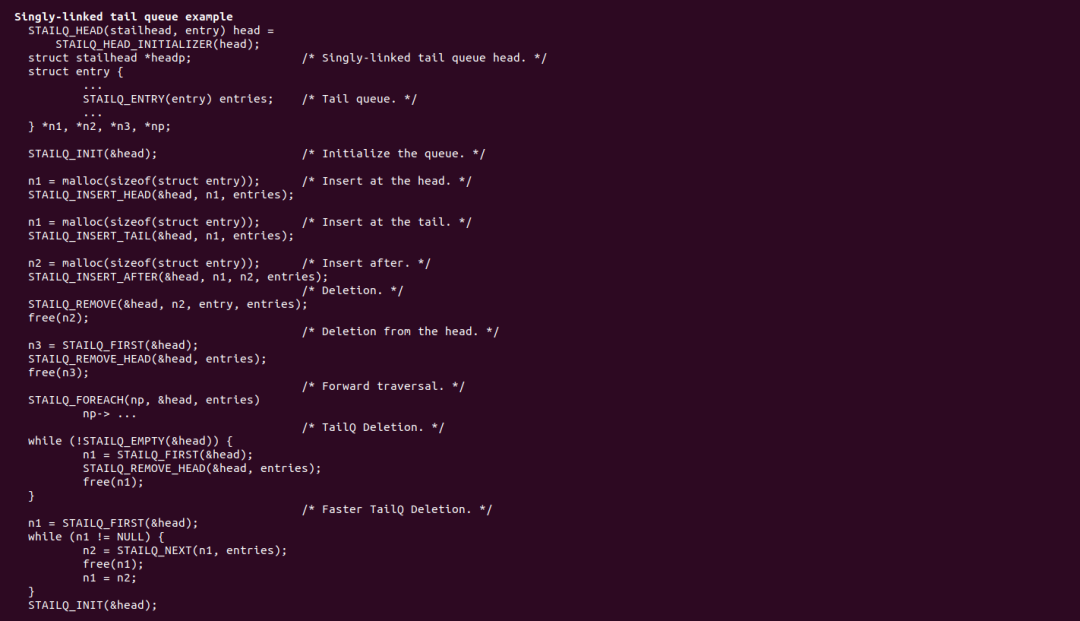
可以看到,man命令很强大,可查到queue的帮助说明很详细,有宏的说明及使用示例等。
以上就是本次的分享,文章如有错误,欢迎支持,谢谢!我们下期见~


 3057
3057


 被折叠的 条评论
为什么被折叠?
被折叠的 条评论
为什么被折叠?
 到【灌水乐园】发言


