


 本文详细介绍了在gem5模拟器中创建和配置经典缓存对象的过程,包括L1Cache和L2Cache的实例化、参数设置以及与CPU和内存总线的连接。同时讨论了Ruby缓存模型的选择和gem5统计输出的理解。教程还展示了如何向脚本添加命令行参数以调整缓存参数。
目录
三、Adding caches to the simple config file
四、Adding parameters to your script
以上一教程的配置脚本作为起点,本章将详细介绍一个更复杂的配置。
将根据下图所示添加一个缓存层次结构到系统中。
此外,本教程还将介绍如何理解gem5的统计输出,并向你的脚本中添加命令行参数。

一、Creating cache objects
因为我们正在建模一个单核心CPU系统,,不关心建模缓存一致性。所以这个教程中,将使用经典缓存(Classic caches)而不是Ruby入门章节(ruby-intro-chapter)。教程将扩展Cache SimObject并对其进行系统配置。首先,需要了解用于配置Cache对象的参数。
1、Classic caches and Ruby
gem5目前有两个完全不同的子系统用于模拟系统中的片上缓存,即“经典缓存”和“Ruby”。这是由于gem5是密歇根大学的m5和威斯康辛大学的GEMS的结合体。GEMS使用Ruby作为其缓存模型,而经典缓存来自m5代码库(因此称为“经典”)。这两种模型的区别在于Ruby被设计用于详细模拟缓存一致性。Ruby的一部分是SLICC,一种用于定义缓存一致性协议的语言。而经典缓存则实现了简化且不灵活的MOESI一致性协议。
在选择使用哪个模型时,应考虑正在建模的内容侧重点。如果正在建模缓存一致性协议的更改,或者一致性协议对结果有重要影响,使用Ruby。如果一致性协议不重要,使用经典缓存。
gem5的长期目标是将这两种缓存模型统一为一个综合模型。
二、Cache
Cache SimObject的声明可以在src/mem/cache/Cache.py中找到。这个Python文件定义了可以设置SimObject的参数。在内部,当实例化SimObject时,这些参数会传递给该对象的C++实现。Cache SimObject继承自下面显示的BaseCache对象。
在BaseCache类中,有许多参数。例如,assoc是一个整数参数。一些参数,比如write_buffers,在这种情况下有一个默认值,为8。默认参数是Param.*的第一个参数,除非第一个参数是一个字符串。每个参数的字符串参数是该参数的描述(例如,tag_latency = Param.Cycles("Tag lookup latency")表示tag_latency控制着“此缓存的命中延迟”)。
许多这些参数没有默认值,所以在调用m5.instantiate()之前需要设置这些参数。
为了使用特定的参数创建缓存,首先要在与configs/tutorial/part1/simple.py相同目录中创建一个名为caches.py的新文件。
1、导入SimObject(s)
第一步是导入将在此文件中扩展的SimObject(s)。
from m5.objects import Cache2、创建L1Cache
接下来,可以像处理其他Python类一样处理BaseCache对象并进行扩展。可以根据需要给新的缓存取任意名称,创建一个L1缓存。
class L1Cache(Cache):
    assoc = 2
    tag_latency = 2
    data_latency = 2
    response_latency = 2
    mshrs = 4
    tgts_per_mshr = 20
在这里,扩展了BaseCache并设置了大多数在BaseCache SimObject中没有默认值的参数。BaseCache的部分参数没有默认值,就需要设置。如果要查看所有可能的配置选项,并找出哪些是必需的,哪些是可选的,必须查看SimObject的源代码。
3、创建L1Cache子类
接下来,创建两个L1Cache的子类,一个是L1DCache,一个是L1ICache。
class L1ICache(L1Cache):
    size = '16kB'

class L1DCache(L1Cache):
    size = '64kB'
4、创建L2Cache
创建一个带有部分参数的L2缓存
class L2Cache(Cache):
    size = '256kB'
    assoc = 8
    tag_latency = 20
    data_latency = 20
    response_latency = 20
    mshrs = 20
    tgts_per_mshr = 12
现在,已经指定了BaseCache所需的所有必要参数,只需要实例化子类并将缓存连接到互连网络。但如果将大量对象连接到复杂的互连网络,可能会导致配置脚本文件的规模增大,同时脚本配置文件的可读性降低。因此,首先在Cache的子类中添加一些辅助函数(上述的类都是python类)。
5、L1Cache添加连接函数
对于L1缓存,添加两个函数:connectCPU将CPU连接到缓存,connectBus将缓存连接到总线。我们需要将以下代码添加到L1Cache类中。
def connectCPU(self, cpu):
    # need to define this in a base class!
    raise NotImplementedError

def connectBus(self, bus):
    self.mem_side = bus.cpu_side_ports
6、为L1ICache和L1DCache添加连接函数
接下来,需要为指令缓存和数据缓存分别定义单独的connectCPU函数,因为I-cache和D-cache端口有不同的名称。此时的L1ICache和L1DCache类变成如下:
class L1ICache(L1Cache):
    size = '16kB'

    def connectCPU(self, cpu):
        self.cpu_side = cpu.icache_port

class L1DCache(L1Cache):
    size = '64kB'

    def connectCPU(self, cpu):
        self.cpu_side = cpu.dcache_port
7、为L2Cache添加内存侧和CPU侧的连接函数
分别为L2Cache添加连接到内存侧和CPU侧总线的函数。
def connectCPUSideBus(self, bus):
    self.cpu_side = bus.mem_side_ports

def connectMemSideBus(self, bus):
    self.mem_side = bus.cpu_side_ports
完整代码
import m5
from m5.objects import Cache
# Add the common scripts to our path
m5.util.addToPath("../../")
from common import SimpleOpts
# Some specific options for caches
# For all options see src/mem/cache/BaseCache.py
class L1Cache(Cache):
"""Simple L1 Cache with default values"""
assoc = 2
tag_latency = 2
data_latency = 2
response_latency = 2
mshrs = 4
tgts_per_mshr = 20
def __init__(self, options=None):
super(L1Cache, self).__init__()
pass
def connectBus(self, bus):
"""Connect this cache to a memory-side bus"""
self.mem_side = bus.cpu_side_ports
def connectCPU(self, cpu):
"""Connect this cache's port to a CPU-side port
This must be defined in a subclass"""
raise NotImplementedError
class L1ICache(L1Cache):
"""Simple L1 instruction cache with default values"""
# Set the default size
size = "16kB"
SimpleOpts.add_option(
"--l1i_size", help=f"L1 instruction cache size. Default: {size}"
)
def __init__(self, opts=None):
super(L1ICache, self).__init__(opts)
if not opts or not opts.l1i_size:
return
self.size = opts.l1i_size
def connectCPU(self, cpu):
"""Connect this cache's port to a CPU icache port"""
self.cpu_side = cpu.icache_port
class L1DCache(L1Cache):
"""Simple L1 data cache with default values"""
# Set the default size
size = "64kB"
SimpleOpts.add_option(
"--l1d_size", help=f"L1 data cache size. Default: {size}"
)
def __init__(self, opts=None):
super(L1DCache, self).__init__(opts)
if not opts or not opts.l1d_size:
return
self.size = opts.l1d_size
def connectCPU(self, cpu):
"""Connect this cache's port to a CPU dcache port"""
self.cpu_side = cpu.dcache_port
class L2Cache(Cache):
"""Simple L2 Cache with default values"""
# Default parameters
size = "256kB"
assoc = 8
tag_latency = 20
data_latency = 20
response_latency = 20
mshrs = 20
tgts_per_mshr = 12
SimpleOpts.add_option("--l2_size", help=f"L2 cache size. Default: {size}")
def __init__(self, opts=None):
super(L2Cache, self).__init__()
if not opts or not opts.l2_size:
return
self.size = opts.l2_size
def connectCPUSideBus(self, bus):
self.cpu_side = bus.mem_side_ports
def connectMemSideBus(self, bus):
self.mem_side = bus.cpu_side_ports
三、Adding caches to the simple config file
将上一教程的最终完整代码文件复制在同目录,并命名为two_level.py。
cp ./configs/tutorial/part1/simple.py ./configs/tutorial/part1/two_level.py1、导入caches
首先,在文件的顶部(m5.objects导入之后)添加以下内容,将caches.py文件中的名称导入到命名空间中。
from caches import *2、创建L1Cache
在创建CPU之后,创建L1缓存:
system.cpu.icache = L1ICache()
system.cpu.dcache = L1DCache()
3、连接缓存和CPU
使用上述创建的连接函数将缓存连接到CPU上:
system.cpu.icache.connectCPU(system.cpu)
system.cpu.dcache.connectCPU(system.cpu)
删除原文件中用于直接将缓存端口连接到内存总线上的两行。
system.cpu.icache_port = system.membus.cpu_side_ports
system.cpu.dcache_port = system.membus.cpu_side_ports
4、创建L2XBar
L2缓存只允许一个端口与其连接,所以不能直接将L1缓存连接到L2缓存。因此,需要创建一个L2总线,将L1缓存间接连接到L2缓存。然后,可以使用辅助函数将L1缓存连接到L2总线。
system.l2bus = L2XBar()

system.cpu.icache.connectBus(system.l2bus)
system.cpu.dcache.connectBus(system.l2bus)
需要注意的是,在system.l2cache.connectMemSideBus之前,已经定义了system.membus = SystemXBar(),因此可以将其传递给system.l2cache.connectMemSideBus。文件中的其他部分保持不变。
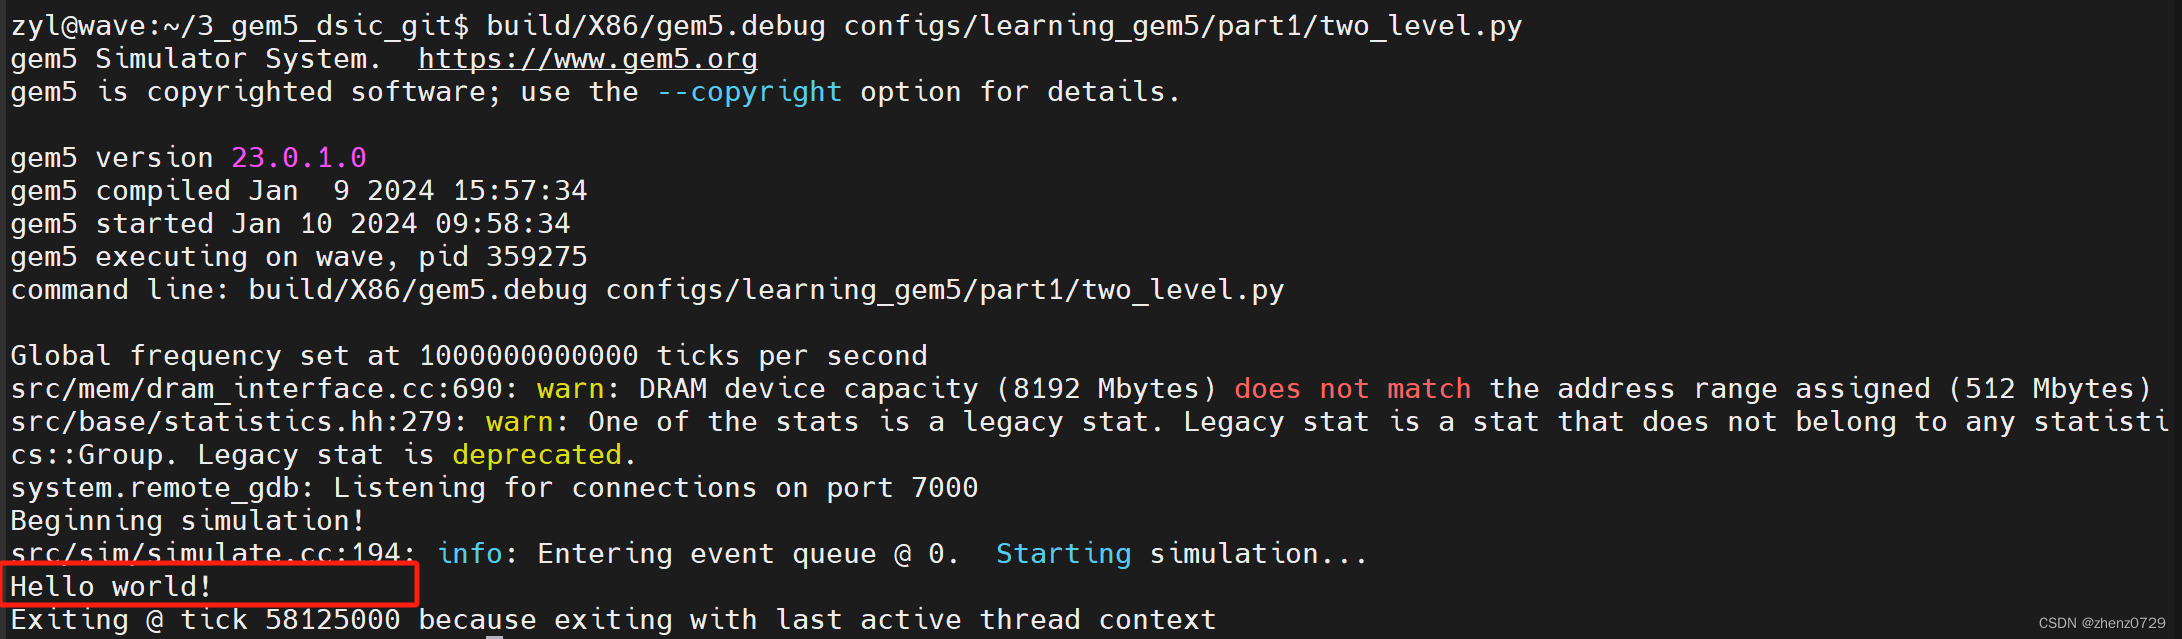
现在有了一个完整的配置,包含了一个两级缓存层次结构。如果运行当前文件,hello程序应该在57467000个时钟周期内完成。完整的脚本保存在gem5源代码的configs/learning_gem5/part1/two_level.py中。
完整代码
# import the m5 (gem5) library created when gem5 is built
import m5

# import all of the SimObjects
from m5.objects import *
from gem5.runtime import get_runtime_isa

# Add the common scripts to our path
m5.util.addToPath("../../")

# import the caches which we made
from caches import *

# import the SimpleOpts module
from common import SimpleOpts

# Default to running 'hello', use the compiled ISA to find the binary
# grab the specific path to the binary
thispath = os.path.dirname(os.path.realpath(__file__))
default_binary = os.path.join(
    thispath,
    "../../../",
    "tests/test-progs/hello/bin/x86/linux/hello",
)

# Binary to execute
SimpleOpts.add_option("binary", nargs="?", default=default_binary)

# Finalize the arguments and grab the args so we can pass it on to our objects
args = SimpleOpts.parse_args()

# create the system we are going to simulate
system = System()

# Set the clock frequency of the system (and all of its children)
system.clk_domain = SrcClockDomain()
system.clk_domain.clock = "1GHz"
system.clk_domain.voltage_domain = VoltageDomain()

# Set up the system
system.mem_mode = "timing"  # Use timing accesses
system.mem_ranges = [AddrRange("512MB")]  # Create an address range

# Create a simple CPU
system.cpu = X86TimingSimpleCPU()

# Create an L1 instruction and data cache
system.cpu.icache = L1ICache(args)
system.cpu.dcache = L1DCache(args)

# Connect the instruction and data caches to the CPU
system.cpu.icache.connectCPU(system.cpu)
system.cpu.dcache.connectCPU(system.cpu)

# Create a memory bus, a coherent crossbar, in this case
system.l2bus = L2XBar()

# Hook the CPU ports up to the l2bus
system.cpu.icache.connectBus(system.l2bus)
system.cpu.dcache.connectBus(system.l2bus)

# Create an L2 cache and connect it to the l2bus
system.l2cache = L2Cache(args)
system.l2cache.connectCPUSideBus(system.l2bus)

# Create a memory bus
system.membus = SystemXBar()

# Connect the L2 cache to the membus
system.l2cache.connectMemSideBus(system.membus)

# create the interrupt controller for the CPU
system.cpu.createInterruptController()
system.cpu.interrupts[0].pio = system.membus.mem_side_ports
system.cpu.interrupts[0].int_requestor = system.membus.cpu_side_ports
system.cpu.interrupts[0].int_responder = system.membus.mem_side_ports

# Connect the system up to the membus
system.system_port = system.membus.cpu_side_ports

# Create a DDR3 memory controller
system.mem_ctrl = MemCtrl()
system.mem_ctrl.dram = DDR3_1600_8x8()
system.mem_ctrl.dram.range = system.mem_ranges[0]
system.mem_ctrl.port = system.membus.mem_side_ports

system.workload = SEWorkload.init_compatible(args.binary)

# Create a process for a simple "Hello World" application
process = Process()
# Set the command
# cmd is a list which begins with the executable (like argv)
process.cmd = [args.binary]
# Set the cpu to use the process as its workload and create thread contexts
system.cpu.workload = process
system.cpu.createThreads()

# set up the root SimObject and start the simulation
root = Root(full_system=False, system=system)
# instantiate all of the objects we've created above
m5.instantiate()

print("Beginning simulation!")
exit_event = m5.simulate()
print("Exiting @ tick %i because %s" % (m5.curTick(), exit_event.getCause()))
测试结果
四、Adding parameters to your script
在使用gem5进行实验时,为了避免每次想要使用不同的参数测试系统时都需要编辑配置脚本。可以在gem5配置脚本中添加命令行参数。
注意:由于配置脚本是Python代码,可以使用支持参数解析的Python库。尽管pyoptparse官方上已经被弃用,但因为gem5的最低Python版本曾经是2.5,gem5附带的许多配置脚本仍然使用它,而不是新版的pyargparse。现在gem5的最低Python版本是3.6,因此在编写不需要与当前gem5脚本交互的新脚本时,可以选择Python的pyargparse。
-
Pyargparse是Python标准库中的argparse模块,而pyoptparse是gem5自己实现的一个选项解析库。Pyargparse提供了更丰富的功能和更好的用户体验,并在Python社区中广泛使用。
-
Pyargparse在Python 2.7版本之后成为标准库的一部分,而pyoptparse是为了与较旧版本的Python兼容而创建的。由于gem5的最低Python版本现在是3.6,因此pyargparse是更好的选择,特别是对于编写新的脚本。
-
Pyargparse提供了更简洁、更直观的API,并且支持更丰富的参数类型和选项配置。它具有更好的错误处理和帮助信息生成。
为了向我们的两级缓存配置添加选项,在导入缓存之后,让我们添加一些选项。
import argparse

parser = argparse.ArgumentParser(description='A simple system with 2-level cache.')
parser.add_argument("binary", default="", nargs="?", type=str,
                    help="Path to the binary to execute.")
parser.add_argument("--l1i_size",
                    help=f"L1 instruction cache size. Default: 16kB.")
parser.add_argument("--l1d_size",
                    help="L1 data cache size. Default: Default: 64kB.")
parser.add_argument("--l2_size",
                    help="L2 cache size. Default: 256kB.")

options = parser.parse_args()
如果想像上面所示的方式传递二进制文件的路径,并通过选项(options)使用它,可以将其指定为options.binary。
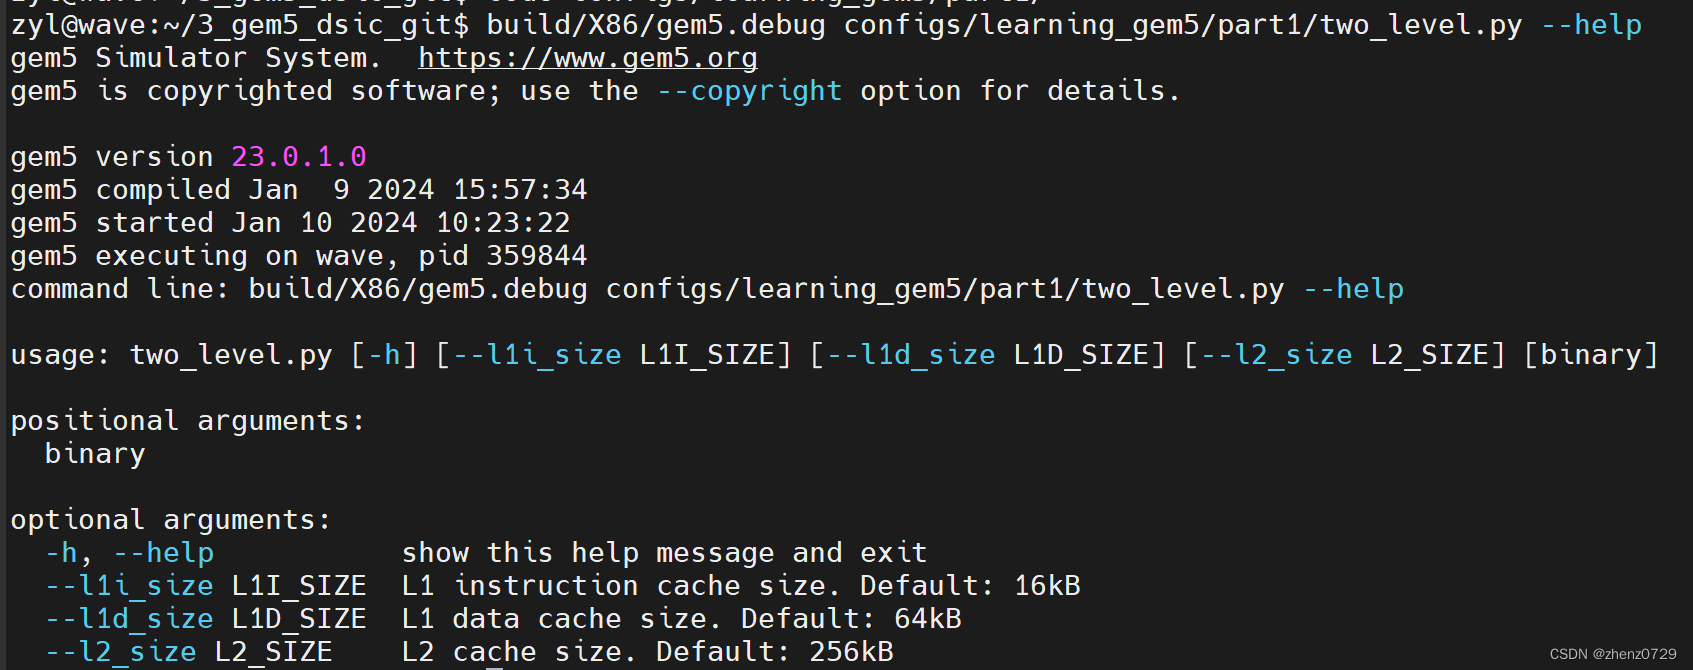
system.workload = SEWorkload.init_compatible(options.binary)使用build/X86/gem5.debug configs/learning_gem5/part1/two_level.py --help可以显示刚刚添加的选项。
接下来,需要将这些选项传递给配置脚本中创建的缓存。为了实现这一点,我们将简单地修改two_level_opts.py脚本,将选项作为参数传递给缓存的构造函数,并添加一个合适的构造函数。
system.cpu.icache = L1ICache(options)
system.cpu.dcache = L1DCache(options)
...
system.l2cache = L2Cache(options)
在caches.py文件中,需要为每个类添加构造函数(Python中的__init__函数)。从基本L1缓存开始,因为没有任何适用于基本L1缓存的参数,所以只需添加一个空的构造函数。但在这种情况下,不能忘记调用父类的构造函数。如果省略对父类构造函数的调用,gem5的SimObject属性查找函数将失败,并且在尝试实例化缓存对象时会出现"RuntimeError: maximum recursion depth exceeded"的错误。因此,在L1Cache类中,需要在静态类成员之后添加以下内容。
def __init__(self, options=None):
    super(L1Cache, self).__init__()
    pass
接下来,在L1ICache中,需要使用创建的选项(l1i_size)来设置大小。在下面的代码中,对于没有将选项传递给L1ICache构造函数和在命令行上没有指定选项的情况,有相应的保护代码。在这些情况下,将使用我们指定的大小默认值。
def __init__(self, options=None):
    super(L1ICache, self).__init__(options)
    if not options or not options.l1i_size:
        return
    self.size = options.l1i_size
可以在L1DCache使用相同的代码:
def __init__(self, options=None):
    super(L1DCache, self).__init__(options)
    if not options or not options.l1d_size:
        return
    self.size = options.l1d_size
在L2Cache使用相同的代码:
def __init__(self, options=None):
    super(L2Cache, self).__init__()
    if not options or not options.l2_size:
        return
    self.size = options.l2_size
测试
build/X86/gem5.debug configs/learning_gem5/part1/two_level.py --l2_size='2MB' --l1d_size='128kB'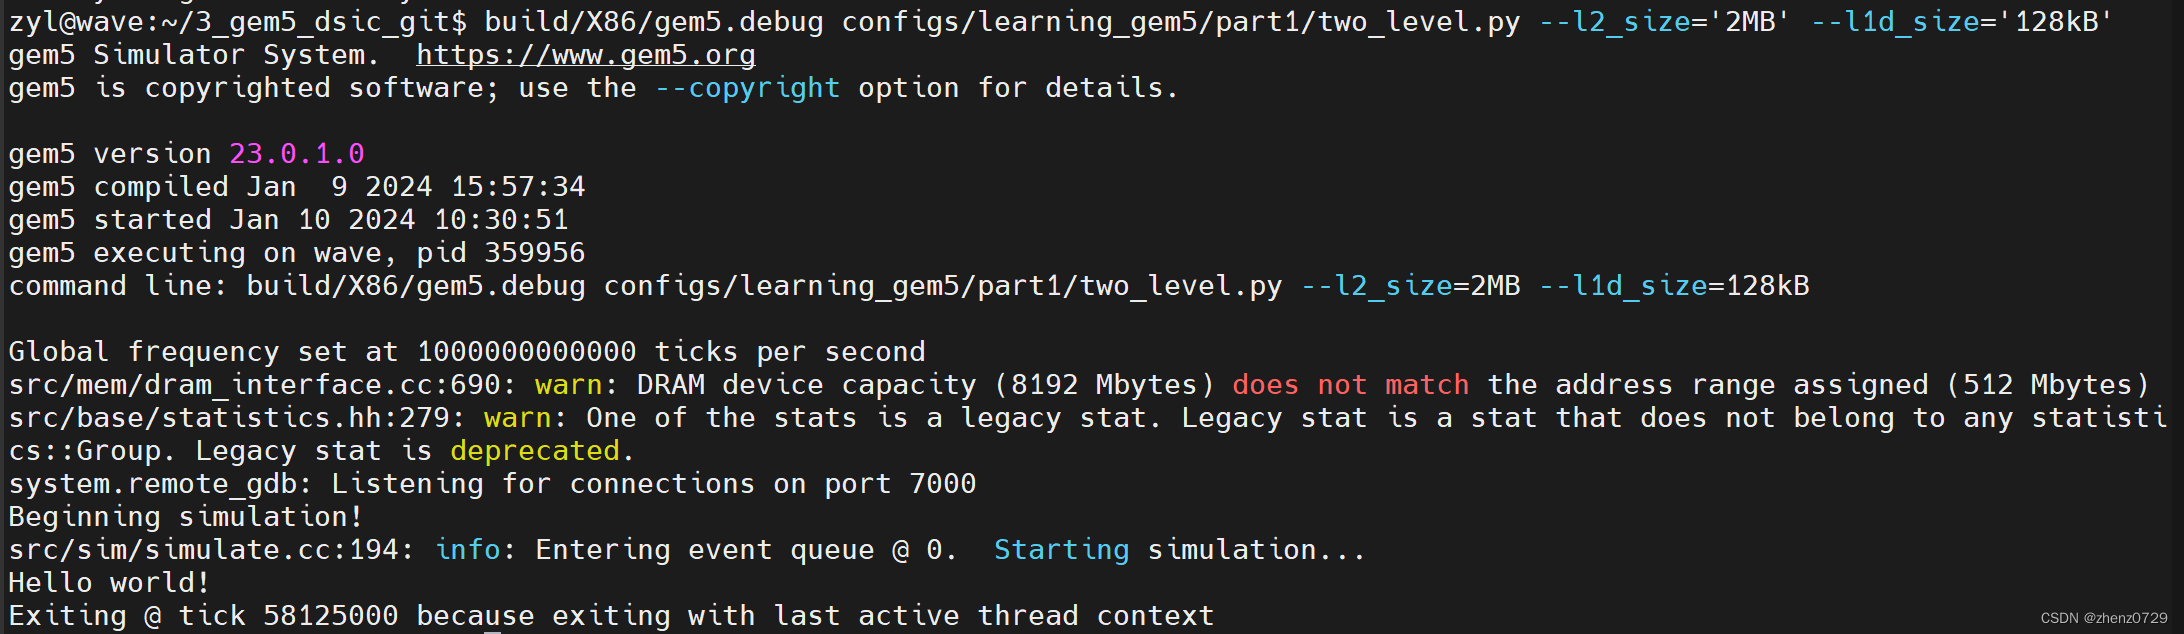


 237
237

 被折叠的 条评论
为什么被折叠?
被折叠的 条评论
为什么被折叠?
 到【灌水乐园】发言


