1.主界面布局xml代码
<?xml version="1.0" encoding="utf-8"?>
<LinearLayout xmlns:android="http://schemas.android.com/apk/res/android"
    android:layout_width="match_parent"
    android:layout_height="match_parent"
    android:orientation="vertical" >

    <TextView
        android:layout_width="match_parent"
        android:layout_height="50dp"
        android:background="#339933"
        android:gravity="center"
        android:text="配置设备"
        android:textColor="#ffffff"
        android:textSize="20dp" />

    <ListView
        android:id="@+id/smart_control_lamp_listview"
        android:layout_width="match_parent"
        android:layout_height="match_parent" >
    </ListView>

</LinearLayout>
2.SceneMatchSwitchActivity界面代码
public class SceneMatchSwitchActivity extends Activity {
private ListView mLampListview;
@Override
protected void onCreate(Bundle savedInstanceState) {
super.onCreate(savedInstanceState);
setContentView(R.layout.activity_scene_match_switches);
mLampListview = (ListView) findViewById(R.id.smart_control_lamp_listview);
mLampListview.setAdapter(new myAdapter());
}
private class myAdapter extends BaseAdapter {
@Override
public int getCount() {
return 7;
}
@Override
public Object getItem(int position) {
return null;
}
@Override
public long getItemId(int position) {
return 0;
}
@Override
public View getView(int position, View convertView, ViewGroup parent) {
ViewHolder holder = null;
if (convertView == null) {
convertView = View.inflate(getApplicationContext(), R.layout.item_bluetooth_device_status, null);
holder = new ViewHolder();
convertView.setTag(holder);
holder.mTextViewDeviceName = (TextView) convertView.findViewById(R.id.bluetooth_device_name_textview);
holder.mTextViewDeviceState = (TextView) convertView.findViewById(R.id.bluetooth_device_state);
holder.mTextViewDeviceSwitch = (ImageView) convertView.findViewById(R.id.bluetooth_device_switch_imageview);
holder.mTextViewDeviceIcon = (ImageView) convertView.findViewById(R.id.bluetooth_device_icon_imageview);
} else {
holder = (ViewHolder) convertView.getTag();
}
return convertView;
}
private class ViewHolder {
TextView mTextViewDeviceName;
TextView mTextViewDeviceState;
ImageView mTextViewDeviceSwitch;
ImageView mTextViewDeviceIcon;
}
}
}
3.listview要加载的item样式:图片以及布局代码
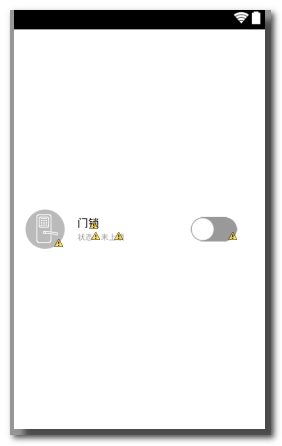
<?xml version="1.0" encoding="utf-8"?>
<RelativeLayout xmlns:android="http://schemas.android.com/apk/res/android"
    android:layout_width="match_parent"
    android:layout_height="match_parent"
    android:layout_weight="1"
    android:padding="5dp" >

    <ImageView
        android:id="@+id/bluetooth_device_switch_imageview"
        style="@style/HotelModeSelect_001"
        android:layout_alignParentRight="true"
        android:layout_centerVertical="true"
        android:layout_marginRight="30dp"
        android:src="@drawable/openguan" />

    <ImageView
        android:id="@+id/bluetooth_device_icon_imageview"
        style="@style/HotelModeSelect_001"
        android:layout_alignParentLeft="true"
        android:layout_centerVertical="true"
        android:layout_marginLeft="9dp"
        android:src="@drawable/lock_close_icon" />

    <LinearLayout
        style="@style/HotelModeSelect_001"
        android:layout_centerVertical="true"
        android:layout_marginLeft="16dp"
        android:layout_toRightOf="@+id/bluetooth_device_icon_imageview"
        android:orientation="vertical" >

        <TextView
            android:id="@+id/bluetooth_device_name_textview"
            style="@style/HotelModeSelect_001"
            android:textColor="#000000"
            android:text="门锁" />

        <LinearLayout
            android:layout_width="wrap_content"
            android:layout_height="wrap_content"
            android:layout_marginTop="3dp" >

            <TextView
                style="@style/HotelModeSelect_001"
                android:text="状态:"
                android:textColor="#66000000"
                android:textSize="10sp" />

            <TextView
                android:id="@+id/bluetooth_device_state"
                style="@style/HotelModeSelect_001"
                android:text="未上锁"
                android:textColor="#66000000"
                android:textSize="10sp" />
        </LinearLayout>
    </LinearLayout>

</RelativeLayout>


 368
368


 被折叠的 条评论
为什么被折叠?
被折叠的 条评论
为什么被折叠?
 到【灌水乐园】发言


