


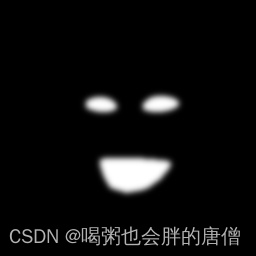
今天的目标是将人脸的嘴巴和眼睛区域抠出来,使用insightface简单实现出来,为了方便批量使用多进程跑数据,使用多进程的方式,下面是代码:
import os
import cv2
from  multiprocessing import  Pool
import numpy as np
from insightface.app import FaceAnalysis
from  tqdm import  tqdm

model = FaceAnalysis()
model.prepare(ctx_id=0, det_size=(224, 224))


path='inputs/'
res_p='res/'
ls=os.listdir(path)
os.makedirs(res_p,exist_ok=True)
ls.sort()

def process(ind):
    frame = cv2.imread(path + ind)
    faces = model.get(np.array(frame))
    # 这里仅仅演示单人图片
    points = faces[0].landmark_2d_106

    h, w = frame.shape[:2]
    hull_mask = np.zeros((h, w, 1), dtype=np.float32)
    # 左眼
    cv2.fillConvexPoly(hull_mask, cv2.convexHull(points[33:43].astype(np.int32)), (1,))
    # 右眼
    cv2.fillConvexPoly(hull_mask, cv2.convexHull(points[87:97].astype(np.int32)), (1,))
    # 嘴巴
    cv2.fillConvexPoly(hull_mask, cv2.convexHull(points[52:72].astype(np.int32)), (1,))
    dilate = h // 32
    hull_mask = cv2.dilate(hull_mask, cv2.getStructuringElement(cv2.MORPH_ELLIPSE, (dilate, dilate)), iterations=1)
    blur = h // 16
    blur = blur + (1 - blur % 2)
    hull_mask = cv2.GaussianBlur(hull_mask, (blur, blur), 0)
    hull_mask = hull_mask[..., None]
    cv2.imwrite(res_p + ind.split('.')[0] + '_eyem.jpg', hull_mask * 255)


if __name__ == '__main__':
    with Pool(processes=min(10,len(ls))) as p:
        with tqdm(total=len(ls)) as pbar:
            for _ in p.imap_unordered(process,ls):
                pbar.update()
测试一下:


 7万+
7万+


 被折叠的 条评论
为什么被折叠?
被折叠的 条评论
为什么被折叠?
 到【灌水乐园】发言


