


双线性插值算法的原理比较简单,就是这样一个需求,假如想知道一个坐标的数值,直接找到其4个周围的数值,利用这4个数值进行线性插值出目标位置的数值,比较简单的思路就是先对x方向进行插值,然后对y方向进行插值,就诞生了所谓的双线性插值,示例图如下:
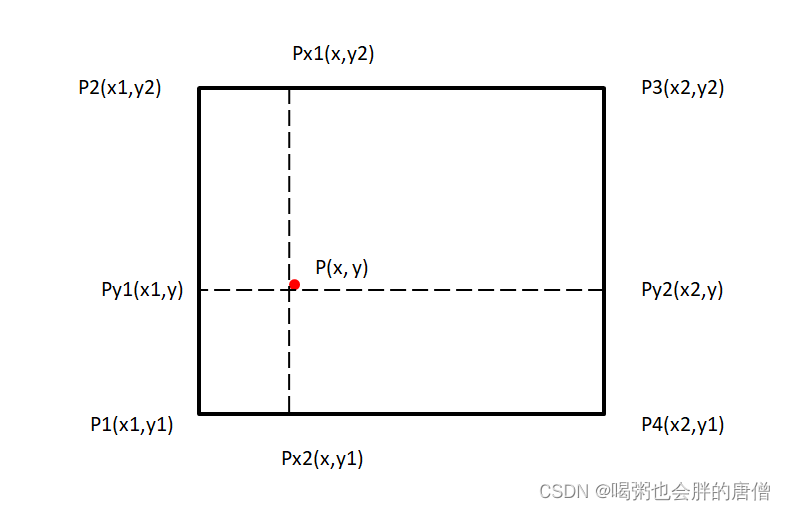
也就是使用P1/P2/P3/P4四个点插值出来P的数值
不管是先进行x坐标还是先进行y坐标都是OK的
具体来说,就是使用先计算出Px1和Px2的数值,然后再计算出来Py1和Py2,最终计算出来P的数值。具体公式化为如下:
简单的使用python实现一下:
class Point:
    def __init__(self, x=None, y=None):
        self.x = x
        self.y = y


def bilinear_interpolation(x, y, points, values):
    px1 = (values[3]-values[0])*((x-points[1].x)/(points[2].x-points[1].x))+values[1]
    px2 = (values[2] - values[1]) * ((x - points[0].x) / (points[3].x - points[0].x)) + values[0]
    p = (px1-px2)*((y-points[0].y)/(points[1].y-points[0].y))+px2
    return p


if __name__ == '__main__':
    points = [Point(1, 2), Point(1, 4), Point(3, 4), Point(3, 2)]
    vs = [1, 2, 3, 4]
    print(bilinear_interpolation(x=2, y=3, points=points, values=vs))#2.5
经常我们都能看到使用OpenCV等工具进行resize尺寸,默认一般都是双线性插值,双线性插值是效率和精度的平衡,也就是耗时比较少效果也不错。下面我使用python简单的实现一下resize,这里所说的resize都是放大的resize,因为缩小尺寸根本用不到插值,只需要在原图进行采样即可,所以我这里说的resize是针对放大尺寸来说的。
import cv2
import numpy as np


class Point:
    def __init__(self, x=None, y=None):
        self.x = x
        self.y = y


def bilinear_interpolation(x, y, points, values):
    px1 = (values[3]-values[0])*((x-points[1].x)/(points[2].x-points[1].x))+values[1]
    px2 = (values[2] - values[1]) * ((x - points[0].x) / (points[3].x - points[0].x)) + values[0]
    p = (px1-px2)*((y-points[0].y)/(points[1].y-points[0].y))+px2
    return np.clip(p, 0, 255)


def resize(img, w_new, h_new):
    out_img = np.zeros((h_new, w_new, 3))
    h, w = img.shape[:2]
    source_w = [(i+0.5)*w/w_new-0.5 for i in range(w_new)]
    source_w_1 = [int(np.clip(np.floor(i), 0, w-2)) for i in source_w]
    source_h = [(i + 0.5) * h / h_new - 0.5 for i in range(h_new)]
    source_h_1 = [int(np.clip(np.floor(i), 0, h - 2)) for i in source_h]

    for i in range(0, h_new):
        for j in range(0, w_new):
            #寻找4个近邻点
            p1 = (source_h_1[i], source_w_1[j])
            p2 = (source_h_1[i]+1, source_w_1[j])
            p3 = (source_h_1[i]+1, source_w_1[j]+1)
            p4 = (source_h_1[i], source_w_1[j]+1)
            points = [Point(p1[1], p1[0]), Point(p2[1], p2[0]), Point(p3[1], p3[0]), Point(p4[1], p4[0])]
            vs_b = [img[p1[0], p1[1], 0], img[p2[0], p2[1], 0], img[p3[0], p3[1], 0], img[p4[0], p4[1], 0]]
            vs_g = [img[p1[0], p1[1], 1], img[p2[0], p2[1], 1], img[p3[0], p3[1], 1], img[p4[0], p4[1], 1]]
            vs_r = [img[p1[0], p1[1], 2], img[p2[0], p2[1], 2], img[p3[0], p3[1], 2], img[p4[0], p4[1], 2]]
            # print(source_w[j], source_h[i], i, j)
            out_img[i, j, 0] = bilinear_interpolation(x=source_w[j], y=source_h[i], points=points, values=vs_b)
            out_img[i, j, 1] = bilinear_interpolation(x=source_w[j], y=source_h[i], points=points, values=vs_g)
            out_img[i, j, 2] = bilinear_interpolation(x=source_w[j], y=source_h[i], points=points, values=vs_r)
    return out_img


if __name__ == '__main__':
    # points = [Point(1, 2), Point(1, 4), Point(3, 4), Point(3, 2)]
    # vs = [1, 2, 3, 4]
    # print(bilinear_interpolation(x=2, y=3, points=points, values=vs))#2.5
    img = cv2.imread('demo.jpg')
    h, w = img.shape[:2]
    img = cv2.resize(img, (w//4, h//4))
    res = resize(img.astype(np.float32), w//2, h//2).astype(np.uint8)
    cv2.imwrite('demo_resize.jpg', res)
    res_cv = cv2.resize(img, (w//2, h//2))
    cv2.imwrite('demo_resize_opencv.jpg', res_cv)
运行结果如下:

不过需要注意的是,python这样运行分辨率较大时会很慢,可以考虑使用numpy的矩阵运算的方式进行运行或者修改成一些加速库,这里只是展示一些原理学习,并不能直接使用在工程项目里面。


 1万+
1万+


 被折叠的 条评论
为什么被折叠?
被折叠的 条评论
为什么被折叠?
 到【灌水乐园】发言


