


参考《QT quick 核心编程》
使用qml画图。以下面的代码段为例,记录画图方法。
一、基本用法
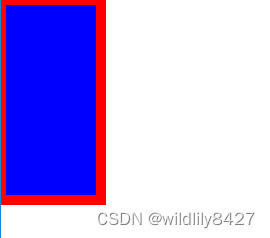
Canvas {// 画布
        id:canvas;
        width: parent.width; // 画布宽度
        height: parent.height;// 画布高度

        onPaint: {
            var ctx = canvas.getContext("2d"); // 使用画布类型
            ctx.rect(0,0, 100,200);// 画一个矩形rect(x, y ,width ,height)
            ctx.lineWidth = 10;// 设置边框宽度
            ctx.strokeStyle = "red";// 设置边框颜色
            ctx.fillStyle = "blue"; // 设置填充颜色
            ctx.fill();// 画填充
            ctx.stroke();// 画边框
        }
    }
注意:
1、上述代码中获取画布类型可以使用Canvas的contextType属性。
2、上述代码中画图的顺序(ctx.fill(); ctx.stroke();这两句的顺序)不同,出来的效果不同。可能与图层有关系。
使用contextType 属性,获取画布类型,代码如下:
Canvas {
        id:canvas;
        width: parent.width;
        height: parent.height;
        contextType: "2d"

        onPaint: {
            context.rect(0,0, 200,100);// 画一个矩形rect(x, y ,width ,height)
            context.lineWidth = 10;// 设置边框宽度
            context.strokeStyle = "red";// 设置边框颜色
            context.fillStyle = "blue"; // 设置填充颜色
            context.fill();// 画填充
            context.stroke();// 画边框
        }
    }

二、绘制路径
步骤:
- 调用beginPath();
- 调用moveTo()、lineTo()等可以构造路径函数的方法。
- 调用fill()或stroke()方法。
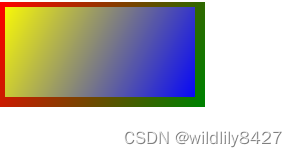
 Canvas {
        id:canvas;
        width: parent.width;
        height: parent.height;
        contextType: "2d"

        onPaint: {
            context.beginPath();// 这句要再rect()这句前面,才能画出对应图形
            context.rect(0,0, 200,100);// 画一个矩形rect(x, y ,width ,height)
            context.lineWidth = 10;// 设置边框宽度

            var gradientFill = context.createLinearGradient(0,0,200,100);
            gradientFill.addColorStop(0.0,"yellow");
            gradientFill.addColorStop(1.0,"blue");
            context.fillStyle = gradientFill;
            context.fill();

            var gradient = context.createLinearGradient(0,0,200,100);
            gradient.addColorStop(0.0,"red");
            gradient.addColorStop(1.0,"green");
            context.strokeStyle = gradient;
            context.stroke();
        }
    }
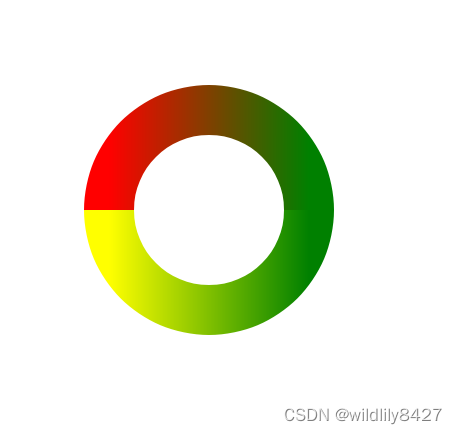
Canvas {
        id:canvas;
        width: parent.width;
        height: parent.height;
        contextType: "2d"

        onPaint: {
            context.lineWidth = 50;
            context.beginPath();

            context.arc(300, 300, 100, 0, Math.PI,true);
            var gradient = context.createLinearGradient(200,300,400,300);
            gradient.addColorStop(0.0,"red");
            gradient.addColorStop(1.0,"green");
            context.strokeStyle = gradient;
            context.stroke();

            context.beginPath();
            context.arc(300, 300, 100, Math.PI, 2 * Math.PI,true);
            var gradient1 = context.createLinearGradient(400,300,200,300);
            gradient1.addColorStop(0.0,"green");
            gradient1.addColorStop(1.0,"yellow");
            context.strokeStyle = gradient1;
            context.stroke();
        }
    }
Canvas {
        id:canvas;
        width: parent.width;
        height: parent.height;
        contextType: "2d"

        onPaint: {
            context.lineWidth = 5;
            context.beginPath();
            context.strokeStyle = "blue";

            context.moveTo(100,100);
            context.lineTo(100,300);
            context.lineTo(200,300);
            context.closePath();// 结束当前路径,从路径终点到起点画一条直线来封闭路径

            context.stroke();

        }
    }

通过路径还可以绘制二次方贝塞尔曲线quadraticCurveTo,三次方贝塞尔曲线bezierCurveTo、弧线(arc、arcTo)、椭圆ellipse、文字text等。
绘制文字
Canvas {
id:canvas;
width: parent.width;
height: parent.height;
contextType: "2d"
onPaint: {
// 方式1
context.beginPath();
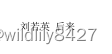
context.text("刘若英 后来",100,100);// 文字x,y位置
context.stroke();
// 方式2
context.strokeText("刘若英 后来",100,100);// 文字x,y位置
}
}
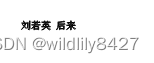
Canvas {
        id:canvas;
        width: parent.width;
        height: parent.height;
        contextType: "2d"

        onPaint: {
            // 方式1
//            context.beginPath();
//            context.text("刘若英 后来",100,100);// 文字x,y位置
//            context.fill();

            // 方式2
            context.fillText("刘若英 后来1",100,100);// 文字x,y位置

        }
    }
绘制图片、变换、裁剪、图像合成。


 381
381


 被折叠的 条评论
为什么被折叠?
被折叠的 条评论
为什么被折叠?
 到【灌水乐园】发言


