第一部分:
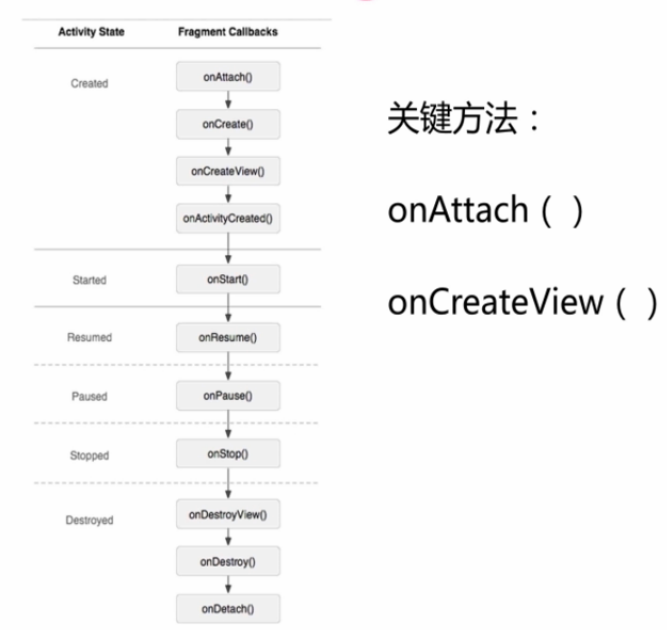
1. Fragment的生命周期:
2. 案例:
第一步:创建布局fragment2,用来作为Fragment3和Fragment4的布局。只包含一个TextView控件,其中ID为text。
<?xml version="1.0" encoding="utf-8"?>
<LinearLayout xmlns:android="http://schemas.android.com/apk/res/android"
    android:layout_width="match_parent"
    android:layout_height="match_parent"
    android:orientation="vertical" >

    <TextView
        android:id="@+id/text"
        android:layout_width="wrap_content"
        android:layout_height="wrap_content"
        android:text="text" />

</LinearLayout>
package com.example.fragment;

import android.app.Activity;
import android.app.Fragment;
import android.os.Bundle;
import android.util.Log;
import android.view.LayoutInflater;
import android.view.View;
import android.view.ViewGroup;
import android.widget.TextView;

public class MyFragment3 extends Fragment{

	/*
	 * 每次创建都会绘制Fragment的View组件时回调该方法。
	 * */
	@Override
	// 加载自己的布局
	public View onCreateView(LayoutInflater inflater, ViewGroup container,
			Bundle savedInstanceState) {
		// 把layout布局文件转换成View对象

		// 第一个参数resource:Fragment需要加载的布局文件
		// 第二个参数root:加载layout的父ViewGroup
		// attactToRoot:false,不返回父ViewGroup
		View view = inflater.inflate(R.layout.fragment2, container, false);
		TextView tv = (TextView)view.findViewById(R.id.text);// 这里加了view是因为返回对象必须是一个view。
		tv.setText("第一个Fragment");
		Log.i("Main", "Fragment1---onCreateView()");
		return view;
	}

	/*
	 * 当Fragment被添加到Activity的时候会回调这个方法,这个方法只会去调用一次。
	 * */
	@Override
	public void onAttach(Activity activity) {
		// TODO Auto-generated method stub
		super.onAttach(activity);
		Log.i("Main", "Fragment1---onAttach()");
	}

	/*
	 * 创建Fragment时会调用。只会调用一次
	 * */
	@Override
	public void onCreate(Bundle savedInstanceState) {
		// TODO Auto-generated method stub
		super.onCreate(savedInstanceState);
		Log.i("Main", "Fragment1---onCreate()");
	}

	/*
	 * 创建以后的一个状态,当Fragment所在的Activity启动完成后调用。
	 * */
	@Override
	public void onActivityCreated(Bundle savedInstanceState) {
		// TODO Auto-generated method stub
		super.onActivityCreated(savedInstanceState);
		Log.i("Main", "Fragment1---onActivityCreated()");
	}

	/*
	 * 启动Fragment。
	 * */
	@Override
	public void onStart() {
		// TODO Auto-generated method stub
		super.onStart();
		Log.i("Main", "Fragment1---onStart()");
	}

	/*
	 * 恢复Fragment时会被回调,调用onStart()方法后面一定会调用这个方法。
	 * */
	@Override
	public void onResume() {
		// TODO Auto-generated method stub
		super.onResume();
		Log.i("Main", "Fragment1---onResume()");
	}

	/*
	 * 暂停Fragment。
	 * */
	@Override
	public void onPause() {
		// TODO Auto-generated method stub
		super.onPause();
		Log.i("Main", "Fragment1---onPause()");
	}

	/*
	 * 停止Fragment。
	 * */
	@Override
	public void onStop() {
		// TODO Auto-generated method stub
		super.onStop();
		Log.i("Main", "Fragment1---onStop()");
	}

	/*
	 * 销毁Fragment所包含的View组件时调用,与CreateView对应。
	 * */
	@Override
	public void onDestroyView() {
		// TODO Auto-generated method stub
		super.onDestroyView();
		Log.i("Main", "Fragment1---onDestroyView()");
	}

	/*
	 * 销毁Fragment时会被回调。
	 * */
	@Override
	public void onDestroy() {
		// TODO Auto-generated method stub
		super.onDestroy();
		Log.i("Main", "Fragment1---onDestroy()");
	}

	/*
	 * Fragment从Activity中删除时会回调该方法,并且这个方法只会调用一次。
	 * */
	@Override
	public void onDetach() {
		// TODO Auto-generated method stub
		super.onDetach();
		Log.i("Main", "Fragment1---onDetach()");
	}
}
package com.example.fragment;

import android.app.Activity;
import android.app.Fragment;
import android.os.Bundle;
import android.util.Log;
import android.view.LayoutInflater;
import android.view.View;
import android.view.ViewGroup;
import android.widget.TextView;

public class MyFragment4 extends Fragment{

	@Override
	// 加载自己的布局
	public View onCreateView(LayoutInflater inflater, ViewGroup container,
			Bundle savedInstanceState) {
		// 把layout布局文件转换成View对象

		// 第一个参数resource:Fragment需要加载的布局文件
		// 第二个参数root:加载layout的父ViewGroup
		// attactToRoot:false,不返回父ViewGroup
		View view = inflater.inflate(R.layout.fragment2, container, false);
		TextView tv = (TextView)view.findViewById(R.id.text);
		tv.setText("第二个Fragment");
		Log.i("Main", "Fragment2---onCreateView()");
		return view;
	}

	@Override
	public void onAttach(Activity activity) {
		// TODO Auto-generated method stub
		super.onAttach(activity);
		Log.i("Main", "Fragment2---onAttach()");
	}

	@Override
	public void onCreate(Bundle savedInstanceState) {
		// TODO Auto-generated method stub
		super.onCreate(savedInstanceState);
		Log.i("Main", "Fragment2---onCreate()");
	}

	@Override
	public void onActivityCreated(Bundle savedInstanceState) {
		// TODO Auto-generated method stub
		super.onActivityCreated(savedInstanceState);
		Log.i("Main", "Fragment2---onActivityCreated()");
	}

	@Override
	public void onStart() {
		// TODO Auto-generated method stub
		super.onStart();
		Log.i("Main", "Fragment2---onStart()");
	}

	@Override
	public void onResume() {
		// TODO Auto-generated method stub
		super.onResume();
		Log.i("Main", "Fragment2---onResume()");
	}

	@Override
	public void onPause() {
		// TODO Auto-generated method stub
		super.onPause();
		Log.i("Main", "Fragment2---onPause()");
	}

	@Override
	public void onStop() {
		// TODO Auto-generated method stub
		super.onStop();
		Log.i("Main", "Fragment2---onStop()");
	}

	@Override
	public void onDestroy() {
		// TODO Auto-generated method stub
		super.onDestroy();
		Log.i("Main", "Fragment2---onDestroy()");
	}

	@Override
	public void onDetach() {
		// TODO Auto-generated method stub
		super.onDetach();
		Log.i("Main", "Fragment2---onDetach()");
	}
}
第五步:创建main3布局文件,是为下面的MainActivity3提供布局页面的:只有一个Button按钮。
<?xml version="1.0" encoding="utf-8"?>
<LinearLayout xmlns:android="http://schemas.android.com/apk/res/android"
    android:layout_width="match_parent"
    android:layout_height="match_parent"
    android:orientation="vertical"
    android:id="@+id/layout">

    <Button
        android:text="切换Fragment"
        android:id="@+id/button"
        android:layout_width="wrap_content"
        android:layout_height="wrap_content">
    </Button>

</LinearLayout>package com.example.fragment;
import android.app.Activity;
import android.app.FragmentManager;
import android.app.FragmentTransaction;
import android.os.Bundle;
import android.view.View;
import android.view.View.OnClickListener;
import android.widget.Button;
public class MainActivity3 extends Activity{
private Button button;
private boolean flag = true;
@Override
protected void onCreate(Bundle savedInstanceState) {
// TODO Auto-generated method stub
super.onCreate(savedInstanceState);
setContentView(R.layout.main3);
init();
button = (Button) findViewById(R.id.button);
button.setOnClickListener(new OnClickListener() {
@Override
public void onClick(View v) {
// TODO Auto-generated method stub
FragmentManager fragmentManager = getFragmentManager();
FragmentTransaction beginTransaction = fragmentManager.beginTransaction();
// 点击按钮时,Fragment4和Fragment3之间相互转换。是动态加在的
if(flag){
MyFragment4 frag4 = new MyFragment4();
// 这个layout是在main3中的LinearLayout。
beginTransaction.replace(R.id.layout, frag4);
flag = false;
}
else{
MyFragment3 frag3 = new MyFragment3();
beginTransaction.replace(R.id.layout, frag3);
flag = true;
}
beginTransaction.commit();
}
});
}
private void init() {
// TODO Auto-generated method stub
FragmentManager fragmentManager = getFragmentManager();// 动态生成Fragment3,默认生成这个。
FragmentTransaction beginTransaction = fragmentManager.beginTransaction();
MyFragment3 frag3 = new MyFragment3();
beginTransaction.add(R.id.layout,frag3);
beginTransaction.commit();
}
}
第五步:去MainActivity中设置switch跳转:
package com.example.fragment;

import android.os.Bundle;
import android.app.Activity;
import android.app.FragmentManager;
import android.app.FragmentTransaction;
import android.content.Intent;
import android.view.Menu;
import android.widget.CompoundButton;
import android.widget.CompoundButton.OnCheckedChangeListener;
import android.widget.RadioGroup;

public class MainActivity extends Activity implements android.widget.RadioGroup.OnCheckedChangeListener{

	private RadioGroup group;

    @Override
    protected void onCreate(Bundle savedInstanceState) {
        super.onCreate(savedInstanceState);
        setContentView(R.layout.main);

        group = (RadioGroup) findViewById(R.id.radiogroup);
        group.setOnCheckedChangeListener(this);
    }

	@Override
	public void onCheckedChanged(RadioGroup group, int checkedId) {
		//
		switch(checkedId){
		case R.id.first:
			Intent intent = new Intent(this,MainActivity2.class);
			startActivity(intent);
			break;
		case R.id.second:
			MyFragment2 fragment2 = new MyFragment2();
			FragmentManager fragmentManager = getFragmentManager();
			FragmentTransaction beginTransaction = fragmentManager.beginTransaction();
			// 第一个参数是说你要把fragment2加载到布局的ID,例子中frame在main布局文件中定义。
			// 第二个参数是说
			beginTransaction.add(R.id.frame, fragment2);
			beginTransaction.addToBackStack(null);	// 返回键就可以返回了。
			beginTransaction.commit();
			break;
		case R.id.third:
			Intent intent1 = new Intent(this,MainActivity3.class);
			startActivity(intent1);
			break;
		case R.id.fourth:
			break;
		default:
			break;
		}
	}
}
查看Log日志:
完全是个线性变化,不会打断,一直都是从头到尾的。开始会从onAttach()到onResume(),退出走后面的。
我们下面走一个流程:
启动Fragment
屏幕锁屏
屏幕解屏
切换到其他Fragment
回到桌面
回到应用
退出Fragment
第二部分:
3. Fragment与Activity通信:
案例一:Activity向Fragment传送信息:
第一步:在MainActivity文件中设置switch,进行点击跳转:
package com.example.fragment;

import android.os.Bundle;
import android.app.Activity;
import android.app.FragmentManager;
import android.app.FragmentTransaction;
import android.content.Intent;
import android.view.Menu;
import android.widget.CompoundButton;
import android.widget.CompoundButton.OnCheckedChangeListener;
import android.widget.RadioGroup;

public class MainActivity extends Activity implements android.widget.RadioGroup.OnCheckedChangeListener{

	private RadioGroup group;

    @Override
    protected void onCreate(Bundle savedInstanceState) {
        super.onCreate(savedInstanceState);
        setContentView(R.layout.main);

        group = (RadioGroup) findViewById(R.id.radiogroup);
        group.setOnCheckedChangeListener(this);
    }

	@Override
	public void onCheckedChanged(RadioGroup group, int checkedId) {
		//
		switch(checkedId){
		case R.id.first:
			Intent intent = new Intent(this,MainActivity2.class);
			startActivity(intent);
			break;
		case R.id.second:
			MyFragment2 fragment2 = new MyFragment2();
			FragmentManager fragmentManager = getFragmentManager();
			FragmentTransaction beginTransaction = fragmentManager.beginTransaction();
			// 第一个参数是说你要把fragment2加载到布局的ID,例子中frame在main布局文件中定义。
			// 第二个参数是说
			beginTransaction.add(R.id.frame, fragment2);
			beginTransaction.addToBackStack(null);	// 返回键就可以返回了。
			beginTransaction.commit();
			break;
		case R.id.third:
			Intent intent1 = new Intent(this,MainActivity3.class);
			startActivity(intent1);
			break;
		case R.id.fourth:
			Intent intent2 = new Intent(this,MainActivity4.class);
			startActivity(intent2);
			break;
		default:
			break;
		}
	}
}
package com.example.fragment;

import android.app.Activity;
import android.app.Fragment;
import android.os.Bundle;
import android.util.Log;
import android.view.LayoutInflater;
import android.view.View;
import android.view.ViewGroup;
import android.widget.TextView;
import android.widget.Toast;

public class MyFragment5 extends Fragment{

	@Override
	// 加载自己的布局
	public View onCreateView(LayoutInflater inflater, ViewGroup container,
			Bundle savedInstanceState) {
		// 把layout布局文件转换成View对象

		// 第一个参数resource:Fragment需要加载的布局文件
		// 第二个参数root:加载layout的父ViewGroup
		// attactToRoot:false,不返回父ViewGroup
		View view = inflater.inflate(R.layout.fragment2, container, false);
		TextView tv = (TextView)view.findViewById(R.id.text);
		String text = getArguments().get("name")+" ";// 获取它所在的Activity,然后接收从Activity中传来的信息,然后用Toast显示处理。
		tv.setText(text);
		Toast.makeText(getActivity(), "已成功接收到"+text, Toast.LENGTH_SHORT).show();

		return view;
	}

}
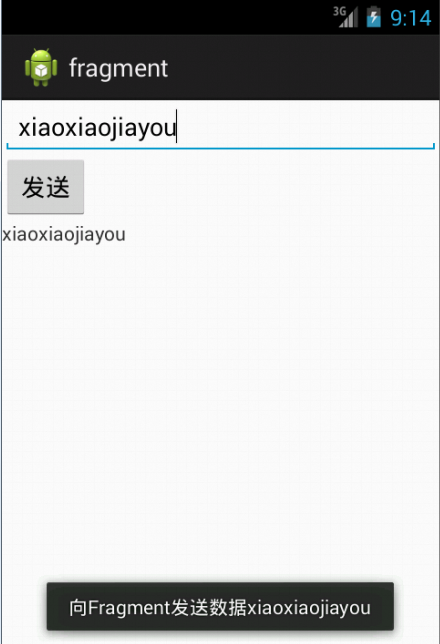
第三步:创建一个与下面活动对应的布局文件main4,其中包含一个EditText和Button。
<?xml version="1.0" encoding="utf-8"?>
<LinearLayout xmlns:android="http://schemas.android.com/apk/res/android"
    android:layout_width="match_parent"
    android:layout_height="match_parent"
    android:orientation="vertical"
    android:id="@+id/layout"
    >

	<EditText
	    android:layout_width="match_parent"
	    android:layout_height="wrap_content"
	    android:id="@+id/editText"
	    />

	<Button
	    android:layout_width="wrap_content"
	    android:layout_height="wrap_content"
	    android:text="发送"
	    android:id="@+id/send"
	    />
</LinearLayout>package com.example.fragment;
import android.app.Activity;
import android.app.FragmentManager;
import android.app.FragmentTransaction;
import android.os.Bundle;
import android.view.View;
import android.view.View.OnClickListener;
import android.widget.Button;
import android.widget.EditText;
import android.widget.Toast;
public class MainActivity4 extends Activity{
private EditText editext;
private Button send;
@Override
protected void onCreate(Bundle savedInstanceState) {
// TODO Auto-generated method stub
super.onCreate(savedInstanceState);
setContentView(R.layout.main4);
editext = (EditText) findViewById(R.id.editText);
send = (Button) findViewById(R.id.send);
send.setOnClickListener(new OnClickListener() {
@Override
public void onClick(View arg0) {
// TODO Auto-generated method stub
String text = editext.getText().toString();
MyFragment5 fragment5 = new MyFragment5();
Bundle bundle = new Bundle();
bundle.putString("name", text);// 用这个方法从Activity给Fragment发送信息,信息名称为name
fragment5.setArguments(bundle);// Fragment从这里向Activity接收信息
FragmentManager fragmentManager = getFragmentManager();// 动态创建Fragment。
FragmentTransaction beginTransaction = fragmentManager.beginTransaction();
beginTransaction.add(R.id.layout,fragment5,"fragment5");
beginTransaction.commit();
Toast.makeText(MainActivity4.this, "向Fragment发送数据"+text, Toast.LENGTH_SHORT).show();
}
});
}
}

案例二:案例二包括了双方的收发:
第一步:改写MyFragment5文件:定义一个接口,让MainActivity4去实现,通过接口来传递信息。
就是Fragment通过onattach方法获取了当前的Activity,然后Activity调用自己实现的方法thank将数据传回去。
package com.example.fragment;

import android.app.Activity;
import android.app.Fragment;
import android.os.Bundle;
import android.util.Log;
import android.view.LayoutInflater;
import android.view.View;
import android.view.ViewGroup;
import android.widget.TextView;
import android.widget.Toast;

public class MyFragment5 extends Fragment {

	public MyListener listener;
	private String code = "Thank you!";

	// 定义一个接口,在MainActivity4中实现。
	public interface MyListener {
		public void thank(String code);
	}

	// 当Fragment添加到Activity中时调用的一个方法。也就是通过这个方法,Fragment获取了当前的Activity。
	@Override
	public void onAttach(Activity activity) {
		// TODO Auto-generated method stub
		listener = (MyListener) activity; // 所以这里Activity也就是那个Activity。
		super.onAttach(activity);
	}

	@Override
	// 加载自己的布局
	public View onCreateView(LayoutInflater inflater, ViewGroup container,
			Bundle savedInstanceState) {
		// 把layout布局文件转换成View对象

		// 第一个参数resource:Fragment需要加载的布局文件
		// 第二个参数root:加载layout的父ViewGroup
		// attactToRoot:false,不返回父ViewGroup
		View view = inflater.inflate(R.layout.fragment2, container, false);
		TextView tv = (TextView) view.findViewById(R.id.text);
		String text = getArguments().get("name") + " ";
		tv.setText(text);
		Toast.makeText(getActivity(), "已成功接收到" + text, Toast.LENGTH_SHORT)
				.show();
		Toast.makeText(getActivity(), "向Activity发送" + code, Toast.LENGTH_SHORT)
		.show();
		listener.thank(code); // 这样就把字符串传给了Activity。相当于Activity通过自己实现的方法thank将数据传了回去,thank函数是Activity中的。
		return view;
	}

}
package com.example.fragment;

import com.example.fragment.MyFragment5.MyListener;

import android.app.Activity;
import android.app.FragmentManager;
import android.app.FragmentTransaction;
import android.os.Bundle;
import android.view.View;
import android.view.View.OnClickListener;
import android.widget.Button;
import android.widget.EditText;
import android.widget.Toast;

// 实现在MyFragment5中定义的接口MyListener
public class MainActivity4 extends Activity implements MyListener {

	private EditText editext;
	private Button send;

	@Override
	protected void onCreate(Bundle savedInstanceState) {
		// TODO Auto-generated method stub
		super.onCreate(savedInstanceState);
		setContentView(R.layout.main4);
		editext = (EditText) findViewById(R.id.editText);
		send = (Button) findViewById(R.id.send);

		send.setOnClickListener(new OnClickListener() {

			@Override
			public void onClick(View arg0) {
				// TODO Auto-generated method stub
				String text = editext.getText().toString();
				MyFragment5 fragment5 = new MyFragment5();
				Bundle bundle = new Bundle();
				bundle.putString("name", text);
				fragment5.setArguments(bundle);
				FragmentManager fragmentManager = getFragmentManager();
				FragmentTransaction beginTransaction = fragmentManager
						.beginTransaction();
				beginTransaction.add(R.id.layout, fragment5, "fragment5");
				beginTransaction.commit();
				Toast.makeText(MainActivity4.this, "向Fragment发送数据" + text,
						Toast.LENGTH_SHORT).show();
			}
		});
	}

	@Override
	public void thank(String code) {
		// TODO Auto-generated method stub
		Toast.makeText(MainActivity4.this, "Think" + code, Toast.LENGTH_SHORT)
				.show();
	}
}


 935
935

 被折叠的 条评论
为什么被折叠?


