


QVBoxLayout:垂直布局
QWidget *widget = new QWidget();
QVBoxLayout * vBoxLayout = new QVBoxLayout();
QLabel *label = new QLabel("hello");
QPushButton *pushButton = new QPushButton("hi");
vBoxLayout->addWidget(label);
vBoxLayout->addWidget(pushButton);
widget->setLayout(vBoxLayout);
widget->show();

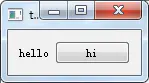
QHBoxLayout:水平布局
代码实现:
QWidget *widget = new QWidget();
QHBoxLayout * hBoxLayout = new QHBoxLayout();
QLabel *label = new QLabel("hello");
QPushButton *pushButton = new QPushButton("hi");
hBoxLayout->addWidget(label);
hBoxLayout->addWidget(pushButton);
widget->setLayout(hBoxLayout);
widget->show();```
**QHBoxLayout嵌套QVBoxLayout**
代码实现:
```cpp
QWidget *widget = new QWidget();
QHBoxLayout * hBoxLayout = new QHBoxLayout();
QVBoxLayout * vBoxLayout = new QVBoxLayout();
QLabel *label_text = new QLabel("Chengdu 1 – 3 Day Weather Forecast Summary");
QLabel *label_picture = new QLabel();
label_picture->setPixmap(QPixmap(":/weather").scaled(32,32, Qt::KeepAspectRatioByExpanding));
QPushButton *pushButton = new QPushButton("more");
vBoxLayout->addWidget(label_text);
vBoxLayout->addWidget(pushButton);
hBoxLayout->addWidget(label_picture);
hBoxLayout->addLayout(vBoxLayout);
widget->setLayout(hBoxLayout);
widget->show();

布局使用小结:
1、向布局中添加一个Widget
void QBoxLayout::addWidget(QWidget *widget, int stretch = 0, Qt::Alignment alignment = Qt::Alignment())
2、向布局中添加一个布局
void QBoxLayout::addLayout(QLayout *layout, int stretch = 0)
3、确定Widget的布局
void QWidget::setLayout(QLayout *layout);
转载自:
作者:静_谷
链接:https://www.jianshu.com/p/938301a4d54e
来源:简书
下面附加一个联系的示例,供参考学习:
链接:
https://blog.csdn.net/zq9955/article/details/113698935


 2364
2364

 被折叠的 条评论
为什么被折叠?
被折叠的 条评论
为什么被折叠?
 到【灌水乐园】发言


