


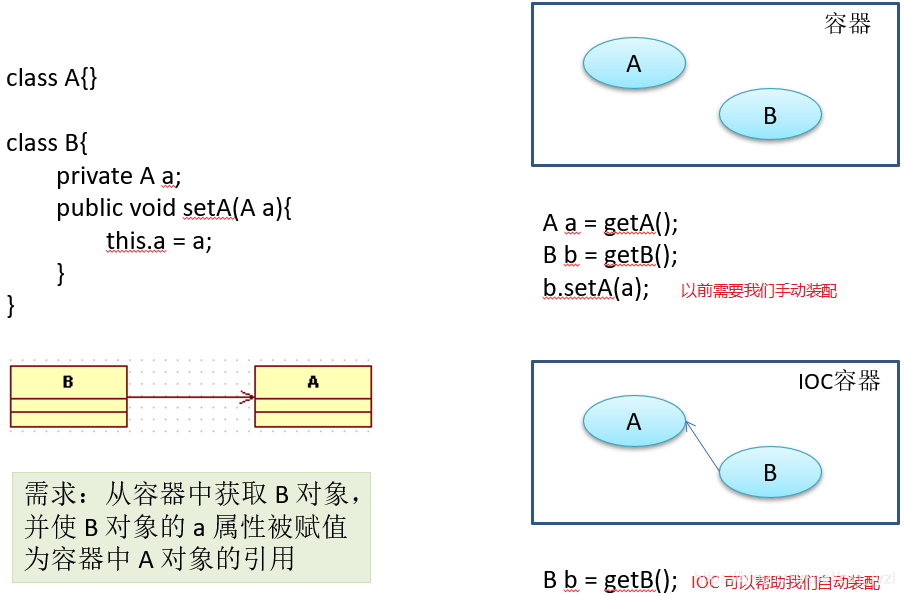
什么是 IOC
IOC(Inversion of Control)的意思是控制反转,什么意思呢?
意思就是反转资源的获取方向,传统的方式是组件主动的从容器中获取所需要的资源,在这样的模式
下开发人员往往需要知道在具体容器中特定资源的获取方式,增加了学习成本,同时降低了开发效率。
而应用了 IOC 之后, 则是容器主动地将资源推送给它所管理的组件, 开发人员不需要知道容器是如何创建资源对象的,只需要提供接收资源的方式即可,极大的降低了学习成本,提高了开发的效率。
我的理解就是没用 IOC 之前,我们需要主动的 new 一个对象或者通过工厂,而 IOC 的意思就是,Spring 事先就帮我们创建好对象并放到容器中,当我们需要的时候,容器自动给我们提供。
举一个通俗简单的例子:平时我们如果想做饭,就需要自己去菜市场买菜,而 IOC 呢就是我们需要什么菜,不用我们自己去买,菜市场的人会为我们自动送来,我们所要做的就是用什么来盛蔬菜。或者说我们都看过少林寺的电影,如果僧人想要喝水,就需要自己跑到山下去挑水,后来方丈弄了一个抽水泵,水直接从山底送到了寺院中,而僧人要做的就是用容器来装水,用碗也好,用桶也好,用水缸也好。
IOC 的前生
需求: 生成 HTML 或 PDF 格式的不同类型的报表。
-
分离接口与实现
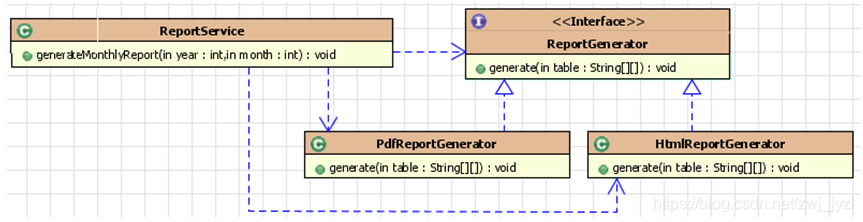
在 ReportService 中不仅需要知道接口与具体的实现类,还需要知道实现类的获取方式,耦合很高。比如:ReportGenerator reportGenerator = new PdfReportGenerator();或ReportGenerator reportGenerator = new HtmlReportGenerator();举个例子:比如在远古社会,我们想要制作一把斧子,还要知道斧子的形状,以及怎么制作斧子。
-
采用工厂设计模式

采用工厂设计模式,我们只需要通过工厂就可以得到具体的实现类,不用关注实现类的具体实现细节,虽然这样好很多,但是仍然要依赖工厂类,而且代码比以前要复杂。到了封建社会,我们可以直接去铁匠铺,用银子买一把斧子,不用知道制造斧子的流程。
-
IOC 控制反转
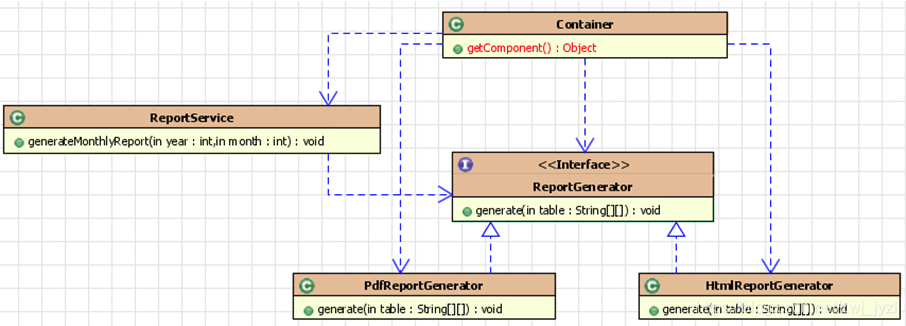
采用 IOC 之后,容器就会自动的将我们需要的实现类注入到ReportService中。而到了现代社会,你只要说我需要一把斧子,那么就会有人自动把斧子送到你手上。
Spring 需要用到的 jar 包
- spring-core
- spring-beans:(依赖注入:XML 配置 bean)
- spring-context:(注解方式配置 bean,扫描指定的类并为添加注解的类创建对象放入容器中)
- spring-aop:(aop 配置)
- spring-expression:(解析 aop 的切面表达式)
- commons-logging:(Spring 还需要依赖一个日志包)
如何将 Bean 放入容器中
XML 配置
通过全类名(反射)
<bean id="helloWorld" class="com.spring.helloworld.HelloWorld">

</bean>
通过工厂方法(静态工厂 or 实例工厂)
-
通过静态工厂
通过静态工厂创建 bean,需要先创建一个工厂类,工厂类中写一个静态的方法,该方法返回一个对象。然后我们在配置文件中配置的时候,需要指明使用哪个工厂类的哪个方法来创建 bean。如果方法中需要参数,我们可以使用<constrctor-arg>元素为该方法传递参数。<!-- 通过工厂方法的方式来配置 bean --> <!-- 1. 通过静态工厂方法: 一个类中有一个静态方法, 可以返回一个类的实例(了解) --> <!-- 在 class 中指定静态工厂方法的全类名, 在 factory-method 中指定静态工厂方法的方法名 --> <bean id="dateFormat" class="java.text.DateFormat" factory-method="getDateInstance"> <!-- 可以通过 constructor-arg 子节点为静态工厂方法指定参数 --> <constructor-arg value="2"></constructor-arg> </bean> -
通过实例工厂
通过实例工厂创建 bean,和使用静态工厂创建 bean 的唯一不同就是,需要先实例化该工厂,然后才能用该工厂创建 bean。<!-- 2. 实例工厂方法: 先需要创建工厂对象, 再调用工厂的非静态方法返回实例(了解) --> <!-- ①. 创建工厂对应的 bean --> <bean id="simpleDateFormat" class="java.text.SimpleDateFormat"> <constructor-arg value="yyyy-MM-dd hh:mm:ss"></constructor-arg> </bean> <!-- ②. 有实例工厂方法来创建 bean 实例 --> <!-- factory-bean 指向工厂 bean, factory-method 指定工厂方法(了解) --> <bean id="datetime" factory-bean="simpleDateFormat" factory-method="parse"> <!-- 通过 constructor-arg 执行调用工厂方法需要传入的参数 --> <constructor-arg value="1990-12-12 12:12:12"></constructor-arg> </bean>
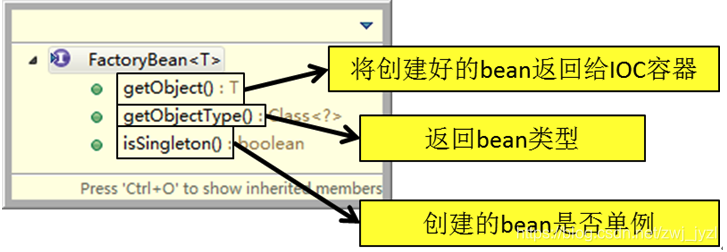
通过 FactoryBean
Factory Bean 创建的 bean,返回的是该工厂 getObject() 方法所返回的对象。我们要想使用 FactoryBean 创建 bean,必须要先创建一个类来实现 FactoryBean 接口。
public class UserBean implements FactoryBean<User>{
	/**
	 * 返回的 bean 的实例
	 */
	@Override
	public User getObject() throws Exception {
		User user = new User();
		user.setUserName("abc");
		user.setWifeName("ABC");

		List<Car> cars = new ArrayList<>();
		cars.add(new Car("ShangHai", "BuiKe", 180, 300000));
		cars.add(new Car("ShangHai", "CRUZE", 130, 150000));

		user.setCars(cars);
		return user;
	}

	/**
	 * 返回的 bean 的类型
	 */
	@Override
	public Class<?> getObjectType() {
		return User.class;
	}

	/**
	 * 返回的 bean 是否为单例的
	 */
	@Override
	public boolean isSingleton() {
		return true;
	}
}
<!-- 配置通过 FactroyBean 的方式来创建 bean 的实例(了解) -->
<bean id="user" class="com.spring.ref.UserBean">

</bean>
当然 UserBean 也可以定义属性,使用 标签来为属性赋值。
注解方式
@Component:标识一个普通的组件。
@Controller:标识在 Controller 层。
@Service:标识在 Service 层。
@Respository:标识在 Dao 层。
默认情况下使用类名的首字母小写作为 id,也可以使用注解的 value 属性,来指定 id。
使用了上述注解之后,还需要在配置文件中配置需要扫描的包,只有被扫描到的类才会被注入到容器中。
使用 <context:component-scan> 标签指定被扫描的包,前提是在配置文件中加入 context 命名空间:
<context:component-scan base-package="com.vijay.component"/>
<context:component-scan> 详细说明:
base-package:表示扫描该包及其子包下的所有类,如果要扫描多个包,中间用逗号分隔。
如果仅希望扫描特定的类而非所有类,则可以使用 resource-pattern 属性来过滤:
<context:component-scan base-package="com.atguigu.component" resource-pattern="autowire/*.class"/>
还可以使用 <context:include-filter> 子标签包含要扫描的目标类,和 <context:exclude-filter> 子标签排除目标类。
<component-scan>下可以拥有若干个 include-filter 和 exclude-filter 子节点。
注意: <context:include-filter>标签要和 use-default-filters 属性搭配使用,因为 spring 使用的默认过滤器会扫描所有标有注解的类,我们需要将 use-default-filters 属性设为 false,<context:include-filter> 标签才会起作用。
过滤的表达式:
| 类别 | 示例 | 说明 |
|---|---|---|
| annotation | com.vijay.XxxAnnotation | 过滤所有标注了XxxAnnotation的类。这个规则根据目标组件是否标注了指定类型的注解进行过滤。 |
| assignable | com.vijay.BaseXxx | 过滤所有BaseXxx类的子类。这个规则根据目标组件是否是指定类型的子类的方式进行过滤。 |
| aspectj | com.vijay.*Service+ | 所有类名是以Service结束的,或这样的类的子类。这个规则根据AspectJ表达式进行过滤。 |
| regex | com.vijay.anno.* | 所有com.atguigu.anno包下的类。这个规则根据正则表达式匹配到的类名进行过滤。 |
| custom | com.atguigu.XxxTypeFilter | 使用XxxTypeFilter类通过编码的方式自定义过滤规则。该类必须实现org.springframework.core.type.filter.TypeFilter接口 |
给 bean 的属性赋值
如何给 bean 的属性赋值
XML 配置
属性注入
属性注入就是利用 setter 方法注入。
<bean id="helloWorld" class="com.spring.helloworld.HelloWorld">
    <!-- 为属性赋值 -->
    <property name="user" value="Jerry"></property>
</bean>
其中 name 属性的值对应的是 setUser() 方法中,set 之后且将一个字母小写。比如如果是 setUserName(),则 name 对应的要写 userName。
构造器注入
构造器注入用的是 constructor-arg 标签。
<bean id="helloWorld3" class="com.spring.helloworld.HelloWorld">
    <!-- 要求: 在 Bean 中必须有对应的构造器.  -->
    <constructor-arg value="Mike"></constructor-arg>
</bean>
默认对构造器中的参数是按顺序注入,不过也可以不按顺序,需要用 index 属性指定参数的位置。
<bean id="car" class="com.spring.helloworld.Car">
    <constructor-arg value="KUGA" index="1"></constructor-arg>
    <constructor-arg value="ChangAnFord" index="0"></constructor-arg>
</bean>
如果有多个构造器,还可以利用 type 属性规定参数的类型,以区分重载的构造器。
<bean id="book" class="com.atguigu.spring.bean.Book" >
    <constructor-arg value= "10010" index ="0" type="java.lang.Integer" />
    <constructor-arg value= "Book01" index ="1" type="java.lang.String" />
    <constructor-arg value= "Author01" index ="2" type="java.lang.String" />
    <constructor-arg value= "20.2" index ="3" type="java.lang.Double" />
</bean >
index 和 type 还可以混合使用:
<bean id="car" class="com.spring.helloworld.Car">
    <constructor-arg value="KUGA" index="1"></constructor-arg>
    <constructor-arg value="ChangAnFord" index="0"></constructor-arg>
    <constructor-arg value="250000" type="float"></constructor-arg>
</bean>
使用 p 命名空间
为了简化 bean 的配置,我们可以直接使用 p 属性来为属性赋值,而不用 property、constructor-arg 标签,不过使用 p 属性,必须要引入 p 命名空间。
<bean id="studentSuper" class="com.helloworld.bean.Student" p:studentId="2002" p:stuName="Jerry2016" p:age="18" />
级联属性赋值
<bean id="action" class="com.spring.ref.Action">
    <property name="service" ref="service2"></property>
    <!-- 设置级联属性(了解) -->
    <property name="service.dao.dataSource" value="DBCP2"></property>
</bean>
级联属性什么意思呢?就是我们不仅可以为自己的属性赋值,也可以为依赖的其他 bean 的属性赋值。但是需要注意的是,必须先要为自己的属性赋值,即初始化之后,才能为依赖的 bean 属性赋值。
以下情况会报异常:
<bean id="action" class="com.spring.ref.Action">
    <!-- 没有为 service 属性赋值,直接为级联属性赋值 -->
    <!-- 设置级联属性(了解) -->
    <property name="service.dao.dataSource" value="DBCP2"></property>
</bean>
注解方式
@Autowired
在指定了要扫描的包时,<context:component-scan> 元素会自动注册一个 bean 的后置处理器:AutowiredAnnotationBeanPostProcessor 的实例。该后置处理器可以自动装配标记了 @Autowired、@Resource或 @Inject注解的属性。
| 注解 | 说明 |
|---|---|
| @Autowired | 默认按类型装配,如果容器中有多个相同类型的 bean,则会查看 id 是否有和属性名相同的 bean,如果也没有则会报异常。不过我们可以搭配 @Qualifier 注解根据 id指明要注入的 bean。 如果没有合适的 bean,我们也可以指定 reqired 属性为 false,这样也不会报异常。 |
| @Resource | @Resource注解要求提供一个bean名称的属性,若该属性为空,则自动采用标注处的变量或方法名作为bean的名称。 |
| @Inject | @Inject和@Autowired注解一样也是按类型注入匹配的bean,但没有reqired属性。 |
可以给 bean 的属性赋哪些值
字面值
字面值就是 基本数据类型、String 类型等,可以通过 value 属性或 value 标签赋值。
如果字面值中包含特殊字符,可以用 <![CDATA[]]> 将字面值包起来:
<bean id="car2" class="com.spring.helloworld.Car">
    <constructor-arg value="ChangAnMazda"></constructor-arg>
    <!-- 若字面值中包含特殊字符, 则可以使用 DCDATA 来进行赋值. (了解) -->
    <constructor-arg>
    <value><![CDATA[<ATARZA>]]></value>
    </constructor-arg>
    <constructor-arg value="180" type="int"></constructor-arg>
</bean>
null 值
我们也可以给属性赋 null 值,不过没有什么实际用处,因为我们不赋值,就默认是 null 值。
<bean id="dao2" class="com.spring.ref.Dao">
    <!-- 为 Dao 的 dataSource 属性赋值为 null, 若某一个 bean 的属性值不是 null, 使用时需要为其设置为 null(了解) -->
    <property name="dataSource"><null/></property>
</bean>
外部 bean
使用 ref 属性,来指定 bean 之间的依赖关系。
<!-- 配置 bean -->
<bean id="dao5" class="com.spring.ref.Dao"></bean>

<bean id="service" class="com.atguigu.spring.ref.Service">
    <!-- 通过 ref 属性值指定当前属性指向哪一个 bean! -->
    <property name="dao" ref="dao5"></property>
</bean>
内部 bean
内部 bean 指直接声明在 <property> 标签或 <constructor-arg> 标签内部的 bean,不用指定 id 属性,而且只能在本实例中使用。别的 bean 无法引用。
<!-- 声明使用内部 bean -->
<bean id="service2" class="com.spring.ref.Service">
    <property name="dao">
        <!-- 内部 bean, 类似于匿名内部类对象. 不能被外部的 bean 来引用, 也没有必要设置 id 属性 -->
        <bean class="com.spring.ref.Dao">
            <property name="dataSource" value="c3p0"></property>
        </bean>
    </property>
</bean>
集合属性如何赋值
如果属性的类型是集合类型,那么该怎么为属性赋值呢?在 Spring 中可以通过一组内置的 XM L标签来配置集合属性,例如:、或
数组和 List
如果属性的类型是 List 类型,则需要用 标签,在 标签的内部,可以指定上述讲到的四种类型:字面值、null 值、外部 bean、内部 bean,甚至内嵌其他集合。
<bean id="shop" class="com.spring.bean.Shop" >
    <property name= "categoryList">
        <!-- 以字面量为值的List集合 -->
        <list>
            <value> 历史</value >
            <value> 军事</value >
        </list>
    </property>
    <property name= "bookList">
        <!-- 以bean的引用为值的List集合 -->
        <list>
            <ref bean= "book01"/>
            <ref bean= "book02"/>
        </list>
    </property>
</bean >
Set
配置 Set 类型,需要用到 标签,配置方式和 List 无异。
Map
Map 类型使用
<bean id="cup" class="com.spring.bean.Cup">
    <property name="bookMap">
       <map>
           <entry key = "bookKey01" value-ref="book01"></entry>
           <entry key = "bookKey02" value-ref="book02"></entry>
       </map>
    </property>
</bean>
Properties
Properties 类型使用 标签来定义,与 Map 类型相似,每个 标签下用 子标签来定义每条数据。
<bean id="dataSource" class="com.atguigu.spring.bean.DataSource">
        <property name="properties">
           <props>
               <prop key="userName">root</prop>
               <prop key="password">root</prop>
               <prop key="url">jdbc:mysql:///test</prop>
               <prop key="driverClass">com.mysql.jdbc.Driver</prop>
           </props>
        </property>
</bean>
将集合定义到 bean 的外部,以便供多个 bean 引用
如果想让一个集合定义到 bean 的外部,可以使用 <util:> 标签,前提是必须要先在配置文件顶部添加 util schema 定义。
<util:list id="bookList">
    <ref bean="book01"/>
    <ref bean="book02"/>
    <ref bean="book03"/>
    <ref bean="book04"/>
    <ref bean="book05"/>
</util:list>

<util:list id="categoryList">
    <value>编程</value>
    <value>极客</value>
    <value>相声</value>
    <value>评书</value>
</util:list>
Bean 的高级配置
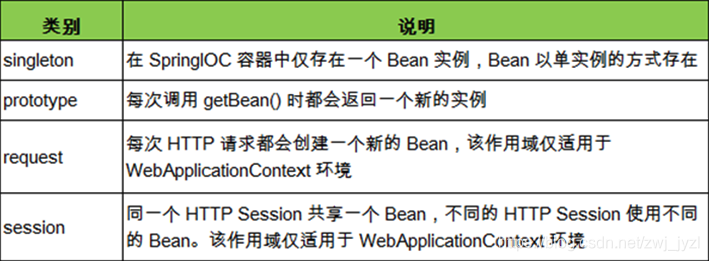
配置 Bean 的作用域
默认在配置文件中配置的 bean 都是单例的,即容器一初始化的时候,同时也初始化这些 bean。不过 bean 还可以配置成多例的,多例的 bean,是在使用的时候才初始化,每次使用 getBean()
方法都会创建一个新的实例。
我们可以使用 scope 属性设置 bean 的作用域:
<!-- 默认情况下 bean 是单例的! -->
<!-- 但有的时候, bean 就不能使单例的. 例如: Struts2 的 Action 就不是单例的! 可以通过 scope 属性来指定 bean 的作用域 -->
<!--
    prototype: 原型的. 每次调用 getBean 方法都会返回一个新的 bean. 且在第一次调用 getBean 方法时才创建实例
    singleton: 单例的. 每次调用 getBean 方法都会返回同一个 bean. 且在 IOC 容器初始化时即创建 bean 的实例. 默认值
-->
<bean id="dao2" class="com.spring.ref.Dao" scope="prototype"></bean>
单例的 bean 只要容器存在,则该实例就会一直存在,只有当容器被销毁的时候,该实例才会被销毁。
多例的 bean 除非一直使用着才会一直存在,如果长时间不用,且没有别的对象引用,则就会被 Java 的垃圾回收器回收。
Bean 的生命周期
Bean 的生命周期分为 5 步:
① 通过构造器或工厂方法创建 bean 实例
② 为 bean 的属性设置值和对其他 bean 的引用
③ 调用bean的初始化方法
④ bean 可以使用了
⑤ 当容器关闭时,调用 bean 的销毁方法
在配置 bean 时,通过 init-method和 destroy-method 属性为 bean 指定初始化和销毁方法。
bean 的后置处理器可以在调用初始化方法前后对 bean 进行额外的处理。需要注意的是:bean 后置处理器对 IOC 容器里的所有 bean 实例逐一处理,而非单一实例。其典型应用是:检查 bean 属性的正确性或根据特定的标准更改 bean 的属性。
bean 后置处理器时需要实现接口:org.springframework.beans.factory.config.BeanPostProcessor。在初始化方法被调用前后,Spring 将把每个 bean 实例分别传递给上述接口的以下两个方法:
- postProcessBeforeInitialization(Object, String)
- postProcessAfterInitialization(Object, String)
添加了 bean 的后置处理器后 bean 的生命周期变为:
① 通过构造器或工厂方法创建 bean 实例
② 为 bean 的属性设置值和对其他 bean 的引用
③ 将 bean 实例传递给 bean 后置处理器的 postProcessBeforeInitialization() 方法
④ 调用bean的初始化方法
⑤ 将 bean 实例传递给 bean 后置处理器的 postProcessAfterInitialization() 方法
⑥ bean 可以使用了
⑦ 当容器关闭时,调用 bean 的销毁方法
引用外部属性文件
当 bean 的配置信息逐渐增多时,查找和修改一些 bean 的配置信息就变得愈加困难。这时可以将一部分信息提取到 bean 配置文件的外部,以 properties 格式的属性文件保存起来,同时在 bean 的配置文件中引用 properties 属性文件中的内容,从而实现一部分属性值在发生变化时仅修改 properties 属性文件即可。
(1)创建 properties 属性文件
prop.userName=root
prop.password=root
prop.url=jdbc:mysql:///test
prop.driverClass=com.mysql.jdbc.Driver
(2)引入 context 名称空间
(3)指定 properties 属性文件的位置
<!-- 指定properties属性文件的位置 -->
<!-- classpath:xxx 表示属性文件位于类路径下 -->
<context:property-placeholder location="classpath:jdbc.properties"/>
(4)从 properties 属性文件中引入属性值
<!-- 从properties属性文件中引入属性值 -->
<bean id="dataSource" class="com.mchange.v2.c3p0.ComboPooledDataSource">
    <property name="user" value="${prop.userName}"/>
    <property name="password" value="${prop.password}"/>
    <property name="jdbcUrl" value="${prop.url}"/>
    <property name="driverClass" value="${prop.driverClass}"/>
</bean>
获取 Bean
第一步:
我们想要获取 Bean 实例之前,必须要先对容器进行实例化。
Spring 提供了两种 IOC 容器实现:
-
BeanFactory
IOC 容器的基本实现,是 Spring 内部的基础设施,是面向 Spring 本身的,不是提供给开发人员使用的。 -
ApplicationContext
ApplicationContext 是 BeanFactory 的子接口,提供了更多的高级特性。
下面看一下类的层次结构:
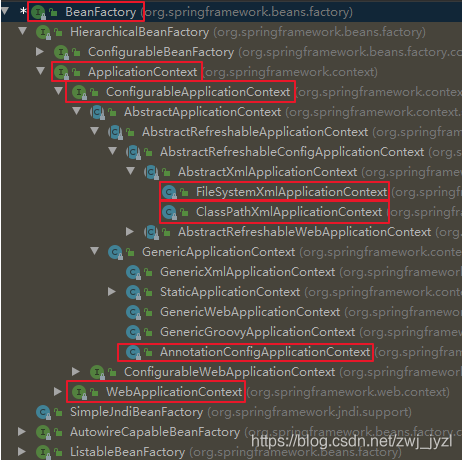
|–BeanFactory:Spring 容器的顶层接口。
|----ApplicationContext
|------ConfigurableApplicationContext:是 ApplicationContext 的子接口,它新增了两个方法 refresh() 和 close(),使得 ApplicationContext 具有启动、关闭和刷新上下文的能力。
|--------ClassPathXmlApplicationContext:从类路径下加载配置文件。
|--------FileSystemXmlApplicationContext:从文件系统中加载配置文件。
|--------AnnotationConfigApplicationContext:用于纯注解的方式,通过配置类获取容器:ApplicationContext ac = new AnnotationConfigApplicationContext(SpringConfiguration.class);
|------WebApplicationContext:专门为 Web 应用而准备的,它允许从相对于 Web 根目录的路径中完成初始化工作。
第二步:
接下来就是获取 Bean 了。
我们可以调用 ApplicationContext 的 getBean() 方法获取容器中的对象:
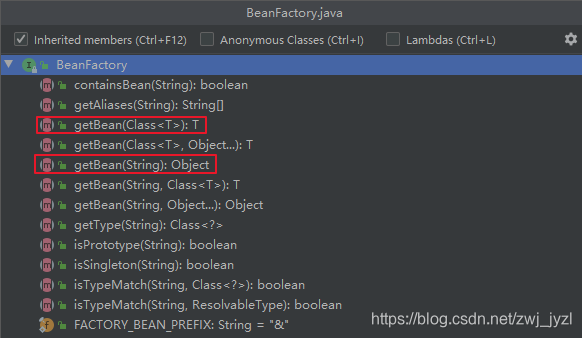
可以看到我们可以通过类型获取,也可以通过 Bean 的 id 获取:
ApplicationContext ctx = new ClassPathXmlApplicationContext("applicationContext.xml");

HelloWorld helloWorld = ctx.getBean(HelloWorld. class);
// or
HelloWorld helloWorld = (HelloWorld)ctx.getBean("helloWorld");
不过需要注意的是,根据类型来获取 bean,如果容器中有两个相同类型的对象,则会报异常,因为 Spring 容器不知道对应的是哪一个实例。
整合多个配置文件
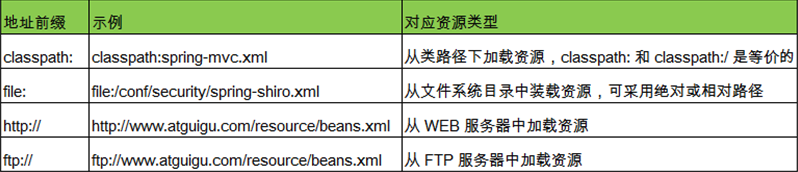
Spring 允许通过 <import> 将多个配置文件引入到一个文件中,进行配置文件的集成。这样在启动 Spring 容器时,仅需要指定这个合并好的配置文件就可以。
import 元素的 resource属 性支持 Spring 的标准的路径资源:
泛型依赖注入
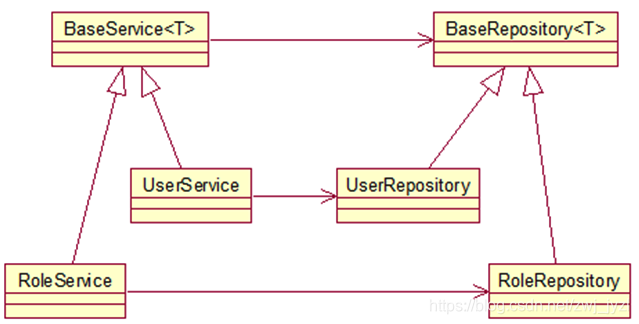
当 BaseService<T> 中引用了 BaseRepository<T>,如果容器中有 UserService extends BaseService<User> 和 UserRepository extends BaseRepository<User> ,则 UserService 中会自动注入 UserRepository。即当子类的泛型类型相同时,Spring 会帮助我们自动注入。
(1)组件基类
public class BaseRepository<T> {
    public void save() {
       System.out.println("Saved by BaseRepository");
    }
}

public class BaseService<T> {
    @Autowired
    private BaseRepository<T> repository;

    public void add() {
       repository.save();
    }
(2)组件实体类
@Repository
public class UserRepository extends BaseRepository<User>{
    public void save() {
       System.out.println("Saved by UserRepository");
    }
}

@Service
public class UserService extends BaseService<User>{

}
(3)实体类
public class User {

}
(4)测试
ApplicationContext ioc = new ClassPathXmlApplicationContext("di.xml");

UserService us = (UserService) ioc.getBean("userService");

us.add();

// 输出:Saved by UserRepository


 590
590


 被折叠的 条评论
为什么被折叠?
被折叠的 条评论
为什么被折叠?
 到【灌水乐园】发言


