


一、手动安装
二、一键安装脚本
#!/bin/bash

#关闭firewalld防火墙
systemctl stop firewalld
systemctl disable firewalld
systemctl mask firewalld

#关闭selinux
setenforce 0   #临时关闭
sed -i  '/^SELINUX/ s/enforcing/disabled/' /etc/selinux/config #永久关闭

#新建用户,用来启动nginx
useradd  -s /sbin/nologin nginx
#解决依赖关系,以及安装常用工具
yum install -y zlib zlib-devel openssl openssl-devel pcre pcre-devel gcc gcc-c++ automake autoconf make
yum install -y psmisc lsof net-tools vim wget

#下载nginx压缩包
mkdir  -p  /nginx
cd /nginx
curl  -O http://nginx.org/download/nginx-1.20.2.tar.gz

#解压文件
tar xf  nginx-1.20.2.tar.gz
cd nginx-1.20.2

#编译前的配置工作,根据实际需要选择常用模块
./configure --prefix=/usr/local/nginx --pid-path=/usr/local/nginx/logs/nginx.pid --user=nginx --group=nginx --build=scweb_server --with-threads  --with-file-aio --with-http_v2_module --with-http_ssl_module --with-stream --with-compat --with-file-aio --with-threads --with-http_addition_module --with-http_auth_request_module --with-http_dav_module --with-http_flv_module --with-http_gunzip_module --with-http_gzip_static_module --with-http_mp4_module --with-http_random_index_module --with-http_realip_module --with-http_secure_link_module --with-http_slice_module --with-http_ssl_module --with-http_stub_status_module --with-http_sub_module --with-http_v2_module --with-mail --with-mail_ssl_module --with-stream --with-stream_realip_module --with-stream_ssl_module --with-stream_ssl_preread_module

#允许2个编译命令同时执行,可根据内核线程数适量增加(linux环境下nproc命令可查看线程数)
make -j 2

#编译安装
make install

#添加到系统服务,设置开机自启
echo '[Unit]
Description=The nginx HTTP and reverse proxy server
After=network-online.target remote-fs.target nss-lookup.target
Wants=network-online.target

[Service]
Type=forking
PIDFile=/usr/local/nginx/logs/nginx.pid
ExecStartPre=/usr/bin/rm -f /usr/local/nginx/logs/nginx.pid
ExecStartPre=/usr/local/nginx/sbin/nginx -t
ExecStart=/usr/local/nginx/sbin/nginx
ExecReload=/usr/local/nginx/sbin/nginx -s reload
KillSignal=SIGQUIT
TimeoutStopSec=5
KillMode=process
PrivateTmp=true

[Install]
WantedBy=multi-user.target' > /usr/lib/systemd/system/nginx.service

chmod 755 /usr/lib/systemd/system/nginx.service

#延迟读取pid文件,避免提前读取pid文件(nginx启动需要时间)报错
mkdir -p /etc/systemd/system/nginx.service.d
printf "[Service]\nExecStartPost=/bin/sleep 0.1\n" > /etc/systemd/system/nginx.service.d/override.conf

#添加软链接和设置环境变量选其一
#ln -s /usr/local/nginx/sbin/nginx /usr/local/sbin/nginx
#将nginx配置到系统环境变量中
echo 'export PATH=$PATH:/usr/local/nginx/sbin' >> /etc/profile

#nginx配置文件高亮显示
mkdir -p  ~/.vim/syntax
cd ~/.vim/syntax
wget -O nginx.vim  http://www.vim.org/scripts/download_script.php?src_id=19394
echo "au BufRead,BufNewFile /usr/local/nginx/*,/usr/local/nginx/conf/* if &ft == '' | setfiletype nginx | endif " >> ~/.vim/filetype.vim

#日志轮转
echo '/usr/local/nginx/logs/*.log {
    create 0640 nginx root
    daily
    rotate 10
    missingok
    notifempty
    compress
    delaycompress
    sharedscripts
    postrotate
        /bin/kill -USR1 `cat /usr/local/nginx/logs/nginx.pid 2>/dev/null` 2>/dev/null || true
    endscript
}
' > /etc/logrotate.d/nginx

systemctl daemon-reload
systemctl enable nginx  #开机自启
systemctl status nginx
三、问题篇
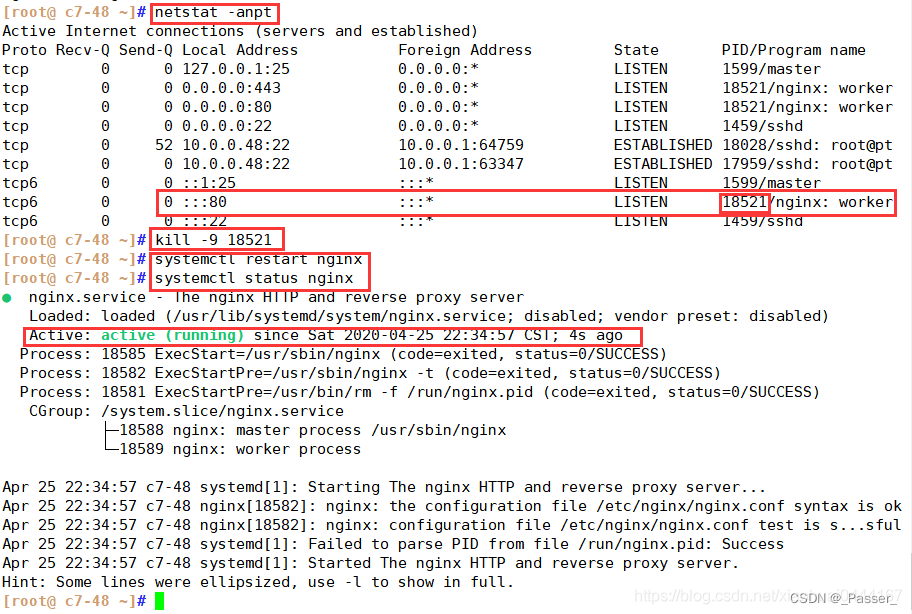
1,问题:
有可能80端口被占用,或者有死进程
 2,解决方法:
查看端口或者查看进程
停掉80端口服务,或者杀死进程
在启动nginx服务


 4920
4920


 被折叠的 条评论
为什么被折叠?
被折叠的 条评论
为什么被折叠?
 到【灌水乐园】发言


