


Color Blending
在HLSL中,BlendState数据类型与前面effects中所使用的RasterizerState类型类似,只是具有不同的成员。在深入学习如何创建并使用blend state之前,需要先描述一些术语。在color blending中,将要被写入到pixel中的新的颜色称为source color,在render target中已经存在的颜色称为destination color。使用下面的公式把source和destination color混合在一起:
(source * sourceBlendFactor)blendOperation(dest * destBlendFactor)
每一个blend factor都使用表8.1中的某个值,而blend operation则使用表8.2的某个值。

表8.1 Blend Factor Options
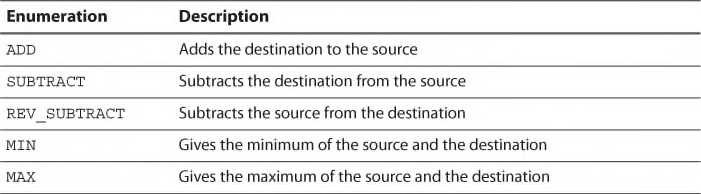
表8.2 Blend Operation Options
注意
还有一些blend factors支持dual-source color(两个source color)混合,但是超出了本节所讨论的主题。要获取关于dual-source color混合的完整列表和描述,可以查看DirectX的文档。
关于如何使用blend factor和blend operation枚举变量,表8.3列出了一些常用的组合方法。

表8.3 Common Color Blending Settings
从表中可以看到,Additive Blending简单地把source color和destination color相加,Multiplication Blending是把他们相乘。一个2倍的Multiplication Blending使用DEST_COLOR作为source blend factor而不是把该factor置为0。
Alpha Blending使用source alpha通道(SRC_ALPHA)作为乘法因子把source color和destination color进行混合,得到一种透明的效果。与environment mapping和fog中所讨论的插值一样,也可以把source color的alpha通道值看成一个百分比滑块,通过该值确定每一种color所占的比例。比如,如果source alpha值为1.0,那么最终颜色中source color占了100%的比例,而destination color就没有影响。如果source alpha值为0.7,则最终的结果中source color占了70%,destination color占了30%。
列表8.4列出了使用alpha blending effect的代码。但是为了使effect更加有趣,该effect中针对alpha通道使用了一个独立的纹理transparency map。通过让alpha texture在运行期间动态变化,可以产生一些非常有趣的结果。这里列出了该effect的全部代码,包括ambient lighting,point light,specular highlighting,fog。
列表8.4 TransparencyMapping.fx
#include "include\\Common.fxh"

/************* Resources *************/

cbuffer CBufferPerFrame
{
	float4 AmbientColor : AMBIENT <
		string UIName =  "Ambient Light";
		string UIWidget = "Color";
	> = {1.0f, 1.0f, 1.0f, 0.0f};

	float4 LightColor : COLOR <
		string Object = "LightColor0";
		string UIName =  "Light Color";
		string UIWidget = "Color";
	> = {1.0f, 1.0f, 1.0f, 1.0f};

	float3 LightPosition : POSITION <
		string Object = "PointLight0";
		string UIName =  "Light Position";
		string Space = "World";
	> = {0.0f, 0.0f, 0.0f};

	float LightRadius <
		string UIName =  "Light Radius";
		string UIWidget = "slider";
		float UIMin = 0.0;
		float UIMax = 100.0;
		float UIStep = 1.0;
	> = {10.0f};

	float3 FogColor <
		string UIName =  "Fog Color";
		string UIWidget = "Color";
	> = {0.5f, 0.5f, 0.5f};

	float FogStart = { 20.0f };
	float FogRange = { 40.0f };

	float3 CameraPosition : CAMERAPOSITION < string UIWidget="None"; >;
}

cbuffer CBufferPerObject
{
	float4x4 WorldViewProjection : WORLDVIEWPROJECTION < string UIWidget="None"; >;
	float4x4 World : WORLD < string UIWidget="None"; >;

	float4 SpecularColor : SPECULAR <
		string UIName =  "Specular Color";
		string UIWidget = "Color";
	> = {1.0f, 1.0f, 1.0f, 1.0f};

	float SpecularPower : SPECULARPOWER <
		string UIName =  "Specular Power";
		string UIWidget = "slider";
		float UIMin = 1.0;
		float UIMax = 255.0;
		float UIStep = 1.0;
	> = {25.0f};
}

Texture2D ColorTexture <
	string ResourceName = "default_color.dds";
	string UIName =  "Color Texture";
	string ResourceType = "2D";
>;

Texture2D TransparencyMap <
	string UIName =  "Transparency Map";
	string ResourceType = "2D";
>;

SamplerState TrilinearSampler
{
	Filter = MIN_MAG_MIP_LINEAR;
	AddressU = WRAP;
	AddressV = WRAP;
};

RasterizerState DisableCulling
{
	CullMode = NONE;
};

BlendState EnableAlphaBlending
{
	BlendEnable[0] = True;
	SrcBlend = SRC_ALPHA;
	DestBlend = INV_SRC_ALPHA;
};

/************* Data Structures *************/

struct VS_INPUT
{
	float4 ObjectPosition : POSITION;
	float2 TextureCoordinate : TEXCOORD;
	float3 Normal : NORMAL;
};

struct VS_OUTPUT
{
	float4 Position : SV_Position;
	float3 Normal : NORMAL;
	float2 TextureCoordinate : TEXCOORD0;
	float4 LightDirection : TEXCOORD1;
	float3 ViewDirection : TEXCOORD2;
	float FogAmount : TEXCOORD3;
};

/************* Utility Functions *************/

float get_fog_amount(float3 viewDirection, float fogStart, float fogRange)
{
	return saturate((length(viewDirection) - fogStart) / (fogRange));
}

/************* Vertex Shader *************/

VS_OUTPUT vertex_shader(VS_INPUT IN, uniform bool fogEnabled)
{
	VS_OUTPUT OUT = (VS_OUTPUT)0;

	OUT.Position = mul(IN.ObjectPosition, WorldViewProjection);
	OUT.TextureCoordinate = get_corrected_texture_coordinate(IN.TextureCoordinate);
	OUT.Normal = normalize(mul(float4(IN.Normal, 0), World).xyz);

	float3 worldPosition = mul(IN.ObjectPosition, World).xyz;

	OUT.LightDirection = get_light_data(LightPosition, worldPosition, LightRadius);
	float3 viewDirection = CameraPosition - worldPosition;

	if (fogEnabled)
	{
		OUT.FogAmount = get_fog_amount(viewDirection, FogStart, FogRange);
	}

	OUT.ViewDirection = normalize(viewDirection);

	return OUT;
}

/************* Pixel Shader *************/

float4 pixel_shader(VS_OUTPUT IN, uniform bool fogEnabled) : SV_Target
{
	float4 OUT = (float4)0;

	float3 normal = normalize(IN.Normal);
	float3 viewDirection = normalize(IN.ViewDirection);
	float4 color = ColorTexture.Sample(TrilinearSampler, IN.TextureCoordinate);
	float3 ambient = get_vector_color_contribution(AmbientColor, color.rgb);

	LIGHT_CONTRIBUTION_DATA lightContributionData;
	lightContributionData.Color = color;
	lightContributionData.Normal = normal;
	lightContributionData.ViewDirection = viewDirection;
	lightContributionData.SpecularColor = SpecularColor;
	lightContributionData.SpecularPower = SpecularPower;
	lightContributionData.LightDirection = IN.LightDirection;
	lightContributionData.LightColor = LightColor;
	float3 light_contribution = get_light_contribution(lightContributionData);

	OUT.rgb = ambient + light_contribution;
	OUT.a = TransparencyMap.Sample(TrilinearSampler, IN.TextureCoordinate).a;

	if (fogEnabled)
	{
		OUT.rgb = lerp(OUT.rgb, FogColor, IN.FogAmount);
	}

	return OUT;
}

technique10 alphaBlendingWithFog
{
	pass p0
	{
		SetVertexShader(CompileShader(vs_4_0, vertex_shader(true)));
		SetGeometryShader(NULL);
		SetPixelShader(CompileShader(ps_4_0, pixel_shader(true)));

		SetRasterizerState(DisableCulling);
		SetBlendState(EnableAlphaBlending, (float4)0, 0xFFFFFFFF);
	}
}

technique10 alphaBlendingWithoutFog
{
	pass p0
	{
		SetVertexShader(CompileShader(vs_4_0, vertex_shader(false)));
		SetGeometryShader(NULL);
		SetPixelShader(CompileShader(ps_4_0, pixel_shader(false)));

		SetRasterizerState(DisableCulling);
		SetBlendState(EnableAlphaBlending, (float4)0, 0xFFFFFFFF);
	}
}
Transparency Mapping Effect
在一种technique里面调用SetBlendState()函数就可以使用BlendState对象。函数的第一个参数就是要使用的BlendState对象。第二参数是一个颜色值常量,用于当source或destination blend factor中任何一个factor被设置为BLEND_FACTOR值的情况。第三个参数是一个32位的multisample coverage mask值,该参数值用于确定有效的render targets中哪些采样会被更新。第11章,“Direct3D Initialization”将会讲解multisampling。
Transparency Mapping Output
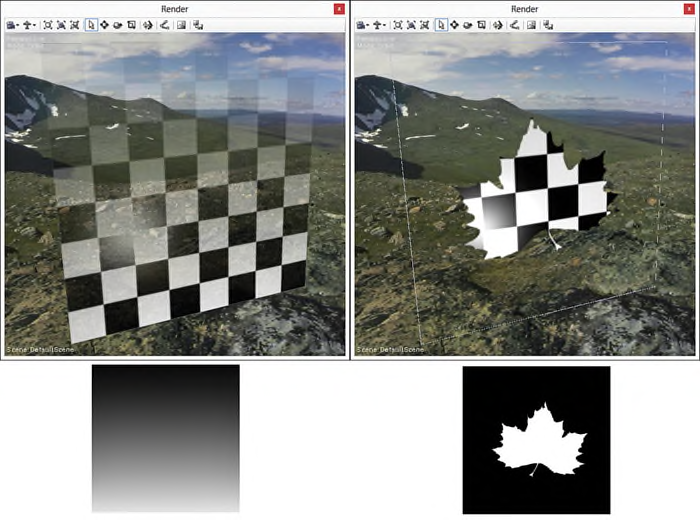
图8.8 TransparencyMapping.fx applied to a plane with a checkerboard color texture
using a gradient alpha map (left) and an alpha map in the shape of a maple leaf (right).
(Skybox texture by Emil Persson.)
Alpha blending依赖于所渲染objects的顺序。透明的objects应该以从后到前的顺序(从距离camera最远到距离最近的顺序)进行渲染;否则,“bleed through”(渗透出来的)背景pixels就是错误的。图8.9中显示了plane位于sphere前面的同一个场景中,使用两种绘制objects的遍历顺序得到的输出结果。在两图中,render target都是先被设置为灰色,再绘制参考表格。之后,在左图中,先绘制environment-mapped sphere再绘制alpha-blended plane。在右图中,则是先绘制plane,再绘制sphere。注意右图中,输出结果是混合了灰色背景色以及表格而不是sphere,之所以sphere没有被绘制到render target上,是因为plane是blended。
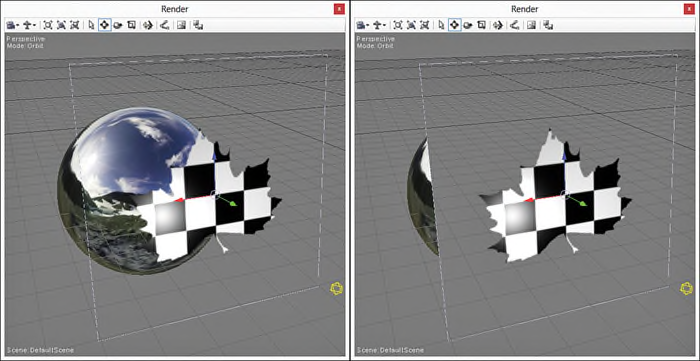
图8.9 A scene depicting the impact of draw order on alpha-blended objects. On the left,
the sphere is rendered before the plane, and vice versa for the image to the right. (Skybox
texture by Emil Persson.)
在NVIDIA FX Composer中objects的绘制顺序是由场景中objects创建的顺序决定的。场景中最早创建的object会最先被绘制。
总结
本意讲述了一些新的图形学技术。包括texture cubes以及它的应用,skybox和environment mapping;还有fog effect和color blending。最终,编写了一个transparency mapping effect,并讨论了有关绘制顺序的问题。下一章,将讨论normal mapping和displacement mapping,这也是第二部分,“Shader Authoring with HLSL”的最后一章。
Exercises
1. Create a texture map, either by hand or using a tool such as Terragen from Planetside
Software. Use the texture map with the skybox effect, and observe the output as you
manipulate the camera.
2. Experiment with the environment mapping effect. Modify the ambient and environment light
values and the reflection amount, and observe the results.
3. Implement a complete fog effect that incorporates a single directional light.
4. Explore the transparency mapping effect with multiple objects in a scene. Vary the creation
order of objects, and observe the results.
1.手动或者使用一个工具(比如Planetside Software的Terragen)创建一个texture map。把该texture map应用到skybox effect中,调整camera并观察输出结果。
2.测试environment mapping effect。尝试修改ambient和environment light值,以及reflection amout,并观察输出结果。
3.实现一个完整的fog effect,并在场景上加入一个directional light。
4.尝试在一个包含多个objects的场景中使用tranparency mapping effect。使用多种不同的顺序创建objects,并观察输出结果。


 1095
1095

 被折叠的 条评论
为什么被折叠?
被折叠的 条评论
为什么被折叠?
 到【灌水乐园】发言


