


原型模式的定义
原型模式(Prototype pattern):
Specify the kinds of objects to create using a prototypical instance,and create new objects by copying this prototype.
(使用原型实例来指定创建对象的种类,并且通过复制原型实例来创建一个新的对象)
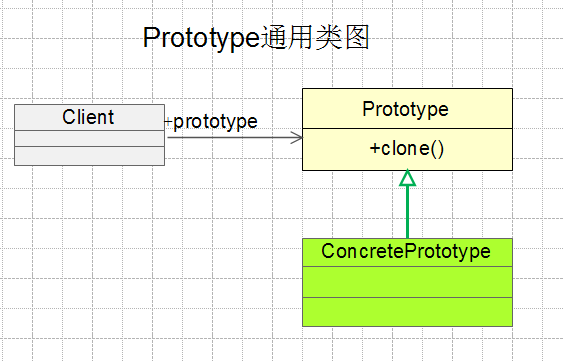
原型模式通用的类图:
原型模式通用源码:
public class PrototypeClass implements Cloneable {
@Override
protected PrototypeClass clone(){
    // TODO Auto-generated method stub
    PrototypeClass prototypeClass = null;
    try {
        prototypeClass = (PrototypeClass)super.clone();
    } catch (CloneNotSupportedException e) {
        // TODO: handle exception
        //process CloneNotSupportedException
    }
    return prototypeClass;
}
}
原型模式的实现
下面以一个英雄的样例来实现原型模式:
import java.util.ArrayList;
public class Hero implements Cloneable{
  private String name;
  private ArrayList<String> heroSkills = new ArrayList<String>();

    public Hero() {
        System.out.println("Hero 构造方法");
    }

    @Override
    protected Hero clone(){
        // TODO Auto-generated method stub
        try {
            Hero hero = (Hero) super.clone();
            hero.name = this.name;
            hero.heroSkills = this.heroSkills;
            return hero;
        } catch (CloneNotSupportedException e) {
            // TODO Auto-generated catch block
            e.printStackTrace();
        }
        return null;
    }

    public String getName() {
        return name;
    }

    public void setName(String name) {
        this.name = name;
    }

    public ArrayList<String> getHeroSkills() {
        return heroSkills;
    }

    public void addHeroSkills(String skillName) {
        if(!heroSkills.contains(skillName)){
            this.heroSkills.add(skillName);
        }
    }

    public void showInfo() {
        System.out.println("----------- Hero Start -----------");
        System.out.println("name : " + name);
        System.out.println("heroSkills: ");
        for (String heroSkill : heroSkills) {
            System.out.println("hero Skill: " + heroSkill);
        }
        System.out.println("-----------Hero End -----------");
    }

}
Hero类是一个英雄类,定义了名称和技能二个变量,Hero实现Cloneable接口的clone的方法。
Client端的使用方法:
public class Prototype {

    public static void main(String[] args) {
        // TODO Auto-generated method stub
        Hero hero = new Hero();
        hero.setName("Sniper--火枪");
        hero.addHeroSkills("榴霰弹");
        hero.addHeroSkills("爆头");
        hero.addHeroSkills("瞄准");
        hero.addHeroSkills("暗杀");
        hero.showInfo();

        Hero heroClone = hero.clone();
        heroClone.showInfo();

        heroClone.setName("Sniper--火枪--第一把");
        heroClone.showInfo();

        hero.showInfo();
    }
}
运行方法,输入如下:
Hero 构造方法
----------- Hero Start -----------
name : Sniper--火枪
heroSkills:
hero Skill: 榴霰弹
hero Skill: 爆头
hero Skill: 瞄准
hero Skill: 暗杀
-----------Hero End -----------
----------- Hero Start -----------
name : Sniper--火枪
heroSkills:
hero Skill: 榴霰弹
hero Skill: 爆头
hero Skill: 瞄准
hero Skill: 暗杀
-----------Hero End -----------
----------- Hero Start -----------
name : Sniper--火枪--第一把
heroSkills:
hero Skill: 榴霰弹
hero Skill: 爆头
hero Skill: 瞄准
hero Skill: 暗杀
-----------Hero End -----------
----------- Hero Start -----------
name : Sniper--火枪
heroSkills:
hero Skill: 榴霰弹
hero Skill: 爆头
hero Skill: 瞄准
hero Skill: 暗杀
-----------Hero End -----------
从输出的信息,我们可以看出我们通过new一个对象和通过hero.clone()方法产生对象是一致的,并且通过clone方法产生的对象是不跑构造方法的。
深复制和浅复制
我们把Client改为:
    public static void main(String[] args) {
        // TODO Auto-generated method stub
        Hero hero = new Hero();
        hero.setName("Sniper--火枪");
        hero.addHeroSkills("榴霰弹");
        hero.addHeroSkills("爆头");
        hero.addHeroSkills("瞄准");
        hero.addHeroSkills("暗杀");
        hero.showInfo();

        Hero heroClone = hero.clone();
        heroClone.showInfo();

        heroClone.addHeroSkills("火枪的第五个技能");
        heroClone.showInfo();

        hero.showInfo();
    }
输出信息:
Hero 构造方法
----------- Hero Start -----------
name : Sniper--火枪
heroSkills:
hero Skill: 榴霰弹
hero Skill: 爆头
hero Skill: 瞄准
hero Skill: 暗杀
-----------Hero End -----------
----------- Hero Start -----------
name : Sniper--火枪
heroSkills:
hero Skill: 榴霰弹
hero Skill: 爆头
hero Skill: 瞄准
hero Skill: 暗杀
-----------Hero End -----------
----------- Hero Start -----------
name : Sniper--火枪
heroSkills:
hero Skill: 榴霰弹
hero Skill: 爆头
hero Skill: 瞄准
hero Skill: 暗杀
hero Skill: 火枪的第五个技能
-----------Hero End -----------
----------- Hero Start -----------
name : Sniper--火枪
heroSkills:
hero Skill: 榴霰弹
hero Skill: 爆头
hero Skill: 瞄准
hero Skill: 暗杀
hero Skill: 火枪的第五个技能
-----------Hero End -----------
从此输出信息,我们发现在通过hero.clone()产生的对象中添加了火枪的第五个技能,但是这个会存在原生的hero对象中。这个什么原因呢?
在clone方法中,我们采用的是:
hero.heroSkills = this.heroSkills;这种方法,这是浅复制的方法。也就是说这种引用类型的新对象hero的变量heroSkills 单纯的指向了this.heroSkills 引用,而并没有进行复制。那要怎么样才能解决这个问题,主要是采取深复制的方法:即在复制对象时,对于引用型的字段也要采用copy的形式,而不是单纯引用的形式。
示例如下 :
protected Hero clone(){
    // TODO Auto-generated method stub
    try {
        Hero hero = (Hero) super.clone();
        hero.name = this.name;
        //hero.heroSkills = this.heroSkills;
        hero.heroSkills = (ArrayList<String>) this.heroSkills.clone();
        return hero;
    } catch (CloneNotSupportedException e) {
        // TODO Auto-generated catch block
        e.printStackTrace();
    }
    return null;
}
修改后的输出信息:
Hero 构造方法
----------- Hero Start -----------
name : Sniper--火枪
heroSkills:
hero Skill: 榴霰弹
hero Skill: 爆头
hero Skill: 瞄准
hero Skill: 暗杀
-----------Hero End -----------
----------- Hero Start -----------
name : Sniper--火枪
heroSkills:
hero Skill: 榴霰弹
hero Skill: 爆头
hero Skill: 瞄准
hero Skill: 暗杀
-----------Hero End -----------
----------- Hero Start -----------
name : Sniper--火枪
heroSkills:
hero Skill: 榴霰弹
hero Skill: 爆头
hero Skill: 瞄准
hero Skill: 暗杀
hero Skill: 火枪的第五个技能
-----------Hero End -----------
----------- Hero Start -----------
name : Sniper--火枪
heroSkills:
hero Skill: 榴霰弹
hero Skill: 爆头
hero Skill: 瞄准
hero Skill: 暗杀
-----------Hero End -----------
通过这种深复制的方法,可以让hero.heroSkills的变量也复制,从而让clone的方法复制的对象完全拥有一个完全独立于原型对象的heroSkills变量。
原型模式的优点
- 性能优良
原型模式是在内存二进制流的复制,要比new一个对象性能要好许多,特别是在一个循环体内产生大量的对象时,原型模式就可以更加显示其性能的优势 - 避免构造函数的约束
这既是它的优点也是缺点,直接在内存中复制对象,构造方法是不会执行的,优点是减少了约束,缺点也是减少了约束,大家要根据实际的情况来权衡。
原型模式的使用场景
- 资源优化场景
类初始化需要消耗非常多的资源,包括数据,硬件资源等 - 性能与安全要求的场景
通过new产生一个对象需要非常繁琐的数据准备或访问权限,则可以使用原型模式 - 一个对象多个修改者的场景
一个对象需要提供给其它对象访问,而且各个访问者可能都需要修改其值时,可以考虑使用原型模式复制多个对象供访问者使用。
原型模式注意事项
- 构造函数不会被执行
对象复制时构造函数没有执行,Object类的clone方法的原理是从内存中以二进制流 - 深复制和浅复制
使用原型模式时,引用的成员变量必须满足两个条件才不会被复制。一是类的成员变量,而不是方法内变量,二是必须是一个可变的引用对象,而不是一个原始类型或不可变的对象
android 原型模式的样例
Intent 类
源码位置:frameworks/base/core/java/android/content/Intent.java
(1)Intent类的原型模式的关键代码:
public class Intent implements Parcelable, Cloneable {
.........................
/**
* Copy constructor.
*/
public Intent(Intent o) {
   this.mAction = o.mAction;
   this.mData = o.mData;
   this.mType = o.mType;
   this.mPackage = o.mPackage;
   this.mComponent = o.mComponent;
   this.mFlags = o.mFlags;
   this.mContentUserHint = o.mContentUserHint;
   if (o.mCategories != null) {
       this.mCategories = new ArraySet<String>(o.mCategories);
   }
   if (o.mExtras != null) {
        this.mExtras = new Bundle(o.mExtras);
   }
   if (o.mSourceBounds != null) {
         this.mSourceBounds = new Rect(o.mSourceBounds);
   }
   if (o.mSelector != null) {
          this.mSelector = new Intent(o.mSelector);
    }
    if (o.mClipData != null) {
        this.mClipData = new ClipData(o.mClipData);
     }
}

@Override
public Object clone() {
    return new Intent(this);
}
................................
}
从代码中,我们可以看到,Intent类是实现Cloneable接口,在clone方法中,通过Intent的构造方法来返回Intent类型的对象。并且非常明显,Intent是深复制。
(2)Intent使用样例
Intent intent = new Intent(MainActivity.this, InsertContactsActivity.class);
Intent intentCloneIntent = (Intent) intent.clone();
startActivity(intentCloneIntent);
Bundle类
源码地址:
frameworks/base/core/java/android/os/Bundle.java
(1)Bundle关键类
public final class Bundle extends BaseBundle implements Cloneable, Parcelable {

    private boolean mHasFds = false;
    private boolean mFdsKnown = true;

    /**
     * Constructs a Bundle containing a copy of the mappings from the given
     * Bundle.
     *
     * @param b a Bundle to be copied.
     */
    public Bundle(Bundle b) {
        super(b);
        mHasFds = b.mHasFds;
        mFdsKnown = b.mFdsKnown;
    }
    /**
     * Clones the current Bundle. The internal map is cloned, but the keys and
     * values to which it refers are copied by reference.
     */
    @Override
    public Object clone() {
        return new Bundle(this);
    }
..............
}
(2)Bundle使用样例
在一个activity中发送带Bundle的Intent:
Bundle newExtrasBundle = new Bundle();
Bundle newExtras = (Bundle)newExtrasBundle.clone();
newExtras.putString("circleCrop", "true");
newExtras.putBoolean("return-data", true);
Intent cropIntent = new Intent(MainActivity.this, OtherActivity.class);
cropIntent.putExtras(newExtras);
startActivity(cropIntent);
在OtherActivity中接受到此Intent:
Intent intent = getIntent();
Bundle bundle = intent.getExtras();
String circleCrop = bundle.getString("circleCrop");
Boolean returnDataBoolean = bundle.getBoolean("return-data");
textView.setText("circleCrop:"+circleCrop+"---returnDataBoolean:"+returnDataBoolean);
参考资料
1.Android设计模式源码解析之原型模式
https://github.com/hfreeman2008/android_design_patterns_analysis/tree/master/prototype/mr.simple
2.设计模式之禅之原型模式


 2547
2547


 被折叠的 条评论
为什么被折叠?
被折叠的 条评论
为什么被折叠?
 到【灌水乐园】发言


