


对于矩阵变换,不清楚的可以参考前一篇文章,学习资料来源于:http://www.opengl-tutorial.org/cn/beginners-tutorials/tutorial-3-matrices/
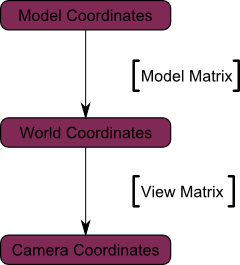
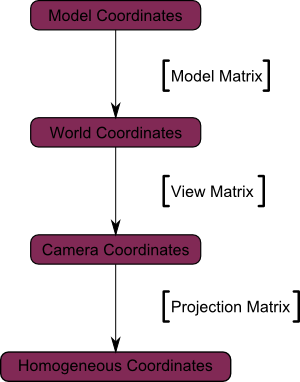
模型(Model)、观察(View)和投影(Projection)矩阵
利用模型、观察和投影矩阵,可以将模型的变换过程清晰地分解为三个阶段。虽然此法并非必需(前两课我们就没用这个方法嘛),但采用此法较为稳妥。我们将看到,这种公认的方法对变换流程作了清晰的划分。
模型矩阵
三维模型由一组顶点定义。顶点的XYZ坐标是相对于物体中心定义的:也就是说,若某顶点位于(0,0,0),则其位于物体的中心。
我们希望能够移动它,玩家也需要用键鼠控制这个模型。这很简单,只需记住:缩放旋转平移就够了。在每一帧中,用算出的这个矩阵去乘(在GLSL中乘,不是在C++中!)所有的顶点,物体就会移动。唯一不动的是世界空间(World Space)的中心。
从模型空间(Model Space)(顶点都相对于模型的中心定义)变换到世界空间(顶点都相对于世界空间中心定义)。

观察矩阵
仔细想想,摄像机的原理也是相通的。如果想换个角度观察一座山,您可以移动摄像机也可以……移动山。后者在实际中不可行,在计算机图形学中却十分方便。
起初,摄像机位于世界坐标系的原点。移动世界只需乘一个矩阵。假如你想把摄像机向右(X轴正方向)移动3个单位,这和把整个世界(包括网格)向左(X轴负方向)移3个单位是等效的!脑子有点乱?

投影矩阵
现在,我们处于摄像机空间中。这意味着,经历了这么多变换后,现在一个坐标X==0且Y==0的顶点,应该被画在屏幕的中心。但仅有x、y坐标还不足以确定物体是否应该画在屏幕上:它到摄像机的距离(z)也很重要!两个x、y坐标相同的顶点,z值较大的一个将会最终显示在屏幕上。
这就是所谓的透视投影(perspective projection):
过程总结(具体看代码总结):
第一步:创建模型观察投影(MVP)矩阵。任何要渲染的模型都要做这一步。
第二步:把MVP传给GLSL
// 包含标准输出头文件
#include <stdio.h>
#include <stdlib.h>

// GLEW头文件
#include <GL/glew.h>

// GLFW头文件
#include <glfw3.h>
GLFWwindow* window;

// GLM头文件
#include <glm/glm.hpp>
#include <glm/gtc/matrix_transform.hpp>
#include <glm/gtx/transform.hpp>
using namespace glm;

//使用shader时需要的链接库
#include <common/shader.hpp>

int main( void )
{
	/******* 初始化GLFW*******/
	if( !glfwInit() )
	{
		fprintf( stderr, "Failed to initialize GLFW\n" );
		getchar();
		return -1;
	}

	glfwWindowHint(GLFW_SAMPLES, 4);
	glfwWindowHint(GLFW_CONTEXT_VERSION_MAJOR, 3);
	glfwWindowHint(GLFW_CONTEXT_VERSION_MINOR, 3);
	glfwWindowHint(GLFW_OPENGL_FORWARD_COMPAT, GL_TRUE); // To make MacOS happy; should not be needed
	glfwWindowHint(GLFW_OPENGL_PROFILE, GLFW_OPENGL_CORE_PROFILE); //We don't want the old OpenGL

	// 初始化一个窗口
	window = glfwCreateWindow( 1024, 768, "Tutorial 03 - Matrices", NULL, NULL);
	if( window == NULL ){
		fprintf( stderr, "Failed to open GLFW window. If you have an Intel GPU, they are not 3.3 compatible. Try the 2.1 version of the tutorials.\n" );
		getchar();
		glfwTerminate();
		return -1;
	}
	glfwMakeContextCurrent(window);

	/******* 初始化GLEW*******/
	glewExperimental = true; // Needed for core profile
	if (glewInit() != GLEW_OK) {
		fprintf(stderr, "Failed to initialize GLEW\n");
		getchar();
		glfwTerminate();
		return -1;
	}

	// 设置输入模型,能捕获键盘输入
	glfwSetInputMode(window, GLFW_STICKY_KEYS, GL_TRUE);

	// 清除颜色设定
	glClearColor(0.0f, 0.0f, 0.4f, 0.0f);

	//VAO(顶点数组集合)数组设定
	GLuint VertexArrayID;
	glGenVertexArrays(1, &VertexArrayID);
	glBindVertexArray(VertexArrayID);

	// 加载着色器
	GLuint programID = LoadShaders( "SimpleTransform.vertexshader", "SingleColor.fragmentshader" );

	/******* 模型的变换:MVP的每个分量皆为四元矩阵*******/
	// 模型观察投影矩阵(MVP)创建
	GLuint MatrixID = glGetUniformLocation(programID, "MVP");


	// 投影矩阵 : 45°视角 ,视野比例为: 4:3 , 显示距离:从 0.1 个单位到 100 个单位
	glm::mat4 Projection = glm::perspective(30.0f, 16.0f / 9.0f, 0.1f, 100.0f);
	// Or, for an ortho camera :
	//glm::mat4 Projection = glm::ortho(-10.0f,10.0f,-10.0f,10.0f,0.0f,100.0f); // In world coordinates

	// 相机矩阵
	glm::mat4 View       = glm::lookAt(
								glm::vec3(2,2,2), // 从世界坐标 (4,3,3) 点观察
								glm::vec3(0,0,0), // 原点在世界坐标的原点
								glm::vec3(0,1,0)  // 朝向方向为(0,1,0)
						   );
	// 模型矩阵:将物体的中心坐标移至世界中心坐标,此时中心坐标与世界坐标重合,注意每个函数的参数,可以自行查阅
	glm::mat4 myScalingMatrix = glm::scale(glm::vec3(2.0f, 2.0f ,2.0f));    //缩放矩阵
	glm::mat4 myMatrix = glm::translate(glm::vec3(10.0f, 0.0f, 0.0f));      //平移矩阵
	glm::mat4 myrotateMatrix = glm::rotate(45.f,glm::vec3(0.0f,1.0f,0.0f)); //旋转矩阵
	glm::mat4 Model      = glm::mat4(1.0f);         //单位矩阵

	// MVP 模型观察投影矩阵
	glm::mat4 MVP        = Projection * View * Model*myScalingMatrix*myrotateMatrix; // Remember, matrix multiplication is the other way around

	static const GLfloat g_vertex_buffer_data[] = {
		-1.0f, -1.0f, 0.0f,
		1.0f, -1.0f, 0.0f,
		0.0f,  0.0f, 0.0f,
		1.0f, 1.0f, 0.0f,
		-1.0f, 1.0f, 0.0f,
		0.0f,  0.0f, 0.0f
	};

	static const GLushort g_element_buffer_data[] = { 0, 1, 2 };

	GLuint vertexbuffer;
	glGenBuffers(1, &vertexbuffer);
	glBindBuffer(GL_ARRAY_BUFFER, vertexbuffer);
	glBufferData(GL_ARRAY_BUFFER, sizeof(g_vertex_buffer_data), g_vertex_buffer_data, GL_STATIC_DRAW);

	do{

		// Clear the screen
		glClear( GL_COLOR_BUFFER_BIT );

		// Use our shader
		glUseProgram(programID);

		/****将MVP转变传递给当前绑定的着色器****/
		glUniformMatrix4fv(MatrixID, 1, GL_FALSE, &MVP[0][0]);

		// 1rst attribute buffer : vertices
		glEnableVertexAttribArray(0);
		glBindBuffer(GL_ARRAY_BUFFER, vertexbuffer);
		glVertexAttribPointer(
			0,                  // attribute. No particular reason for 0, but must match the layout in the shader.
			3,                  // size
			GL_FLOAT,           // type
			GL_FALSE,           // normalized?
			0,                  // stride
			(void*)0            // array buffer offset
		);

		// Draw the triangle !
		glDrawArrays(GL_TRIANGLES, 0, 6); // 3 indices starting at 0 -> 1 triangle

		glDisableVertexAttribArray(0);

		// Swap buffers
		glfwSwapBuffers(window);
		glfwPollEvents();

	} // Check if the ESC key was pressed or the window was closed
	while( glfwGetKey(window, GLFW_KEY_ESCAPE ) != GLFW_PRESS &&
		   glfwWindowShouldClose(window) == 0 );

	// Cleanup VBO and shader
	glDeleteBuffers(1, &vertexbuffer);
	glDeleteProgram(programID);
	glDeleteVertexArrays(1, &VertexArrayID);

	// Close OpenGL window and terminate GLFW
	glfwTerminate();

	return 0;
}


 2万+
2万+

 被折叠的 条评论
为什么被折叠?
被折叠的 条评论
为什么被折叠?
 到【灌水乐园】发言


