


ML主要分为训练和预测两个阶段,此教程就是将训练好的模型freeze并保存下来.freeze的含义就是将该模型的图结构和该模型的权重固化到一起了.也即加载freeze的模型之后,立刻能够使用了。
下面使用一个简单的demo来详细解释该过程,
一、首先运行脚本tiny_model.py
#-*- coding:utf-8 -*-
import tensorflow as tf
import numpy as np


with tf.variable_scope('Placeholder'):
    inputs_placeholder = tf.placeholder(tf.float32, name='inputs_placeholder', shape=[None, 10])
    labels_placeholder = tf.placeholder(tf.float32, name='labels_placeholder', shape=[None, 1])

with tf.variable_scope('NN'):
    W1 = tf.get_variable('W1', shape=[10, 1], initializer=tf.random_normal_initializer(stddev=1e-1))
    b1 = tf.get_variable('b1', shape=[1], initializer=tf.constant_initializer(0.1))
    W2 = tf.get_variable('W2', shape=[10, 1], initializer=tf.random_normal_initializer(stddev=1e-1))
    b2 = tf.get_variable('b2', shape=[1], initializer=tf.constant_initializer(0.1))

    a = tf.nn.relu(tf.matmul(inputs_placeholder, W1) + b1)
    a2 = tf.nn.relu(tf.matmul(inputs_placeholder, W2) + b2)

    y = tf.div(tf.add(a, a2), 2)

with tf.variable_scope('Loss'):
    loss = tf.reduce_sum(tf.square(y - labels_placeholder) / 2)

with tf.variable_scope('Accuracy'):
    predictions = tf.greater(y, 0.5, name="predictions")
    correct_predictions = tf.equal(predictions, tf.cast(labels_placeholder, tf.bool), name="correct_predictions")
    accuracy = tf.reduce_mean(tf.cast(correct_predictions, tf.float32))


adam = tf.train.AdamOptimizer(learning_rate=1e-3)
train_op = adam.minimize(loss)

# generate_data
inputs = np.random.choice(10, size=[10000, 10])
labels = (np.sum(inputs, axis=1) > 45).reshape(-1, 1).astype(np.float32)
print('inputs.shape:', inputs.shape)
print('labels.shape:', labels.shape)


test_inputs = np.random.choice(10, size=[100, 10])
test_labels = (np.sum(test_inputs, axis=1) > 45).reshape(-1, 1).astype(np.float32)
print('test_inputs.shape:', test_inputs.shape)
print('test_labels.shape:', test_labels.shape)

batch_size = 32
epochs = 10

batches = []
print("%d items in batch of %d gives us %d full batches and %d batches of %d items" % (
    len(inputs),
    batch_size,
    len(inputs) // batch_size,
    batch_size - len(inputs) // batch_size,
    len(inputs) - (len(inputs) // batch_size) * 32)
)
for i in range(len(inputs) // batch_size):
    batch = [ inputs[batch_size*i:batch_size*i+batch_size], labels[batch_size*i:batch_size*i+batch_size] ]
    batches.append(list(batch))
if (i + 1) * batch_size < len(inputs):
    batch = [ inputs[batch_size*(i + 1):],labels[batch_size*(i + 1):] ]
    batches.append(list(batch))
print("Number of batches: %d" % len(batches))
print("Size of full batch: %d" % len(batches[0]))
print("Size if final batch: %d" % len(batches[-1]))

global_count = 0

with tf.Session() as sess:
#sv = tf.train.Supervisor()
#with sv.managed_session() as sess:
    sess.run(tf.initialize_all_variables())
    for i in range(epochs):
        for batch in batches:
            # print(batch[0].shape, batch[1].shape)
            train_loss , _= sess.run([loss, train_op], feed_dict={
                inputs_placeholder: batch[0],
                labels_placeholder: batch[1]
            })
            # print('train_loss: %d' % train_loss)

            if global_count % 100 == 0:
                acc = sess.run(accuracy, feed_dict={
                    inputs_placeholder: test_inputs,
                    labels_placeholder: test_labels
                })
                print('accuracy: %f' % acc)
            global_count += 1

    acc = sess.run(accuracy, feed_dict={
        inputs_placeholder: test_inputs,
        labels_placeholder: test_labels
    })
    print("final accuracy: %f" % acc)
    #在session当中就要将模型进行保存
    saver = tf.train.Saver()
    last_chkp = saver.save(sess, 'results/graph.chkp')
    #sv.saver.save(sess, 'results/graph.chkp')

for op in tf.get_default_graph().get_operations():
    print(op.name)

二、综合上述几个文件,生成可以使用的模型的步骤如下:
#-*- coding:utf-8 -*-
import os, argparse
import tensorflow as tf
from tensorflow.python.framework import graph_util

dir = os.path.dirname(os.path.realpath(__file__))

def freeze_graph(model_folder):
    # We retrieve our checkpoint fullpath
    checkpoint = tf.train.get_checkpoint_state(model_folder)
    input_checkpoint = checkpoint.model_checkpoint_path

    # We precise the file fullname of our freezed graph
    absolute_model_folder = "/".join(input_checkpoint.split('/')[:-1])
    output_graph = absolute_model_folder + "/frozen_model.pb"

    # Before exporting our graph, we need to precise what is our output node
    # this variables is plural, because you can have multiple output nodes
    #freeze之前必须明确哪个是输出结点,也就是我们要得到推论结果的结点
    #输出结点可以看我们模型的定义
    #只有定义了输出结点,freeze才会把得到输出结点所必要的结点都保存下来,或者哪些结点可以丢弃
    #所以,output_node_names必须根据不同的网络进行修改
    output_node_names = "Accuracy/predictions"

    # We clear the devices, to allow TensorFlow to control on the loading where it wants operations to be calculated
    clear_devices = True

    # We import the meta graph and retrive a Saver
    saver = tf.train.import_meta_graph(input_checkpoint + '.meta', clear_devices=clear_devices)

    # We retrieve the protobuf graph definition
    graph = tf.get_default_graph()
    input_graph_def = graph.as_graph_def()

    #We start a session and restore the graph weights
    #这边已经将训练好的参数加载进来,也即最后保存的模型是有图,并且图里面已经有参数了,所以才叫做是frozen
    #相当于将参数已经固化在了图当中
    with tf.Session() as sess:
        saver.restore(sess, input_checkpoint)

        # We use a built-in TF helper to export variables to constant
        output_graph_def = graph_util.convert_variables_to_constants(
            sess,
            input_graph_def,
            output_node_names.split(",") # We split on comma for convenience
        )

        # Finally we serialize and dump the output graph to the filesystem
        with tf.gfile.GFile(output_graph, "wb") as f:
            f.write(output_graph_def.SerializeToString())
        print("%d ops in the final graph." % len(output_graph_def.node))


if __name__ == '__main__':
    parser = argparse.ArgumentParser()
    parser.add_argument("--model_folder", type=str, help="Model folder to export")
    args = parser.parse_args()

    freeze_graph(args.model_folder)
说明: 对于freeze操作,我们需要定义输出结点的名字.因为网络其实是比较复杂的,定义了输出结点的名字,那么freeze的时候就只把输出该结点所需要的子图都固化下来,其他无关的就舍弃掉.因为我们freeze模型的目的是接下来做预测.所以,一般情况下,output_node_names就是我们预测的目标 .
三、加载freeze后的模型,注意该模型已经是包含图和相应的参数了.所以,我们不需要再加载参数进来.也即该模型加载进来已经是可以使用了.
#-*- coding:utf-8 -*-
import argparse
import tensorflow as tf

def load_graph(frozen_graph_filename):
    # We parse the graph_def file
    with tf.gfile.GFile(frozen_graph_filename, "rb") as f:
        graph_def = tf.GraphDef()
        graph_def.ParseFromString(f.read())

    # We load the graph_def in the default graph
    with tf.Graph().as_default() as graph:
        tf.import_graph_def(
            graph_def,
            input_map=None,
            return_elements=None,
            name="prefix",
            op_dict=None,
            producer_op_list=None
        )
    return graph

if __name__ == '__main__':
    parser = argparse.ArgumentParser()
    parser.add_argument("--frozen_model_filename", default="results/frozen_model.pb", type=str, help="Frozen model file to import")
    args = parser.parse_args()
    #加载已经将参数固化后的图
    graph = load_graph(args.frozen_model_filename)

    # We can list operations
    #op.values() gives you a list of tensors it produces
    #op.name gives you the name
    #输入,输出结点也是operation,所以,我们可以得到operation的名字
    for op in graph.get_operations():
        print(op.name,op.values())
        # prefix/Placeholder/inputs_placeholder
        # ...
        # prefix/Accuracy/predictions
    #操作有:prefix/Placeholder/inputs_placeholder
    #操作有:prefix/Accuracy/predictions
    #为了预测,我们需要找到我们需要feed的tensor,那么就需要该tensor的名字
    #注意prefix/Placeholder/inputs_placeholder仅仅是操作的名字,prefix/Placeholder/inputs_placeholder:0才是tensor的名字
    x = graph.get_tensor_by_name('prefix/Placeholder/inputs_placeholder:0')
    y = graph.get_tensor_by_name('prefix/Accuracy/predictions:0')

    with tf.Session(graph=graph) as sess:
        y_out = sess.run(y, feed_dict={
            x: [[3, 5, 7, 4, 5, 1, 1, 1, 1, 1]] # < 45
        })
        print(y_out) # [[ 0.]] Yay!
    print ("finish")
1、在预测的过程中,当把freeze后的模型加载进来后,我们只需要定义好输入的tensor和目标tensor即可
2、在这里要注意一下tensor_name和ops_name,
注意prefix/Placeholder/inputs_placeholder仅仅是操作的名字,prefix/Placeholder/inputs_placeholder:0才是tensor的名字
x = graph.get_tensor_by_name('prefix/Placeholder/inputs_placeholder:0')一定要使用tensor的名字
3、要获取图中ops的名字和对应的tensor的名字,可用如下的代码:
    # We can list operations
    #op.values() gives you a list of tensors it produces
    #op.name gives you the name
    #输入,输出结点也是operation,所以,我们可以得到operation的名字
    for op in graph.get_operations():
        print(op.name,op.values())
=============================================================================================================================
上面是使用了Saver()来保存模型,也可以使用sv = tf.train.Supervisor()来保存模型
#-*- coding:utf-8 -*-
import tensorflow as tf
import numpy as np


with tf.variable_scope('Placeholder'):
    inputs_placeholder = tf.placeholder(tf.float32, name='inputs_placeholder', shape=[None, 10])
    labels_placeholder = tf.placeholder(tf.float32, name='labels_placeholder', shape=[None, 1])

with tf.variable_scope('NN'):
    W1 = tf.get_variable('W1', shape=[10, 1], initializer=tf.random_normal_initializer(stddev=1e-1))
    b1 = tf.get_variable('b1', shape=[1], initializer=tf.constant_initializer(0.1))
    W2 = tf.get_variable('W2', shape=[10, 1], initializer=tf.random_normal_initializer(stddev=1e-1))
    b2 = tf.get_variable('b2', shape=[1], initializer=tf.constant_initializer(0.1))

    a = tf.nn.relu(tf.matmul(inputs_placeholder, W1) + b1)
    a2 = tf.nn.relu(tf.matmul(inputs_placeholder, W2) + b2)

    y = tf.div(tf.add(a, a2), 2)

with tf.variable_scope('Loss'):
    loss = tf.reduce_sum(tf.square(y - labels_placeholder) / 2)

with tf.variable_scope('Accuracy'):
    predictions = tf.greater(y, 0.5, name="predictions")
    correct_predictions = tf.equal(predictions, tf.cast(labels_placeholder, tf.bool), name="correct_predictions")
    accuracy = tf.reduce_mean(tf.cast(correct_predictions, tf.float32))


adam = tf.train.AdamOptimizer(learning_rate=1e-3)
train_op = adam.minimize(loss)

# generate_data
inputs = np.random.choice(10, size=[10000, 10])
labels = (np.sum(inputs, axis=1) > 45).reshape(-1, 1).astype(np.float32)
print('inputs.shape:', inputs.shape)
print('labels.shape:', labels.shape)


test_inputs = np.random.choice(10, size=[100, 10])
test_labels = (np.sum(test_inputs, axis=1) > 45).reshape(-1, 1).astype(np.float32)
print('test_inputs.shape:', test_inputs.shape)
print('test_labels.shape:', test_labels.shape)

batch_size = 32
epochs = 10

batches = []
print("%d items in batch of %d gives us %d full batches and %d batches of %d items" % (
    len(inputs),
    batch_size,
    len(inputs) // batch_size,
    batch_size - len(inputs) // batch_size,
    len(inputs) - (len(inputs) // batch_size) * 32)
)
for i in range(len(inputs) // batch_size):
    batch = [ inputs[batch_size*i:batch_size*i+batch_size], labels[batch_size*i:batch_size*i+batch_size] ]
    batches.append(list(batch))
if (i + 1) * batch_size < len(inputs):
    batch = [ inputs[batch_size*(i + 1):],labels[batch_size*(i + 1):] ]
    batches.append(list(batch))
print("Number of batches: %d" % len(batches))
print("Size of full batch: %d" % len(batches[0]))
print("Size if final batch: %d" % len(batches[-1]))

global_count = 0

#with tf.Session() as sess:
sv = tf.train.Supervisor()
with sv.managed_session() as sess:
    #sess.run(tf.initialize_all_variables())
    for i in range(epochs):
        for batch in batches:
            # print(batch[0].shape, batch[1].shape)
            train_loss , _= sess.run([loss, train_op], feed_dict={
                inputs_placeholder: batch[0],
                labels_placeholder: batch[1]
            })
            # print('train_loss: %d' % train_loss)

            if global_count % 100 == 0:
                acc = sess.run(accuracy, feed_dict={
                    inputs_placeholder: test_inputs,
                    labels_placeholder: test_labels
                })
                print('accuracy: %f' % acc)
            global_count += 1

    acc = sess.run(accuracy, feed_dict={
        inputs_placeholder: test_inputs,
        labels_placeholder: test_labels
    })
    print("final accuracy: %f" % acc)
    #在session当中就要将模型进行保存
    #saver = tf.train.Saver()
    #last_chkp = saver.save(sess, 'results/graph.chkp')
    sv.saver.save(sess, 'results/graph.chkp')

for op in tf.get_default_graph().get_operations():
    print(op.name)
注意:使用了sv = tf.train.Supervisor(),就不需要再初始化了,将sess.run(tf.initialize_all_variables())注释掉,否则会报错.
Section 2:
It’s been a while since TensorFlow is open-sourced and slowly is becoming more and more popular. One of the features that TF has is the ability to define and train your model using Python API and port the learned model in C++. Until the latest version of TF it’s been a pain in neck of how to do it. Some people find work-arounds. There are some (let me be honest, it was the only one I found) tutorials which tought how to port it but the fact that their model was not trainable made a big difference that you can’t use the same approach for your trainable models.
As I said, this ability is now easier in latest version (version 0.7 at this time) and I think it will be even easier in the next releases. Here we go, the whole code for a CIFAR-10 CNN is shared in the github repository.
Requirements
- Install Bazel: Google’s build tool used to compile things for TensorFlow.
- Clone the TensorFlow repo. (It will make the build process easier if you also get your hands dirty with installing the tensorflow from the sourceby building it.)
- Copy the freeze_graph.py file to your project folder as it is not in the installed wheel yet.
- Also in the past there is an issue that the files that “freeze_graph.py” were using, i.e. “graph_util” was not in the wheel. If you get an error in “freeze_graph.py” complaining “graph_util” not found you should build the wheel yourself to get it.
General Steps
- Define the input and output graph in our model.
- Save the checkpoints. (This is important as all your trained variables reside here)
- Save the graph definition (raw definition, no variable). We name this‘input_graph’
- Use the freeze_graph file to combine the graph structure(no. 3, input_graph) with the valuse of each nodes values(no. 2) and generate a new graph model as ‘output_graph’
- Use the output graph in the C++ file to do the inference. #Optional: We can also map the network outputs to the labels.
- Create a build file and build the file in the‘tensorflow/tensorflow/{our_project}’ folder. this takes a while for the 1st time as it bundles all tensorflow stuff into a single runnable file.
- Your executable file is ready!!!
Now let me to go deeper with each steps with real world example. I have written the model myself(of course by getting some code snippets from tensorflow examples but the overall architecture is unique)
Step # 1
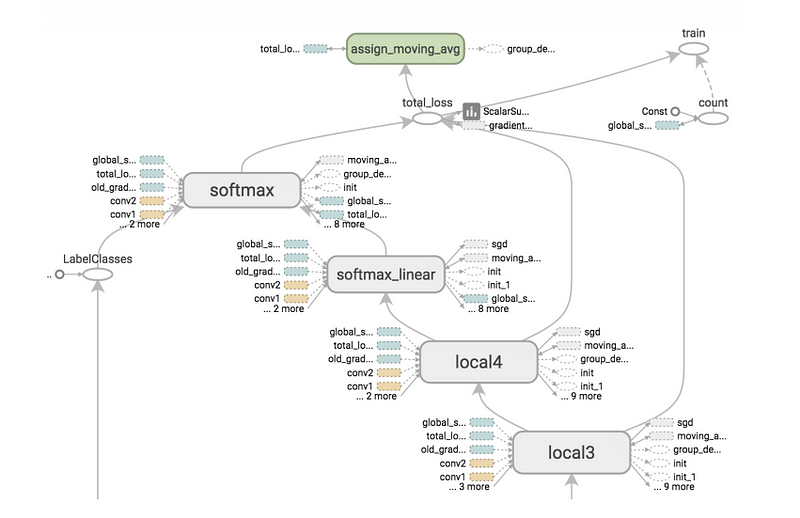
Here we tell which node is the input node in our graph and which is the output. These are needed as in the C++ code, when you provide a sample to do inference on it, the code should know where to insert the sample in the graph. Also after inference it should know which node(s) result it should report back to you.
Step #2
In your training loop, save the checkpoints each few steps, let’s say 10,50 or 100. It depends on what you are trying to get out of the model. For making everything smooth let’s define following concept(which is from tensorflow example) to make it easier to load it later.
Here the 2 important points are:
- The global_step is set to 0, this makes we have only one checkpoint file named ‘saved_checkpoint-0’. The other way to do it is giving the current step instead of Zero but this causes us to have 5 last checkpoints each time which the names are changing and make it harder to load later.
- The latest_filename is set to a constant name.
Step #3
Save the graph definition once before the loop starts or exactly before the next step.
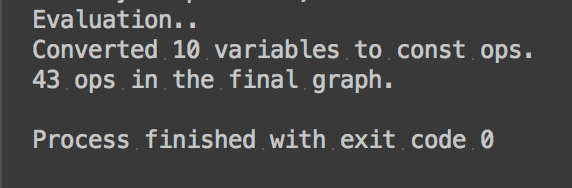
Step #4
As told before, you should have ‘freeze_graph.py’ file beside your project and import it inside your training file. Then it’s really easy to get the “output_graph”. For more example of how to use it, you can refer to“freeze_graph_test.py” file. To summarize, It will combine the graph structure with the values from checkpoint file into one file, so when you import it to your C++ code, it has both your network architecture and your trained variables value.
Note: As I wrote in the comment in the code, in my first trial to do this I simply put the raw name of the output_graph, but when testing for this tutorial in the new project, I got error that output_graph is not in the node names. By debugging and checking all the node names, I found that the name in the second project is “ Dense2/output_graph”. Consider fisrt trying the real name. If you get the same error, then write the full name of the node.
When running this, you will get something like this feedback if everything goes well
Step #5
I use the C++ code provided by tensorflow and modified it for my project. It is well written (like the tensorflow itself and also other Google’s code :) ). Also grab the BUILD file which we need it too.
As we need to build the file exactly in the same root folder, for convenience duplicate the “label_image” folder, name it as you want(I named it “ccifar”) and continue the followings inside the new clone of that folder.
So let’s start modifying it according to your needs. I won’t copy paste it here again, but I will tell the line numbers you SHOULD change for your project to make everything goes smooth. Consider giving the full path to your files instead of relative path. It is also suggested to put them in this style. That is have your BUILD file across your main.cc file and a data folder where your extra files as output_graph.pb, labels_mapping.txt and your test image reside.
Let’s modify these lines:
- Line #237: This i the file you feed into your model for inference and get the result. You can override it via giving command line argument. More on that later in the running section.
- Line #238: Insert path to the output_graph.pb we got in the Step #4 here.
- Line #241: You can give a text file with the labels for each output to make it easier when running. It will automatically assign the first labels to the output of model when it is 0, the second line when the result is 1 and so on. For example, for CIFAR-10 it looks like this:
airplane
automobile
bird
cat
deer
dog
frog
horse
ship
truck
- Line #244–245: Change the width and height of your input. If your input is not image like ours, you can find where they use it and comment it.
- Line #248–249: Change this to the name of your input and output layer name.
Everything is ready to build our model now. It looks a lot of steps but it is really simple. You can add and modify your code according to above steps in less than 10 minutes or so. So don’t get afraid if it is long.
Step #6
Modify BUILD file to compile which sources, if you already used the tensorflow’s code file names no need to change anything.
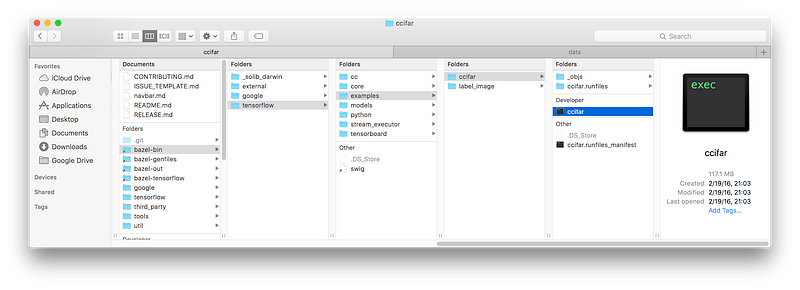
If you do exactly as I told above, now we are in the following path:
“<path to the tensorflow repo clone>/tensorflow/tensorflow/examples/ccifar”
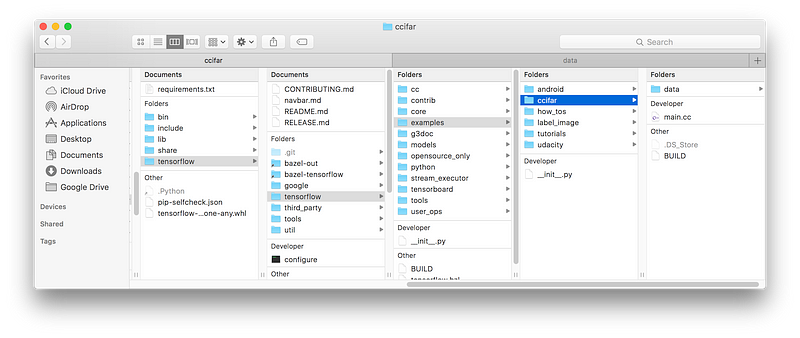
Now open a terminal in the ccifar root folder(i.e. ‘examples’) and run the folowing code to build it:
“bazel build ccifar/…”
It will take a while and may be produce bunch of warnings. When finished, you will get new folders in your cloned tensorflow root folder as “bazel-*”
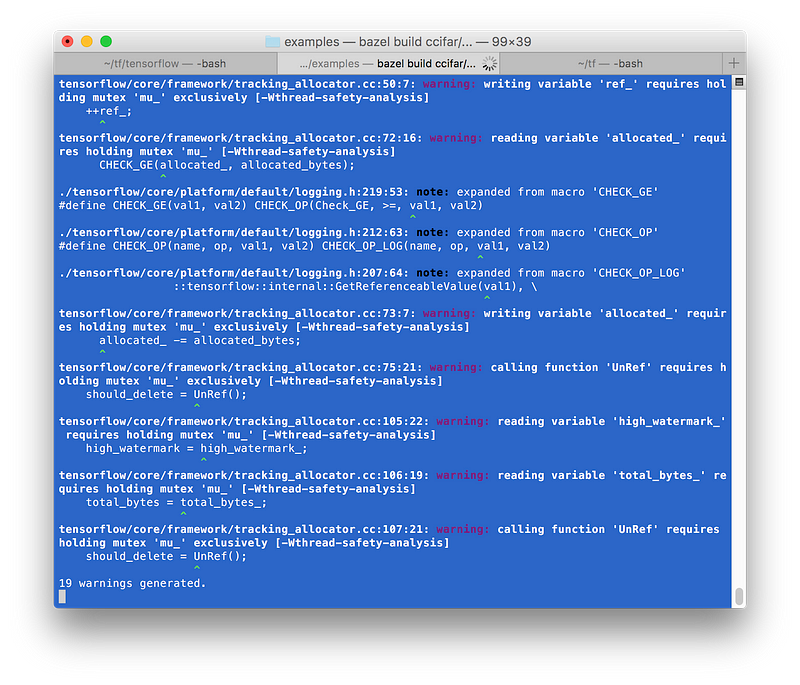
Note: As I mentioned in Requirements section, if you tried to build the wheel yourself, you will install bazel and swig. I had a problem with bazel and it was: “First argument of load() is a path, not a label. It should start with a single slash if it is an absolute path.”. I found that it is due to changes in bazel. The WORKSPACE file is up-to-date with latest bazel but I was using bazel 0.1.3. After updating to latest one the problem fixed.
Step #7
Finished!
Now you get your executable file in the following path:
“tensorflow/bazel-bin/tensorflow/examples/ccifar”
If you run it, you will get this:
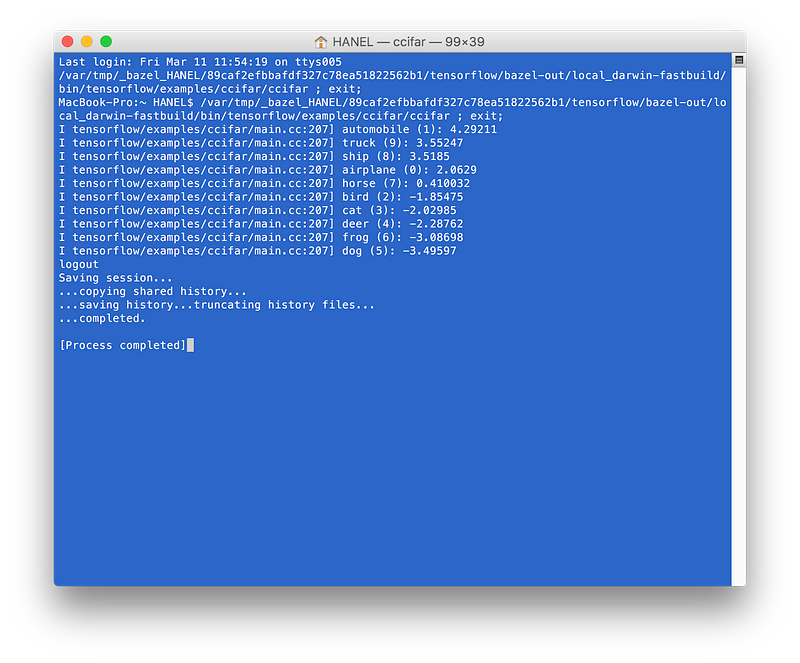
As you see the first prediction is automobile and the image I provided to the model was:

You can also give additional arguments when running from terminal by using: “ — image=<path to your image>”
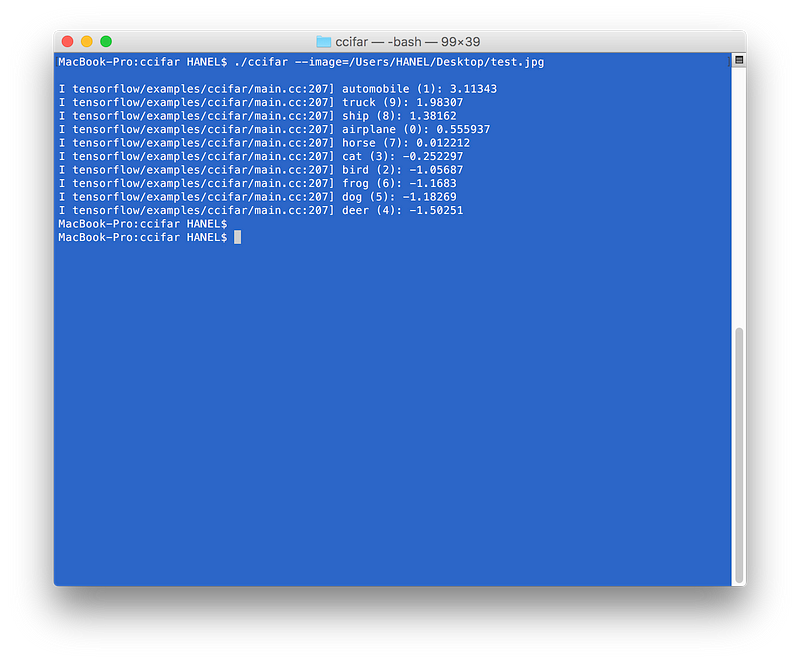
I trained my own CIFAR-10 for ridiculously few steps, as low as 1000 steps just for the tutorial purpose but you see it still predict the correct label for the image. I post the complete project in the github. Actually at first, in the first 20 days of the release of tensorflow I wanted to write a tutorial about it but I didn’t continue as it was so easy. It goes about 75% accuracy with 40–50K steps. If you have any questions about it ask me.
I hope this tutorial helps you to get your models works in the C++ easily. I tried to explain every situation I encounter during development and also writing this post. Let me know about any new problems, ways to do it, … in the comments.
Section 3:
Currently the process isn't very well documented (and subject to refinement), but the approximate steps are as follows:
- Build and train your model as a
tf.Graphcalledg_1. - Fetch the final values of each of the variables and store them as numpy arrays (using
Session.run()). - In a new
tf.Graphcalledg_2, createtf.constant()tensors for each of the variables, using the value of the corresponding numpy array fetched in step 2. -
Use
tf.import_graph_def()to copy nodes fromg_1intog_2, and use theinput_mapargument to replace each variable ing_1with the correspondingtf.constant()tensors created in step 3. You may also want to useinput_mapto specify a new input tensor (e.g. replacing an input pipeline with atf.placeholder()). Use thereturn_elementsargument to specify the name of the predicted output tensor. -
Call
g_2.as_graph_def()to get a protocol buffer representation of the graph.
(NOTE: The generated graph will have extra nodes in the graph for training. Although it is not part of the public API, you may wish to use the internal graph_util.extract_sub_graph() function to strip these nodes from the graph.)
Alternatively to my previous answer using freeze_graph(), which is only good if you call it as a script, there is a very nice function that will do all the heavy lifting for you and is suitable to be called from your normal model training code.
convert_variables_to_constants() does two things:
- It freezes the weights by replacing variables with constants
- It removes nodes which are not related to feedforward prediction
Assuming sess is your tf.Session() and "output" is the name of your prediction node, the following code will serialize your minimal graph both into textual and binary protobuf.
from tensorflow.python.framework.graph_util import convert_variables_to_constants

minimal_graph = convert_variables_to_constants(sess, sess.graph_def, ["output"])

tf.train.write_graph(minimal_graph, '.', 'minimal_graph.proto', as_text=False)
tf.train.write_graph(minimal_graph, '.', 'minimal_graph.txt', as_text=True)


 5671
5671

 被折叠的 条评论
为什么被折叠?
被折叠的 条评论
为什么被折叠?
 到【灌水乐园】发言


