先总结下自定义View的步骤:
1、自定义View的属性
2、在View的构造方法中获得我们自定义的属性
[ 3、重写onMesure ]
4、重写onDraw
我把3用[]标出了,所以说3不一定是必须的,当然了大部分情况下还是需要重写的。
1、自定义View的属性,首先在res/values/ 下建立一个attrs.xml , 在里面定义我们的属性和声明我们的整个样式。
<?xml version="1.0" encoding="utf-8"?>
<resources>

    <declare-styleable name="mtextview">
        <attr name="text" format="string"/>
        <attr name="textColor" format="color"/>
        <attr name="textSize" format="dimension"/>
    </declare-styleable>

</resources>
我们定义了字体,字体颜色,字体大小3个属性,format是值该属性的取值类型:
然后在布局中声明我们的自定义View
<?xml version="1.0" encoding="utf-8"?>
<LinearLayout xmlns:android="http://schemas.android.com/apk/res/android"
    xmlns:custom="http://schemas.android.com/apk/res/com.pepe.widgetdemo"
    android:layout_width="match_parent"
    android:layout_height="match_parent"
    android:orientation="vertical" >

    <com.pepe.widgetdemo.OneTextView
        android:layout_width="100dp"
        android:layout_height="100dp"
        custom:text="第一个"
        custom:textColor="#00ff00"
        custom:textSize="20sp"
        />
    <com.pepe.widgetdemo.OneTextView
        android:layout_width="200dp"
        android:layout_height="200dp"
        android:layout_marginTop="10dp"
        custom:text="第二个"
        custom:textColor="#0000ff"
        custom:textSize="20sp"
        />
</LinearLayout>
一定要引入 xmlns:custom=”http://schemas.android.com/apk/res/com.pepe.widgetdemo”我们的命名空间,后面的包路径指的是项目的package
2、在View的构造方法中,获得我们的自定义的样式
public class OneTextView extends View {

    /**
     * 文字内容
     */
    private String mText;
    /**
     * 文字颜色
     */
    private int mTextColor;
    /**
     * 文字大小
     */
    private int mTextSize;
    /**
     * 画笔
     */
    private Paint mPaint;
    /**
     * 矩形,用来控制绘制文本的范围
     */
    private Rect mBound;

    public OneTextView(Context context, AttributeSet attrs) {
        super(context, attrs);
        // TODO Auto-generated constructor stub
        // 获取属性
        TypedArray typedArray = context.obtainStyledAttributes(attrs,
                R.styleable.mtextview);
        // 获取文字内容
        mText = typedArray.getString(R.styleable.mtextview_text);
        // 获取文字颜色,并设置默认为红色
        mTextColor = typedArray.getColor(R.styleable.mtextview_textColor,
                Color.RED);
        // 获取文字大小,并设置默认为15px
        mTextSize = typedArray.getDimensionPixelSize(
                R.styleable.mtextview_textSize, 15);
        typedArray.recycle();

        mPaint = new Paint();
        mPaint.setTextSize(mTextSize);
        /**
         * 获取绘制文本的宽和高
         */
        mBound = new Rect();
        mPaint.getTextBounds(mText, 0, mText.length(), mBound);
    }


}
我们重写了1个构造方法,默认的布局文件调用的是两个参数的构造方法,我们在构造方法中获得自定义属性。
3、我们重写onDraw,onMesure调用系统提供的:
@Override
    protected void onMeasure(int widthMeasureSpec, int heightMeasureSpec)
    {
        super.onMeasure(widthMeasureSpec, heightMeasureSpec);
    }
@Override
    protected void onDraw(Canvas canvas) {
        // TODO Auto-generated method stub
        super.onDraw(canvas);
        // 设置画笔为黄色
        mPaint.setColor(Color.YELLOW);
        // 绘制背景
        canvas.drawRect(0, 0, getMeasuredWidth(), getMeasuredHeight(), mPaint);

        mPaint.setColor(mTextColor);
        // 绘制文字,第2,3个参数是文字左上角的坐标,设置文字在控件中心
        canvas.drawText(mText, getWidth() / 2 - mBound.width() / 2, getHeight()
                / 2 + mBound.height() / 2, mPaint);
    }
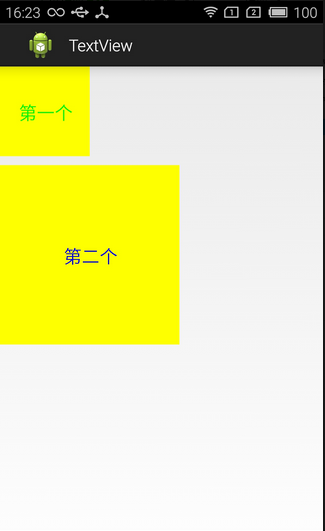
此时的效果是:


 1万+
1万+

 被折叠的 条评论
为什么被折叠?


