


IOS-UITableView 及自定义cell
- 类似于Android中的ListView,继承自UIScrollView。
- 分为两种样式
- UITableViewStylePlain (每组数据之间不留空隙)
- UITableViewStyleGrouped (每组数据之间间隔明显)
- Plain样式有一个特点:
- 在展示数据时,不同组的头部标题会在显示着一组数据时停留在顶部
- 这样可以起到提示当前显示哪一组的作用
- 我们还可以自定义展示UITableView的HeaderView和FooterView
- 并且还可以在其代理中自定义每一组的HeaderView和FooterView
- 如何展示数据
- 如果使用UITableView来展示数据,
- 那么这个对象必须遵守UITableViewDataSource协议
- 并且成为UITableView的数据源
- 那么这个对象必须遵守UITableViewDataSource协议
- UITableViewDataSource协议的方法
- 如果使用UITableView来展示数据,
    // 一共有多少组数据
    - (NSInteger)numberOfSectionsInTableView:(UITableView *)tableView;
    // 每一组有多少行数据
    - (NSInteger)tableView:(UITableView *)tableView numberOfRowsInSection:(NSInteger)section;
    // 每一行显示什么内容
    - (UITableViewCell *)tableView:(UITableView *)tableView cellForRowAtIndexPath:(NSIndexPath *)indexPath;
    //每组数据显示怎样的头部和尾部标题
    - (NSString *)tableView:(UITableView *)tableView titleForHeaderInSection:(NSInteger)section
    - (NSString *)tableView:(UITableView *)tableView titleForFooterInSection:(NSInteger)section
数据刷新
- [taleView reloadData]; //重新加载全部数据
- [tableView reloadRowAtIndexPaths: withRowAnimation:] //刷新某一行
NSIndexPath对象内包含section和row两个属性
- UITableViewCell
- UITableView的每一行都是一个UITableViewCell,通过dataSource的tableView:cellForRowAtIndexPath:方法来初始化每一行
- 通过选择UITableViewCell不同的样式,我们可以在UITableViewCell内显示不同的内容
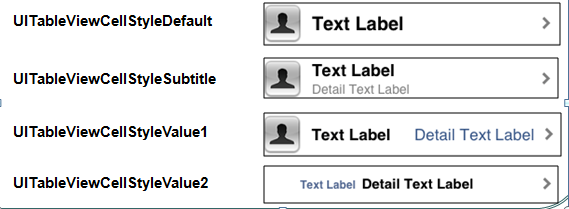
- UITableViewCell内部有三个属性
- UIImageView* imageView
- UILabel* textLabel
- UILabel* detailTextLabel
- UIImageView* imageView
- UITableViewCell内部有三个属性
UITableViewCell的样式有:
- UITableView的每一行都是一个UITableViewCell,通过dataSource的tableView:cellForRowAtIndexPath:方法来初始化每一行
UITableViewCell内部有个默认的子视图:contentView,
- contentView是UITableViewCell所显示内容的父视图,可显示一些辅助指示视图
- 辅助指示视图的作用是显示一个表示动作的图标,可以通过设置UITableViewCell的accessoryType来显示,默认是UITableViewCellAccessoryNone
- 其他还有
- UITableViewCellAccessoryDisclosureIndicator
- UITableViewCellAccessoryDetailDisclosureButton
- UITableViewCellAccessoryCheckmark
- 还可以通过cell的accessoryView属性来自定义辅助指示视图(比如往右边放一个开关)
- cell的重用
- 类似与Android中的ListView的优化问题,IOS中UITableView的优化类似
- ios的cell缓存机制
- 当滚动列表时,部分UITableViewCell会移出窗口,UITableView会将窗口外的UITableViewCell放入一个对象池中,
等待重用。当UITableView要求dataSource返回UITableViewCell时,dataSource会先查看这个对象池,如果池中有未使用的UITableViewCell,
dataSource会用新的数据配置这个UITableViewCell,然后返回给UITableView,重新显示到窗口中,从而避免创建新对象
- 当滚动列表时,部分UITableViewCell会移出窗口,UITableView会将窗口外的UITableViewCell放入一个对象池中,
- 简单的cell重用代码如下
- 类似与Android中的ListView的优化问题,IOS中UITableView的优化类似
- (UITableViewCell *)tableView:(UITableView *)tableView cellForRowAtIndexPath:(NSIndexPath *)indexPath
    {
        // 1.定义一个cell的标识
          static NSString *ID = @"mjcell";

        // 2.从缓存池中取出cell (其实系统维护了一个cell缓存链表)
          UITableViewCell *cell = [tableView dequeueReusableCellWithIdentifier:ID];

        // 3.如果缓存池中没有cell
          if (cell == nil) {
            cell = [[UITableViewCell alloc] initWithStyle:UITableViewCellStyleSubtitle reuseIdentifier:ID];
        }

        // 4.设置cell的属性...

          return cell;
    }
storyboard中的静态cell
- 对于app中的cell,有的cell可能就是用来显示固定数据的
- 这些cell的数据并不需要动态的设置,比如一个设置界面的选项布局
- xcode允许我们直接在storyboard中描述这种cell, 这样我们就可以不用实现数据源相关方法了。
- 注意的是:你如果实现了数据源相关方法,就不可能使用静态单元格成功!!!
- xcode在从storyboard中加载tableView时,会直接把我们描述的静态cell给显示在TableView上
- 对于TableView的content选择 static cell
- 对于每一种静态cell的布局,我们有两种方式选择,根据 TableViewCell的style属性
- 使用系统自带的4个样式
- 选择custom, 这样对于每个静态cell我们可以自己进行布局(拖控件,设置控件内容)
- 小技巧: 一般先搞定一组,然后在改变section属性时,Interface Builder会自动帮我们按已经搞定的一组复制出其他几组
cell的编辑
- IOS中的TableView自带两种编辑状态:添加和删除, 默认进入编辑状态是删除状态
- 删除状态:自带的侧滑删除的效果
- 添加状态:可以添加数据
- 相关方法
- IOS中的TableView自带两种编辑状态:添加和删除, 默认进入编辑状态是删除状态
  // 让tableView进入编辑状态的两种方式
    [tableView setEditing: YES animated:YES];
    tableView.editing = YES;

    #pragma mark - tableView的代理方法

    /**
     *  当tableView进入编辑状态的时候会调用,询问每一行进行怎样的操作(添加\删除)
     */
    - (UITableViewCellEditingStyle)tableView:(UITableView *)tableView editingStyleForRowAtIndexPath:(NSIndexPath *)indexPath
    {
        //TODO:返回要进行的操作类型
    }

    /**
     *  如果实现了这个方法,就自动实现了添加和滑动删除的功能
     *  提交了一个编辑操作就会调用(操作:删除\添加)这个方法
     *  @param editingStyle 编辑的行为
     *  @param indexPath    操作的行号
     */
    - (void)tableView:(UITableView *)tableView commitEditingStyle:(UITableViewCellEditingStyle)editingStyle forRowAtIndexPath:(NSIndexPath *)indexPath
    {
        if (editingStyle == UITableViewCellEditingStyleDelete) { // 提交的是删除操作
                //TODO: 更改数据模型,刷新表格
        } else if (editingStyle == UITableViewCellEditingStyleInsert) {
                //TODO: 更改数据模型,刷新表格
        }
    }
- 如果对展示的数据进行了编辑操作, 那么我们就必须要刷新表格,那么怎么刷新才是比较有效率的呢?
- [self.tableView reloadData];
- 全局刷新, 但性能不好
- [tableView deleteRowsAtIndexPaths:(NSArray*)deleteRows withRowAnimation:];
- 这个方法使用前提是:删除后的行数应和修改后的数据模型中数据的个数相同
- 这个方法调用后,会刷新被删除的行后面cell,并不会向前刷新
- [tableView insertRowsAtIndexPaths:(NSArray*)insertRows withRowAnimation:];
- 类似与上面的方法,也只是会刷新后面的cell
- [tableView reloadRowsAtIndexPaths:(NSArray*)Rows withRowAnimation:]
- 这个方法用来刷新指定行,要求数据模型内数据的个数不能变。
- 自定义cell
- 一共有两种方式,一种是通过xib,一种是通过代码
- xib适合定义样式相同的cell
- 通过代码一般定义样式不同的cell
- 通过xib
- 新建一个xib文件,并拖出一个Table View Cell
- 样式设置为 Custom, 并且定义好标识以便重用
- 摆放自己需要的控件
- 定义一个类,描述这个Cell, 并把这个Cell对应的类设置为我们自定义的类
    //描述xib中自定义cell的类
    //这里只看快速创建cell的类方法
    @implementation MJTGCell
    + (instancetype)cellWithTableView:(UITableView *)tableView
    {
        static NSString *ID = @"cell";  //这个标识与xib文件中,cell的标识相同

        // dequeueReusableCellWithIdentifier 先从缓存池中取,如果缓存池中没有可循环利用的cell,先去storyboard中找到合适的cell(静态cell)
        // cell是从storyboard中创建出来的
        MJTGCell *cell = [tableView dequeueReusableCellWithIdentifier:ID];

        if (cell == nil) {
            //获取xib文件中我们描述的Table View Cell, 并会把这个cell以在xib文件中定义标识为准,丢入缓存池中
            cell = [[[NSBundle mainBundle] loadNibNamed:@"MJTGCell" owner:nil options:nil] lastObject];
        }

        return cell;
    }

    //如果cell是通过storyboard或者xib创建的,就会调用这个方法来初始化cell
    - (void)awakeFromNib
    {
        // Initialization code
        UIView *divider = [[UIView alloc] init];
        divider.backgroundColor = [UIColor blackColor];
        divider.alpha = 0.2;
        [self.contentView addSubview:divider];
        self.divider = divider;
    }

    @end
- 通过代码
- 对于通过代码自定义的cell,一般每个cell的样式可能都不相同
- 即其中基本控件相同,但控件大小随数据的变化而变化,即frame不固定
- 这些控件的frame是在数据决定后才决定的
- 经过上面的分析,对于这种自定义cell,我们提供两个模型(把data模型算上的话是3个)
- 自定义cell模型,这个模型中定义了cell中含有的基本控件的样式和属性
- FrameData模型,这个模型可以根据data模型,算出data展示时所需要的控件的大小
- 给cell模型设置FrameData模型就可以使cell变的完整可用,即cell的展示是根据数据来动态变化的
- 需要注意: 自定义的cell继承自UITableViewCell, 并且自定义的控件都要添加到cell的contentView中!!!!
- 范例如下
- 该范例展示的自定义cell中含有一个UIImageView,一个UILabel和一个UIButton
- 核心方法如下
    /**
      *自定义cell:MJMessageCell
      */
    @implementation MJMessageCell  //继承自UITableViewCell
    //类构造方法,快速创建cell
    + (instancetype)cellWithTableView:(UITableView *)tableView
    {
        static NSString *ID = @"message";
        MJMessageCell *cell = [tableView dequeueReusableCellWithIdentifier:ID];
        if (cell == nil) {
            cell = [[MJMessageCell alloc] initWithStyle:UITableViewCellStyleDefault reuseIdentifier:ID];
        }
        return cell;
    }
    //重写initWithStyle:reuseIdentifier: 以便cell的可重用
    - (id)initWithStyle:(UITableViewCellStyle)style reuseIdentifier:(NSString *)reuseIdentifier
    {
        self = [super initWithStyle:style reuseIdentifier:reuseIdentifier];
        if (self) {
            //TODO, 定义cell内基本控件的属性
            // 这里需要初识化的控件有有UIImageView 和两个UILabel
            //这些控件都要添加到cell的contentView中!!!!!!!!
        }
        return self;
    }

    - (void)setMessageFrame:(MJMessageFrame *)messageFrame
    {
        //在这个方法中,根据传入的FrameData模型,设置控件相关的frame
    }


    //FrameData模型:

    @interface MJMessageFrame : NSObject
    //各种对应cell中控件的Frame
    @property (nonatomic, assign, readonly) CGRect iconF;
    @property (nonatomic, assign, readonly) CGRect timeF;
    @property (nonatomic, assign, readonly) CGRect textF;
    @property (nonatomic, assign, readonly) CGFloat cellHeight;
    //数据模型
    @property (nonatomic, strong) MJMessage *message;
    @end

    @implementation MJMessageFrame
    - (void)setMessage:(MJMessage *)message
    {
        //TODO: 根据数据设置相关的frame属性
    }


    //在控制器中,FrameData模型作为数据源

    @interface MJViewController () <UITableViewDataSource, UITableViewDelegate>
    @property (weak, nonatomic) IBOutlet UITableView *tableView;
    @property (nonatomic, strong) NSMutableArray *messageFrames;  //FrameData模型
    @end

    @implementation MJViewController
    //懒加载FrameData模型
    - (NSMutableArray *)messageFrames
    {
        if (_messageFrames == nil) {
                //TODO, 加载数据模型,并将数据模型设置给FrameData模型
            }

            _messageFrames = mfArray;
        }
        return _messageFrames;
    }


    - (UITableViewCell *)tableView:(UITableView *)tableView cellForRowAtIndexPath:(NSIndexPath *)indexPath
    {
        // 1.创建cell
        MJMessageCell *cell = [MJMessageCell cellWithTableView:tableView];

        // 2.给cell传递模型
        cell.messageFrame = self.messageFrames[indexPath.row];

        // 3.返回cell
        return cell;
    }

    //设置每个cell的高度
    - (CGFloat)tableView:(UITableView *)tableView heightForRowAtIndexPath:(NSIndexPath *)indexPath
    {
        MJMessageFrame *mf = self.messageFrames[indexPath.row];
        return mf.cellHeight;
    }
    @end


 2753
2753

 被折叠的 条评论
为什么被折叠?
被折叠的 条评论
为什么被折叠?
 到【灌水乐园】发言


