


目录
1. 说在前面
在我上一篇博客上, 简单介绍了关于URDF和XACRO的东西. 利用现有的模型, 是能够很容易建立出一个现成的模型. 这里, 直接使用上一篇博客中提到的UR5 + Barrett(为了方便, 后面我都称之为ur5bh). 这篇博客的目的本来是想利用Gazebo + ROS Control + MoveIt! 让模型动起来, 但是在编辑的过程中, 为了让所有事情变得更清晰, 最终导致博客太长了, 预计分作几篇博客来完成这件事.
回顾:
第一篇 – 机器人描述: http://blog.csdn.net/sunbibei/article/details/52297524
本篇作为第二篇, 主要介绍在机器人描述文件中, 关于transmission相关的一些内容, 以及怎么将一个模型导入到Gazebo中.
该系列, 主要是以具体任务为向导, 将我所了解到的一些东西分享出来, 尽可能的让所有事情知其所以然. 如果有误或不清晰的地方, 还请指出来, 谢谢…
1.1. ROS Control
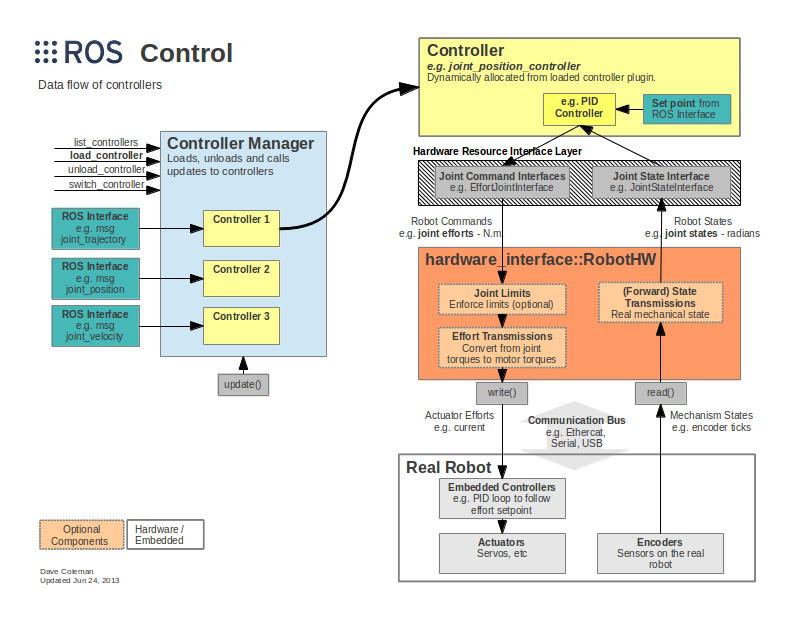
无论因为什么而做机器人相关的工作, 控制是绝对避开不了的一个话题. 怎么让机器人动起来, 或者怎么控制机器人上挂载的传感器等等问题, 如何避免不同控制器对硬件资源的冲突. 这些都是很繁琐的工作, 并且必然存在大量的重复工作. ROS Control为这些问题提出了一种解决方案, 当然, 其功能会更强大. ROS Control, 脱胎于pr2_mechanism, 在此基础上, 将其抽象, 使之成为一个框架, 而不限于pr2. 整体架构如下图所示. (pr2_mechanism也是一个很好的软件系统. 如果有时间, 后面也整理出来分享给大家)
1.2. 机器人 – ur5bh
既然是给定的任务, 那么必然需要一个载体. 后面都将统一使用下图模型.
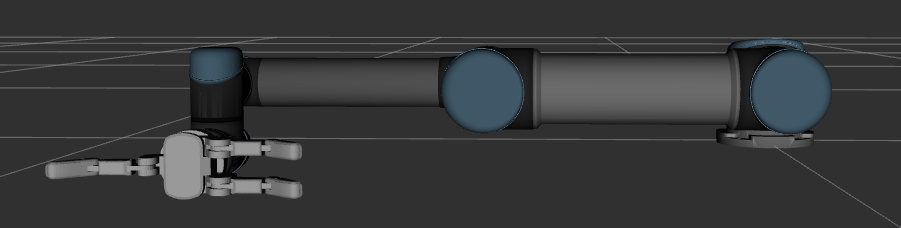
该模型的描述文件, 在第一篇博客中也提到了, 其实很简单. 就是如下所示的内容:
<?xml version="1.0"?>
<robot xmlns:xacro="http://www.ros.org/wiki/xacro" name="ur5bh" >

    <!-- common stuff -->
    <xacro:include filename="$(find ur_description)/urdf/common.gazebo.xacro" />

    <!-- ur5 -->
    <xacro:include filename="$(find ur_description)/urdf/ur5.urdf.xacro" />

    <!-- barrett hand -->
    <xacro:include filename="$(find bhand_description)/urdf/bh282.urdf.xacro" />

    <!-- arm -->
    <xacro:ur5_robot prefix="" joint_limited="true"/>

    <link name="world" />

    <joint name="world_joint" type="fixed">
        <parent link="world" />
        <child link = "base_link" />
        <origin xyz="0.0 0.0 0.0" rpy="0.0 0.0 0.0" />
    </joint>

    <!-- end effector -->
    <xacro:bhand_macro parent="ee_link" name="bh">
        <origin xyz="0.012 0.0 0.0" rpy="${pi/2.0} ${pi/2.0} ${pi/2.0}"/>
    </xacro:bhand_macro>

</robot>
当然, 前述文件需要编译成功的话, 是需要依赖于你电脑上是有安装两个ROS Package – ur_dscription and bhand_description.
1.3. Step by Step
为了统一环境和路径这种, 后面, 我会记录我运行的每一步. 首先我在~/.bashrc中注释掉了自己的所有工作空间. 依次执行下列命令:
$ mkdir -p ~/csdn_ws/src && cd ~/csdn_ws/src
$ catkin_init_workspace
# 下载bhand包, 得到bhand_description
$ git clone -b hydro-devel https://github.com/RobotnikAutomation/barrett_hand.git
$ cd .. && catkin_make
$ echo "source ~/csdn_ws/devel/setup.bash" >> ~/.bashrc
$ source ~/.bashrc
$ cd ~/csdn_ws/src/ && catkin_create_pkg ur5bh_description ur_description bhand_description
$ cd ~/csdn_ws && catkin_make
$ mkdir src/ur5bh_description/urdf && cd src/ur5bh_description/urdf
$ gedit ur5bh.urdf.xacro
上述命令很简单, 就不多作解释了吧? 最后打开编辑器之后, 将上述内容xml内容复制到该文本中, 保存. 另外, 如果在$ cd ~/csdn_ws && catkin_make这一步出现找不到ur_description包的错误, 在命令行里面通过apt-get来安装, 命令如下:
# 若提示ur_description包找不到的错误, 则执行下述命令
$ sudo apt-get install ros-indigo-ur-description
# 所有都OK的话, 可以用如下命令来查看模型效果
$ roslaunch urdf_tutorial xacrodisplay.launch model:=ur5bh.urdf.xacro
如果没有问题, 最后使用urdf_tutorial包可以可视化模型, 就是前图所示的状态.
2. 解析URDF
想要搞清楚后面的事情, 读懂URDF文件是很重要的一件事情. 现在我们建立好了ur5bh, 可以通过如下命令, 将XACRO文件转换成URDF.
# 默认情况下rosrun xacro xacro.py ur5bh.urdf.xacro将会直接将所有转换后的内容输出到命令行
$ rosrun xacro xacro.py ur5bh.urdf.xacro >> ur5bh.urdf
在该目录下, 将会在当前目录下生成一个ur5bh.urdf文件, 是解析之后得到的所有内容. 在使用过程中, 最终上传到ROS 参数服务器中的”robot_description”的内容一模一样. 我摘录其中值得说道的内容如下:
<gazebo>
    <plugin filename="libgazebo_ros_control.so" name="ros_control">
        <!--robotNamespace>/</robotNamespace-->
        <!--robotSimType>gazebo_ros_control/DefaultRobotHWSim</robotSimType-->
    </plugin>
</gazebo>

... ...

<transmission name="shoulder_pan_trans">
    <type>transmission_interface/SimpleTransmission</type>
    <joint name="shoulder_pan_joint">
        <hardwareInterface>PositionJointInterface</hardwareInterface>
    </joint>
    <actuator name="shoulder_pan_motor">
        <mechanicalReduction>1</mechanicalReduction>
    </actuator>
</transmission>
... ...
<transmission name="bh_j32_transmission">
    <type>transmission_interface/SimpleTransmission</type>
    <joint name="bh_j32_joint"/>
    <actuator name="bh_j32">
        <hardwareInterface>PositionJointInterface</hardwareInterface>
        <mechanicalReduction>1</mechanicalReduction>
        <motorTorqueConstant>1</motorTorqueConstant>
    </actuator>
</transmission>
其中第一条Tag gazebo的内容, 在文件的第一行, 作用是导入gazebo_ros_control, 如果该文件被Gazebo加载的话, Gazebo将会为该模型添加默认的Gazebo_ros_control库. 该库究竟有什么作用, 后面我会细说. 这儿我先详细解析一下, transmission是一个什么鬼. 其实从下面这张图中, 可以窥视一些端倪.
在前述ROS Control的数据流图中可以看得到, transmission是硬件抽象层中的一部分. 从图中可以看到, transmission的任务很清晰, 主要是两个方向的任务:
- Actuator <–> Joint: 定义Joint的Pos, Vel, Tor与Motor的Pos, Vel, Tor.
- State: 将编码器(例如角度, 力矩传感器等)的数据, 传递给对应的Joint, 变成最终的RobotState.
2.1. TransmissionInfo
此处所指的是第一种transmission. 每一个transmission主要由两部分构成, 从上面xml内容中也可以看出来, 分别是joint和actuator. 转换成代码, 如下所示(transmission_interface/transmission_info.h):
/**
 * \brief Contains semantic info about a given joint loaded from XML (URDF)
 */
struct JointInfo
{
    std::string name_;
    std::vector<std::string> hardware_interfaces_;
    std::string role_;
    std::string xml_element_;
};

/**
 * \brief Contains semantic info about a given actuator loaded from XML (URDF)
 */
struct ActuatorInfo
{
    std::string name_;
    std::vector<std::string> hardware_interfaces_;
    std::string xml_element_;
};

/**
 * \brief Contains semantic info about a given transmission loaded from XML (URDF)
 */
struct TransmissionInfo
{
    std::string name_;
    std::string type_;
    std::vector<JointInfo> joints_;
    std::vector<ActuatorInfo> actuators_;
};
2.2. TransmissionLoader
那这些信息又是怎么加载的呢? 以及, 每一个Tag里面的子Tag又是些什么鬼啊? 答案都可以在TransmissionLoader这个类里面找到答案. 这是一个抽象类, 实现的每一个Transmission的子类, 都要配套实现一个TransmissionLoader. 该基类的定义如下(只是摘录了部分):
class TransmissionLoader
{
public:
    virtual ~TransmissionLoader() {}

    typedef boost::shared_ptr<Transmission> TransmissionPtr;
    virtual TransmissionPtr load(const TransmissionInfo& transmission_info) = 0;
protected:
    enum ParseStatus
    {
      SUCCESS,
      NO_DATA,
      BAD_TYPE
    };

    ... ...

    static ParseStatus getActuatorReduction(
            const TiXmlElement& parent_el,
            const std::string&  actuator_name,
            const std::string&  transmission_name,
            bool                required,
            double&             reduction);

    static ParseStatus getJointReduction(
            const TiXmlElement& parent_el,
            const std::string&  joint_name,
            const std::string&  transmission_name,
            bool                required,
            double&             reduction);

    static ParseStatus getJointOffset(
            const TiXmlElement& parent_el,
            const std::string&  joint_name,
            const std::string&  transmission_name,
            bool                required,
            double&             offset);

    static ParseStatus getActuatorRole(
            const TiXmlElement& parent_el,
            const std::string&  actuator_name,
            const std::string&  transmission_name,
            bool                required,
            std::string&        role);

    static ParseStatus getJointRole(
            const TiXmlElement& parent_el,
            const std::string&  joint_name,
            const std::string&  transmission_name,
            bool                required,
            std::string&        role);
}
中间省略了几个静态函数, 主要用以判断数据格式是否正确等. 上面是TransmissionLoader基类的定义, 其中包含一个纯虚函数. 其他都是一些工具函数. 其中关于几个子标签的数据读取, 其中mechanicalReduction在getActuatorReduction()中读取, 源码如下, 类似的, Joint也是可以有mechanicalReduction标签的. 除了这个标签外, Actuator和Joint还可以有role标签, joint还有一个独有的标签offset</
 最低0.47元/天 解锁文章


 1012
1012


 被折叠的 条评论
为什么被折叠?
被折叠的 条评论
为什么被折叠?
 到【灌水乐园】发言


