译者前言:
本文译自MSDN,原作者为David Rousset,文章中如果有我的额外说明,我会加上【译者注:】。
正文开始:
现在我们已经通过前面的教程编写相机、网格和设备对象的核心逻辑建立了3D引擎的核心,我们可以对渲染工作做一些增强了。下一步我们再连接点来绘制一些线条来组成一个线框渲染效果。
本章教程是以下系列的一部分:
2 – 绘制线段和三角形来获得线框渲染效果(本文)
在本章教程中,你将学习如何绘制线条、什么是面(Face)以及用Bresenham算法得到一些三角形。
可喜的是,最后你就能知道如何写出非常酷的东西了。
大赞!我们的3D旋转立方体真正展示在了我们的屏幕上!
首先使用基本算法画出两个点之间的线
让我们来先写一个简单的算法来绘制2个顶点之间的线,我们将用以下逻辑:
- 如果2点之间的距离小于2个像素,什么也不做
- 否则,我们计算两点之间的中心点 (point0坐标 + (point1坐标 - point0坐标) / 2)
- 我们在屏幕上将这个点绘制出来
- 我们使用递归的方式在point0&中心点之间以及中心点与point1之间绘制点
下面是示例代码:
【译者注:C#代码】
public void DrawLine(Vector2 point0, Vector2 point1)
{
    var dist = (point1 - point0).Length();

    // 如果两点间的距离小于2,什么都不做
    if (dist < 2)
        return;

    // 查找两点间的中心点
    Vector2 middlePoint = point0 + (point1 - point0)/2;
    // 绘制这个点到屏幕上
    DrawPoint(middlePoint);
    // 我们使用递归的方式在point0&中心点之间以及中心点与point1之间绘制点
    DrawLine(point0, middlePoint);
    DrawLine(middlePoint, point1);
}
【译者注:TypeScript代码】
public drawLine(point0: BABYLON.Vector2, point1: BABYLON.Vector2): void {
    var dist = point1.subtract(point0).length();

    // 如果两点间的距离小于2,什么都不做
    if(dist < 2)
        return;

    // 查找两点间的中心点
    var middlePoint = point0.add((point1.subtract(point0)).scale(0.5));
    // 绘制这个点到屏幕上
    this.drawPoint(middlePoint);
    // 我们使用递归的方式在point0&中心点之间以及中心点与point1之间绘制点
    this.drawLine(point0, middlePoint);
    this.drawLine(middlePoint, point1);
}
【译者注:JavaScript代码】
Device.prototype.drawLine = function (point0, point1) {
    var dist = point1.subtract(point0).length();

    // 如果两点间的距离小于2,什么都不做
    if (dist < 2) {
        return;
    }

    // 查找两点间的中心点
    var middlePoint = point0.add((point1.subtract(point0)).scale(0.5));
    // 绘制这个点到屏幕上
    this.drawPoint(middlePoint);
    // 我们使用递归的方式在point0&中心点之间以及中心点与point1之间绘制点
    this.drawLine(point0, middlePoint);
    this.drawLine(middlePoint, point1);
};
你需要更新渲染循环处理函数来使用这个新的代码片段:
【译者注:C#代码】
for (var i = 0; i < mesh.Vertices.Length - 1; i++)
{
    var point0 = Project(mesh.Vertices[i], transformMatrix);
    var point1 = Project(mesh.Vertices[i + 1], transformMatrix);
    DrawLine(point0, point1);
}
【译者注:TypeScript代码】
for (var i = 0; i < cMesh.Vertices.length -1; i++){
    var point0 = this.project(cMesh.Vertices[i], transformMatrix);
    var point1 = this.project(cMesh.Vertices[i + 1], transformMatrix);
    this.drawLine(point0, point1);
}
【译者注:JavaScript代码】
for (var i = 0; i < cMesh.Vertices.length -1; i++){
    var point0 = this.project(cMesh.Vertices[i], transformMatrix);
    var point1 = this.project(cMesh.Vertices[i + 1], transformMatrix);
    this.drawLine(point0, point1);
}
你现在应该得到这样的效果:
我知道这看起来很奇怪,但这是预期的行为。它能帮助你了解如何显示3D网格。为了有一个更好的渲染效果,需要了解另一个概念。
显示三角形的面
现在,我们知道如何绘制线条,我们需要一个更好的方式来使他们显示网格。最简单的2D几何图形是三角形。我们使用三维的思想使用这些三角形绘制成我们所需要的网格。那么我们需要将立方体的每一面都分成2个三角形。我们先“手工”做到这一点,以后可以使用3D建模软件来帮我们自动做到这一步,这就是下一章节的内容了。
要绘制三角形,你需要有3个点(points)/顶点(vertices)。一个简单的面只包含三个值,这些值是索引下标,通过这些下标可以取得顶点数组中的某一个顶点,然后进行渲染。
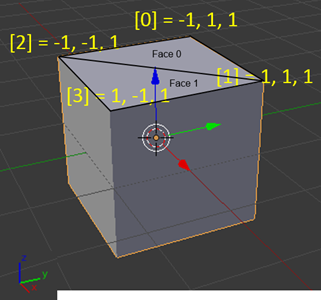
要理解这个概念,让我们再看看Blender中的立方体盒子。
我们在此途中使用0,1,2,3来显示4个顶点。要绘制立方体的上面,我们要画2个三角形。
第一个,面片0,绘制路径为 顶点0 (-1, 1, 1) 到 顶点1 (1,1,1) 到 顶点2 (-1, -1, 1) 然后再到 顶点0 (-1, 1, 1)。
第二个,面片1,绘制路径为 顶点1 (1, 1, 1) 到 顶点2 (-1, -1, 1) 到 顶点3 (1, -1 , 1) 然后再到 顶点1 (1, 1, 1)。
等效的代码是这样的:
var mesh = new SoftEngine.Mesh("Square", 4, 2);
meshes.Add(mesh);
mesh.Vertices[0] = new Vector3(-1, 1, 1);
mesh.Vertices[1] = new Vector3(1, 1, 1);
mesh.Vertices[2] = new Vector3(-1, -1, 1);
mesh.Vertices[3] = new Vector3(1, -1, 1);

mesh.Faces[0] = new Face { A = 0, B = 1, C = 2 };
mesh.Faces[1] = new Face { A = 1, B = 2, C = 3 };
如果你想绘制完整的立方体,需要找到10个剩下的面片(Face),才能够组成 12个面片(Face)来绘制立方体的6个不同的面(Sides)。
现在让我们来为面片(Face)对象做定义,这是一个非常简单的对象,因为内部仅仅只是3个索引下标。也请一并更新新的网格代码:
【译者注:C#代码】
namespace SoftEngine
{
    public struct Face
    {
        public int A;
        public int B;
        public int C;
    }
    public class Mesh
    {
        public string Name { get; set; }
        public Vector3[] Vertices { get; private set; }
        public Face[] Faces { get; set; }
        public Vector3 Position { get; set; }
        public Vector3 Rotation { get; set; }

        public Mesh(string name, int verticesCount, int facesCount)
        {
            Vertices = new Vector3[verticesCount];
            Faces = new Face[facesCount];
            Name = name;
        }
    }
}
【译者注:TypeScript代码】
///<reference path="babylon.math.ts"/>

module SoftEngine {
    export interface Face {
        A: number;
        B: number;
        C: number;
    }

    export class Mesh {
        Position: BABYLON.Vector3;
        Rotation: BABYLON.Vector3;
        Vertices: BABYLON.Vector3[];
        Faces: Face[];

        constructor(public name: string, verticesCount: number, facesCount: number) {
            this.Vertices = new Array(verticesCount);
            this.Faces = new Array(facesCount);
            this.Rotation = new BABYLON.Vector3(0, 0, 0);
            this.Position = new BABYLON.Vector3(0, 0, 0);
        }
    }
}
【译者注:JavaScript代码】
var SoftEngine;
(function (SoftEngine) {
    var Mesh = (function () {
        function Mesh(name, verticesCount, facesCount) {
            this.name = name;
            this.Vertices = new Array(verticesCount);
            this.Faces = new Array(facesCount);
            this.Rotation = new BABYLONTS.Vector3(0, 0, 0);
            this.Position = new BABYLONTS.Vector3(0, 0, 0);
        }
        return Mesh;
    })();
    SoftEngine.Mesh = Mesh;
})(SoftEngine || (SoftEngine = {}));
现在我们需要更新设备( Device)对象的 渲染( Render() 函数/方法)遍历所有定义的面片,并绘制相关三角形。
【译者注:C#代码】
foreach (var face in mesh.Faces)
{
    var vertexA = mesh.Vertices[face.A];
    var vertexB = mesh.Vertices[face.B];
    var vertexC = mesh.Vertices[face.C];

    var pixelA = Project(vertexA, transformMatrix);
    var pixelB = Project(vertexB, transformMatrix);
    var pixelC = Project(vertexC, transformMatrix);

    DrawLine(pixelA, pixelB);
    DrawLine(pixelB, pixelC);
    DrawLine(pixelC, pixelA);
}
【译者注:TypeScript/JavaScript代码】
for (var indexFaces = 0; indexFaces < cMesh.Faces.length; indexFaces++)
{
    var currentFace = cMesh.Faces[indexFaces];
    var vertexA = cMesh.Vertices[currentFace.A];
    var vertexB = cMesh.Vertices[currentFace.B];
    var vertexC = cMesh.Vertices[currentFace.C];

    var pixelA = this.project(vertexA, transformMatrix);
    var pixelB = this.project(vertexB, transformMatrix);
    var pixelC = this.project(vertexC, transformMatrix);

    this.drawLine(pixelA, pixelB);
    this.drawLine(pixelB, pixelC);
    this.drawLine(pixelC, pixelA);
}最后,我们需要声明与我们的立方体的12个面片(Face)并进行关联以保证最新代码工作达到预期。
这里是新的声明:
【译者注:C#代码】
var mesh = new SoftEngine.Mesh("Cube", 8, 12);
meshes.Add(mesh);
mesh.Vertices[0] = new Vector3(-1, 1, 1);
mesh.Vertices[1] = new Vector3(1, 1, 1);
mesh.Vertices[2] = new Vector3(-1, -1, 1);
mesh.Vertices[3] = new Vector3(1, -1, 1);
mesh.Vertices[4] = new Vector3(-1, 1, -1);
mesh.Vertices[5] = new Vector3(1, 1, -1);
mesh.Vertices[6] = new Vector3(1, -1, -1);
mesh.Vertices[7] = new Vector3(-1, -1, -1);

mesh.Faces[0] = new Face { A = 0, B = 1, C = 2 };
mesh.Faces[1] = new Face { A = 1, B = 2, C = 3 };
mesh.Faces[2] = new Face { A = 1, B = 3, C = 6 };
mesh.Faces[3] = new Face { A = 1, B = 5, C = 6 };
mesh.Faces[4] = new Face { A = 0, B = 1, C = 4 };
mesh.Faces[5] = new Face { A = 1, B = 4, C = 5 };

mesh.Faces[6] = new Face { A = 2, B = 3, C = 7 };
mesh.Faces[7] = new Face { A = 3, B = 6, C = 7 };
mesh.Faces[8] = new Face { A = 0, B = 2, C = 7 };
mesh.Faces[9] = new Face { A = 0, B = 4, C = 7 };
mesh.Faces[10] = new Face { A = 4, B = 5, C = 6 };
mesh.Faces[11] = new Face { A = 4, B = 6, C = 7 };
【译者注:TypeScript/JavaScript代码】
var mesh = new SoftEngine.Mesh("Cube", 8, 12);
meshes.push(mesh);
mesh.Vertices[0] = new BABYLON.Vector3(-1, 1, 1);
mesh.Vertices[1] = new BABYLON.Vector3(1, 1, 1);
mesh.Vertices[2] = new BABYLON.Vector3(-1, -1, 1);
mesh.Vertices[3] = new BABYLON.Vector3(1, -1, 1);
mesh.Vertices[4] = new BABYLON.Vector3(-1, 1, -1);
mesh.Vertices[5] = new BABYLON.Vector3(1, 1, -1);
mesh.Vertices[6] = new BABYLON.Vector3(1, -1, -1);
mesh.Vertices[7] = new BABYLON.Vector3(-1, -1, -1);

mesh.Faces[0] = { A:0, B:1, C:2 };
mesh.Faces[1] = { A:1, B:2, C:3 };
mesh.Faces[2] = { A:1, B:3, C:6 };
mesh.Faces[3] = { A:1, B:5, C:6 };
mesh.Faces[4] = { A:0, B:1, C:4 };
mesh.Faces[5] = { A:1, B:4, C:5 };

mesh.Faces[6] = { A:2, B:3, C:7 };
mesh.Faces[7] = { A:3, B:6, C:7 };
mesh.Faces[8] = { A:0, B:2, C:7 };
mesh.Faces[9] = { A:0, B:4, C:7 };
mesh.Faces[10] = { A:4, B:5, C:6 };
mesh.Faces[11] = { A:4, B:6, C:7 };
你现在应该得到一个旋转的美丽立方体:
恭喜! :)
使用Bresenham算法绘制增强的线条
Bresenham算法绘制线条不仅速度快,而且效果比我们的递归版本更好。这个算法非常棒,你可以在维基百科上找到它的词条。
下面是该算法的3种语言实现:
【译者注:C#代码】
public void DrawBline(Vector2 point0, Vector2 point1)
{
    int x0 = (int)point0.X;
    int y0 = (int)point0.Y;
    int x1 = (int)point1.X;
    int y1 = (int)point1.Y;

    var dx = Math.Abs(x1 - x0);
    var dy = Math.Abs(y1 - y0);
    var sx = (x0 < x1) ? 1 : -1;
    var sy = (y0 < y1) ? 1 : -1;
    var err = dx - dy;

    while (true) {
        DrawPoint(new Vector2(x0, y0));

        if ((x0 == x1) && (y0 == y1)) break;
        var e2 = 2 * err;
        if (e2 > -dy) { err -= dy; x0 += sx; }
        if (e2 < dx) { err += dx; y0 += sy; }
    }
}
【译者注:TypeScript代码】
public drawBline(point0: BABYLON.Vector2, point1: BABYLON.Vector2): void {
    var x0 = point0.x >> 0;
    var y0 = point0.y >> 0;
    var x1 = point1.x >> 0;
    var y1 = point1.y >> 0;
    var dx = Math.abs(x1 - x0);
    var dy = Math.abs(y1 - y0);
    var sx = (x0 < x1) ? 1 : -1;
    var sy = (y0 < y1) ? 1 : -1;
    var err = dx - dy;

    while (true) {
        this.drawPoint(new BABYLON.Vector2(x0, y0));

        if ((x0 == x1) && (y0 == y1)) break;
        var e2 = 2 * err;
        if (e2 > -dy) { err -= dy; x0 += sx; }
        if (e2 < dx) { err += dx; y0 += sy; }
    }
}
【译者注:JavaScript代码】
Device.prototype.drawBline = function (point0, point1) {
    var x0 = point0.x >> 0;
    var y0 = point0.y >> 0;
    var x1 = point1.x >> 0;
    var y1 = point1.y >> 0;
    var dx = Math.abs(x1 - x0);
    var dy = Math.abs(y1 - y0);
    var sx = (x0 < x1) ? 1 : -1;
    var sy = (y0 < y1) ? 1 : -1;
    var err = dx - dy;
    while(true) {
        this.drawPoint(new BABYLON.Vector2(x0, y0));
        if((x0 == x1) && (y0 == y1)) break;
        var e2 = 2 * err;
        if(e2 > -dy) { err -= dy; x0 += sx; }
        if(e2 < dx) { err += dx; y0 += sy; }
    }
};
在 Render函数中,使用DrawBline替换掉DrawLine函数调用。
如果你注意观察,应该可以发现Bresenham算法比我们自己实现的波动要小很多。
同样的,你可以下载源代码:
TypeScript:SoftEngineTSPart2.zip
JavaScript:SoftEngineJSPart2.zip 或只需右键点击 -> 查看框架的源代码
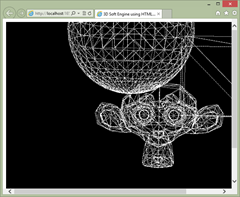
下一章节,你将学习如何从Blender这个免费的建模工具中导出一些Json文件格式的网格,然后加载Json文件并用我们的线框引擎去显示它。实际上,我们已经拥有一切必备条件可以显示下面这样的复杂网格了:


 899
899


 被折叠的 条评论
为什么被折叠?


