


caffe基础-12如何成功跑通caffe的example
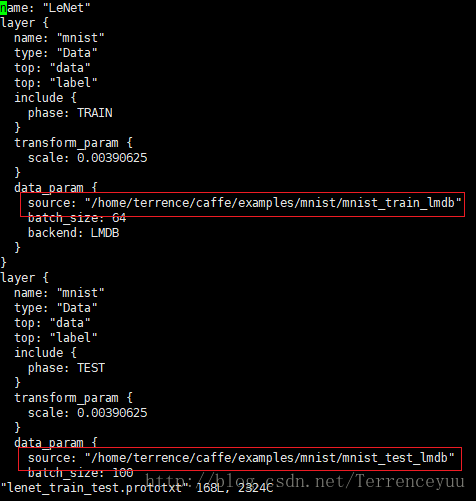
caffe/examples/mnist目录下有个lenet_train_test.prototxt文件,这个网络是官方库用来做手写体识别的。其网络结构如下图所示(绘图命令参考http://blog.csdn.net/terrenceyuu/article/details/76531679):
由于lmdb数据源在安装caffe后是没有的,而且路径也会存在一些问题。导致很多不太熟悉caffe的无法跑通这个官方示例。
- 下面我将通过绘制loss曲线的方式跑一遍这个网络。

1、绘制loss的脚本文件
import numpy as np
import matplotlib.pyplot as plt
import sys,os
caffe_root = '/home/terrence/caffe/'  # this file should be run from {caffe_root}/examples (otherwise change this line)
sys.path.insert(0, caffe_root + 'python')
import caffe

import matplotlib
# Force matplotlib to not use any Xwindows backend.
matplotlib.use('Agg')

#caffe.set_device(0)
caffe.set_mode_gpu()
solver = caffe.SGDSolver('/home/terrence/caffe/examples/mnist/lenet_solver.prototxt')


niter =1000
test_interval = 200
train_loss = np.zeros(niter)
test_acc = np.zeros(int(np.ceil(niter / test_interval)))

# the main solver loop
for it in range(niter):
    solver.step(1)  # SGD by Caffe

    # store the train loss
    train_loss[it] = solver.net.blobs['loss'].data
    solver.test_nets[0].forward(start='conv1')

    if it % test_interval == 0:
        acc=solver.test_nets[0].blobs['accuracy'].data
        print 'Iteration', it, 'testing...','accuracy:',acc
        test_acc[it // test_interval] = acc

print test_acc
_, ax1 = plt.subplots()
ax2 = ax1.twinx()
ax1.plot(np.arange(niter), train_loss)
ax2.plot(test_interval * np.arange(len(test_acc)), test_acc, 'r')
ax1.set_xlabel('iteration')
ax1.set_ylabel('train loss')
ax2.set_ylabel('test accuracy')
plt.show()
- 运行上述脚本就可以跑一遍(/home/terrence/caffe/examples/mnist/lenet_solver.prototxt)这个网络,同时在1000次迭代后(因为niter =1000)绘制loss曲线。
2、修改路径
- 将整个网络所设计到的文件路径设置为绝对路径,否则将找不到文件。如下图(lenet_solver.prototxt)所示。
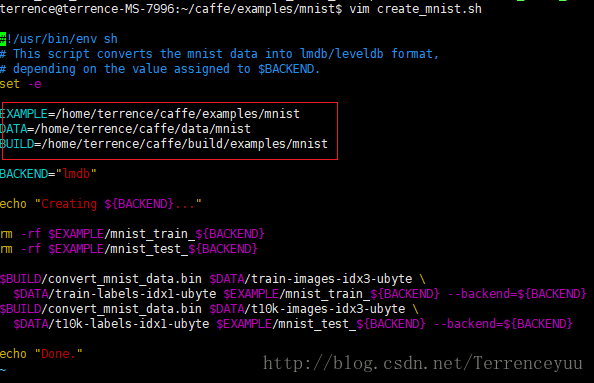
3、制作lmdb数据源
- 制作数据源需要sh一下create_mnist.sh这个文件:

- 同时,此文件的路径也要修改。
- 此时,会报没有train-images-idx3-ubyte这个文件,我们进入caffe/data/mnist文件夹下发现就一个get_mnist.sh脚本文件。所以,运行此脚本,就会发现这个文件夹下多出了4个文件。

- 再次运行create_mnist.sh这个脚本,就可以成功制作出lmdb数据源了,成功后会多两个文件夹,分别为train和test的数据。

4、运行结果
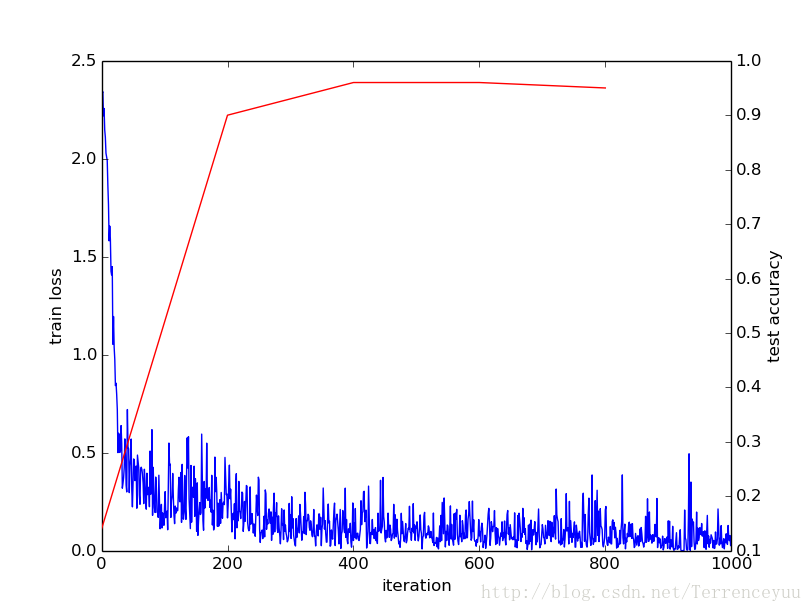
- 此时,再次执行1中所对于的.py脚本,就可以成功训练了。同时在1000次迭代后会产生一个loss曲线图。

- 曲线图如下(其中,蓝色为loss,红色为accuracy)


 1万+
1万+

 被折叠的 条评论
为什么被折叠?
被折叠的 条评论
为什么被折叠?
 到【灌水乐园】发言


