


- 插值
- Python: cv2.resize(src, dsize[, dst[, fx[, fy[, interpolation]]]]) → dst
- interpolation –
interpolation method:
- INTER_NEAREST - a nearest-neighbor interpolation
- INTER_LINEAR - a bilinear interpolation (used by default)
- INTER_AREA - resampling using pixel area relation. It may be a preferred method for image decimation, as it gives moire’-free results. But when the image is zoomed, it is similar to theINTER_NEAREST method.
- INTER_CUBIC - a bicubic interpolation over 4x4 pixel neighborhood
- INTER_LANCZOS4 - a Lanczos interpolation over 8x8 pixel neighborhood
# -*- coding: utf-8 -*-
import cv2

fn="test2.jpg"
img=cv2.imread(fn)
w=img.shape[1]
h=img.shape[0]

#放大,双立方插值
newimg1=cv2.resize(img,(w*2,h*2),interpolation=cv2.INTER_CUBIC)
#放大, 最近邻插值
newimg2=cv2.resize(img,(w*2,h*2),interpolation=cv2.INTER_NEAREST)
#放大, 象素关系重采样
newimg3=cv2.resize(img,(w*2,h*2),interpolation=cv2.INTER_AREA)
#缩小, 象素关系重采样
newimg4=cv2.resize(img,(300,200),interpolation=cv2.INTER_AREA)


cv2.imshow('preview1',newimg1)
cv2.imshow('preview2',newimg2)
cv2.imshow('preview3',newimg3)
cv2.imshow('preview4',newimg4)
cv2.waitKey()
cv2.destroyAllWindows()
-
Python:
cv2.
warpAffine
(src, M, dsize
[, dst
[, flags
[, borderMode
[, borderValue
]
]
]
]
) → dst
-
C:
void
cvWarpAffine
(const CvArr*
src, CvArr*
dst, const CvMat*
map_matrix, int
flags=CV_INTER_LINEAR+CV_WARP_FILL_OUTLIERS, CvScalar
fillval=cvScalarAll(0)
)
-
Python:
cv.
WarpAffine
(src, dst, mapMatrix, flags=CV_INTER_LINEAR+CV_WARP_FILL_OUTLIERS, fillval=(0, 0, 0, 0)
) → None
-
C:
void
cvGetQuadrangleSubPix
(const CvArr*
src, CvArr*
dst, const CvMat*
map_matrix
)
-
Python:
cv.
GetQuadrangleSubPix
(src, dst, mapMatrix
) → None
-
Parameters: - src – input image.
- dst – output image that has the size dsize and the same type assrc .
- M –
 transformation matrix.
 - dsize – size of the output image.
- flags – combination of interpolation methods (see resize() ) and the optional flag WARP_INVERSE_MAP that means that M is the inverse transformation (
 ).
). - borderMode – pixel extrapolation method (seeborderInterpolate()); when borderMode=BORDER_TRANSPARENT , it means that the pixels in the destination image corresponding to the “outliers” in the source image are not modified by the function.
- borderValue – value used in case of a constant border; by default, it is 0.
The function warpAffine transforms the source image using the specified matrix:

getRotationMatrix2D
Calculates an affine matrix of 2D rotation.
-
C++:
Mat
getRotationMatrix2D
(Point2f
center, double
angle, double
scale
)
-
Python:
cv2.
getRotationMatrix2D
(center, angle, scale
) → retval
-
C:
CvMat*
cv2DRotationMatrix
(CvPoint2D32f
center, double
angle, double
scale, CvMat*
map_matrix
)
-
Python:
cv.
GetRotationMatrix2D
(center, angle, scale, mapMatrix
) → None
-
Parameters: - center – Center of the rotation in the source image.
- angle – Rotation angle in degrees. Positive values mean counter-clockwise rotation (the coordinate origin is assumed to be the top-left corner).
- scale – Isotropic scale factor.
- map_matrix – The output affine transformation, 2x3 floating-point matrix.
The function calculates the following matrix:

where

The transformation maps the rotation center to itself. If this is not the target, adjust the shift.
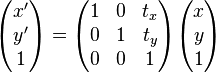
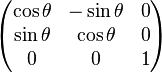
仿射变换,又称仿射映射,是指在几何中,一个向量空间进行一次线性变换并接上一个平移,变换为另一个向量空间。
一个对向量 平移
平移 ,与旋转放大缩小
 的仿射映射为

上式在 齐次坐标上,等价于下面的式子
-

-
-
为了表示仿射变换,需要使用齐次坐标,即用三维向量 (x, y, 1) 表示二维向量,对于高维来说也是如此。按照这种方法,就可以用矩阵乘法表示变换。
 ;
;  变为
变为在矩阵中增加一列与一行,除右下角的元素为 1 外其它部分填充为 0,通过这种方法,所有的线性变换都可以转换为仿射变换。例如,上面的旋转矩阵变为
通过这种方法,使用与前面一样的矩阵乘积可以将各种变换无缝地集成到一起
-
# -*- coding: utf-8 -*-
import cv2

fn="test3.jpg"
img=cv2.imread(fn)
w=img.shape[1]
h=img.shape[0]
#得到仿射变换矩阵,完成旋转
#中心
mycenter=(h/2,w/2)
#旋转角度
myangle=90
#缩放尺度
myscale=0.5
#仿射变换完成缩小并旋转
transform_matrix=cv2.getRotationMatrix2D(mycenter,myangle,myscale)

newimg=cv2.warpAffine(img,transform_matrix,(h,w))
cv2.imshow('preview',newimg)

cv2.waitKey()
cv2.destroyAllWindows()
本博客所有内容是原创,如果转载请注明来源
http://blog.csdn.net/myhaspl/


 1607
1607

 被折叠的 条评论
为什么被折叠?
被折叠的 条评论
为什么被折叠?
 到【灌水乐园】发言


