


PCIE(PCI Express)是INTEL提出的新一代的总线接口,目前普及的PCIE 3.0的传输速率为8GT/s,下一代PCIE 4.0将翻番为16GT/S,因为传输速率快广泛应用于数据中心、云计算、人工智能、机器学习、视觉计算、显卡、存储和网络等领域。PCIE插槽是可以向下兼容的,比如PCIE 1X接口可以插4X、8X、16X的插槽上。

实现基本的PCIE驱动程序,实现以下模块:初始化设备、设备打开、数据读写和控制、中断处理、设备释放、设备卸载。本程序适合PCIE驱动开发通用调试的基本框架,对于具体PCIE设备,需要配置相关寄存器才可以使用!
源代码
#include <linux/module.h>
#include <linux/kernel.h>
#include <linux/fs.h>
#include <linux/signal.h>
#include <linux/init.h>
#include <linux/cdev.h>
#include <linux/delay.h>
#include <linux/poll.h>
#include <linux/device.h>
#include <linux/pci.h>
#include <linux/interrupt.h>
#include <asm/uaccess.h>
MODULE_LICENSE("Dual BSD/GPL");
MODULE_DESCRIPTION("pcie device driver");
#define DEV_NAME "hello_pcie"
#define DEBUG
#ifdef DEBUG
#define DEBUG_ERR(format,args...) \
do{ \
printk("[%s:%d] ",__FUNCTION__,__LINE__); \
printk(format,##args); \
}while(0)
#else
#define DEBUG_PRINT(format,args...)
#endif
//1M
#define DMA_BUFFER_SIZE 1*1024*1024
#define FASYNC_MINOR 1
#define FASYNC_MAJOR 244
#define DEVICE_NUMBER 1
static struct class * hello_class;
static struct device * hello_class_dev;
struct hello_device
{
struct pci_dev* pci_dev;
struct cdev cdev;
dev_t devno;
}my_device;
//barn(n=0,1,2或者0,1,2,3,4,5) 空间的物理地址,长度,虚拟地址
unsigned long bar0_phy;
unsigned long bar0_vir;
unsigned long bar0_length;
unsigned long bar1_phy;
unsigned long bar1_vir;
unsigned long bar1_length;
//进行DMA转换时,dma的源地址和目的地址
dma_addr_t dma_src_phy;
dma_addr_t dma_src_vir;
dma_addr_t dma_dst_phy;
dma_addr_t dma_dst_vir;
//根据设备的id填写,这里假设厂商id和设备id
#define HELLO_VENDOR_ID 0x666
#define HELLO_DEVICE_ID 0x999
static struct pci_device_id hello_ids[] = {
{HELLO_VENDOR_ID,HELLO_DEVICE_ID,PCI_ANY_ID,PCI_ANY_ID,0,0,0},
{0,}
};
MODULE_DEVICE_TABLE(pci,hello_ids);
static int hello_probe(struct pci_dev *pdev, const struct pci_device_id *id);
static void hello_remove(struct pci_dev *pdev);
static irqreturn_t hello_interrupt(int irq, void * dev);
//往iATU写数据的函数
void iATU_write_config_dword(struct pci_dev *pdev,int offset,int value)
{
}
//假设需要将bar0映射到内存
static void iATU_bar0(void)
{
//下面几步,在手册中有example
//iATU_write_config_dword(my_device.pci_dev,iATU Lower Target Address ,xxx);//xxx表示内存中的地址,将bar0映射到这块内存
//iATU_write_config_dword(my_device.pci_dev,iATU Upper Target Address ,xxx);//xxx表示内存中的地址,将bar0映射到这块内存
//iATU_write_config_dword(my_device.pci_dev,iATU Control 1,0x0);//映射的时内存,所以写0x0
//iATU_write_config_dword(my_device.pci_dev,iATU Control 2,xxx);//使能某个region,开始地址转换
}
//往dma配置寄存器中读写数据的函数,这是难点一:dma寄存器的寻址。
int dma_read_config_dword(struct pci_dev *pdev,int offset)
{
int value =0;
return value;
}
void dma_write_config_dword(struct pci_dev *pdev,int offset,int value)
{
}
void dma_init(void)
{
int pos;
u16 msi_control;
u32 msi_addr_l;
u32 msi_addr_h;
u32 msi_data;
//1.dma 通道0 写初始化 。如何访问DMA global register 寄存器组需要根据具体的硬件,可以通过pci_write/read_config_word/dword,
//也可以通过某个bar,比如通过bar0+偏移量访问。
//1.1 DMA write engine enable =0x1,这里请根据自己的芯片填写
//dma_write_config_dword(->pci_dev,DMA write engine enable,0x1);
//1.2 获取msi能力寄存器的地址
pos =pci_find_capability(my_device.pci_dev,PCI_CAP_ID_MSI);
//1.3 读取msi的协议部分,得到pci设备是32位还是64位,不同的架构msi data寄存器地址同
pci_read_config_word(my_device.pci_dev,pos+2,&msi_control);
//1.4 读取msi能力寄存器组中的地址寄存器的值
pci_read_config_dword(my_device.pci_dev,pos+4,&msi_addr_l);
//1.5 设置 DMA write done IMWr Address Low.这里请根据自己的芯片填写
//dma_write_config_dword(my_device.pci_dev,DMA write done IMWr Address Low,msi_addr_l);
//1.6 设置 DMA write abort IMWr Address Low.这里请根据自己的芯片填写
//dma_write_config_dword(my_device.pci_dev,DMA write abort IMWr Address Low,msi_addr_l);
if(msi_control&0x80){
//64位的
//1.7 读取msi能力寄存器组中的高32位地址寄存器的值
pci_read_config_dword(my_device.pci_dev,pos+0x8,&msi_addr_h);
//1.8 读取msi能力寄存器组中的数据寄存器的值
pci_read_config_dword(my_device.pci_dev,pos+0xc,&msi_data);
//1.9 设置 DMA write done IMWr Address High.这里请根据自己的芯片填写
//dma_write_config_dword(my_device.pci_dev,DMA write done IMWr Address High,msi_addr_h);
//1.10 设置 DMA write abort IMWr Address High.这里请根据自己的芯片填写
//dma_write_config_dword(my_device.pci_dev,DMA write abort IMWr Address High,msi_addr_h);
} else {
//1.11 读取msi能力寄存器组中的数据寄存器的值
pci_read_config_dword(my_device.pci_dev,pos+0x8,&msi_data);
}
//1.12 把数据寄存器的值写入到dma的控制寄存器组中的 DMA write channel 0 IMWr data中
//dma_write_config_dword(my_device.pci_dev,DMA write channel 0 IMWr data,msi_data);
//1.13 DMA channel 0 control register 1 = 0x4000010
//dma_write_config_dword(my_device.pci_dev,DMA channel 0 control register 1,0x4000010);
//2.dma 通道0 读初始化 和上述操作类似,不再叙述。
}
static int hello_probe(struct pci_dev *pdev, const struct pci_device_id *id)
{
int i;
int result;
//使能pci设备
if (pci_enable_device(pdev)){
result = -EIO;
goto end;
}
pci_set_master(pdev);
my_device.pci_dev=pdev;
if(unlikely(pci_request_regions(pdev,DEV_NAME))){
DEBUG_ERR("failed:pci_request_regions\n");
result = -EIO;
goto enable_device_err;
}
//获得bar0的物理地址和虚拟地址
bar0_phy = pci_resource_start(pdev,0);
if(bar0_phy<0){
DEBUG_ERR("failed:pci_resource_start\n");
result =-EIO;
goto request_regions_err;
}
//假设bar0是作为内存,流程是这样的,但是在本程序中不对bar0进行任何操作。
bar0_length = pci_resource_len(pdev,0);
if(bar0_length!=0){
bar0_vir = (unsigned long)ioremap(bar0_phy,bar0_length);
}
//申请一块DMA内存,作为源地址,在进行DMA读写的时候会用到。
dma_src_vir=(dma_addr_t)pci_alloc_consistent(pdev,DMA_BUFFER_SIZE,&dma_src_phy);
if(dma_src_vir != 0){
for(i=0;i<DMA_BUFFER_SIZE/PAGE_SIZE;i++){
SetPageReserved(virt_to_page(dma_src_phy+i*PAGE_SIZE));
}
} else {
goto free_bar0;
}
//申请一块DMA内存,作为目的地址,在进行DMA读写的时候会用到。
dma_dst_vir=(dma_addr_t)pci_alloc_consistent(pdev,DMA_BUFFER_SIZE,&dma_dst_phy);
if(dma_dst_vir!=0){
for(i=0;i<DMA_BUFFER_SIZE/PAGE_SIZE;i++){
SetPageReserved(virt_to_page(dma_dst_phy+i*PAGE_SIZE));
}
} else {
goto alloc_dma_src_err;
}
//使能msi,然后才能得到pdev->irq
result = pci_enable_msi(pdev);
if (unlikely(result)){
DEBUG_ERR("failed:pci_enable_msi\n");
goto alloc_dma_dst_err;
}
result = request_irq(pdev->irq, hello_interrupt, 0, DEV_NAME, my_device.pci_dev);
if (unlikely(result)){
DEBUG_ERR("failed:request_irq\n");
goto enable_msi_error;
}
//DMA 的读写初始化
dma_init();
enable_msi_error:
pci_disable_msi(pdev);
alloc_dma_dst_err:
for(i=0;i<DMA_BUFFER_SIZE/PAGE_SIZE;i++){
ClearPageReserved(virt_to_page(dma_dst_phy+i*PAGE_SIZE));
}
pci_free_consistent(pdev,DMA_BUFFER_SIZE,(void *)dma_dst_vir,dma_dst_phy);
alloc_dma_src_err:
for(i=0;i<DMA_BUFFER_SIZE/PAGE_SIZE;i++){
ClearPageReserved(virt_to_page(dma_src_phy+i*PAGE_SIZE));
}
pci_free_consistent(pdev,DMA_BUFFER_SIZE,(void *)dma_src_vir,dma_src_phy);
free_bar0:
iounmap((void *)bar0_vir);
request_regions_err:
pci_release_regions(pdev);
enable_device_err:
pci_disable_device(pdev);
end:
return result;
}
static void hello_remove(struct pci_dev *pdev)
{
int i;
free_irq(pdev->irq,my_device.pci_dev);
pci_disable_msi(pdev);
for(i=0;i<DMA_BUFFER_SIZE/PAGE_SIZE;i++){
ClearPageReserved(virt_to_page(dma_dst_phy+i*PAGE_SIZE));
}
pci_free_consistent(pdev,DMA_BUFFER_SIZE,(void *)dma_dst_vir,dma_dst_phy);
for(i=0;i<DMA_BUFFER_SIZE/PAGE_SIZE;i++){
ClearPageReserved(virt_to_page(dma_src_phy+i*PAGE_SIZE));
}
pci_free_consistent(pdev,DMA_BUFFER_SIZE,(void *)dma_src_vir,dma_src_phy);
iounmap((void *)bar0_vir);
pci_release_regions(pdev);
pci_disable_device(pdev);
}
//难点三:中断响应设置
static irqreturn_t hello_interrupt(int irq, void * dev)
{
//1.该中断调用时机:当DMA完成的时候,会往msi_addr中写入msi_data,从而产生中断调用这个函数
//2.根据DMA Channel control 1 register寄存器的状态,判断读写状态,读失败,写失败,读成功,写成功,做出不同的处理。
return 0;
}
static struct pci_driver hello_driver = {
.name = DEV_NAME,
.id_table = hello_ids,
.probe = hello_probe,
.remove = hello_remove,
};
static int hello_open(struct inode *inode, struct file *file)
{
printk("driver: hello_open\n");
//填写产品的逻辑
return 0;
}
int hello_close(struct inode *inode, struct file *file)
{
printk("driver: hello_close\n");
//填写产品的逻辑
return 0;
}
long hello_unlocked_ioctl(struct file *file, unsigned int cmd, unsigned long arg)
{
//填写产品的逻辑
//为应用层提供的函数接口,通过解析cmd,在switch中做出不同的处理。
iATU_bar0();//某个合适的地方调用
return 0;
}
//难点二:启动dma的读写(read和write函数).
static struct file_operations hello_fops = {
.owner = THIS_MODULE,
.open = hello_open,
.release = hello_close,
.unlocked_ioctl = hello_unlocked_ioctl,
};
static int hello_drv_init(void)
{
int ret;
ret = pci_register_driver(&hello_driver);
if (ret < 0) {
printk("failed: pci_register_driver\n");
return ret;
}
ret=alloc_chrdev_region(&my_device.devno,0,DEVICE_NUMBER,"hello");
if (ret < 0) {
printk("failed: register_chrdev_region\n");
return ret;
}
cdev_init(&my_device.cdev, &hello_fops);
ret = cdev_add(&my_device.cdev, my_device.devno, DEVICE_NUMBER);
if (ret < 0) {
printk("faield: cdev_add\n");
return ret;
}
hello_class = class_create(THIS_MODULE, "hello_class");
hello_class_dev = device_create(hello_class, NULL, my_device.devno, NULL, "hello_device");
return 0;
}
static void hello_drv_exit(void)
{
device_destroy(hello_class,my_device.devno);
class_destroy(hello_class);
cdev_del(&(my_device.cdev));
unregister_chrdev_region(my_device.devno,DEVICE_NUMBER);
pci_unregister_driver(&hello_driver);
}
module_init(hello_drv_init);
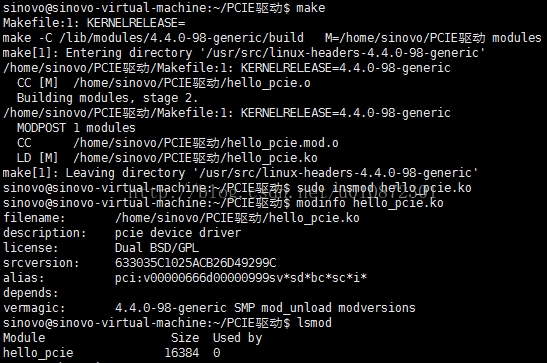
module_exit(hello_drv_exit);运行结果
程序运行后,在linux内核注册PCIE设备,内容如下
下载
PCIE驱动开发(内含Makefile,直接编译即可使用)
http://download.csdn.net/download/u010872301/10116259


 1905
1905


 被折叠的 条评论
为什么被折叠?
被折叠的 条评论
为什么被折叠?
 到【灌水乐园】发言


