


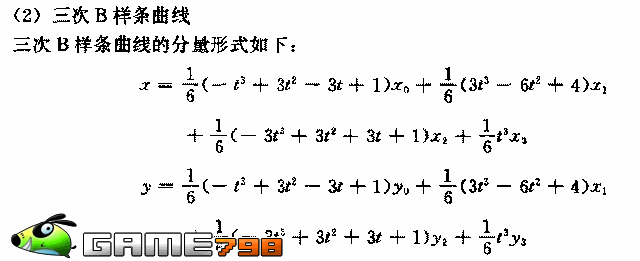
绘制B样条曲线:
#include <stdlib.h>

#include <GL/glut.h>

//

#if 0


/// the points of the curve - these are the same as the bezier curve

/// points demonstrated in the bezier curve example.

float Points[4][3] = {

	{ 10,10,0 },

	{  5,10,2 },

	{ -5,0,0 },

	{-10,5,-2}

};

#define NUM_POINTS 4


//	The following sets of 4 indices are the curves that need to

//	be drawn to create a clamped cubic b-spline. In total there

//	are 5 curve segments to draw.

//

//	0 0 0 1

//    0 0 1 2

//      0 1 2 3

//        1 2 3 3

//          2 3 3 3

//

//	Remember this when trying to understand knot vectors!!

//


#else


float Points[9][3] = {


	{ 10,5,0 },

	{  5,10,0 },

	{ -5,15,0 },

	{ -10,-5,0 },

	{ 4,-4,0 },

	{ 10,5,0 },

	{  5,10,0 },

	{ -5,15,0 },

	{ -10,-5,0 }


};

#define NUM_POINTS 9


//若绘制过首尾控制点的曲线

//	0 0 0 1

//    0 0 1 2

//      0 1 2 3

//        1 2 3 4

//          2 3 4 5

//            3 4 5 6

//              4 5 6 6

//                5 6 6 6

//

//	Remember this when trying to understand knot vectors!!

//

//若绘制首尾相接的平滑曲线 ,即为当前绘制

//      0 1 2 3

//        1 2 3 4

//          2 3 4 5

//            3 4 5 6


#endif


// the level of detail for the curve

unsigned int LOD=20;


///

#define NUM_SEGMENTS (NUM_POINTS-3)


//

float* GetPoint(int i) {

	// return 1st point

	if (i<0) {

		return	Points[0];

	}


	if (i<NUM_POINTS)

		return Points[i];

	// return last point

	return Points[NUM_POINTS-1];

}


//------------------------------------------------------------	OnKeyPress()

//

void myIdle(void)

{

	glutPostRedisplay();

}


//------------------------------------------------------------	OnDraw()

//

void OnDraw() {


	// clear the screen & depth buffer

	glClear(GL_COLOR_BUFFER_BIT);


	// clear the previous transform

	glLoadIdentity();


	// set the camera position

// 	gluLookAt(	1,10,30,	//	eye pos

// 		0,0,0,	//	aim point

// 		0,1,0);	//	up direction


// 	glColor3f(0.5,0.2,0);

 	glPointSize(3);

//

// 	// draw curve hull

	glColor3f(0.3,0,0.5);

	glBegin(GL_LINE_STRIP);

	for(int i=0;i!=NUM_POINTS;++i) {

		glVertex3fv( Points[i] );

	}

	glEnd();


	glColor3f(0,1,0);


	// begin drawing our curve

	glBegin(GL_LINE_STRIP);


	for(int start_cv=0,j=0;j<NUM_SEGMENTS;j++,start_cv++)

	{

		// for each section of curve, draw LOD number of divisions

		for(int i=0;i!=LOD;++i) {


			// use the parametric time value 0 to 1 for this curve

			// segment.

			float t = (float)i/LOD;


			// the t value inverted

			float it = 1.0f-t;


			// calculate blending functions for cubic bspline

			float b0 = it*it*it/6.0f;

			float b1 = (3*t*t*t - 6*t*t +4)/6.0f;

			float b2 = (-3*t*t*t +3*t*t + 3*t + 1)/6.0f;

			float b3 =  t*t*t/6.0f;


			// calculate the x,y and z of the curve point

			float x = b0 * GetPoint( start_cv + 0 )[0] +

				b1 * GetPoint( start_cv + 1 )[0] +

				b2 * GetPoint( start_cv + 2 )[0] +

				b3 * GetPoint( start_cv + 3 )[0] ;


			float y = b0 * GetPoint( start_cv + 0 )[1] +

				b1 * GetPoint( start_cv + 1 )[1] +

				b2 * GetPoint( start_cv + 2 )[1] +

				b3 * GetPoint( start_cv + 3 )[1] ;


			float z = b0 * GetPoint( start_cv + 0 )[2] +

				b1 * GetPoint( start_cv + 1 )[2] +

				b2 * GetPoint( start_cv + 2 )[2] +

				b3 * GetPoint( start_cv + 3 )[2] ;


			// specify the point

			glVertex2f( x,y );

		}

	}


	// we need to specify the last point on the curve

	//glVertex3fv( Points[NUM_POINTS-1] );

	glEnd();


	// draw CV's

	glBegin(GL_POINTS);

	for(int i=0;i!=NUM_POINTS;++i) {

		glVertex3fv( Points[i] );

	}

	glEnd();


	// currently we've been drawing to the back buffer, we need

	// to swap the back buffer with the front one to make the image visi
最低0.47元/天 解锁文章


 1361
1361


 被折叠的 条评论
为什么被折叠?
被折叠的 条评论
为什么被折叠?
 到【灌水乐园】发言


