


View titleView = findViewById(R.id.my_foot_parent_id) ; // 此时 titleView 为空,找不到。此时空指针 TextView titleTextView = (TextView)titleView.findViewById(R.id.title_tv) ; titleTextView.setText("new Title");
-
1
-
2

-
1
-
2
其正确的使用形式应该如下:
// 使用include时设置的id,即R.id.my_title_ly View titleView = findViewById(R.id.my_foot_ly) ; // 通过titleView找子控件 TextView titleTextView = (TextView)titleView.findViewById(R.id.title_tv) ; titleTextView.setText("new Title");
-
1
-
2
-
3

-
1
-
2
-
3
或者更简单的直接查找它的子控件
TextView titleTextView = (TextView)findViewById(R.id.title_tv) ; titleTextView.setText("new Title");
-
1
-
2

-
1
-
2
那么使用findViewById(R.id.my_foot_parent_id)为什么会报空指针呢? 我们来分析它的源码看看吧。对于布局文件的解析,最终都会调用到LayoutInflater的inflate方法,该方法最终又会调用rInflate方法,我们看看这个方法。
inflate方法中关键代码
if (TAG_MERGE.equals(name)) { if (root == null || !attachToRoot) { throw new InflateException("<merge /> can be used only with a valid " + "ViewGroup root and attachToRoot=true"); } rInflate(parser, root, inflaterContext, attrs, false); } else { // Temp is the root view that was found in the xml final View temp = createViewFromTag(root, name, inflaterContext, attrs); ViewGroup.LayoutParams params = null; if (root != null) { if (DEBUG) { System.out.println("Creating params from root: " + root); } // Create layout params that match root, if supplied params = root.generateLayoutParams(attrs); if (!attachToRoot) { // Set the layout params for temp if we are not // attaching. (If we are, we use addView, below) temp.setLayoutParams(params); } }
-
1
-
2
-
3
-
4
-
5
-
6
-
7
-
8
-
9
-
10
-
11
-
12
-
13
-
14
-
15
-
16
-
17
-
18
-
19
-
20
-
21
-
22
-
23
-
24
-
25
-
26

-
1
-
2
-
3
-
4
-
5
-
6
-
7
-
8
-
9
-
10
-
11
-
12
-
13
-
14
-
15
-
16
-
17
-
18
-
19
-
20
-
21
-
22
-
23
-
24
-
25
-
26
rInflate方法关键代码
void rInflate(XmlPullParser parser, View parent, Context context, AttributeSet attrs, boolean finishInflate) throws XmlPullParserException, IOException { final int depth = parser.getDepth(); int type; while (((type = parser.next()) != XmlPullParser.END_TAG || parser.getDepth() > depth) && type != XmlPullParser.END_DOCUMENT) { if (type != XmlPullParser.START_TAG) { continue; } final String name = parser.getName(); if (TAG_REQUEST_FOCUS.equals(name)) { parseRequestFocus(parser, parent); } else if (TAG_TAG.equals(name)) { parseViewTag(parser, parent, attrs); } else if (TAG_INCLUDE.equals(name)) { if (parser.getDepth() == 0) { throw new InflateException("<include /> cannot be the root element"); } parseInclude(parser, context, parent, attrs); } else if (TAG_MERGE.equals(name)) { throw new InflateException("<merge /> must be the root element"); } else { final View view = createViewFromTag(parent, name, context, attrs); final ViewGroup viewGroup = (ViewGroup) parent; final ViewGroup.LayoutParams params = viewGroup.generateLayoutParams(attrs); rInflateChildren(parser, view, attrs, true); viewGroup.addView(view, params); } } if (finishInflate) { parent.onFinishInflate(); } }
-
1
-
2
-
3
-
4
-
5
-
6
-
7
-
8
-
9
-
10
-
11
-
12
-
13
-
14
-
15
-
16
-
17
-
18
-
19
-
20
-
21
-
22
-
23
-
24
-
25
-
26
-
27
-
28
-
29
-
30
-
31
-
32
-
33
-
34
-
35
-
36
-
37
-
38
-
39

-
1
-
2
-
3
-
4
-
5
-
6
-
7
-
8
-
9
-
10
-
11
-
12
-
13
-
14
-
15
-
16
-
17
-
18
-
19
-
20
-
21
-
22
-
23
-
24
-
25
-
26
-
27
-
28
-
29
-
30
-
31
-
32
-
33
-
34
-
35
-
36
-
37
-
38
-
39
这个方法其实就是遍历xml中的所有元素,然后挨个进行解析。例如解析到一个标签,那么就根据用户设置的一些layout_width、layout_height、id等属性来构造一个TextView对象,然后添加到父控件(ViewGroup类型)中。标签也是一样的,我们看到遇到include标签时,会调用parseInclude函数,这就是对标签的解析,我们看看吧。
private void parseInclude(XmlPullParser parser, Context context, View parent, AttributeSet attrs) throws XmlPullParserException, IOException { int type; if (parent instanceof ViewGroup) { // Apply a theme wrapper, if requested. This is sort of a weird // edge case, since developers think the <include> overwrites // values in the AttributeSet of the included View. So, if the // included View has a theme attribute, we'll need to ignore it. final TypedArray ta = context.obtainStyledAttributes(attrs, ATTRS_THEME); final int themeResId = ta.getResourceId(0, 0); final boolean hasThemeOverride = themeResId != 0; if (hasThemeOverride) { context = new ContextThemeWrapper(context, themeResId); } ta.recycle(); // If the layout is pointing to a theme attribute, we have to // massage the value to get a resource identifier out of it. int layout = attrs.getAttributeResourceValue(null, ATTR_LAYOUT, 0); if (layout == 0) { final String value = attrs.getAttributeValue(null, ATTR_LAYOUT); if (value == null || value.length() <= 0) { throw new InflateException("You must specify a layout in the" + " include tag: <include layout=\"@layout/layoutID\" />"); } // Attempt to resolve the "?attr/name" string to an identifier. layout = context.getResources().getIdentifier(value.substring(1), null, null); } // The layout might be referencing a theme attribute. if (mTempValue == null) { mTempValue = new TypedValue(); } if (layout != 0 && context.getTheme().resolveAttribute(layout, mTempValue, true)) { layout = mTempValue.resourceId; } if (layout == 0) {// include标签中没有设置layout属性,会抛出异常 final String value = attrs.getAttributeValue(null, ATTR_LAYOUT); throw new InflateException("You must specify a valid layout " + "reference. The layout ID " + value + " is not valid."); } else { final XmlResourceParser childParser = context.getResources().getLayout(layout); try { final AttributeSet childAttrs = Xml.asAttributeSet(childParser); while ((type = childParser.next()) != XmlPullParser.START_TAG && type != XmlPullParser.END_DOCUMENT) { // Empty. } if (type != XmlPullParser.START_TAG) { throw new InflateException(childParser.getPositionDescription() + ": No start tag found!"); } // 1、解析include中的第一个元素 final String childName = childParser.getName(); // 如果第一个元素是merge标签,那么调用rInflate函数解析 if (TAG_MERGE.equals(childName)) { // The <merge> tag doesn't support android:theme, so // nothing special to do here. // 2、我们例子中的情况会走到这一步,首先根据include的属性集创建被include进来的xml布局的根view // 这里的根view对应为my_foot_layout.xml中的RelativeLayout rInflate(childParser, parent, context, childAttrs, false); } else { final View view = createViewFromTag(parent, childName, context, childAttrs, hasThemeOverride); final ViewGroup group = (ViewGroup) parent; final TypedArray a = context.obtainStyledAttributes( attrs, R.styleable.Include); final int id = a.getResourceId(R.styleable.Include_id, View.NO_ID); final int visibility = a.getInt(R.styleable.Include_visibility, -1); a.recycle(); // We try to load the layout params set in the <include /> tag. // If the parent can't generate layout params (ex. missing width // or height for the framework ViewGroups, though this is not // necessarily true of all ViewGroups) then we expect it to throw // a runtime exception. // We catch this exception and set localParams accordingly: true // means we successfully loaded layout params from the <include> // tag, false means we need to rely on the included layout params. ViewGroup.LayoutParams params = null; try { // 获3、取布局属性 params = group.generateLayoutParams(attrs); } catch (RuntimeException e) { // Ignore, just fail over to child attrs. } if (params == null) { params = group.generateLayoutParams(childAttrs); } view.setLayoutParams(params); // Inflate all children.解析所有子控件 rInflateChildren(childParser, view, childAttrs, true); // 5、将include中设置的id设置给根view,因此实际上my_foot_layout.xml中的RelativeLayout的id会变成include标签中的id,include不设置id,那么也可以通过relative的找到. if (id != View.NO_ID) { view.setId(id); } switch (visibility) { case 0: view.setVisibility(View.VISIBLE); break; case 1: view.setVisibility(View.INVISIBLE); break; case 2: view.setVisibility(View.GONE); break; } group.addView(view); } } finally { childParser.close(); } } } else { throw new InflateException("<include /> can only be used inside of a ViewGroup"); } LayoutInflater.consumeChildElements(parser); }
-
1
-
2
-
3
-
4
-
5
-
6
-
7
-
8
-
9
-
10
-
11
-
12
-
13
-
14
-
15
-
16
-
17
-
18
-
19
-
20
-
21
-
22
-
23
-
24
-
25
-
26
-
27
-
28
-
29
-
30
-
31
-
32
-
33
-
34
-
35
-
36
-
37
-
38
-
39
-
40
-
41
-
42
-
43
-
44
-
45
-
46
-
47
-
48
-
49
-
50
-
51
-
52
-
53
-
54
-
55
-
56
-
57
-
58
-
59
-
60
-
61
-
62
-
63
-
64
-
65
-
66
-
67
-
68
-
69
-
70
-
71
-
72
-
73
-
74
-
75
-
76
-
77
-
78
-
79
-
80
-
81
-
82
-
83
-
84
-
85
-
86
-
87
-
88
-
89
-
90
-
91
-
92
-
93
-
94
-
95
-
96
-
97
-
98
-
99
-
100
-
101
-
102
-
103
-
104
-
105
-
106
-
107
-
108
-
109
-
110
-
111
-
112
-
113
-
114
-
115
-
116
-
117
-
118
-
119
-
120
-
121
-
122
-
123
-
124
-
125
-
126
-
127
-
128

-
1
-
2
-
3
-
4
-
5
-
6
-
7
-
8
-
9
-
10
-
11
-
12
-
13
-
14
-
15
-
16
-
17
-
18
-
19
-
20
-
21
-
22
-
23
-
24
-
25
-
26
-
27
-
28
-
29
-
30
-
31
-
32
-
33
-
34
-
35
-
36
-
37
-
38
-
39
-
40
-
41
-
42
-
43
-
44
-
45
-
46
-
47
-
48
-
49
-
50
-
51
-
52
-
53
-
54
-
55
-
56
-
57
-
58
-
59
-
60
-
61
-
62
-
63
-
64
-
65
-
66
-
67
-
68
-
69
-
70
-
71
-
72
-
73
-
74
-
75
-
76
-
77
-
78
-
79
-
80
-
81
-
82
-
83
-
84
-
85
-
86
-
87
-
88
-
89
-
90
-
91
-
92
-
93
-
94
-
95
-
96
-
97
-
98
-
99
-
100
-
101
-
102
-
103
-
104
-
105
-
106
-
107
-
108
-
109
-
110
-
111
-
112
-
113
-
114
-
115
-
116
-
117
-
118
-
119
-
120
-
121
-
122
-
123
-
124
-
125
-
126
-
127
-
128
整个过程就是根据不同的标签解析不同的元素,首先会解析include元素,然后再解析被include进来的布局的root view元素。在我们的例子中对应的root view就是id为my_foot_parent_id的RelativeLayout,然后再解析root view下面的所有元素,这个过程是从上面注释的2~4的过程,然后是设置布局参数。我们注意看注释5处,这里就解释了为什么include标签和被引入的布局的根元素都设置了id的情况下,通过被引入的根元素的id来查找子控件会找不到的情况。我们看到,注释5处的会判断include标签的id如果不是View.NO_ID的话会把该id设置给被引入的布局根元素的id,即此时在我们的例子中被引入的id为my_foot_parent_id的根元素RelativeLayout的id被设置成了include标签中的id,即RelativeLayout的id被动态修改成了”my_foot_ly”。因此此时我们再通过“my_foot_parent_id”这个id来查找根元素就会找不到了!
所以结论就是: 如果include中设置了id,那么就通过include的id来查找被include布局根元素的View;如果include中没有设置Id, 而被include的布局的根元素设置了id,那么通过该根元素的id来查找该view即可。拿到根元素后查找其子控件都是一样的。
(2)<viewstub>标签
viewstub标签同include标签一样可以用来引入一个外部布局,不同的是,viewstub引入的布局默认不会扩张,即既不会占用显示也不会占用位置,从而在解析layout时节省cpu和内存。
viewstub常用来引入那些默认不会显示,只在特殊情况下显示的布局,如进度布局、网络失败显示的刷新布局、信息出错出现的提示布局等。
下面以在一个布局main.xml中加入网络错误时的提示页面network_error.xml为例。main.mxl代码如下:
<?xml version="1.0" encoding="utf-8"?> <RelativeLayout xmlns:android="http://schemas.android.com/apk/res/android" android:layout_width="match_parent" android:layout_height="match_parent" > …… <ViewStub android:id="@+id/network_error_layout" android:layout_width="match_parent" android:layout_height="match_parent" android:layout="@layout/network_error" /> </RelativeLayout>
-
1
-
2
-
3
-
4
-
5
-
6
-
7
-
8
-
9
-
10
-
11
-
12
-
13

-
1
-
2
-
3
-
4
-
5
-
6
-
7
-
8
-
9
-
10
-
11
-
12
-
13
其中network_error.xml为只有在网络错误时才需要显示的布局,默认不会被解析,示例代码如下:
<?xml version="1.0" encoding="utf-8"?> <RelativeLayout xmlns:android="http://schemas.android.com/apk/res/android" android:layout_width="match_parent" android:layout_height="match_parent" > <Button android:id="@+id/network_setting" android:layout_width="@dimen/dp_160" android:layout_height="wrap_content" android:layout_centerHorizontal="true" android:text="@string/network_setting" /> <Button android:id="@+id/network_refresh" android:layout_width="@dimen/dp_160" android:layout_height="wrap_content" android:layout_below="@+id/network_setting" android:layout_centerHorizontal="true" android:layout_marginTop="@dimen/dp_10" android:text="@string/network_refresh" /> </RelativeLayout>
-
1
-
2
-
3
-
4
-
5
-
6
-
7
-
8
-
9
-
10
-
11
-
12
-
13
-
14
-
15
-
16
-
17
-
18
-
19
-
20
-
21
-
22

-
1
-
2
-
3
-
4
-
5
-
6
-
7
-
8
-
9
-
10
-
11
-
12
-
13
-
14
-
15
-
16
-
17
-
18
-
19
-
20
-
21
-
22
在Java中通过(ViewStub)findViewById(id)找到ViewStub,通过stub.inflate()展开ViewStub,然后得到子View,如下:
private View networkErrorView; private void showNetError() { // not repeated infalte if (networkErrorView != null) { networkErrorView.setVisibility(View.VISIBLE); return; } ViewStub stub = (ViewStub)findViewById(R.id.network_error_layout); if(stub !=null){ networkErrorView = stub.inflate(); Button networkSetting = (Button)networkErrorView.findViewById(R.id.network_setting); Button refresh = (Button)findViewById(R.id.network_refresh); } } private void showNormal() { if (networkErrorView != null) { networkErrorView.setVisibility(View.GONE); } }
-
1
-
2
-
3
-
4
-
5
-
6
-
7
-
8
-
9
-
10
-
11
-
12
-
13
-
14
-
15
-
16
-
17
-
18
-
19
-
20
-
21
-
22
-
23

-
1
-
2
-
3
-
4
-
5
-
6
-
7
-
8
-
9
-
10
-
11
-
12
-
13
-
14
-
15
-
16
-
17
-
18
-
19
-
20
-
21
-
22
-
23
在上面showNetError()中展开了ViewStub,同时我们对networkErrorView进行了保存,这样下次不用继续inflate。这就是后面第三部分提到的减少不必要的infalte。
注意这里我对ViewStub的实例进行了一个非空判断,这是因为ViewStub在XML中定义的id只在一开始有效,一旦ViewStub中指定的布局加载之后,这个id也就失败了,那么此时findViewById()得到的值也会是空
viewstub标签大部分属性同include标签类似。
上面展开ViewStub部分代码
ViewStub stub = (ViewStub)findViewById(R.id.network_error_layout); networkErrorView = stub.inflate();
-
1
-
2
-
3
-
1
-
2
-
3
也可以写成下面的形式
View viewStub = findViewById(R.id.network_error_layout); viewStub.setVisibility(View.VISIBLE); // ViewStub被展开后的布局所替换 networkErrorView = findViewById(R.id.network_error_layout); // 获取展开后的布局
-
1
-
2
-
3

-
1
-
2
-
3
注意:
View 的可见性设置为 gone 后,在inflate 时,这个View 及其子View依然会被解析的。使用ViewStub就能避免解析其中指定的布局文件,从而节省布局文件的解析时间,及内存的占用。另外需要提醒大家一点,ViewStub所加载的布局是不可以使用<merge>标签的
(3)<merge>标签
在使用了include后可能导致布局嵌套过多,多余不必要的layout节点,从而导致解析变慢,不必要的节点和嵌套可通过hierarchy viewer(下面布局调优工具中有具体介绍)或设置->开发者选项->显示布局边界查看。
merge标签可用于两种典型情况:
a. 布局顶结点是FrameLayout且不需要设置background或padding等属性,可以用merge代替,因为Activity内容试图的parent view就是个FrameLayout,所以可以用merge消除只剩一个。
b. 某布局作为子布局被其他布局include时,使用merge当作该布局的顶节点,这样在被引入时顶结点会自动被忽略,而将其子节点全部合并到主布局中。
以(1) 标签的示例为例,用hierarchy viewer查看main.xml布局如下图:
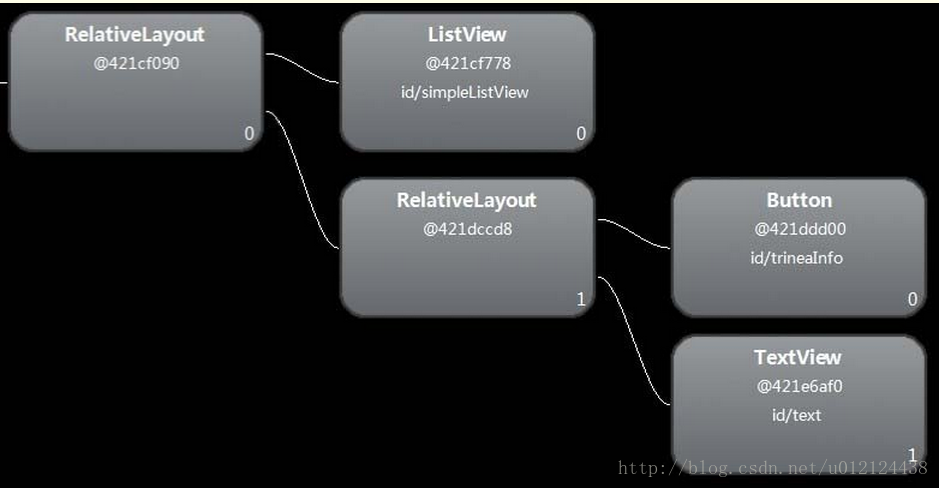
可以发现多了一层没必要的RelativeLayout,将foot.xml中RelativeLayout改为merge,如下:
<?xml version="1.0" encoding="utf-8"?> <merge xmlns:android="http://schemas.android.com/apk/res/android" android:layout_width="match_parent" android:layout_height="match_parent" > <Button android:id="@+id/button" android:layout_width="match_parent" android:layout_height="@dimen/dp_40" android:layout_above="@+id/text"/> <TextView android:id="@+id/text" android:layout_width="match_parent" android:layout_height="@dimen/dp_40" android:layout_alignParentBottom="true" android:text="@string/app_name" /> </merge>
-
1
-
2
-
3
-
4
-
5
-
6
-
7
-
8
-
9
-
10
-
11
-
12
-
13
-
14
-
15
-
16
-
17
-
18
-
19
-
20
资源分享


网上学习 Android的资料一大堆,但如果学到的知识不成体系,遇到问题时只是浅尝辄止,不再深入研究,那么很难做到真正的技术提升。希望这份系统化的技术体系对大家有一个方向参考。
2020年虽然路途坎坷,都在说Android要没落,但是,不要慌,做自己的计划,学自己的习,竞争无处不在,每个行业都是如此。相信自己,没有做不到的,只有想不到的。祝大家2021年万事大吉。
网上学习资料一大堆,但如果学到的知识不成体系,遇到问题时只是浅尝辄止,不再深入研究,那么很难做到真正的技术提升。
一个人可以走的很快,但一群人才能走的更远!不论你是正从事IT行业的老鸟或是对IT行业感兴趣的新人,都欢迎加入我们的的圈子(技术交流、学习资源、职场吐槽、大厂内推、面试辅导),让我们一起学习成长!
ZXQvdTAxMjEyNDQzOA==/font/5a6L5L2T/fontsize/400/fill/I0JBQkFCMA==/dissolve/70/gravity/SouthEast)
可以发现多了一层没必要的RelativeLayout,将foot.xml中RelativeLayout改为merge,如下:
<?xml version="1.0" encoding="utf-8"?> <merge xmlns:android="http://schemas.android.com/apk/res/android" android:layout_width="match_parent" android:layout_height="match_parent" > <Button android:id="@+id/button" android:layout_width="match_parent" android:layout_height="@dimen/dp_40" android:layout_above="@+id/text"/> <TextView android:id="@+id/text" android:layout_width="match_parent" android:layout_height="@dimen/dp_40" android:layout_alignParentBottom="true" android:text="@string/app_name" /> </merge>
-
1
-
2
-
3
-
4
-
5
-
6
-
7
-
8
-
9
-
10
-
11
-
12
-
13
-
14
-
15
-
16
-
17
-
18
-
19
-
20
资源分享
[外链图片转存中…(img-TlztBT9v-1714207754929)]
[外链图片转存中…(img-0qIyuOv8-1714207754929)]
[外链图片转存中…(img-aO0U4QTV-1714207754930)]
网上学习 Android的资料一大堆,但如果学到的知识不成体系,遇到问题时只是浅尝辄止,不再深入研究,那么很难做到真正的技术提升。希望这份系统化的技术体系对大家有一个方向参考。
2020年虽然路途坎坷,都在说Android要没落,但是,不要慌,做自己的计划,学自己的习,竞争无处不在,每个行业都是如此。相信自己,没有做不到的,只有想不到的。祝大家2021年万事大吉。
网上学习资料一大堆,但如果学到的知识不成体系,遇到问题时只是浅尝辄止,不再深入研究,那么很难做到真正的技术提升。
一个人可以走的很快,但一群人才能走的更远!不论你是正从事IT行业的老鸟或是对IT行业感兴趣的新人,都欢迎加入我们的的圈子(技术交流、学习资源、职场吐槽、大厂内推、面试辅导),让我们一起学习成长!


 1万+
1万+

 被折叠的 条评论
为什么被折叠?
被折叠的 条评论
为什么被折叠?
 到【灌水乐园】发言


