


📢博客主页:https://blog.csdn.net/2301_779549673
📢欢迎点赞 👍 收藏 ⭐留言 📝 如有错误敬请指正!
📢本文作为 JohnKi 学习笔记,借鉴了部分大佬案例
📢未来很长,值得我们全力奔赴更美好的生活✨


文章目录
📢前言
笔者在学习浮点数这一块的时候经常看到这样的一部分代码,一开始对着cout.setf本着将就看着,之后学到在搞明白的心思,但是见得实在是太多次了,于是乎用一次性搞明白这句话的意思及怎么用
#include <iostream>
int main() {
    using namespace std;
    cout.setf(ios base::fixed, ios base::floatfield);
    float tree = 3;    // int converted to float
    int guess(3.9832); // double converted to int
    int debt = 7.2E12; // result not defined in C++
    cout << "tree = " << tree << endl;
    cout << "guess =" << guess << endl;
    cout << "debt =" << debt << endl;
    return 0;
}
🏳️🌈cout.setf(ios base::fixed, ios base::floatfield);怎么解释
C++中通过cout来实现格式输出,就类似于C语言中通过printf()来实现格式输出。
cout.setf()的作用是通过设置格式标志来控制输出形式,- 其中
ios_base::fixed表示:用正常的记数方法显示浮点数(与科学计数法相对应),本质上是设置cout为定点输出格式 ios_base::floatfield表示小数点后保留6位小数。
该问题中调用的是setf()函数的第二个原型,setf()函数有两个原型,分别是:
fmtflags setf(fmtflage) //第一原型
fmtflags setf(fmtflags, fmtflags)  //第二原型
//fmtflags 是 bitmask 类型(一种用来存储各个位值的类型)的 typedef 名
//显而易见,两个原型的主要区别在于参数数量不同
🏳️🌈下面详细介绍 setf() 的两个原型的使用:
❤️setf()的第一原型:
C++为标准输入和输出定义了一些格式标志, 它可以通过flags(), setf(), 和 unsetf() 三个函数来控制.
cout.setf(ios_base::left); //对所有cout的输出进行左对齐调整.
还有一些常见的标志:
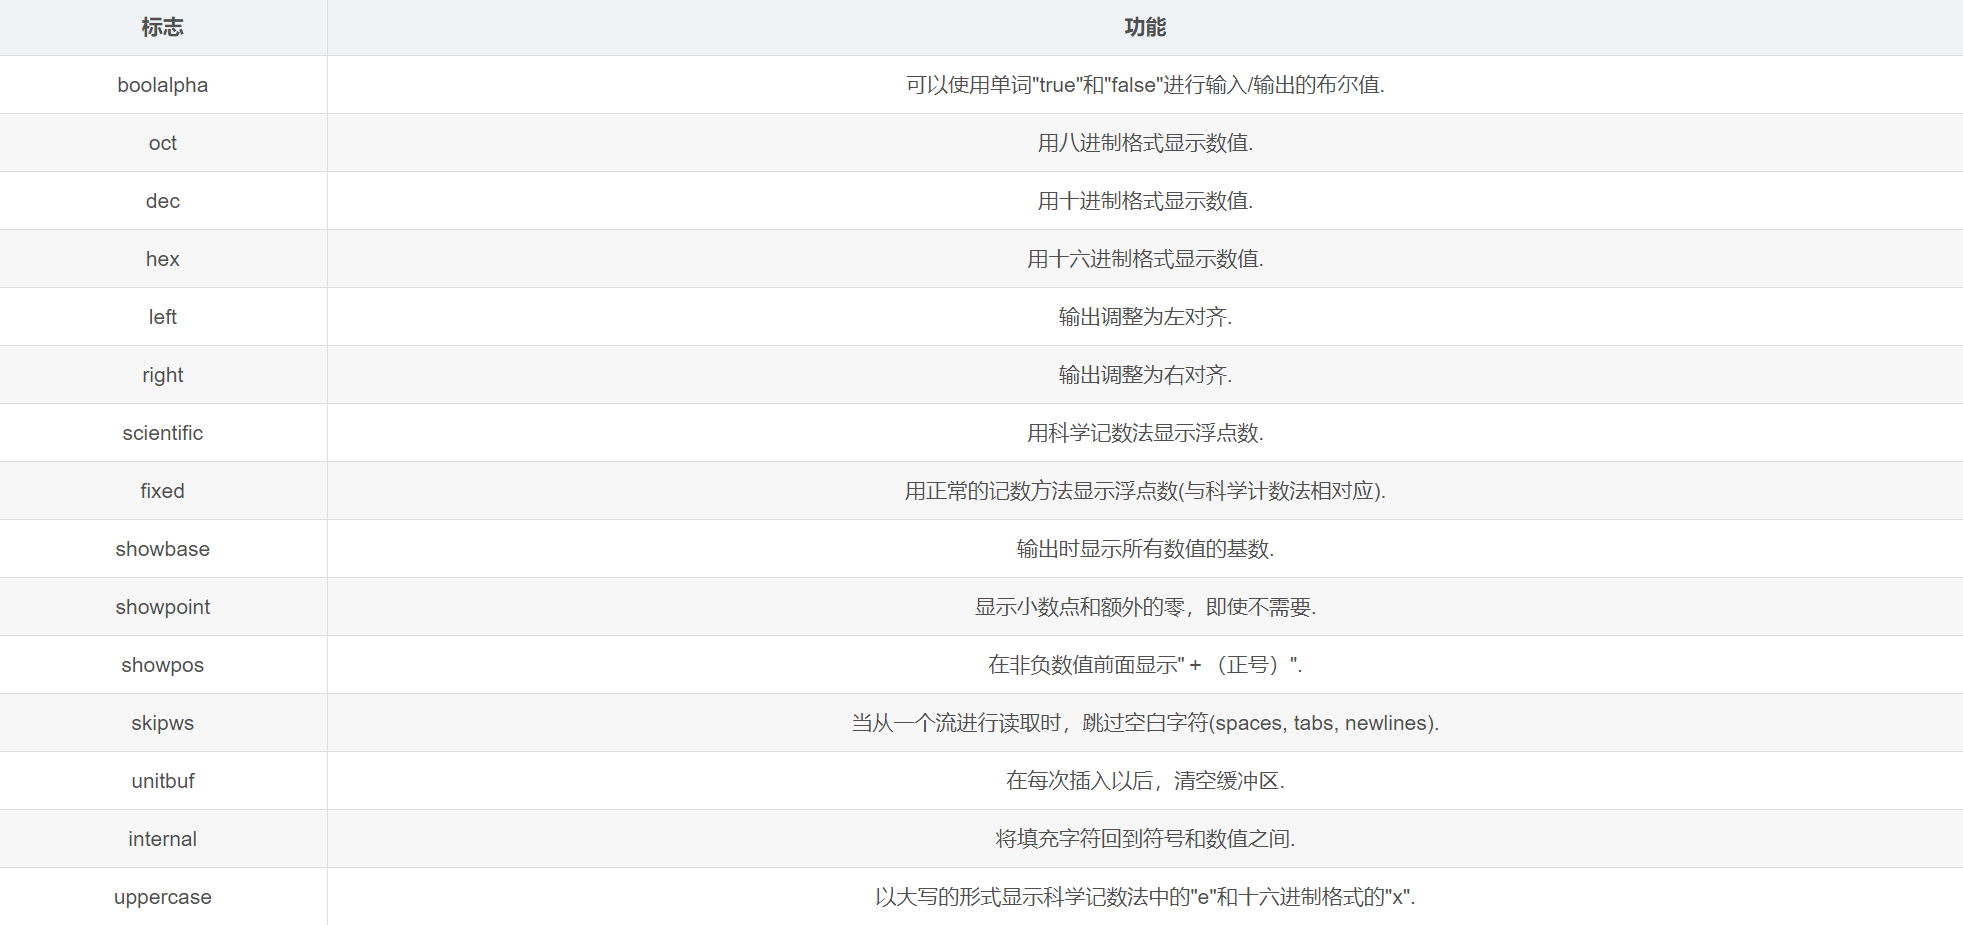
// 形式一:
cout << showpos << 255 << endl;

// 形式二:
showpos(cout);
cout << 255 << endl;

// 形式三:
cout.setf(ios_base::showpos);
cout << 255 << endl;
//输出: +255
// 形式一:
cout << scientific << 255.255 << endl;

// 形式二:
scientific(cout);
cout << 255.255 << endl;

// 形式三:
cout.setf(ios_base::scientific);
cout << 255.255 << endl;
//输出: 2.55255e+02
iostream中定义的操作符
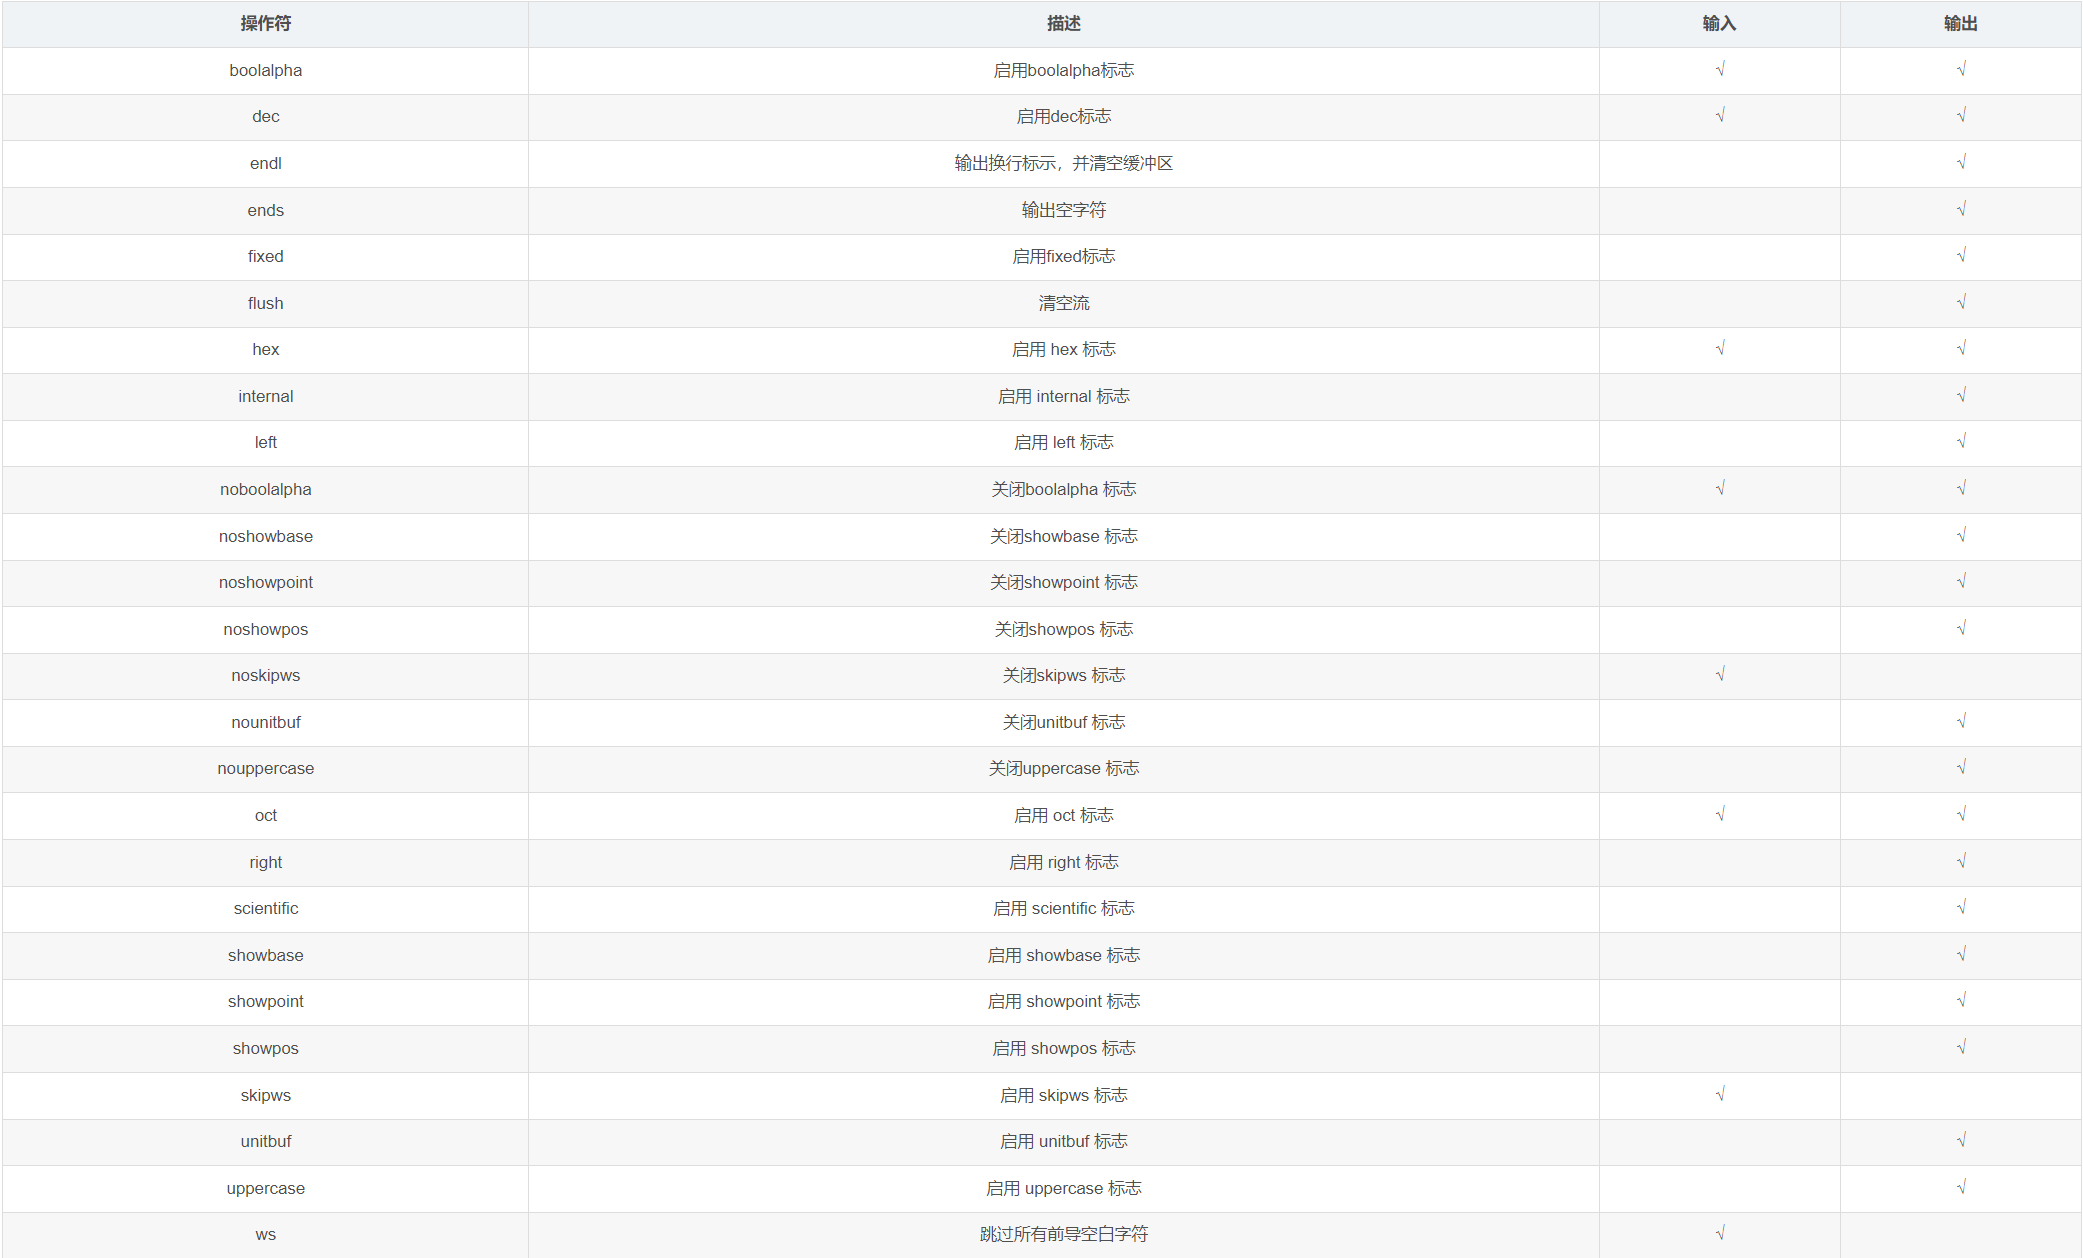
iomanip中定义的操作符

cout << setiosflags(ios_base::scientific) << 255.255 << endl;
//输出: 2.55255e+02
cout << setiosflags(ios_base::scientific); //启用scientific标志
cout << resetiosflags(ios_base::scientific); //关闭scientific标志
cout << setprecision(4) << 255.255 << endl; //设置输出数值的精度为4位
//输出: 255.3
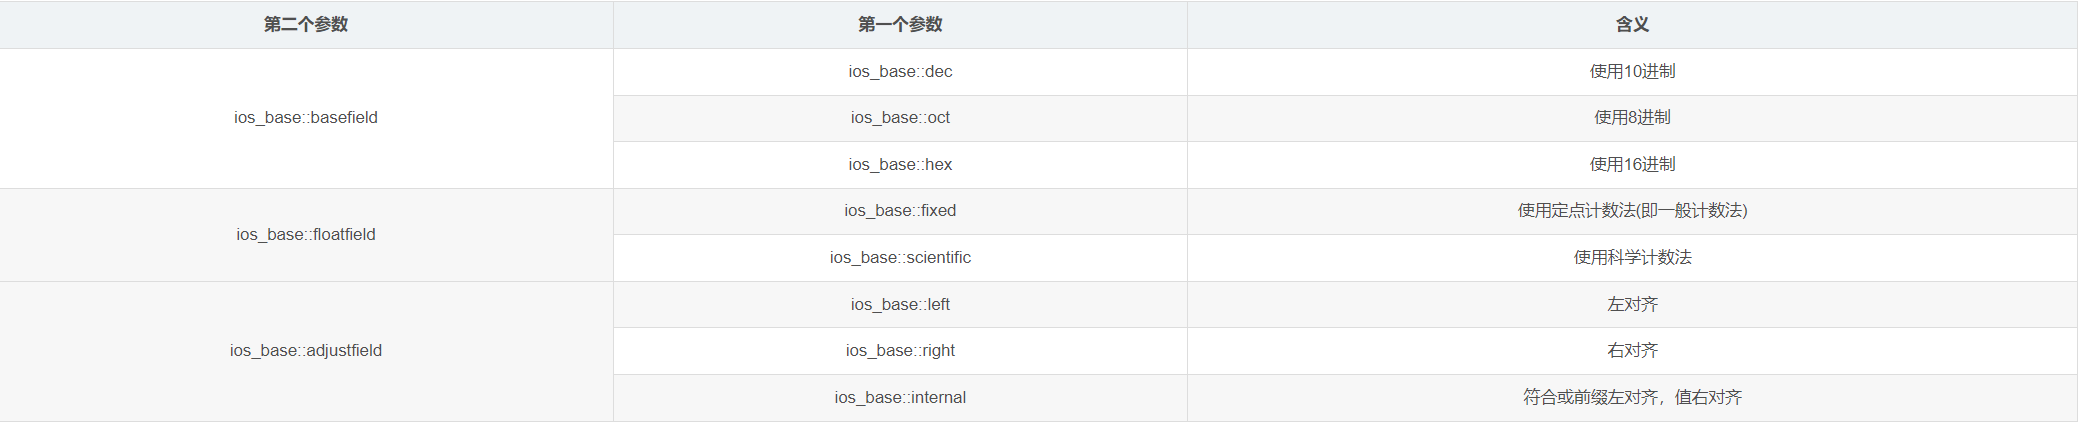
🧡setf()的第二原型:
第二原型包含两个参数,
第一个参数和第一原型里的参数一样,
第二个参数指出要清除第一参数中的哪些位,
也就是说,在第二原型中,第一个参数指出要设置哪些位,第二个参数指出要清除哪些位。
虽然听起来很麻烦,但实际上用起来却很简单,只需按自己的实际需求在下表中找到对应的参数套上去就可以了。
本篇博文对 cout.self()函数 做了一个较为详细的介绍,不知道对你有没有帮助呢
觉得博主写得还不错的三连支持下吧!会继续努力的~


 9233
9233


 被折叠的 条评论
为什么被折叠?
被折叠的 条评论
为什么被折叠?
 到【灌水乐园】发言


