


本人最近有幸拿到一块01科技的k230开发板(之前使用的是k210),相较k210,k230在硬件方面有了很大提升。由于现实生活需要,本人最近探索了一下在k230上部署模型的方法。
方法一:在线训练平台:嘉楠开发者社区(嘉楠开发者社区)
傻瓜式的训练步骤,但唯一值得注意的点是在上传数据集时需要严格网站规定的方法去做,包括文件夹的命名。训练完成后按步骤部署即可。
方法二:AIcube:这是一个本地集成部署平台,由于本人未做实验便不多赘述,附上教程网站,有兴趣的小伙伴可以去试试看。9. 使用AI Cube开发 — AI开发教程 文档 (canaan-creative.com)
方法三:本地自己配置环境部署:
1.首先电脑需要搭建yolo环境,GitHub - ultralytics/ultralytics: NEW - YOLOv8 🚀 in PyTorch > ONNX > OpenVINO > CoreML > TFLite网站如上,还没有搭建好的可以看看其它博客,其他大佬已经讲述的十分详细,我也不多说了,唯一需要注意的就是尽量使用anaconda搭建一个专门用来跑模型的虚拟环境,python版本不要用最新版,我用的是python3.9,cuda看个人需求,如果跑模型的话肯定是独显笔记本加cuda跑的快,但搭建环境也让人十分头疼(各个包之间可能会存在冲突)如果不介意速度可以用cpu去训练(dog)
2.搭建好环境后便可以进行训练了,给出训练代码:
from ultralytics import YOLO
import threading

    # 加载模型

if __name__ == '__main__':
    model = YOLO("yolov8n.pt")  #
    # 训练模型
    model.train(
        data="D:/aaa/dataset_yolo/coco.yaml",

        epochs=50, # 迭代次数
        batch=-1,#数据批量处理数量,一般是2的n次方,写-1的话系统会根据电脑配置自动匹配
        imgsz=320,#这个是模型输入图像大小
        workers=2,
        device='0',#如果是cpu就写'cpu',如果是显卡就写"0"、"1"...
        cache=False,
        amp=True,
   #      剩下两个配置根据电脑的配置来,我应用缓存会报错,所以就False
   )

    # 评估模型
    metrics = model.val()
代码就几行,但是还是要注意以下几点:
(1)数据集的yaml文件一定要完全按照yolo官网的规定来配置,否则很容易报错,本人之前就遇到过。
(2)加载pt模型yolov8最好用yolov8n模型,本人试过yolov8s模型,跑不起来。yolov5模型没有尝试,应该适用范围挺广,大家可以多尝试以下。
3.模型转化
模型转化是个麻烦事,需要将pt转化为onnx或者tflite,再由onnx转化为kmodel模型。
本人利用的是onnx,所以以下给出onnx的代码
# 由pt转onnx模型
from ultralytics import YOLO
model = YOLO("./runs/detect/train38/weights/best.pt") # 加载PT模型
success = model.export(format="onnx")
import os
import numpy as np
import onnx
import onnxsim
from sklearn.metrics.pairwise import cosine_similarity
import nncase
from nncase_base_func import *

def compile_kmodel(model_path, dump_path, calib_data):
    """
    Set compile options and ptq options.
    Compile kmodel.
    Dump the compile-time result to 'compile_options.dump_dir'
    """
    print("\n----------   compile    ----------")
    print("Simplify...")
    model_file = model_simplify(model_path)

    print("Set options...")
    # import_options
    import_options = nncase.ImportOptions()

    ############################################
    # The code below, you need to modify to fit your model.
    # You can find more details about these options in docs/USAGE_v2.md.
    ############################################
    # compile_options
    compile_options = nncase.CompileOptions()
    compile_options.target = "k230"  # "cpu"
    compile_options.dump_ir = False  # if False, will not dump the compile-time result.
    compile_options.dump_asm = True
    compile_options.dump_dir = dump_path
    compile_options.input_file = ""

    # preprocess args   不采用预处理过程,应用与原始数据与训练模型输入之间的差异
    compile_options.preprocess = False  # True
    if compile_options.preprocess:
        compile_options.input_type = "float32"  # "uint8" "float32"
        compile_options.input_shape = [1, 1]
        compile_options.input_range = [-1, 4]
        compile_options.input_layout = ""  # "NHWC"
        compile_options.swapRB = False
        compile_options.mean = [1.5]
        compile_options.std = [1.7]
        compile_options.letterbox_value = 0
        compile_options.output_layout = ""  # "NHWC"

    # quantize options
    ptq_options = nncase.PTQTensorOptions()
    ptq_options.quant_type = "uint8"  # datatype : "float32", "int8", "int16"
    ptq_options.w_quant_type = "uint8"  # datatype : "float32", "int8", "int16"
    ptq_options.calibrate_method = "NoClip"  # "Kld"
    ptq_options.finetune_weights_method = "NoFineTuneWeights"
    ptq_options.dump_quant_error = True  # False 输出模型推断的误差结果,评估转换情况
    ptq_options.dump_quant_error_symmetric_for_signed = True  # False

    # mix quantize options
    # more details in docs/MixQuant.md
    ptq_options.quant_scheme = ""
    ptq_options.quant_scheme_strict_mode = False
    ptq_options.export_quant_scheme = False
    ptq_options.export_weight_range_by_channel = False
    ############################################

    ptq_options.samples_count = len(calib_data[0])
    ptq_options.set_tensor_data(calib_data)

    print("Compiling...")
    compiler = nncase.Compiler(compile_options)
    # import
    model_content = read_model_file(model_file)
    if model_path.split(".")[-1] == "onnx":
        compiler.import_onnx(model_content, import_options)
    elif model_path.split(".")[-1] == "tflite":
        compiler.import_tflite(model_content, import_options)

    compiler.use_ptq(ptq_options)

    # compile
    compiler.compile()
    kmodel = compiler.gencode_tobytes()

    kmodel_path = os.path.join(dump_path, "test1.kmodel")
    with open(kmodel_path, 'wb') as f:
        f.write(kmodel)
    print("----------------end-----------------")
    return kmodel_path

model_path = "best.onnx"
dump_path = "./test1_onnx"
# sample_count is 2
calib_data = [[np.random.rand(1,3,320,320).astype(np.float32), np.random.rand(1,3,320,320).astype(np.float32)]]
# calib_data = [[100*np.random.rand(1, 1).astype(np.float32), 100*np.random.rand(1, 1).astype(np.float32)]]  # 代表数据集
kmodel_path = compile_kmodel(model_path, dump_path, calib_data)
代码如上,本人再给出以下几点提醒:
(1)电脑安装的nncase版本要和k230的镜像nncase版本对应,nncase的镜像下载网站也在嘉楠社区。
(2)验证集calib_data必须对应train代码中imgsz的大小,否则会报错。
(3)dump_path为存放kmodel的文件夹可自行指定
4.部署模型
废话不多说给出部署代码,这份代码和上面的转化都来自官方例程,但无奈官方例程有点混乱。
from libs.PipeLine import PipeLine, ScopedTiming
from libs.AIBase import AIBase
from libs.AI2D import Ai2d
import os
import ujson
from media.media import *
from time import *
import nncase_runtime as nn
import ulab.numpy as np
import time
import utime
import image
import random
import gc
import sys
import aidemo

# 自定义YOLOv8检测类
class ObjectDetectionApp(AIBase):
    def __init__(self,kmodel_path,labels,model_input_size,max_boxes_num,confidence_threshold=0.5,nms_threshold=0.2,rgb888p_size=[224,224],display_size=[1920,1080],debug_mode=0):
        super().__init__(kmodel_path,model_input_size,rgb888p_size,debug_mode)
        self.kmodel_path=kmodel_path
        self.labels=labels
        # 模型输入分辨率
        self.model_input_size=model_input_size
        # 阈值设置
        self.confidence_threshold=confidence_threshold
        self.nms_threshold=nms_threshold
        self.max_boxes_num=max_boxes_num
        # sensor给到AI的图像分辨率
        self.rgb888p_size=[ALIGN_UP(rgb888p_size[0],16),rgb888p_size[1]]
        # 显示分辨率
        self.display_size=[ALIGN_UP(display_size[0],16),display_size[1]]
        self.debug_mode=debug_mode
        # 检测框预置颜色值
        self.color_four=[(255, 220, 20, 60), (255, 119, 11, 32), (255, 0, 0, 142), (255, 0, 0, 230),
                         (255, 106, 0, 228), (255, 0, 60, 100), (255, 0, 80, 100), (255, 0, 0, 70),
                         (255, 0, 0, 192), (255, 250, 170, 30), (255, 100, 170, 30), (255, 220, 220, 0),
                         (255, 175, 116, 175), (255, 250, 0, 30), (255, 165, 42, 42), (255, 255, 77, 255),
                         (255, 0, 226, 252), (255, 182, 182, 255), (255, 0, 82, 0), (255, 120, 166, 157)]
        # 宽高缩放比例
        self.x_factor = float(self.rgb888p_size[0])/self.model_input_size[0]
        self.y_factor = float(self.rgb888p_size[1])/self.model_input_size[1]
        # Ai2d实例,用于实现模型预处理
        self.ai2d=Ai2d(debug_mode)
        # 设置Ai2d的输入输出格式和类型
        self.ai2d.set_ai2d_dtype(nn.ai2d_format.NCHW_FMT,nn.ai2d_format.NCHW_FMT,np.uint8, np.uint8)

    # 配置预处理操作,这里使用了resize,Ai2d支持crop/shift/pad/resize/affine,具体代码请打开/sdcard/app/libs/AI2D.py查看
    def config_preprocess(self,input_image_size=None):
        with ScopedTiming("set preprocess config",self.debug_mode > 0):
            # 初始化ai2d预处理配置,默认为sensor给到AI的尺寸,您可以通过设置input_image_size自行修改输入尺寸
            ai2d_input_size=input_image_size if input_image_size else self.rgb888p_size
            self.ai2d.resize(nn.interp_method.tf_bilinear, nn.interp_mode.half_pixel)
            self.ai2d.build([1,3,ai2d_input_size[1],ai2d_input_size[0]],[1,3,self.model_input_size[1],self.model_input_size[0]])

    # 自定义当前任务的后处理
    def postprocess(self,results):
        with ScopedTiming("postprocess",self.debug_mode > 0):
            result=results[0]
            result = result.reshape((result.shape[0] * result.shape[1], result.shape[2]))
            output_data = result.transpose()
            boxes_ori = output_data[:,0:4]
            scores_ori = output_data[:,4:]
            confs_ori = np.max(scores_ori,axis=-1)
            inds_ori = np.argmax(scores_ori,axis=-1)
            boxes,scores,inds = [],[],[]
            for i in range(len(boxes_ori)):
                if confs_ori[i] > confidence_threshold:
                    scores.append(confs_ori[i])
                    inds.append(inds_ori[i])
                    x = boxes_ori[i,0]
                    y = boxes_ori[i,1]
                    w = boxes_ori[i,2]
                    h = boxes_ori[i,3]
                    left = int((x - 0.5 * w) * self.x_factor)
                    top = int((y - 0.5 * h) * self.y_factor)
                    right = int((x + 0.5 * w) * self.x_factor)
                    bottom = int((y + 0.5 * h) * self.y_factor)
                    boxes.append([left,top,right,bottom])
            if len(boxes)==0:
                return []
            boxes = np.array(boxes)
            scores = np.array(scores)
            inds = np.array(inds)
            # NMS过程
            keep = self.nms(boxes,scores,nms_threshold)
            dets = np.concatenate((boxes, scores.reshape((len(boxes),1)), inds.reshape((len(boxes),1))), axis=1)
            dets_out = []
            for keep_i in keep:
                dets_out.append(dets[keep_i])
            dets_out = np.array(dets_out)
            dets_out = dets_out[:self.max_boxes_num, :]
            return dets_out

    # 绘制结果
    def draw_result(self,pl,dets):
        with ScopedTiming("display_draw",self.debug_mode >0):
            if dets:
                pl.osd_img.clear()
                for det in dets:
                    x1, y1, x2, y2 = map(lambda x: int(round(x, 0)), det[:4])
                    x= x1*self.display_size[0] // self.rgb888p_size[0]
                    y= y1*self.display_size[1] // self.rgb888p_size[1]
                    w = (x2 - x1) * self.display_size[0] // self.rgb888p_size[0]
                    h = (y2 - y1) * self.display_size[1] // self.rgb888p_size[1]
                    pl.osd_img.draw_rectangle(x,y, w, h, color=self.get_color(int(det[5])),thickness=4)
                    pl.osd_img.draw_string_advanced( x , y-50,32," " + self.labels[int(det[5])] + " " + str(round(det[4],2)) , color=self.get_color(int(det[5])))
            else:
                pl.osd_img.clear()


    # 多目标检测 非最大值抑制方法实现
    def nms(self,boxes,scores,thresh):
        """Pure Python NMS baseline."""
        x1,y1,x2,y2 = boxes[:, 0],boxes[:, 1],boxes[:, 2],boxes[:, 3]
        areas = (x2 - x1 + 1) * (y2 - y1 + 1)
        order = np.argsort(scores,axis = 0)[::-1]
        keep = []
        while order.size > 0:
            i = order[0]
            keep.append(i)
            new_x1,new_y1,new_x2,new_y2,new_areas = [],[],[],[],[]
            for order_i in order:
                new_x1.append(x1[order_i])
                new_x2.append(x2[order_i])
                new_y1.append(y1[order_i])
                new_y2.append(y2[order_i])
                new_areas.append(areas[order_i])
            new_x1 = np.array(new_x1)
            new_x2 = np.array(new_x2)
            new_y1 = np.array(new_y1)
            new_y2 = np.array(new_y2)
            xx1 = np.maximum(x1[i], new_x1)
            yy1 = np.maximum(y1[i], new_y1)
            xx2 = np.minimum(x2[i], new_x2)
            yy2 = np.minimum(y2[i], new_y2)
            w = np.maximum(0.0, xx2 - xx1 + 1)
            h = np.maximum(0.0, yy2 - yy1 + 1)
            inter = w * h
            new_areas = np.array(new_areas)
            ovr = inter / (areas[i] + new_areas - inter)
            new_order = []
            for ovr_i,ind in enumerate(ovr):
                if ind < thresh:
                    new_order.append(order[ovr_i])
            order = np.array(new_order,dtype=np.uint8)
        return keep

    # 根据当前类别索引获取框的颜色
    def get_color(self, x):
        idx=x%len(self.color_four)
        return self.color_four[idx]


if __name__=="__main__":
    # 显示模式,默认"hdmi",可以选择"hdmi"和"lcd"
    display_mode="hdmi"
    if display_mode=="hdmi":
        display_size=[1920,1080]
    else:
        display_size=[800,480]
    # 模型路径
    kmodel_path="/sdcard/app/tests/kmodel/yolov8n_320.kmodel"
    labels = ["person", "bicycle", "car", "motorcycle", "airplane", "bus", "train", "truck", "boat", "traffic light", "fire hydrant", "stop sign", "parking meter", "bench", "bird", "cat", "dog", "horse", "sheep", "cow", "elephant", "bear", "zebra", "giraffe", "backpack", "umbrella", "handbag", "tie", "suitcase", "frisbee", "skis", "snowboard", "sports ball", "kite", "baseball bat", "baseball glove", "skateboard", "surfboard", "tennis racket", "bottle", "wine glass", "cup", "fork", "knife", "spoon", "bowl", "banana", "apple", "sandwich", "orange", "broccoli", "carrot", "hot dog", "pizza", "donut", "cake", "chair", "couch", "potted plant", "bed", "dining table", "toilet", "tv", "laptop", "mouse", "remote", "keyboard", "cell phone", "microwave", "oven", "toaster", "sink", "refrigerator", "book", "clock", "vase", "scissors", "teddy bear", "hair drier", "toothbrush"]
    # 其它参数设置
    confidence_threshold = 0.2
    nms_threshold = 0.2
    max_boxes_num = 50
    rgb888p_size=[320,320]

    # 初始化PipeLine
    pl=PipeLine(rgb888p_size=rgb888p_size,display_size=display_size,display_mode=display_mode)
    pl.create()
    # 初始化自定义目标检测实例
    ob_det=ObjectDetectionApp(kmodel_path,labels=labels,model_input_size=[320,320],max_boxes_num=max_boxes_num,confidence_threshold=confidence_threshold,nms_threshold=nms_threshold,rgb888p_size=rgb888p_size,display_size=display_size,debug_mode=0)
    ob_det.config_preprocess()
    try:
        while True:
            os.exitpoint()
            with ScopedTiming("total",1):
                # 获取当前帧数据
                img=pl.get_frame()
                # 推理当前帧
                res=ob_det.run(img)
                # 绘制结果到PipeLine的osd图像
                ob_det.draw_result(pl,res)
                # 显示当前的绘制结果
                pl.show_image()
                gc.collect()
    except Exception as e:
        sys.print_exception(e)
    finally:
        ob_det.deinit()
        pl.destroy()
代码需要注意的是文件路径和labels需要修改,labels根据自己的情况输入字符串。置信度根据自身情况也可以修改。
总结与心得:
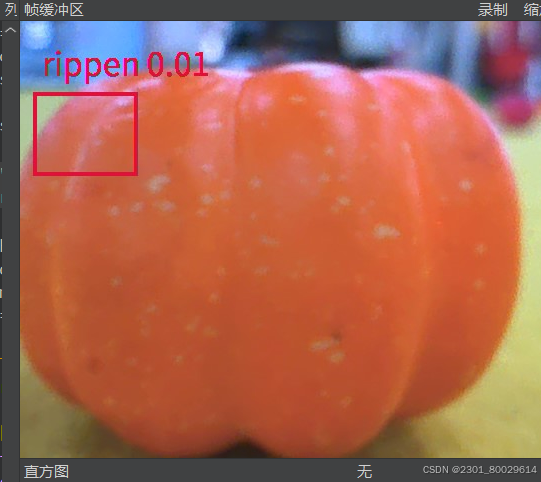
这是迭代50次后的结果非常一般,最开始迭代20次的效果更不用说了。
由于个人能力有限,无法对算法更新,如果要追求更高的识别率不妨增加迭代次数和数据集数目,或者更换pt模型(没准v5的模型会比v8好一点(dog))。
再与线上平台做对比的话,线上平台的效果会好很多,所以要追究高质量与速度可以在线上平台训练,如果想要尝试整个训练过程,我认为本地部署值得一试。


 2459
2459

 被折叠的 条评论
为什么被折叠?
被折叠的 条评论
为什么被折叠?
 到【灌水乐园】发言


