


大家好
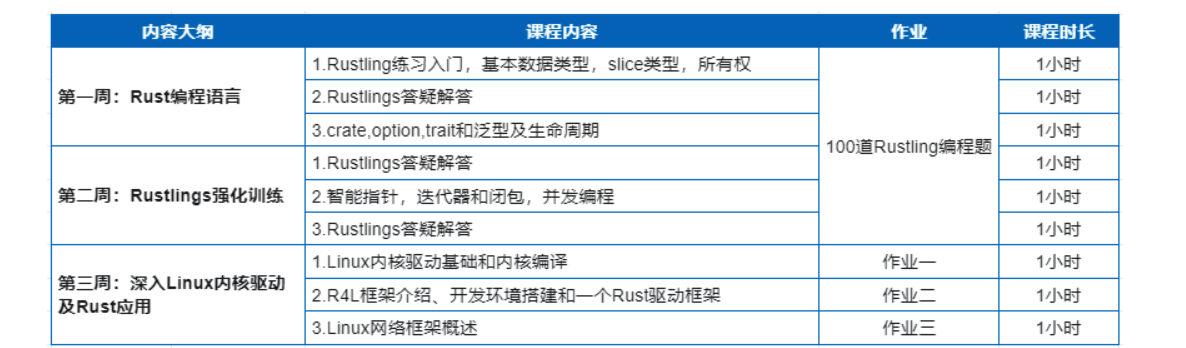
今天 完成 2024年自动驾驶OS开发训练营-初阶营第四期-导学
Day4用 rustlings 练习 Rust 语言
欢迎加入国家智能网联汽车创新中心OS开发训练营大家庭。
🚀 导学阶段启动
在正式开营之前,我们特别设置了导学阶段,旨在帮助大家更好地迎接颇具挑战性的项目实战。

导学阶段包括一系列精心准备的视频课程和配套习题。
github链接:https://classroom.github.com/a/7jeNPL16


第一阶段作业 rustlings ranking:https://cicvedu.github.io/rust-rustlings-semester-4-ranking/

第二阶段作业:https://docs.qq.com/doc/DSk5xTHRJY1FZVUdK
冲💯呀!

📚 课程与习题

🏈新学员或小白:请务必认真观看视频课程,为后续学习打下坚实的基础。视频课程结束后,请完成相应的习题。

🏉老学员:如果您之前已经学习过相关课程,可以直接跳过视频观看,专注于完成习题,复习和巩固知识点。

🏋🏻课程链接:https://opencamp.cn/cicvedu/camp/202407022/stage/1

🔔 日常提醒
为了确保学习效果,我们建议每位学员每周至少投入10-15小时的学习时间。特别强调,在7月15日之前,请大家务必集中精力攻克Rust语言的学习难关,为后续学习打基础。

🌟 组队学习
鼓励大家组建学习小分队,一起攻克难题。快去报名平台上点击“创建队伍”,找到你的学习战友吧!
组队链接:https://opencamp.cn/cicvedu/camp/202407022/stage/1

📝 入营笔试
开营前会安排一个考核 ,请大家认真观看导学内容, 有疑问的可以在群里探讨。
最后,预祝大家在国家智能网联汽车创新中心OS开发训练营的学习之旅中收获满满,技能提升,遇见更好的自己!
我的题目
https://github.com/cicvedu/rustlings-semester-4-watchpoints
在正式开营之前,我们特别设置了导学阶段,旨在帮助大家更好地迎接颇具挑战性的项目实战。
导学阶段包括一系列精心准备的视频课程和配套习题。 github链接:https://classroom.github.com/a/7jeNPL16
第一阶段作业 rustlings ranking:https://cicvedu.github.io/rust-rustlings-semester-4-ranking/
第二阶段作业:https://docs.qq.com/doc/DSk5xTHRJY1FZVUdK 冲💯呀!
Tests
Going out of order from the book to cover tests -- many of the following exercises will ask you to make tests pass!
Further information
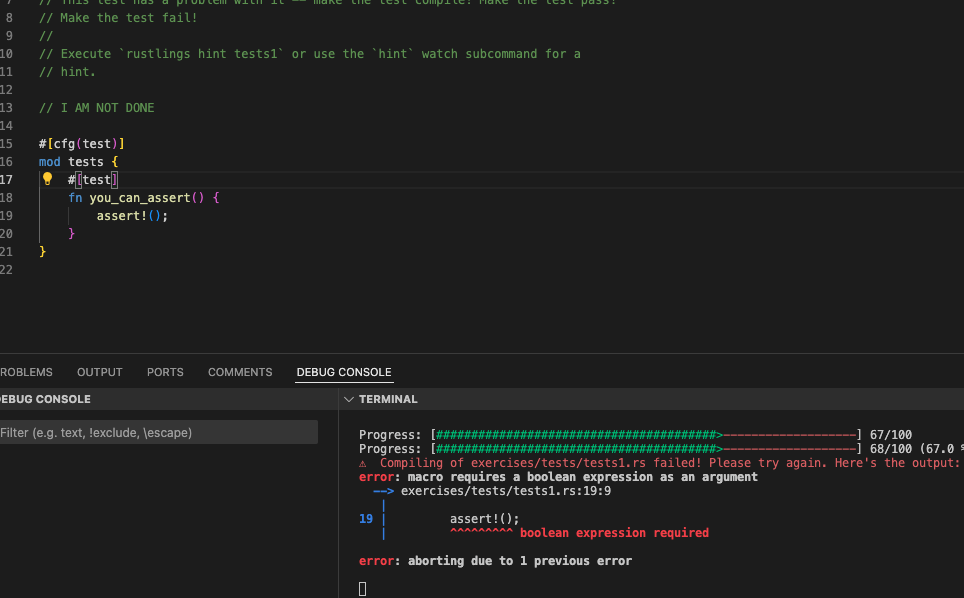
在 Rust 中,#[cfg(test)] 是一个条件编译属性(attribute),它用于指定仅在当前是测试模式下编译代码。这通常用于定义测试模块或测试函数,而这些测试在正常构建时不会被包含在最终的可执行文件中。
当你使用 Rust 的构建工具 cargo 来构建项目时,你可以使用 --tests 标志来告诉 cargo 仅编译和运行项目中的测试。如果没有这个标志,cargo 默认会构建项目的所有代码,但不包括测试代码。
以下是 #[cfg(test)] 的一些关键点:
-
条件编译:
#[cfg(test)]属性告诉 Rust 编译器仅在测试配置下包含这段代码。这意味着,当你正常构建项目时(例如使用cargo build),这些测试代码不会被编译或链接到最终的二进制文件中。 -
组织测试:它允许你将测试代码组织在模块中,通常命名为
tests。这些测试模块可以包含任意数量的测试函数,每个测试函数都使用#[test]属性标记。 -
集成和单元测试:
#[cfg(test)]通常用于单元测试,这些测试针对代码的小块逻辑进行验证。Rust 还支持集成测试,它们位于项目的根目录下的tests文件夹中,并且可以访问项目的私有 API。 -
性能:由于测试代码在正常构建时不会被包含,因此它不会影响最终可执行文件的大小或性能。
-
使用示例:
#[cfg(test)]
mod tests {
    #[test]
    fn you_can_assert() {
        assert!(true);
    }
}
在这个示例中,
tests模块只有在使用cargo test时才会被编译和运行。you_can_assert函数是一个测试函数,它使用assert!宏来验证一个条件。如果条件为true,则测试通过;如果为false,则测试失败。
通过使用 #[cfg(test)],你可以保持代码的整洁和专注于构建目标,同时还能轻松地编写和运行测试来验证代码的正确性。
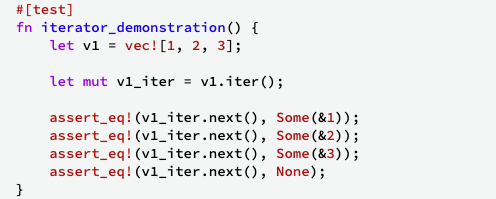
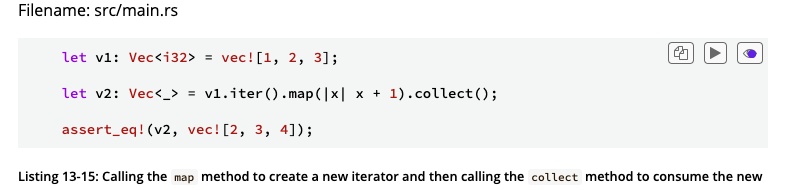
Iterators
This section will teach you about Iterators.
Further information
// Complete the function and return a value of the correct type so the test
// passes.
// Desired output: Ok([1, 11, 1426, 3])
fn result_with_list() -> Result<Vec<i32>, DivisionError>  {
    let numbers = vec![27, 297, 38502, 81];
    let division_results: Vec<Result<i32, DivisionError>> = numbers.into_iter().map(|n| divide(n, 27)).collect();
    let a: Result<Vec<i32>, DivisionError> = division_results.iter().cloned().collect();
    a
}
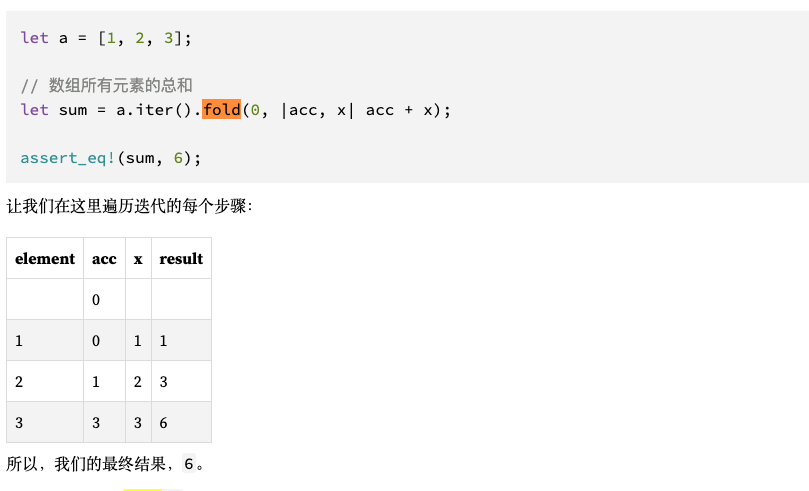
The Rust function you've provided is designed to calculate the factorial of a given number num without using the return keyword, traditional loops, or additional variables. It achieves this using an iterator and the fold method, which is a common functional programming technique.
Here's a breakdown of how the function works:
-
(1..=num): Creates an iterator that starts from 1 and goes up to and includingnum. -
.fold(1, |acc, x| acc * x): Applies a folding operation over the iterator. Thefoldmethod takes two arguments:-
An initial accumulator value, which is 1in this case. This value is used as the starting point for the computation. -
A closure that specifies how to combine the elements of the iterator with the accumulator. The closure takes two parameters: acc(the accumulator) andx(the current element from the iterator). It multiplies the accumulator by the current element (acc * x) and returns the result.
-
The fold method processes each element in the iterator, successively applying the closure, and accumulates the result. By the end of the iteration, the accumulator holds the factorial of num.
This function is a concise and efficient way to calculate the factorial of a number using iterator combinators in Rust. It adheres to the constraints you've mentioned by avoiding explicit return statements, loops, additional variables, and recursion.
Usage example:
fn main() {
    let num = 5;
    println!("The factorial of {} is {}", num, factorial(num));
}
This will output:
The factorial of 5 is 120
The provided function is complete and should work correctly for calculating the factorial of a non-negative integer within the range of u64. If you need to handle edge cases or ensure that the input is valid (e.g., not zero or negative), you might need to add additional logic. However, based on the constraints you've given, the function is correctly implemented.
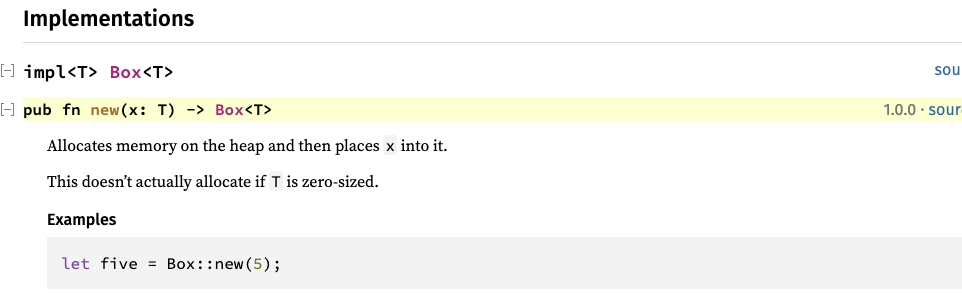
Smart Pointers
In Rust, smart pointers are variables that contain an address in memory and reference some other data, but they also have additional metadata and capabilities. Smart pointers in Rust often own the data they point to, while references only borrow data.
Further Information
-
Smart Pointers -
Using Box to Point to Data on the Heap -
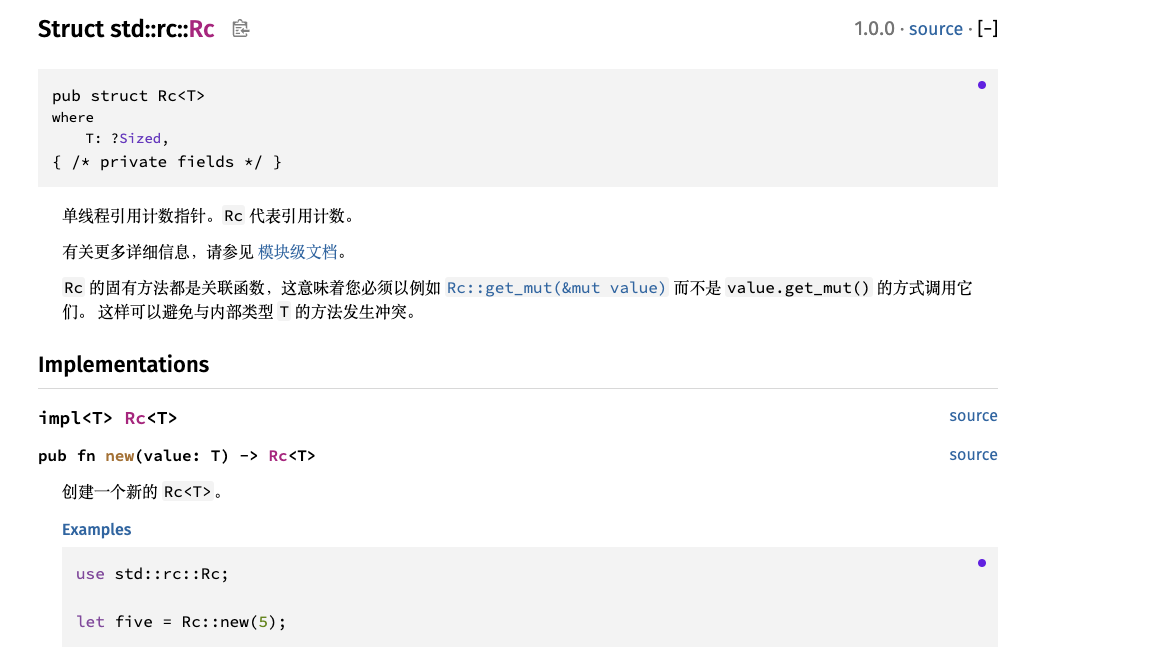
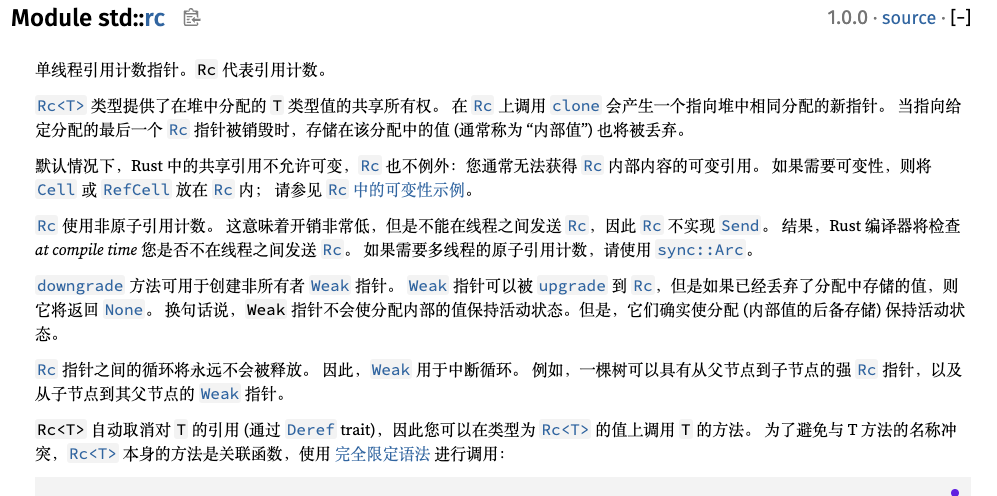
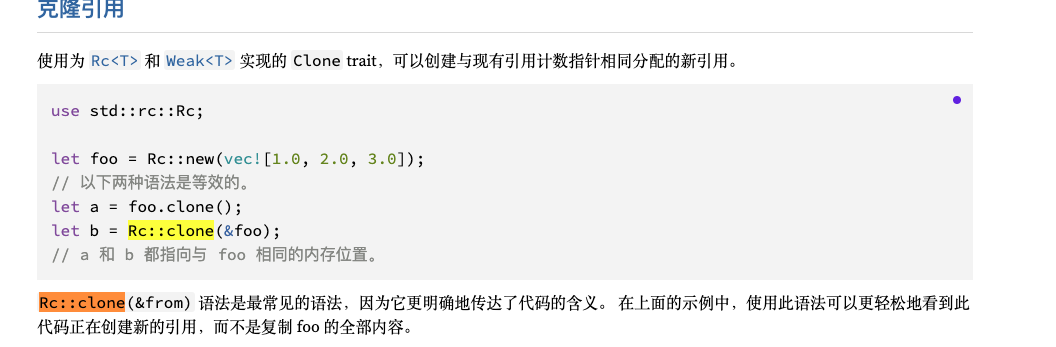
Rc<T>, the Reference Counted Smart Pointer -
Shared-State Concurrency -
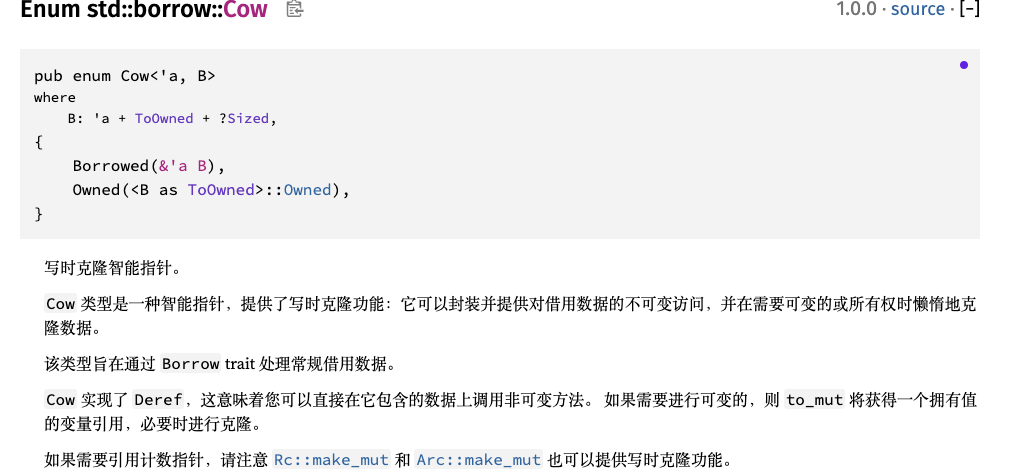
Cow Documentation
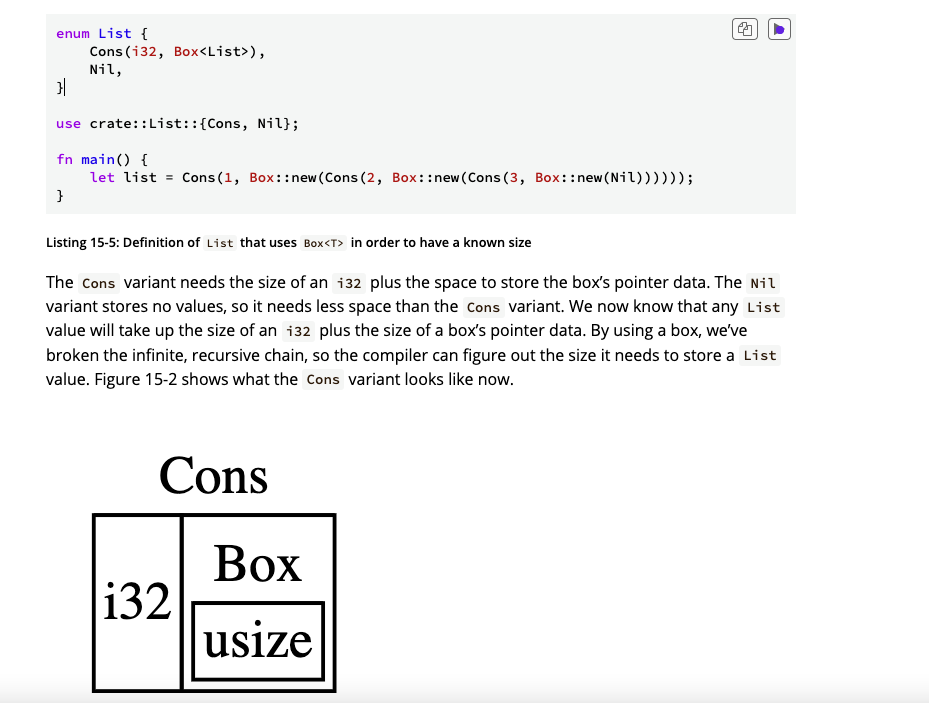
Using Box to Point to Data on the Heap

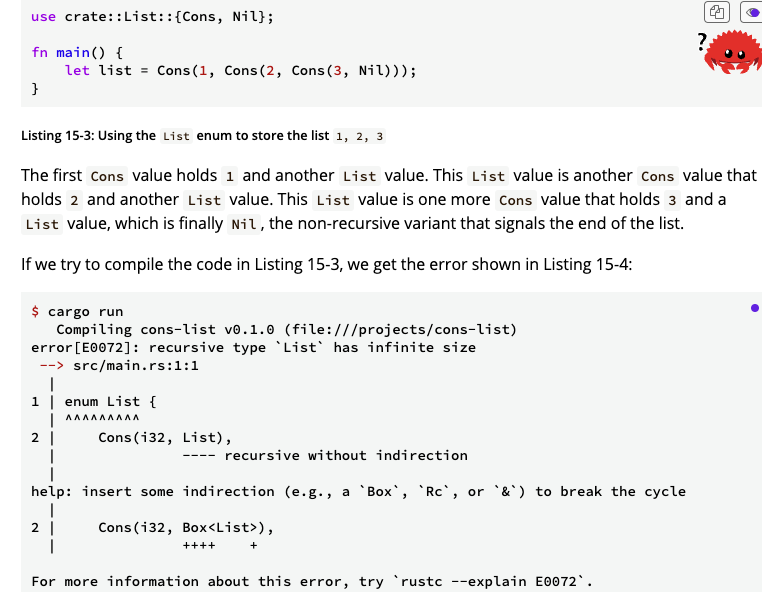
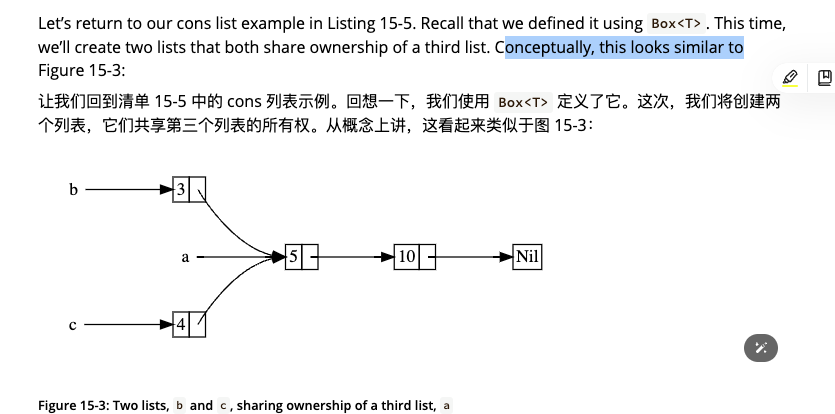
https://doc.rust-lang.org/book/ch15-04-rc.html
//
// In this exercise, we want to express the concept of multiple owners via the
// Rc<T> type. This is a model of our solar system - there is a Sun type and
// multiple Planets. The Planets take ownership of the sun, indicating that they
// revolve around the sun.
//
// Make this code compile by using the proper Rc primitives to express that the
// sun has multiple owners.
//
// Execute `rustlings hint rc1` or use the `hint` watch subcommand for a hint.
这段 Rust 代码的目的是演示如何在多线程环境中使用 Arc(原子引用计数)来共享数据。Arc 是 Rust 标准库中的一个线程安全引用计数指针,允许多个线程之间安全地共享对某个值的所有权。
代码中创建了一个包含 0 到 99 的 u32 类型向量的 numbers。目标是使用 8 个不同的线程,每个线程计算这个向量中特定偏移量位置的元素之和。
以下是代码的关键部分及其解释:
-
let numbers: Vec<_> = (0..100u32).collect();-
这行代码创建了一个包含 0 到 99 的 Vec<u32>。
-
-
let shared_numbers = Arc::new(numbers);-
这里使用 Arc::new创建了一个新的Arc,它包裹了numbers向量。这是第一个TODO位置,代码已经正确填写。
-
-
let child_numbers = Arc::clone(&shared_numbers);-
在循环中,对于每个线程,使用 Arc::clone来增加Arc的引用计数,并为每个线程创建了shared_numbers的一个新引用。这是第二个TODO位置,代码也已经正确填写。
-
-
joinhandles.push(thread::spawn(move || {...});-
thread::spawn创建一个新的线程,并传递一个闭包,该闭包定义了线程的执行逻辑。move关键字将闭包内的变量所有权移动到闭包中,使得每个新线程都能拥有child_numbers的独立引用。
-
-
闭包内部:
-
使用 child_numbers.iter()获取迭代器。 -
filter(|&&n| n % 8 == offset)过滤出符合条件的元素,即第offset个偏移的元素。 -
sum();计算这些元素的总和。 -
println!打印出每个线程计算的和。
-
-
最后,代码等待所有线程完成:
-
for handle in joinhandles.into_iter()迭代所有线程句柄。 -
handle.join().unwrap();等待每个线程完成,并处理可能的错误。
-
这个程序展示了如何在 Rust 中使用 Arc 来实现线程间的数据共享,以及如何使用线程来并行处理数据。每个线程都对数据的不同部分进行操作,而不会影响其他线程的操作,因为 Arc 确保了数据的线程安全性。
Threads
In most current operating systems, an executed program’s code is run in a process, and the operating system manages multiple processes at once. Within your program, you can also have independent parts that run simultaneously. The features that run these independent parts are called threads.
Further information

Macros
Rust's macro system is very powerful, but also kind of difficult to wrap your head around. We're not going to teach you how to write your own fully-featured macros. Instead, we'll show you how to use and create them.
If you'd like to learn more about writing your own macros, the macrokata project has a similar style of exercises to Rustlings, but is all about learning to write Macros.
Further information
-
-
The Little Book of Rust Macros
macro_rules!是 Rust 中定义宏的一种方式。宏是 Rust 的一种强大特性,允许你编写更加灵活和动态的代码。使用macro_rules!,你可以定义可以接受不同输入并根据这些输入生成不同输出的宏。
以下是 macro_rules! 的一些关键点:
-
模式匹配:
macro_rules!使用模式匹配来定义宏的行为。这类似于模式匹配在match表达式中的使用,但更适用于定义宏。 -
重复和可变数量的参数:宏可以接受固定数量的参数,也可以接受可变数量的参数。这通过使用重复模式(如
$(...)*或$(...),+)来实现。 -
重复和分隔符:在宏定义中,可以使用分隔符(如逗号
,)来分隔参数。这在使用宏时需要相应地分隔参数。 -
宏的主体:在
=>之后的部分是宏的主体,即当宏被调用时将被展开的代码块。 -
宏的调用:宏通过宏名称后跟一对圆括号来调用,圆括号内可以包含参数。
-
宏的展开:当宏被调用时,它的参数将替换宏主体中的相应占位符,然后整个宏主体将被插入到调用宏的代码位置。
-
宏的可见性:宏默认是私有的,但可以使用
pub关键字使其变为公共的。 -
错误处理:宏的展开发生在编译时,如果宏的调用不符合宏定义的模式,编译器将报错。
-
递归宏:宏可以递归地调用自己,这在某些情况下非常有用。
-
宏的局限性:宏不是函数,它们在编译时展开,并且没有类型检查。这意味着宏更容易产生难以追踪的错误。
以下是一个简单的宏定义示例:
macro_rules! my_macro {
    () => {
        println!("Hello from the macro!");
    };
}

fn main() {
    my_macro!(); // 调用宏,将打印 "Hello from the macro!"
}
在这个示例中,my_macro 是一个没有参数的宏,当它被调用时,它将展开为一个打印消息的表达式。
#[macro_use] 是 Rust 中的一个属性宏,用于在模块或 crate 级别引入宏。当你想要在一个模块中定义宏,并且在当前模块或其他模块中使用这些宏时,你可以使用 #[macro_use] 来实现这一点。
以下是 #[macro_use] 的一些关键点:
-
引入宏:
#[macro_use]允许你引入其他模块定义的宏,而不需要在每个使用点都重复宏的名称。 -
模块级别:
#[macro_use]通常应用于模块级别,而不是函数或特定项级别。 -
重导出:使用
#[macro_use]引入的宏可以被重导出,这意味着它们可以在当前模块的外部使用。 -
简化代码:通过集中管理宏的导入,
#[macro_use]可以简化代码,避免在多个地方重复相同的宏导入语句。 -
作用域:
#[macro_use]引入的宏在当前作用域及其子模块中都是可见的。 -
与
use的区别:与use关键字不同,#[macro_use]专门用于宏,而use用于引入模块、结构体、函数等。 -
跨 crate 引入:如果一个宏定义在另一个 crate 中,你可以通过
#[macro_use]将其引入到当前 crate 中。 -
属性宏的位置:
#[macro_use]必须放置在文件或模块的顶部,不能放置在函数或其他项内部。
以下是一个使用 #[macro_use] 的示例:
// 在另一个模块或 crate 中定义宏
#[macro_export]
macro_rules! my_macro {
    () => {
        println!("Hello from the macro!");
    };
}

// 在当前模块中引入并使用宏
#[macro_use]
extern crate my_crate;

fn main() {
    my_macro!(); // 使用引入的宏
}
在这个示例中,my_macro 是在另一个 crate 中定义的宏,我们使用 #[macro_use] 将其引入并在 main 函数中使用。注意 #[macro_export] 属性,它允许宏在被导出时保持其宏属性。如果没有这个属性,即使使用了 #[macro_use],宏也无法在导入宏的模块之外使用。
Type conversions
Rust offers a multitude of ways to convert a value of a given type into another type.
The simplest form of type conversion is a type cast expression. It is denoted with the binary operator as. For instance, println!("{}", 1 + 1.0); would not compile, since 1 is an integer while 1.0 is a float. However, println!("{}", 1 as f32 + 1.0) should compile. The exercise using_as tries to cover this.
Rust also offers traits that facilitate type conversions upon implementation. These traits can be found under the convert module. The traits are the following:
-
FromandIntocovered infrom_into -
TryFromandTryIntocovered intry_from_into -
AsRefandAsMutcovered inas_ref_mut
Furthermore, the std::str module offers a trait called FromStr which helps with converting strings into target types via the parse method on strings. If properly implemented for a given type Person, then let p: Person = "Mark,20".parse().unwrap() should both compile and run without panicking.
These should be the main ways within the standard library to convert data into your desired types.
Further information
These are not directly covered in the book, but the standard library has a great documentation for it.
/**
【昵称】小王同学
【坐标】山东
【自我介绍】
  1. 高级后端工程师,擅长c++并发编程。
  2. 专注分布式存储,分布式数据库。
  3. 时间的践行者,立志成为一名讲师。
【我的成绩】
  1.  为了走出农村,2次高考
       一次考研失败,
       遇挫之后不知道干什么,开启被动之旅。
  2. 为了找到合适工作,
      深入研究c++书籍和leetcode 200题目
  3. 为了提高项目能力,参与开源项目建设。
  4. 为了把简单事情说清楚/要干啥
      按照《只管去做》,《福格行为模型>>方法。
      纸上得来终觉浅,绝知此事要躬行
      做一个践行者。
【我能提供】
  1.  后端程序员的简历优化+就业辅导+职业规划
  2.  全栈工程师(c++,rust,go,python )项目开发
  3. 一年践行12本书践行记录。
【希望一起解决什么,开启破圈之旅】
  1. 交接更多朋友,抱团取暖。
      寻找意义本身就更加有意义。
  2. 无法做整个系统,聚焦一个模块
       道可道也,非恒道也
       名可名也,非恒名也。
       无名 万物之始也
       有名 万物之母也
       别想太多,只管去做,躬身入局

链接我: # 微信(github):watchpoints
      #公众号:后端开发成长指南
**/
本文由 mdnice 多平台发布


 4880
4880


 被折叠的 条评论
为什么被折叠?
被折叠的 条评论
为什么被折叠?
 到【灌水乐园】发言


