


转动GM6020(具体方式)
提示:多种方式
慢慢写,现就一种方式。
提示:写完文章后,目录可以自动生成,如何生成可参考右边的帮助文档
前言
提示:这里可以添加本文要记录的大概内容:
例如:随着人工智能的不断发展,机器学习这门技术也越来越重要,很多人都开启了学习机器学习,本文就介绍了机器学习的基础内容。
提示:以下是本篇文章正文内容,下面案例可供参考
一、第一种转动方式
这只是运用库直接转动的方法,具体的还是需要自己写
1.首先正常配置
2.开启CAN1(引脚选择注意官方是PD0,PD1)
3.参数配置,因为GM6020电机比特率为1000000,配到这个应该是9 3 1或者9 2 2都可以
4.加上包含文件就可以,如下
(1)bsp_can.c
/****************************************************************************
 *  Copyright (C) 2018 RoboMaster.
 *
 *  This program is free software: you can redistribute it and/or modify
 *  it under the terms of the GNU General Public License as published by
 *  the Free Software Foundation, either version 3 of the License, or
 *  (at your option) any later version.
 *
 *  This program is distributed in the hope that it will be useful,
 *  but WITHOUT ANY WARRANTY; without even the implied warranty of
 *  MERCHANTABILITY or FITNESS FOR A PARTICULAR PURPOSE.  See the
 *  GNU General Public License for more details.
 *
 *  You should have received a copy of the GNU General Public License
 *  along with this program. If not, see <http://www.gnu.org/licenses/>.
 ***************************************************************************/

#include "bsp_can.h"


moto_info_t motor_info[MOTOR_MAX_NUM];
uint16_t can_cnt;
uint8_t             rx_data[8];
CAN_RxHeaderTypeDef rx_header;

/**
  * @brief  init can filter, start can, enable can rx interrupt
  * @param  hcan pointer to a CAN_HandleTypeDef structure that contains
  *         the configuration information for the specified CAN.
  * @retval None
  */
void can_user_init(CAN_HandleTypeDef* hcan )
{
  CAN_FilterTypeDef  can_filter;

  can_filter.FilterBank = 0;                       // filter 0
  can_filter.FilterMode =  CAN_FILTERMODE_IDMASK;  // mask mode
  can_filter.FilterScale = CAN_FILTERSCALE_32BIT;
  can_filter.FilterIdHigh = 0;
  can_filter.FilterIdLow  = 0;
  can_filter.FilterMaskIdHigh = 0;
  can_filter.FilterMaskIdLow  = 0;                // set mask 0 to receive all can id
  can_filter.FilterFIFOAssignment = CAN_RX_FIFO0; // assign to fifo0
  can_filter.FilterActivation = ENABLE;           // enable can filter
  can_filter.SlaveStartFilterBank  = 14;          // only meaningful in dual can mode

  HAL_CAN_ConfigFilter(hcan, &can_filter);        // init can filter
  HAL_CAN_Start(&hcan1);                          // start can1
  HAL_CAN_ActivateNotification(&hcan1, CAN_IT_RX_FIFO0_MSG_PENDING); // enable can1 rx interrupt
}

/**
  * @brief  can rx callback, get motor feedback info
  * @param  hcan pointer to a CAN_HandleTypeDef structure that contains
  *         the configuration information for the specified CAN.
  * @retval None
  */
void HAL_CAN_RxFifo0MsgPendingCallback(CAN_HandleTypeDef *hcan)
{
//  CAN_RxHeaderTypeDef rx_header;
//  uint8_t             rx_data[8];
  if(hcan->Instance == CAN1)
  {
    HAL_CAN_GetRxMessage(hcan, CAN_RX_FIFO0, &rx_header, rx_data); //receive can data
  }
  if ((rx_header.StdId >= FEEDBACK_ID_BASE)
   && (rx_header.StdId <  FEEDBACK_ID_BASE + MOTOR_MAX_NUM))                  // judge the can id
  {
    can_cnt ++;
    uint8_t index = rx_header.StdId - FEEDBACK_ID_BASE;                  // get motor index by can_id
    motor_info[index].rotor_angle    = ((rx_data[0] << 8) | rx_data[1]);
    motor_info[index].rotor_speed    = ((rx_data[2] << 8) | rx_data[3]);
    motor_info[index].torque_current = ((rx_data[4] << 8) | rx_data[5]);
    motor_info[index].temp           =   rx_data[6];
  }
  if (can_cnt == 500)
  {
    can_cnt = 0;
//    LED_GREEN_TOGGLE(); // green led blink indicate can comunication successful
  }
}

/**
  * @brief  send motor control message through can bus
  * @param  id_range to select can control id 0x1ff or 0x2ff
  * @param  motor voltage 1,2,3,4 or 5,6,7
  * @retval None
  */
void set_motor_voltage(uint8_t id_range, int16_t v1, int16_t v2, int16_t v3, int16_t v4)
{
  CAN_TxHeaderTypeDef tx_header;
  uint8_t             tx_data[8];

  tx_header.StdId = (id_range == 0)?(0x1ff):(0x2ff);
  tx_header.IDE   = CAN_ID_STD;
  tx_header.RTR   = CAN_RTR_DATA;
  tx_header.DLC   = 8;

  tx_data[0] = (v1>>8)&0xff;
  tx_data[1] =    (v1)&0xff;
  tx_data[2] = (v2>>8)&0xff;
  tx_data[3] =    (v2)&0xff;
  tx_data[4] = (v3>>8)&0xff;
  tx_data[5] =    (v3)&0xff;
  tx_data[6] = (v4>>8)&0xff;
  tx_data[7] =    (v4)&0xff;
  HAL_CAN_AddTxMessage(&hcan1, &tx_header, tx_data,(uint32_t*)CAN_TX_MAILBOX0);
}
(2)bsp_can.h
/****************************************************************************
 *  Copyright (C) 2018 RoboMaster.
 *
 *  This program is free software: you can redistribute it and/or modify
 *  it under the terms of the GNU General Public License as published by
 *  the Free Software Foundation, either version 3 of the License, or
 *  (at your option) any later version.
 *
 *  This program is distributed in the hope that it will be useful,
 *  but WITHOUT ANY WARRANTY; without even the implied warranty of
 *  MERCHANTABILITY or FITNESS FOR A PARTICULAR PURPOSE.  See the
 *  GNU General Public License for more details.
 *
 *  You should have received a copy of the GNU General Public License
 *  along with this program. If not, see <http://www.gnu.org/licenses/>.
 ***************************************************************************/

#ifndef __BSP_CAN
#define __BSP_CAN

#include "can.h"

#define FEEDBACK_ID_BASE      0x205
#define CAN_CONTROL_ID_BASE   0x1ff
#define CAN_CONTROL_ID_EXTEND 0x2ff
#define MOTOR_MAX_NUM         7

typedef struct
{
    uint16_t can_id;
    int16_t  set_voltage;
    uint16_t rotor_angle;
    int16_t  rotor_speed;
    int16_t  torque_current;
    uint8_t  temp;
}moto_info_t;

void can_user_init(CAN_HandleTypeDef* hcan);
void set_motor_voltage(uint8_t id_range, int16_t v1, int16_t v2, int16_t v3, int16_t v4);
#endif
(3)main.c
在main.c中加入以下即可转动

总结
提示:这里对文章进行总结:
例如:以上就是今天要讲的内容,本文仅仅简单介绍了pandas的使用,而pandas提供了大量能使我们快速便捷地处理数据的函数和方法。
二、第二种方式驱动GM6020(开环)
1.在一个新建文件中 bsp_can.c 进行编写代码操作
#include "bsp_can.h"

#include "can.h"
#include "gpio.h"
#include "main.h"


void can_Init(CAN_HandleTypeDef*hcan)
{
	//配置can的过滤器
		  CAN_FilterTypeDef  can_filter;
		  can_filter.FilterBank = 0;                       // filter 0
		  can_filter.FilterMode =  CAN_FILTERMODE_IDMASK;  // mask mode
		  can_filter.FilterScale = CAN_FILTERSCALE_32BIT;
		  can_filter.FilterIdHigh = 0;
		  can_filter.FilterIdLow  = 0;
		  can_filter.FilterMaskIdHigh = 0;
		  can_filter.FilterMaskIdLow  = 0;                // set mask 0 to receive all can id
		  can_filter.FilterFIFOAssignment = CAN_RX_FIFO0; // assign to fifo0
		  can_filter.FilterActivation = ENABLE;           // enable can filter
		  can_filter.SlaveStartFilterBank  = 14;          // only meaningful in dual can mode

		  HAL_CAN_ConfigFilter(hcan, &can_filter);        // init can filter


	HAL_CAN_Start(&hcan1);//开启can
	HAL_CAN_ActivateNotification(&hcan1,CAN_IT_RX_FIFO0_MSG_PENDING);//开启在fifo0中的接收中断


}

void boxSend(uint16_t I1,uint16_t I2,uint16_t I3,uint16_t I4)//电压控制1,范围在-25000到25000
{
	uint8_t Data[8]={0};
	CAN_TxHeaderTypeDef txheader;//创建发送报文结构体
	txheader.DLC=8;
	txheader.IDE=CAN_ID_STD;
	txheader.RTR=CAN_RTR_DATA;
//	txheader.StdId=(ID==0)?(0x1ff):(0x2ff);//判断ID是哪个
	txheader.StdId=0x1ff;
	Data[0]=(uint8_t)(I1>>8);
	Data[1]=(uint8_t)I1;

	Data[2]=(uint8_t)(I2>>8);
	Data[3]=(uint8_t)I2;

	Data[4]=(uint8_t)(I3>>8);
	Data[5]=(uint8_t)I3;

	Data[6]=(uint8_t)(I4>>8);
	Data[7]=(uint8_t)I4;

	HAL_CAN_AddTxMessage(&hcan1,&txheader,Data,(uint32_t*)CAN_TX_MAILBOX0);
}


void motorset(Motor_t*Receive,uint8_t Data[])
{
	Receive->angle=(Data[0]<<8)|Data[1];//转子机械角度
	Receive->speeed=(Data[2]<<8)|Data[3];//转速
	Receive->torque=(Data[4]<<8)|Data[5];//输出转矩
	Receive->temp=Data[6];//温度
}

Motor_t GM6020[4];//控制四个电机

//void boxReceive(void)
//{
//	uint8_t ReceiveData[8]={0};
//	CAN_RxHeaderTypeDef Rxheader;//创建接收报文结构体
//	HAL_CAN_GetRxMessage(&hcan1,CAN_RX_FIFO0,&Rxheader,ReceiveData);//将信息接收到fifo0邮箱
//	switch(Rxheader.StdId)//判断ID
//	{
//	case 0x201:
//	{
//		motorset(&GM6020[0],ReceiveData);//处理接收到的数据,拿出来
//		break;
//	}
//
//	}
//
//}


//在fifo0的中断回调里面完成数据接收

void HAL_CAN_RxFifo0MsgPendingCallback(CAN_HandleTypeDef*hcan)
{
	if(hcan->Instance==CAN1)
	{
	    uint8_t ReceiveData[8]={0};
		CAN_RxHeaderTypeDef Rxheader;//创建接收报文结构体
		HAL_CAN_GetRxMessage(&hcan1,CAN_RX_FIFO0,&Rxheader,ReceiveData);//将信息接收到fifo0邮箱
		switch(Rxheader.StdId)//判断ID
		{
		case 0x205:
		{
			motorset(&GM6020[0],ReceiveData);//处理接收到的数据,拿出来
			break;
		}

		}
	}
}


/*
 * bsp_can.c
 *
 *  Created on: Jun 3, 2024
 *      Author: yu
 */
bsp_can.h
//*注意:编写回调函数不要写错了
2.main.c里面加入
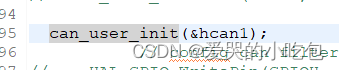
can_Init(&hcan1);
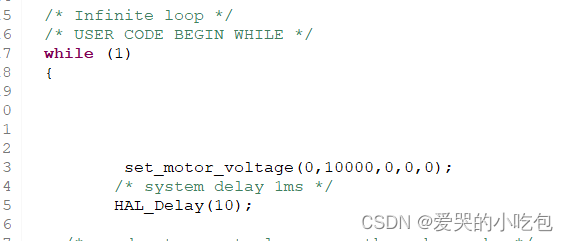
boxSend(1000,0,0,0);
HAL_Delay(20);
电机就可以转动了
# 三、闭环驱动GM6020
main.c的编写
```c
#include "main.h"
#include "can.h"
#include "gpio.h"
//
#include "bsp_can.h"
#include "pid.h"
#include "math.h"//加一个数学包
//加头文件
/* USER CODE BEGIN PV */
extern Motor_t;
int32_t a;//角度,0-8191
int32_t Current_position=0;//当前位置
int32_t current_angle;//当前角度
int32_t Last_angle=0;//上一次角度
double pi=3.14159265358979323846;
double speed;
int32_t new_err;//经过零点以后的值
int32_t err;//记录误差值
/* USER CODE END PV */
//声明变量
/* USER CODE BEGIN 2 */
can_Init(&hcan1);
HAL_CAN_Start(&hcan1);
Pid_Init(&GM6020_speed_pid[0],5,0,0,10000,0,3000,3000,0);//进行外环的位置初始化
Pid_Init(&GM6020_speed_pid[1],5,0,0,10000,0,3000,3000,0);//进行位置内环速度的初始化
/* USER CODE END 2 */
//进行初始化及开启can配置
while (1)
{
// PID_Calc(&GM6020_speed_pid[0],GM6020[0].speeed,100);
// boxSend(GM6020_speed_pid[0].Output,0,0,0);
// boxSend(12000,0,0,0);
current_angle=GM6020[0].angle;//得到现在的角度
err=current_angle-Last_angle;//角度差值
Null_Point(&err);//进行一个零点判断
Current_position+=err;//得到当前位置
PID_Calc(&GM6020_speed_pid[0],Current_position,8191*5);//位置内环计算得到速度
PID_Calc(&GM6020_speed_pid[1],GM6020[0].speeed,GM6020_speed_pid[0].Output);//用外环计算得到位置
boxSend(GM6020_speed_pid[1].Output,0,0,0);//报文发送过去
Last_angle=current_angle;//得到上一次角度
HAL_Delay(2);
/* USER CODE END WHILE */
/* USER CODE BEGIN 3 */
}
/* USER CODE END 3 */
}
//写运行代码,获得当前位置
(2)pid.c
/*
 * pid.c
 *
 *  Created on: Jun 16, 2024
 *      Author: yu
 */


#include "pid.h"
#include "bsp_can.h"

PidTypedef GM6020_speed_pid[4]={0};

void Pid_Init(PidTypedef *Pid ,float kp,float ki,float kd,float max_out,float dead_band,float integral,float max_input,uint8_t mode)
{
	Pid->Kp=kp;
	Pid->Ki=ki;
	Pid->Kd=kd;
	Pid->Input=0;
	Pid->Output=0;
	Pid->Integral=integral;//积分
	Pid->Dead_Band=dead_band;//死驱
	Pid->Max_out=max_out;//最大输出
	Pid->Max_input=max_input;//最大输入
	Pid->Integral=0;
	Pid->E[0]=0;
	Pid->E[1]=0;
	Pid->E[2]=0;
	Pid->D_last=0;
}

float func_Limit(float value,float max,float min)
{
	if(value>max)
	{
		return value=max;
	}
	else if(value<min)
	{
		return value=min;
	}
	else
		return value;
}

float func_abs(float value)
{
	if(value>=0)
		return value;
	else
		return -value;
}


void PID_Calc(PidTypedef *Pid,float return_value,float set_value)//速度环
{
	float p=0,i=0,d=0;
	    // 保存前一次和前两次误差
	    Pid->E[0] = Pid->E[1];
	    Pid->E[1] = Pid->E[2];

	Pid->E[2]=func_Limit(set_value-return_value, Pid->Max_input,-(Pid->Max_input));//当前的误差
	if(Pid->Mode==0)//位置环
	{
		if(func_abs(Pid->E[2])<=Pid->Integral)//如果当前误差绝对值小于积分
		{
			Pid->Integral=Pid->Integral+((Pid->Ki)*(Pid->E[2])+(Pid->Ki)*(Pid->E[1]))/2;//暂时不知道它有何用处
		}
		else
		{
			Pid->Integral=Pid->Integral;
		}
		Pid->Integral=func_Limit(Pid->Integral,Pid->Integral_Max,(-Pid->Integral_Max));


		p=Pid->Kp*(Pid->E[2]);
		i=Pid->Integral;
		d=(Pid->Kd)*(Pid->E[2]-Pid->E[1]);
		Pid->D_last=d;//不知道有什么用处
		Pid->Output=(int16_t)func_Limit(p+i+d,Pid->Max_out,-(Pid->Max_out));
//		Pid->Output=p+i+d;

	}
	else if(Pid->Mode==1)//速度环
	{
		if(func_abs(Pid->E[2])>=Pid->Dead_Band)//当偏差值大于等于这个死区,进入这个if
		{
			p=(Pid->Kp)*(Pid->E[2]-Pid->E[1]);
			i=(Pid->Ki)*(Pid->E[2]);
			d=(Pid->Kd)*(Pid->E[2]-2*(Pid->E[1])+Pid->E[0]);//注意没写*也会出错
			Pid->Output=p+i+d;
			Pid->Output=func_Limit(Pid->Output,Pid->Max_out,-(Pid->Max_out));
		}
	}
	else
		Pid->Output=0;

}

int Position_Moto;
int Moto;


void PID_Calc_Position(PidTypedef *Pid,float return_value,float set_value)
{
		float p1=0,i1=0,d1=0;
		    // 保存前一次和前两次误差
		    Pid->E[0] = Pid->E[1];
		    Pid->E[1] = Pid->E[2];

		Pid->E[2]=func_Limit(set_value, Pid->Max_input,-(Pid->Max_input))-return_value;//当前的误差
		if(Pid->Mode==0)//位置环
		{
			if(func_abs(Pid->E[2])<=Pid->Integral)//如果当前误差绝对值小于积分
			{
				Pid->Integral=Pid->Integral+((Pid->Ki)*(Pid->E[2])+(Pid->Ki)*(Pid->E[1]))/2;//暂时不知道它有何用处
			}
			else
			{
				Pid->Integral=Pid->Integral;
			}
			Pid->Integral=func_Limit(Pid->Integral,Pid->Integral_Max,(-Pid->Integral_Max));


			p1=Pid->Kp*(Pid->E[2]);
			i1=Pid->Integral;
			d1=(Pid->Kd)*(Pid->E[2]-Pid->E[1]);
			Pid->D_last=d1;//不知道有什么用处
			Pid->Output=p1+i1+d1;

		}
}


void Null_Point(int32_t *D_value)
{
	if (*D_value>4096)	*D_value=*D_value-8192;
	if (*D_value<-4096)	*D_value=*D_value+8192;

}
(3)pid.h
/*
 * pid.h
 *
 *  Created on: Jun 16, 2024
 *      Author: yu
 */

#ifndef INC_PID_H_
#define INC_PID_H_


#include "bsp_can.h"
#include "main.h"

typedef struct
{
	float Kp;
	float Ki;
	float Kd;

	float Integral;//积分
	float Input;//输入
	int16_t Output;//输出
	float Integral_Max;//积分上限
	float Dead_Band;//死区
	float Max_out;//最大输出
	float Max_input;//最大输入
	float E[3];//误差值
	float D_last;
	uint8_t Mode;//0为位置式 1为增量式

}PidTypedef;//PidTypedef要定义在头文件中,且源文件要包含头文件

extern PidTypedef GM6020_speed_pid[4];
void PID_Calc(PidTypedef *Pid,float return_value,float set_value);
void Pid_Init(PidTypedef *Pid ,float kp,float ki,float kd,float max_out,float dead_band,float integral,float max_input,uint8_t mode);
void PID_Cascade(PidTypedef *Pid,float return_value,float set_value);
void PID_Calc_Position(PidTypedef *Pid,float return_value,float set_value);//外环位置

void Null_Point(int32_t *D_value);
#endif /* INC_	PID_H_ */
代码编程过程中出现的错误以及需要改进的
1.我的电机进行转动,是需要正反转的,所以我需要使用正负号,而不是uint
然后我使用的can通信协议传输数据是八位八位传的,在计算过程中使用float是没有太大关系的,但是当我得到变量OUTPUT以后,我这个output是需要传输到can总线上的,所以它的数据类型我需要给它int16_t,这样才能保证数据是正常存储与发送传输的
2.我在进行PID计算时,我的误差是要进行一个限幅的,而我的限幅是应该对误差进行的限幅,然后还需要考虑符号优先级问题
3.在计算我的当前位置的时候出现了一个问题,就是我的零点判断问题,以半个周期为判断点,超过半个周期则减去T,超过负半个周期则加一个T
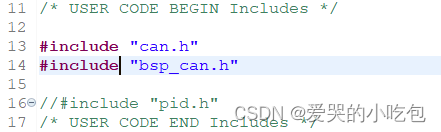
4.注意在编写代码时,头文件要写这个地方
/* USER CODE BEGIN Includes */
#include "bsp_can.h"
#include "pid.h"
/* USER CODE END Includes */
否则重新构建则头文件会被消除掉


 6046
6046

 被折叠的 条评论
为什么被折叠?
被折叠的 条评论
为什么被折叠?
 到【灌水乐园】发言


