


本文仅限记录个人在学习大恒相机SDK二次开发过程中所遇到的问题记录与分享
在对SDK 开发前需要先对VS与QT版本环境进行配置,这里采用的是VS22+QT5.14.2在windows系统下运行。
第一步要在VS中下载QT插件,打开任意VS 程序->扩展->管理扩展->搜索QT Visual Studio Tools
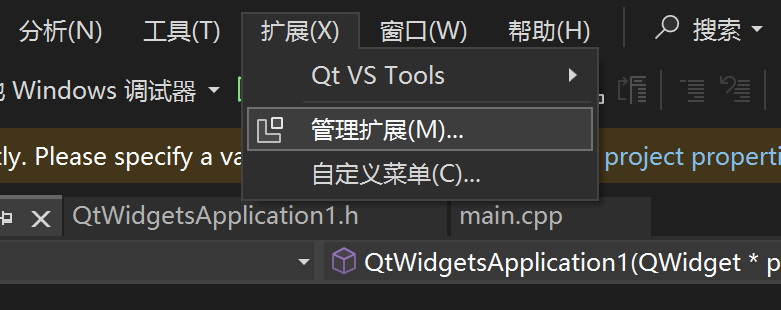
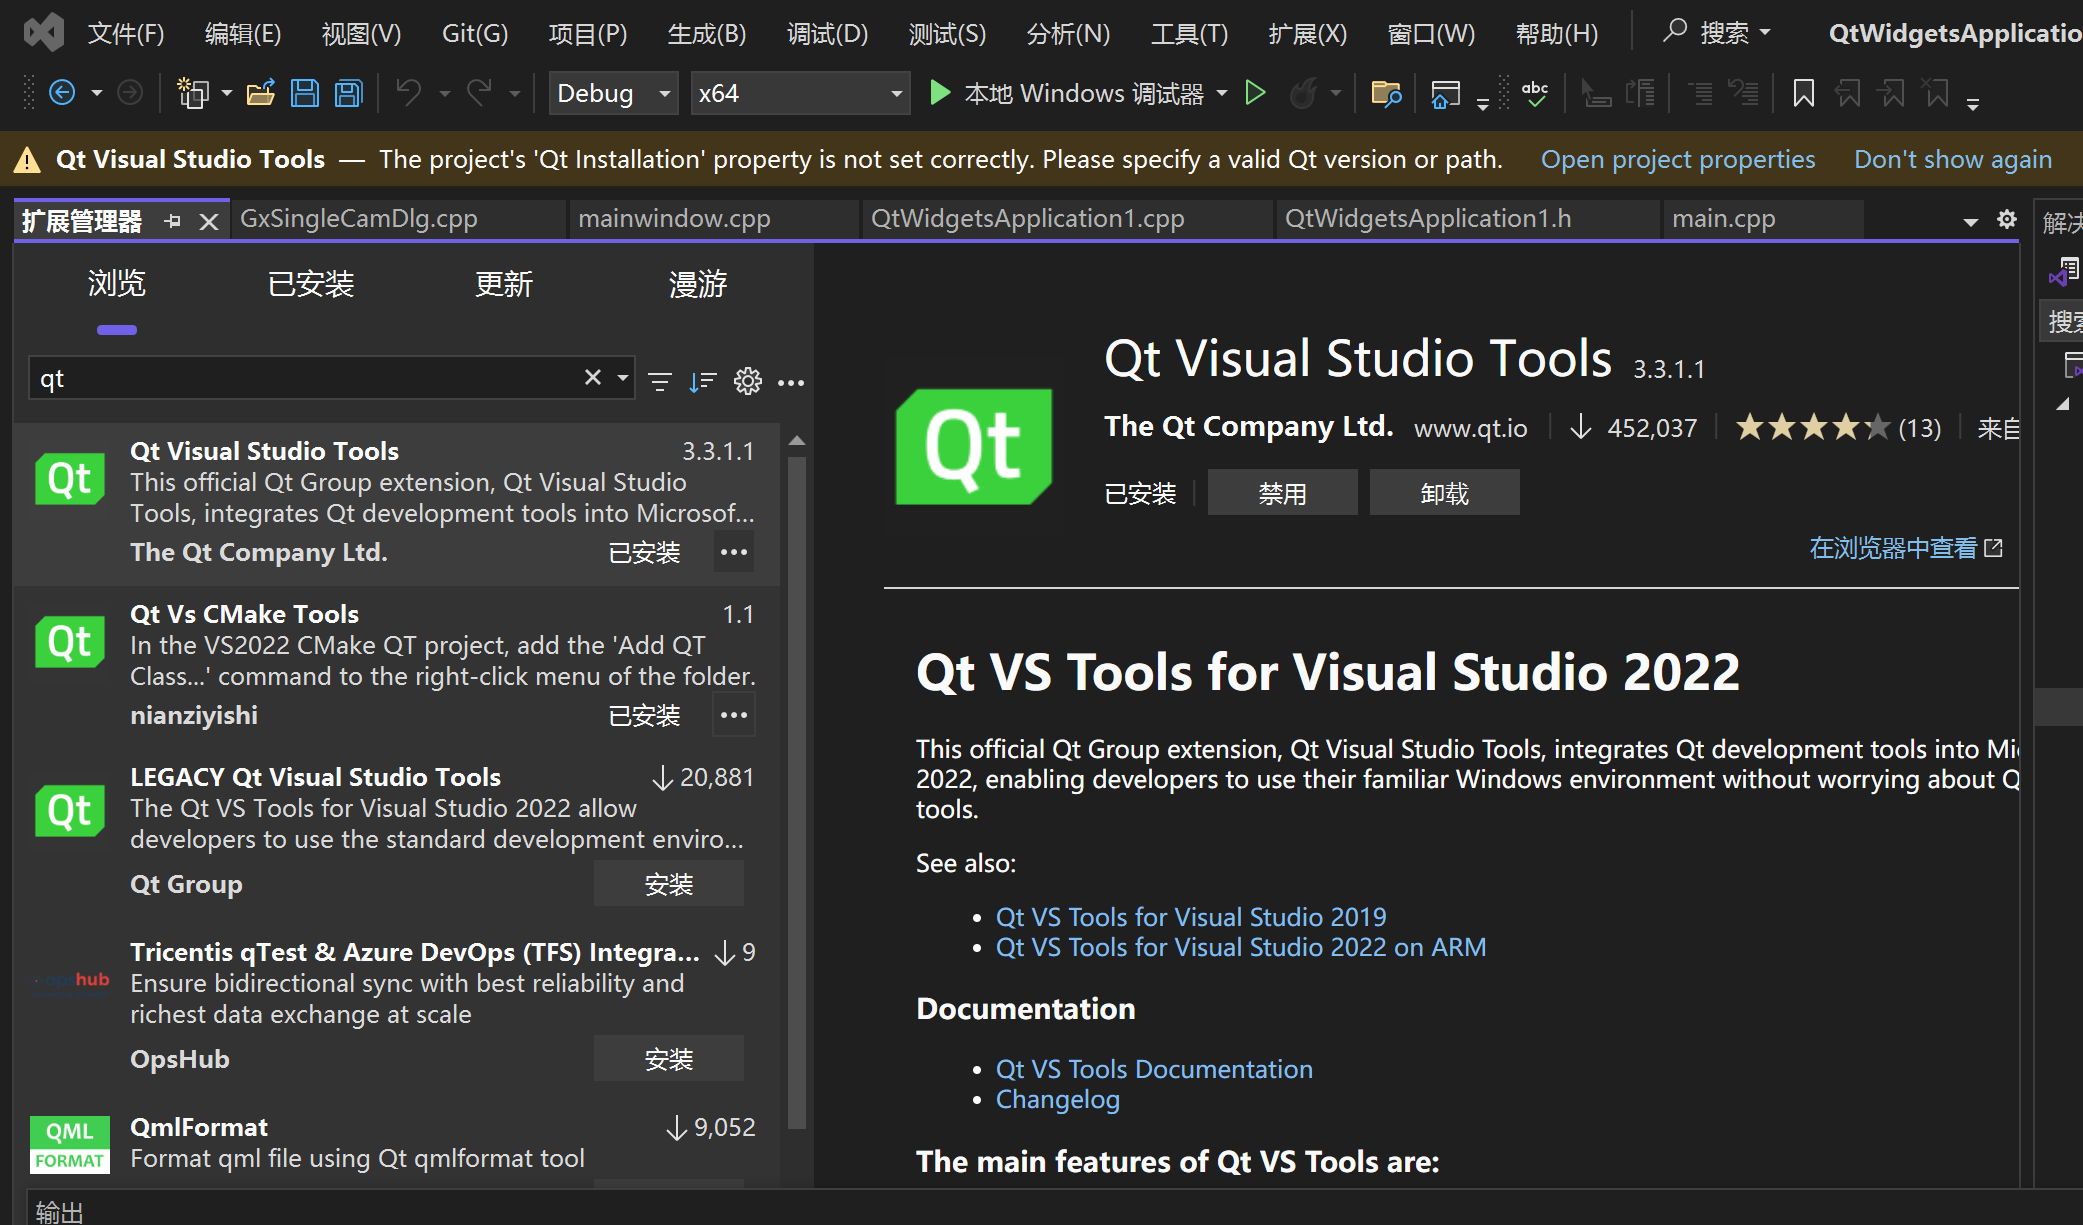 点击安装后关闭VS进行安装。
之后在VS 中进行环境配置扩展->QT VS Tools->QT Versiions
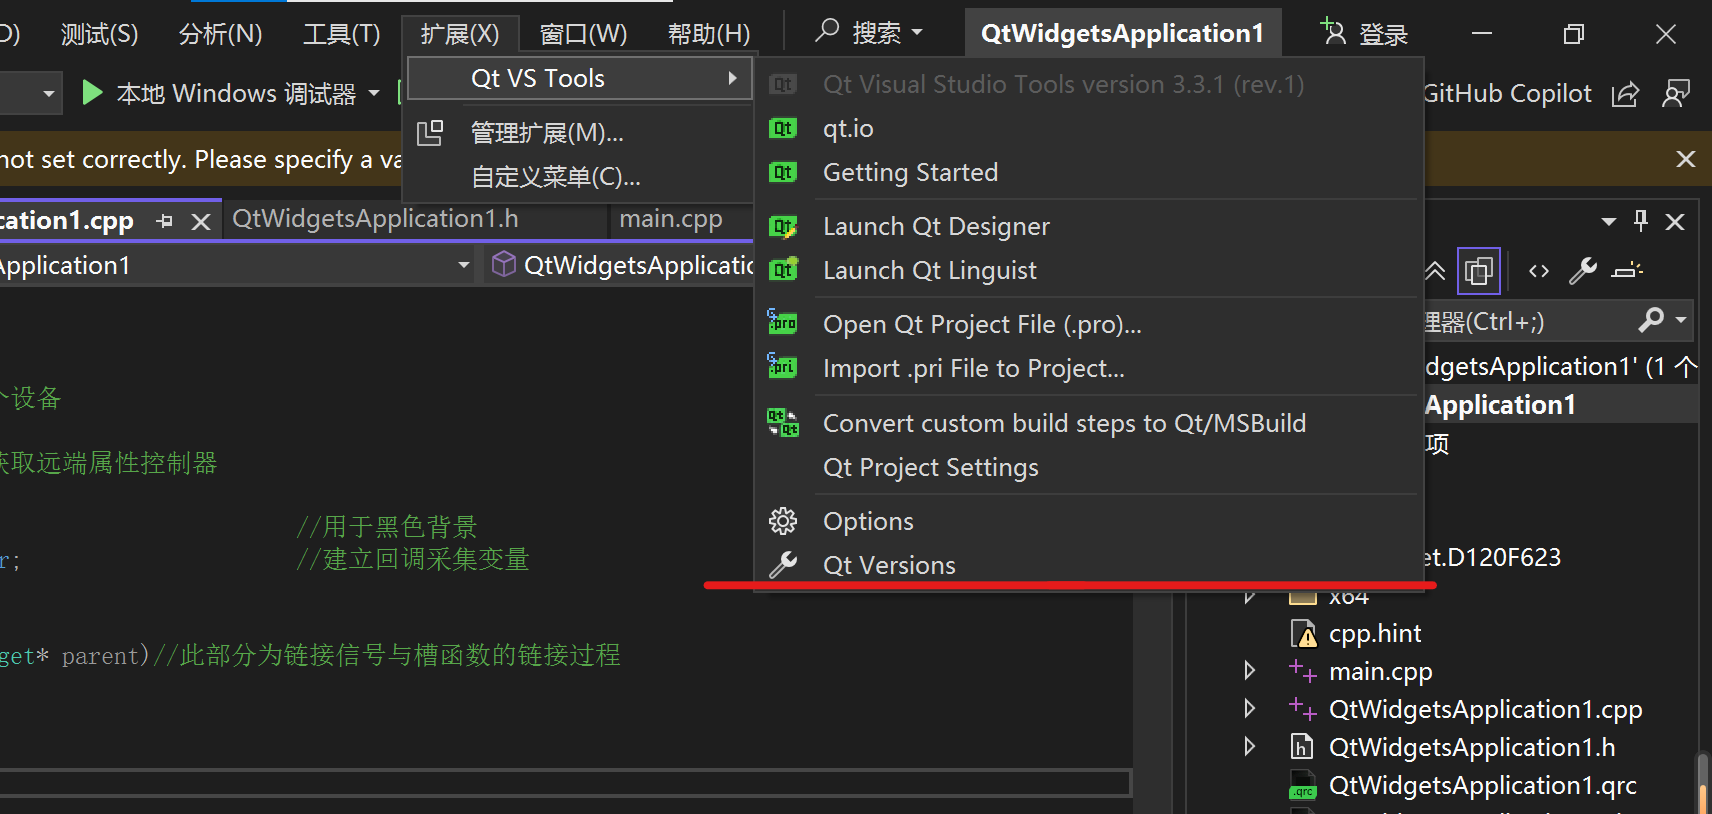
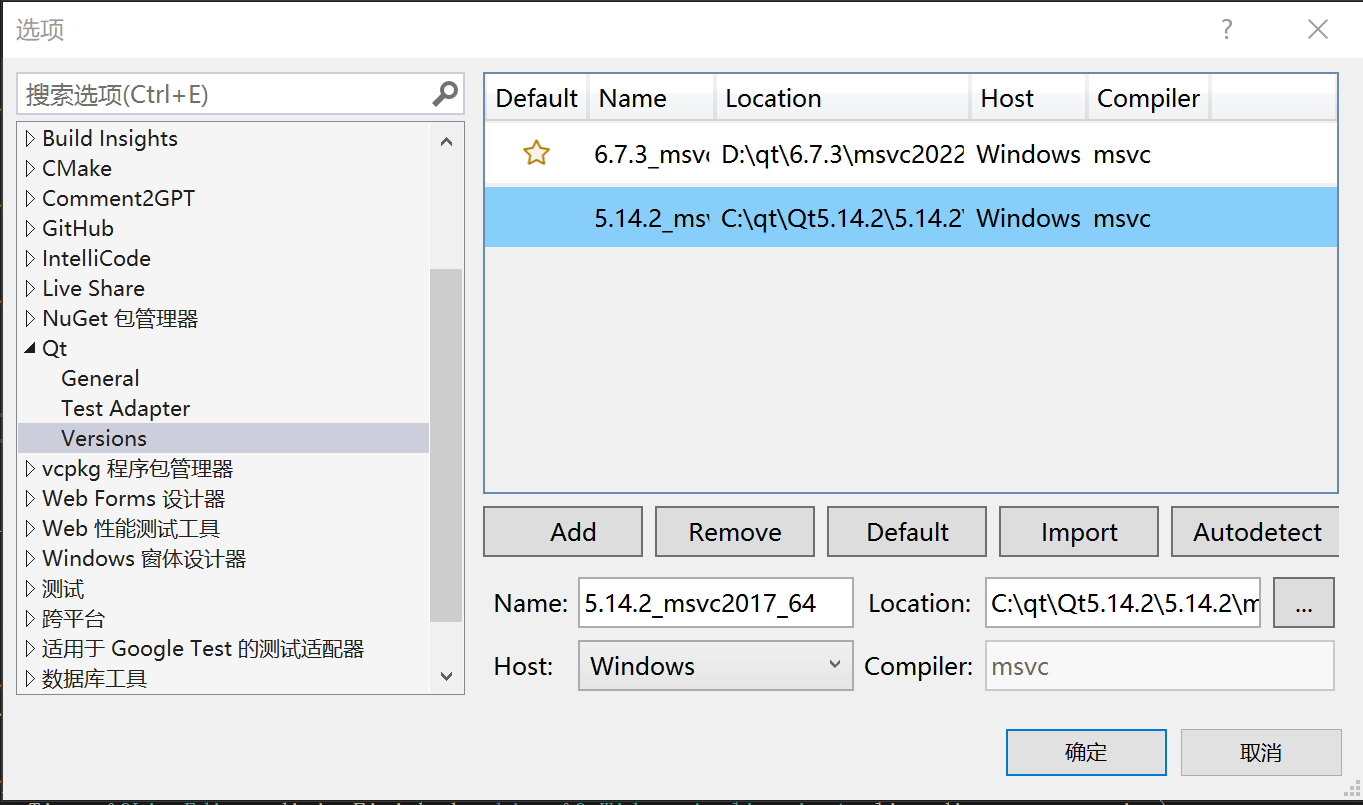
在这里Add添加的地址 是qt目录中cmake.exe的位置,(补充一句,QT6后进行过一次大的修改很多函数都变了,如果有需要QT6之后支持函数的项目可以在这里切换QT版本,本项目QT5.14.2完全没有问题)
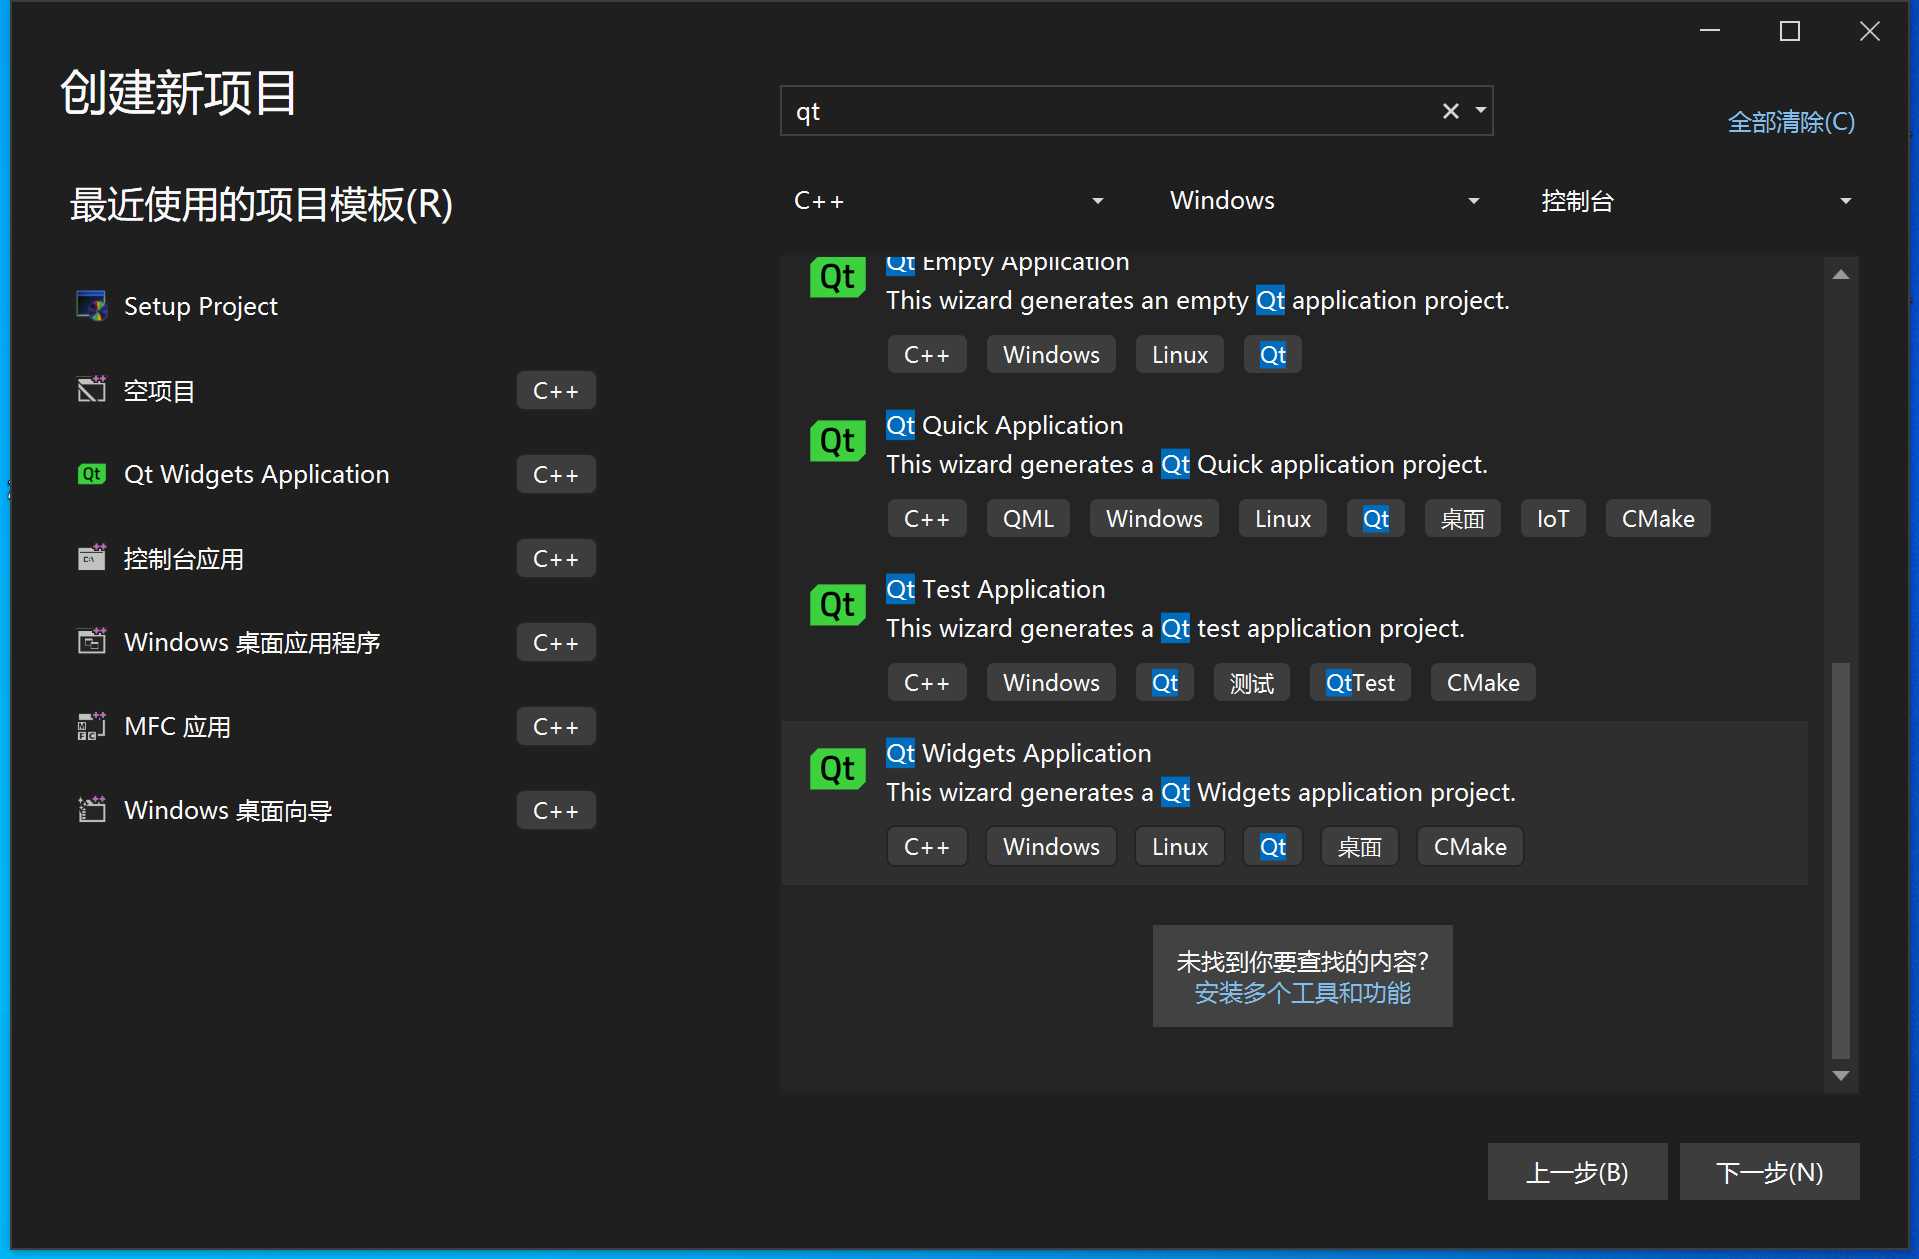
随后在VS中创建一个QT widgets applications项目选择Qmainwindow其余默认即可
这里创建好后如果ui文件无法打开
需要在.ui文件右键打开方式将QT Designer设置成默认值在添加程序中将designer.exe的路径加到程序中,再设为默认值就可正常打开ui界面(这部分很少有人提到,耽误了很久)
下面进入代码编程部分
首先在ui文件中将需要用到的控件拖入到界面中,并修改合适的名称方便后续功能的填写
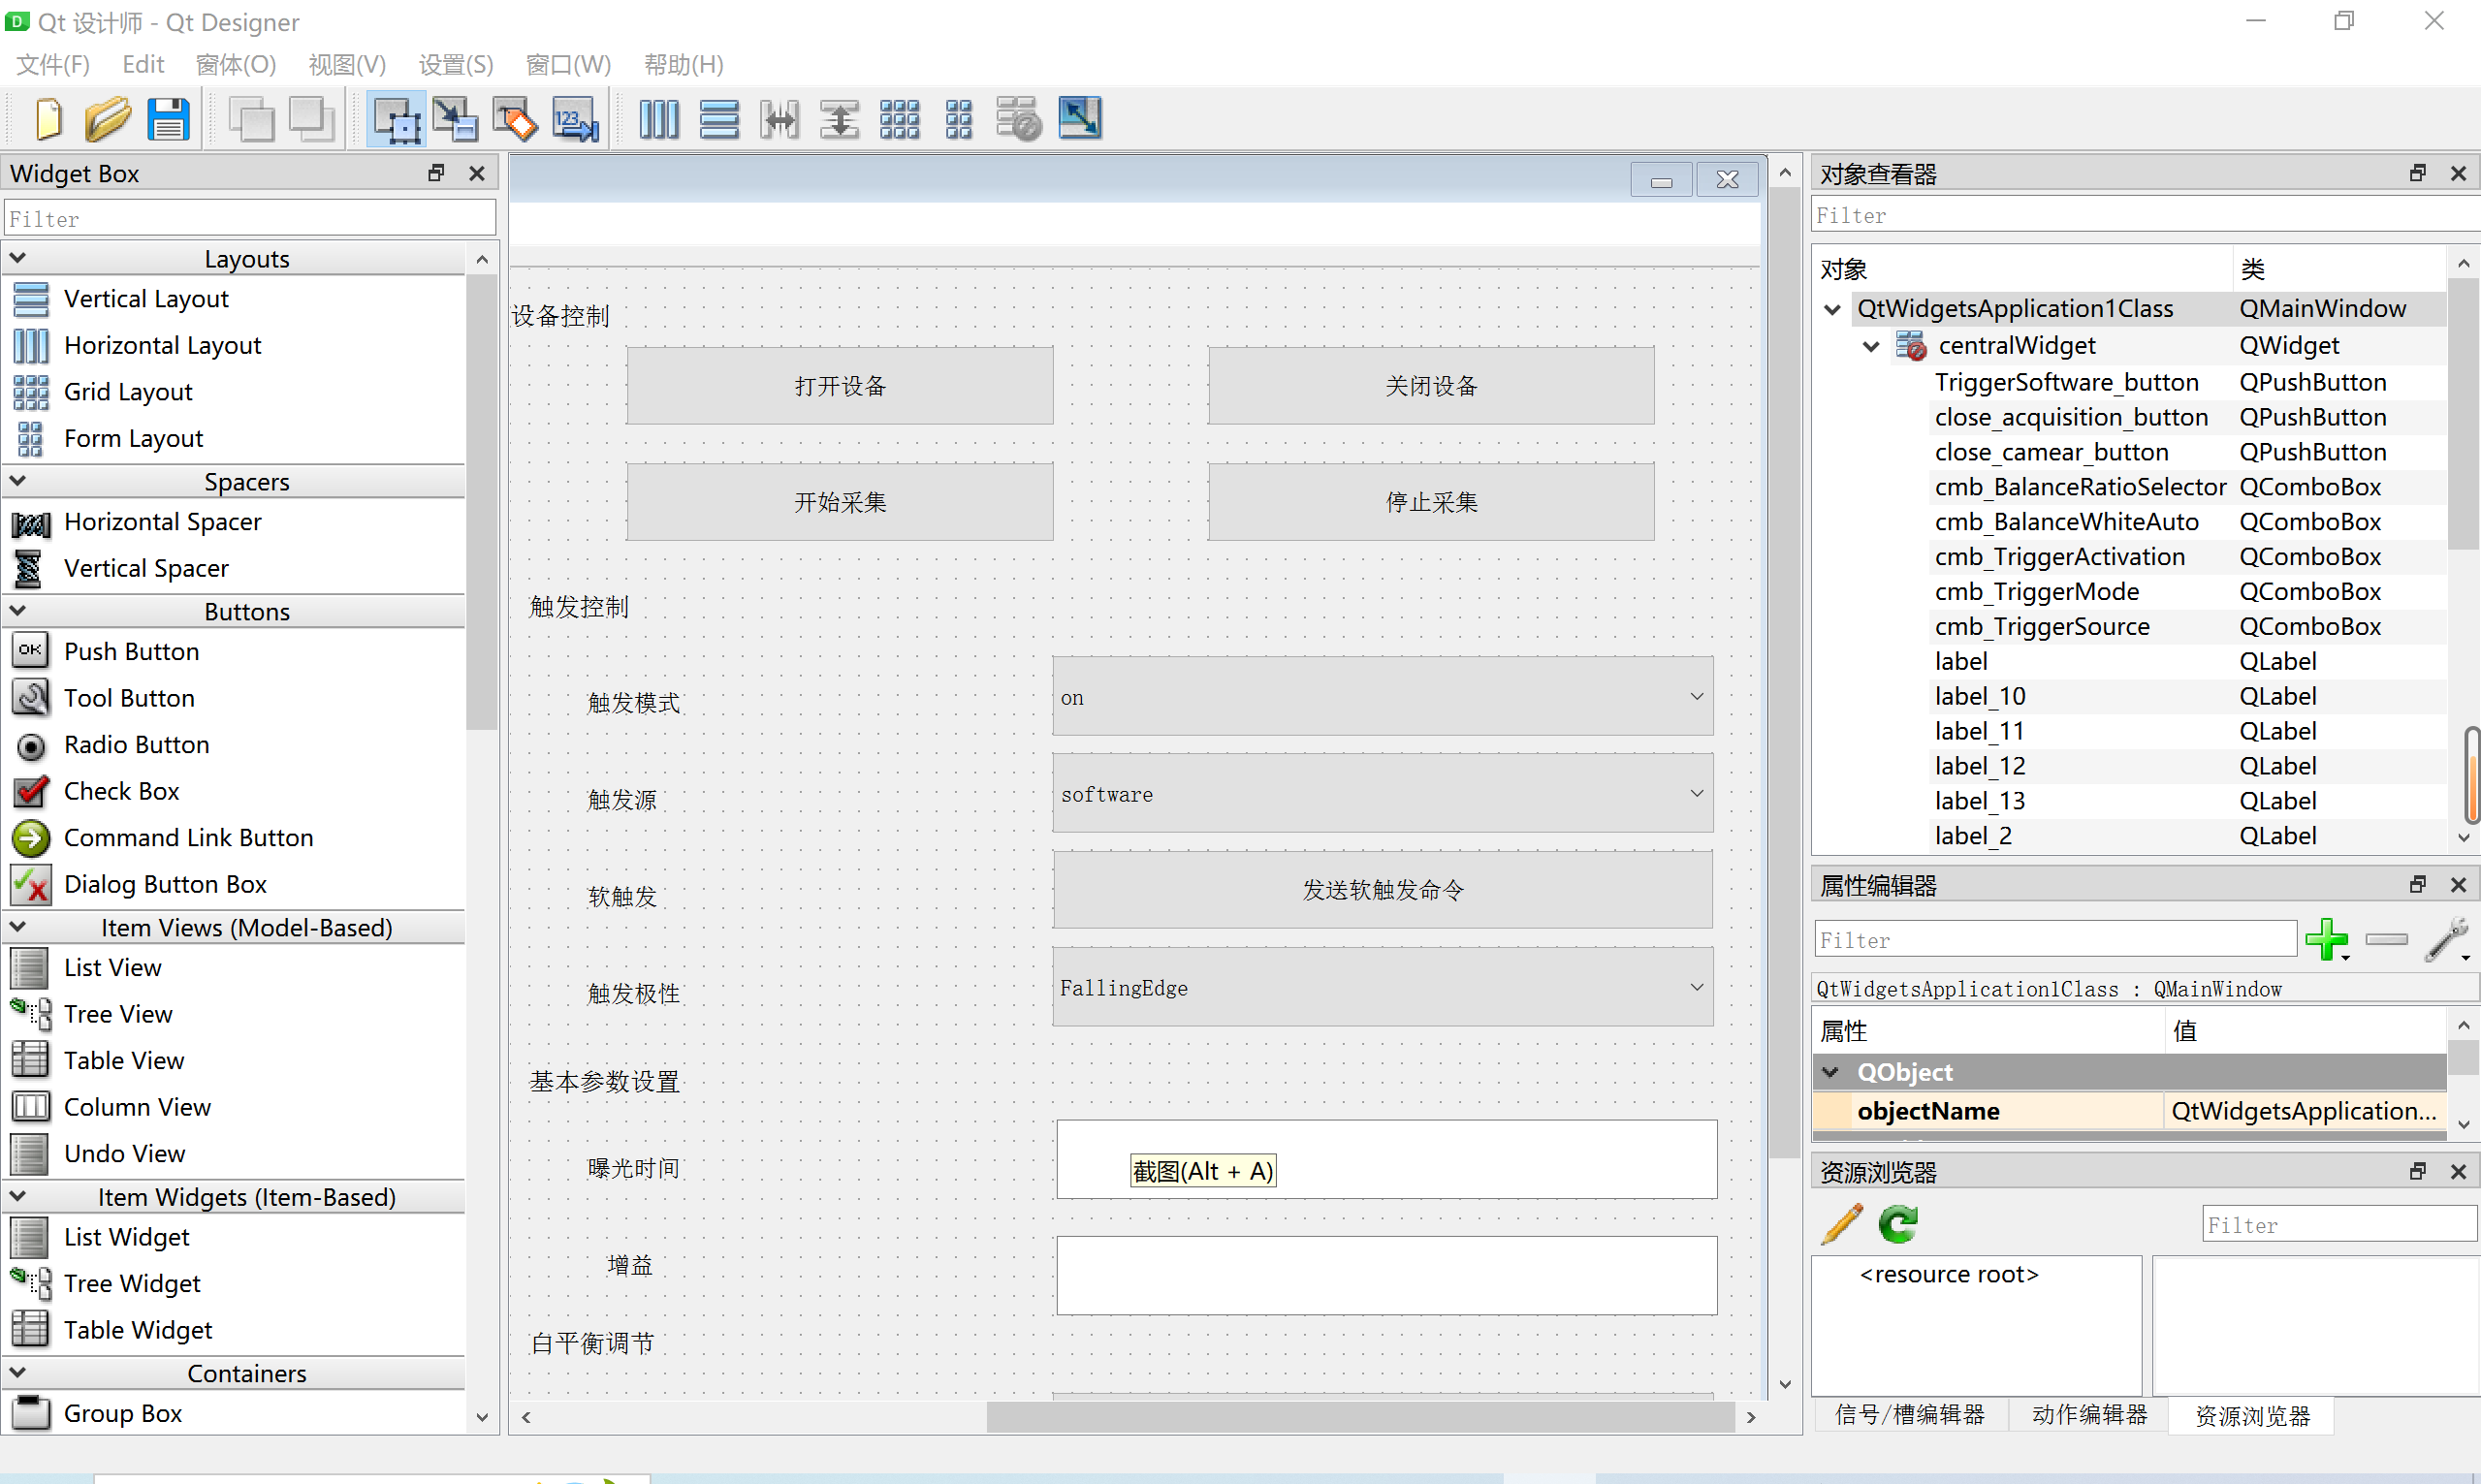
这里界面有点大,无法显示全部,可以根据自己的喜好进行设置
下面是代码部分:
//QWidgetsApplication1.h
#pragma once
#include <QtWidgets/QMainWindow>
#include "ui_QtWidgetsApplication1.h"
#include <qdebug.h>
#include <qlabel.h>
#include <qthread.h>
#include <qqueue.h>
#include <GalaxyIncludes.h>
#include <QObject>

#pragma execution_character_set("utf-8")//用于指定源代码中字符串字面量的执行字符集为 UTF-8 编码   解决非ASCII字符的乱码问题


class QtWidgetsApplication1 : public QMainWindow
{
    Q_OBJECT

public:
    QtWidgetsApplication1(QWidget* parent = Q_NULLPTR);

    Ui::QtWidgetsApplication1Class ui;


    bool m_bisOpen = false;
    bool m_bisSnap = false;

    QQueue <QPixmap> ImageQueue;                                //建立图像缓存队列

    void UpdataUI();

private slots:
    void open_camera();                                         //打开设备
    void close_camera();                                        //关闭设备
    void start_acquisition();                                   //开始采集
    void close_acquisition();                                   //关闭采集
    void set_balance_white_auto(const QString& text);           //自动白平衡设置
    void set_balance_batio_selector(const QString& text);       //白平衡通道选择
    void set_cmb_trigger_mode(const QString& text);             //触发模式
    void set_cmb_trigger_source(const QString& text);           //触发源
    void set_cmb_trigger_activation(const QString& text);       //触发极性
    void trigger_software_button();                             //软触发
    void lineedit_exposure_time();                              //曝光时间
    void lineEdit_Gain();                                       //增益
    void lineEdit_Balance_Ratio();                              //白平衡系数
};


class CSampleCaptureEventHandler : public ICaptureEventHandler//回调采集函数的类
{
public:
     CSampleCaptureEventHandler(QtWidgetsApplication1* mainWindow)
        : pMainWindow(mainWindow)
    {
    }
    void DoOnImageCaptured(CImageDataPointer& objImageDataPointer, void* pUserParam);

private:
    QtWidgetsApplication1* pMainWindow;                 //用于更新画面的一个指针
};
//main.cpp
#include "QtWidgetsApplication1.h"
#include <QtWidgets/QApplication>
int main(int argc, char *argv[])
{
    QApplication a(argc, argv);
    QtWidgetsApplication1 window;
    window.show();
    return a.exec();
}
//QWidgetsApplication1.cpp
#include "QtWidgetsApplication1.h"


CGXDevicePointer objDeviceptr;//打开枚举到的第一个设备
CGXStreamPointer ObjStreamPtr;//打开流通道
CGXFeatureControlPointer ObjFeatureControlPtr;//获取远端属性控制器

QImage blackImage;                                                      //用于黑色背景
ICaptureEventHandler* pCaptureEventHandler=nullptr;                     //建立回调采集变量


QtWidgetsApplication1::QtWidgetsApplication1(QWidget* parent)//此部分为链接信号与槽函数的链接过程
    : QMainWindow(parent)
{
    ui.setupUi(this);


    connect(ui.open_camear_button, &QPushButton::clicked, this, &QtWidgetsApplication1::open_camera);
    connect(ui.close_camear_button, &QPushButton::clicked, this, &QtWidgetsApplication1::close_camera);
    connect(ui.start_acquisition_button, &QPushButton::clicked, this, &QtWidgetsApplication1::start_acquisition);
    connect(ui.close_acquisition_button, &QPushButton::clicked, this, &QtWidgetsApplication1::close_acquisition);
    connect(ui.cmb_BalanceWhiteAuto, &QComboBox::currentTextChanged, this, &QtWidgetsApplication1::set_balance_white_auto);
    connect(ui.cmb_BalanceRatioSelector, &QComboBox::currentTextChanged, this, &QtWidgetsApplication1::set_balance_batio_selector);
    connect(ui.cmb_TriggerMode, &QComboBox::currentTextChanged, this, &QtWidgetsApplication1::set_cmb_trigger_mode);
    connect(ui.cmb_TriggerSource, &QComboBox::currentTextChanged, this, &QtWidgetsApplication1::set_cmb_trigger_source);
    connect(ui.cmb_TriggerActivation, &QComboBox::currentTextChanged, this, &QtWidgetsApplication1::set_cmb_trigger_activation);
    connect(ui.TriggerSoftware_button, &QPushButton::clicked, this, &QtWidgetsApplication1::trigger_software_button);
    connect(ui.lineEdit_ExposureTime, &QLineEdit::editingFinished, this, &QtWidgetsApplication1::lineedit_exposure_time);
    connect(ui.lineEdit_Gain, &QLineEdit::editingFinished, this, &QtWidgetsApplication1::lineEdit_Gain);
    connect(ui.lineEdit_BalanceRatio, &QLineEdit::editingFinished, this, &QtWidgetsApplication1::lineEdit_Balance_Ratio);

    QImage blackImage(ui.label_picture->size(), QImage::Format_RGB888);//24位RGB格式
    blackImage.fill(Qt::black);
    ui.label_picture->setPixmap(QPixmap::fromImage(blackImage));

    UpdataUI();
}

void QtWidgetsApplication1::open_camera()//打开相机设备
{
    IGXFactory::GetInstance().Init();
    GxIAPICPP::gxdeviceinfo_vector vectorDeviceInfo;//声明设备列表vectorDeviceInfo
    IGXFactory::GetInstance().UpdateDeviceList(1000, vectorDeviceInfo);

    if (vectorDeviceInfo.size() <= 0)
    {
        qDebug() << "无可用设备!";
        m_bisOpen = false;//相机未成功打开
    }
    else
    {
        qDebug() << vectorDeviceInfo[0].GetModelName() << endl;
        GxIAPICPP::gxstring strSN = vectorDeviceInfo[0].GetSN();
        objDeviceptr = IGXFactory::GetInstance().OpenDeviceBySN(strSN, GX_ACCESS_EXCLUSIVE);        //通过SN码连接设备
        m_bisOpen = true;
    }
    UpdataUI();
}

void QtWidgetsApplication1::close_camera()//关闭相机
{
    try
    {

        if (m_bisSnap)
        {

            ObjFeatureControlPtr->GetCommandFeature("AcquisitionStop")->Execute();   //发送停止采集命令
            ObjStreamPtr->StopGrab();//关闭数据流通道
            ObjStreamPtr->UnregisterCaptureCallback();//注销数据流

            delete pCaptureEventHandler;//删除程序对象,释放内存
            pCaptureEventHandler = nullptr;//将指针滞空,防止野指针
            ObjStreamPtr->Close();//关闭数据流对象

            objDeviceptr->Close();//关闭设备
            IGXFactory::GetInstance().Uninit(); //与初始化相对应
        }
    }
    catch (...)//捕获所有异常
    {

    }
    qDebug() << "成功关闭设备";
    m_bisOpen = false;
    m_bisSnap = false;
    IGXFactory::GetInstance().Uninit();

    QImage blackImage(ui.label_picture->size(), QImage::Format_RGB888);
    blackImage.fill(Qt::black);//将图像填充为黑色
    ui.label_picture->setPixmap(QPixmap::fromImage(blackImage));// 在labal_picture上显示黑色画面,清空原有图像

    UpdataUI();
}

void QtWidgetsApplication1::start_acquisition()//开始采集
{
    if (m_bisOpen && !m_bisSnap)
    {

        ObjStreamPtr = objDeviceptr->OpenStream(0);//打开设备的第一次数据流通道

        ICaptureEventHandler* pCaptureEventHandler = new CSampleCaptureEventHandler(this);//创建捕获事件处理器
        ObjStreamPtr->RegisterCaptureCallback(pCaptureEventHandler, NULL);                      //注册回调采集函数

        ObjStreamPtr->StartGrab();                                                      //开启采集

        ObjFeatureControlPtr = objDeviceptr->GetRemoteFeatureControl();//获取设备远端控制接口
        //此部分为在代码中修改参数时的实现代码
        // ObjFeatureControlPtr->GetEnumFeature("ExposureAuto")->SetValue("OFF");                //设置曝光模式
        // ObjFeatureControlPtr->GetEnumFeature("TriggerSelector")->SetValue("FrameStart");//触发选择器 触发控制前必须设置
        // ObjFeatureControlPtr->GetEnumFeature("TriggerMode")->SetValue("OFF");//触发模式
        // ObjFeatureControlPtr->GetEnumFeature("TriggerSource")->SetValue("Software");//触发源
        // ObjFeatureControlPtr->GetCommandFeature("TriggerSoftware")->Execute();//软触发
        // ObjFeatureControlPtr->GetEnumFeature("TriggerActivation")->SetValue("RisingEdge");//触发极性

        //ObjFeatureControlPtr->GetFloatFeature("ExposureTime")->SetValue(100000);    //设置曝光时间
        //ObjFeatureControlPtr->GetFloatFeature("Gain")->SetValue(5);//增益

        // ObjFeatureControlPtr->GetEnumFeature("BalanceWhiteAuto")->SetValue("OFF");//自动白平衡
        // ObjFeatureControlPtr->GetEnumFeature("BalanceRatioSelector")->SetValue("RED");//自动白平衡通道选择
        //ObjFeatureControlPtr->GetFloatFeature("BalanceRatio")->SetValue(1);//白平衡系数


        ObjFeatureControlPtr->GetCommandFeature("AcquisitionStart")->Execute();

        m_bisSnap = true;
        qDebug() << "开始采集";
        UpdataUI();
    }
}

void QtWidgetsApplication1::close_acquisition()
{
    if (m_bisSnap)
    {

        // 等待子线程完成
        ObjFeatureControlPtr->GetCommandFeature("AcquisitionStop")->Execute();
        ObjStreamPtr->StopGrab();//停止从数据流中抓取帧
        ObjStreamPtr->UnregisterCaptureCallback();//移除之前注册的回调函数

        delete pCaptureEventHandler;
        pCaptureEventHandler = nullptr;//释放回调函数所占空间
        ObjStreamPtr->Close();//关闭数据流通道                                                              //关闭通道
        m_bisSnap = false;
        UpdataUI();
    }
}

void QtWidgetsApplication1::UpdataUI()                                                      //更新
{
    ui.open_camear_button->setEnabled(!m_bisOpen);//打开设备按钮仅在设备未打开时可用
    ui.close_camear_button->setEnabled(m_bisOpen);//关闭设备按钮仅在设备已经打开时可用
    ui.start_acquisition_button->setEnabled(m_bisOpen && !m_bisSnap);//开始采集仅在设备已经打开且未开始采集时可用
    ui.close_acquisition_button->setEnabled(m_bisOpen && m_bisSnap);  //停止采集仅在设备已打开且已经开始采集时使用
    //更新按钮UI

    if (!ImageQueue.empty())//判断图像队列是否为空
    {
        QPixmap newImage = ImageQueue.dequeue();//从队列中输出一张图片
        QMetaObject::invokeMethod(this, [this, newImage]() //确保UI正在主线程执行
            {
            ui.label_picture->setScaledContents(true);//设置图像自动缩放以适应labal_picture的大小
            ui.label_picture->setPixmap(newImage);//在labal上显示图像
         });
    }                                                                           //读取队列里的图片并显示
}
void CSampleCaptureEventHandler::DoOnImageCaptured(CImageDataPointer& objImageDataPointer, void* pUserParam)//回调函数,当照片被读取时调用
{
        if (objImageDataPointer->GetStatus() == GX_FRAME_STATUS_SUCCESS)//判断图像状态是否成功
        {
            qint64 m_width = objImageDataPointer->GetWidth();//使用qint64类型来存储图像的宽度
            qint64 m_height = objImageDataPointer->GetHeight();//存储高度
            uchar* pbit = (uchar*)objImageDataPointer->GetBuffer();//获取原始图像数据的字节缓冲区指针

            QImage newImage(pbit, m_width, m_height, QImage::Format_Indexed8);//创建QImage对象(假设为8位灰度格式)
            newImage = newImage.scaled(m_width, m_height, Qt::KeepAspectRatio, Qt::SmoothTransformation);//缩放图像尺寸

            double d = ObjFeatureControlPtr->GetFloatFeature("CurrentAcquisitionFrameRate")->GetValue();
            qDebug() << "当前帧率:" << d;//获得当前采集帧率

            pMainWindow->ImageQueue.enqueue(QPixmap::fromImage(newImage));//将图像转换为QPixmap格式并加入队列
            pMainWindow->UpdataUI();//刷新图像
        }
}
void QtWidgetsApplication1::set_balance_white_auto(const QString& text)
{
    std::string stdStr = text.toStdString();//相机中SDK自动白平衡识别字符型输入,将输入文本转换为字符型
   qDebug() << "自动白平衡设置为:" << text;
    ObjFeatureControlPtr->GetEnumFeature("BalanceWhiteAuto")->SetValue(GxIAPICPP::gxstring(stdStr.c_str()));//getvalue之前参考相机SDK,getvalue内内容为GxIAPICPP识别了转换为C语言类型的字符型常量
}

void QtWidgetsApplication1::set_balance_batio_selector(const QString& text)
{
    std::string stdStr = text.toStdString();
    qDebug() << "白平衡通道选择为:" << text;
    ObjFeatureControlPtr->GetEnumFeature("BalanceRatioSelector")->SetValue(GxIAPICPP::gxstring(stdStr.c_str()));
}
void QtWidgetsApplication1::set_cmb_trigger_mode(const QString& text)
{
    std::string stdStr = text.toStdString();
    qDebug() << "触发模式选择为:" << text;
    ObjFeatureControlPtr->GetEnumFeature("TriggerMode")->SetValue(GxIAPICPP::gxstring(stdStr.c_str()));
}
void QtWidgetsApplication1::set_cmb_trigger_source(const QString& text)
{
    std::string stdStr = text.toStdString();
    qDebug() << "触发源选择为:" << text;
    ObjFeatureControlPtr->GetEnumFeature("TriggerSource")->SetValue(GxIAPICPP::gxstring(stdStr.c_str()));
}
void QtWidgetsApplication1::set_cmb_trigger_activation(const QString& text)
{
    std::string stdStr = text.toStdString();
    qDebug() << "触发极性选择为:" << text;
    ObjFeatureControlPtr->GetEnumFeature("TriggerActivation")->SetValue(GxIAPICPP::gxstring(stdStr.c_str()));
}

void QtWidgetsApplication1::trigger_software_button()
{
    ObjFeatureControlPtr->GetCommandFeature("TriggerSoftware")->Execute();//pushbutton形可直接用SDK历程设置
}

void QtWidgetsApplication1::lineedit_exposure_time()
{
    QString text = ui.lineEdit_ExposureTime->text();//editingFinished信号本身是不带参数的。当信号触发时,槽函数不会接收到任何参数。会导致编译错误,因为槽函数的格式与信号不匹配。。
    //槽函数中想要获取QLineEdit的文本内容,正确的做法应该是在槽函数中主动调用lineEdit的text()方法,在槽函数内部使用ui.lineEdit_ExposureTime->text()来获取输入的值。
    ObjFeatureControlPtr->GetFloatFeature("ExposureTime")->SetValue(text.toDouble());//text。toDouble是将接收到的文本转换为双精度浮点型
    double d = ObjFeatureControlPtr->GetFloatFeature("ExposureTime")->GetValue();
    qDebug() << "曝光时间为:" << text;
}

void QtWidgetsApplication1::lineEdit_Gain()
{
    QString text = ui.lineEdit_Gain->text();
    ObjFeatureControlPtr->GetFloatFeature("Gain")->SetValue(text.toDouble());
    double d = ObjFeatureControlPtr->GetFloatFeature("Gain")->GetValue();
    qDebug() << "增益为:" << text;
}

void QtWidgetsApplication1::lineEdit_Balance_Ratio()
{
    QString text = ui.lineEdit_BalanceRatio->text();
    ObjFeatureControlPtr->GetFloatFeature("BalanceRatio")->SetValue(text.toDouble());
    double d = ObjFeatureControlPtr->GetFloatFeature("BalanceRatio")->GetValue();
    qDebug() << "白平衡系数为:" << text;
}
其中注释掉的部分有许多错误尝试,不必细看
最终实现如图所示效果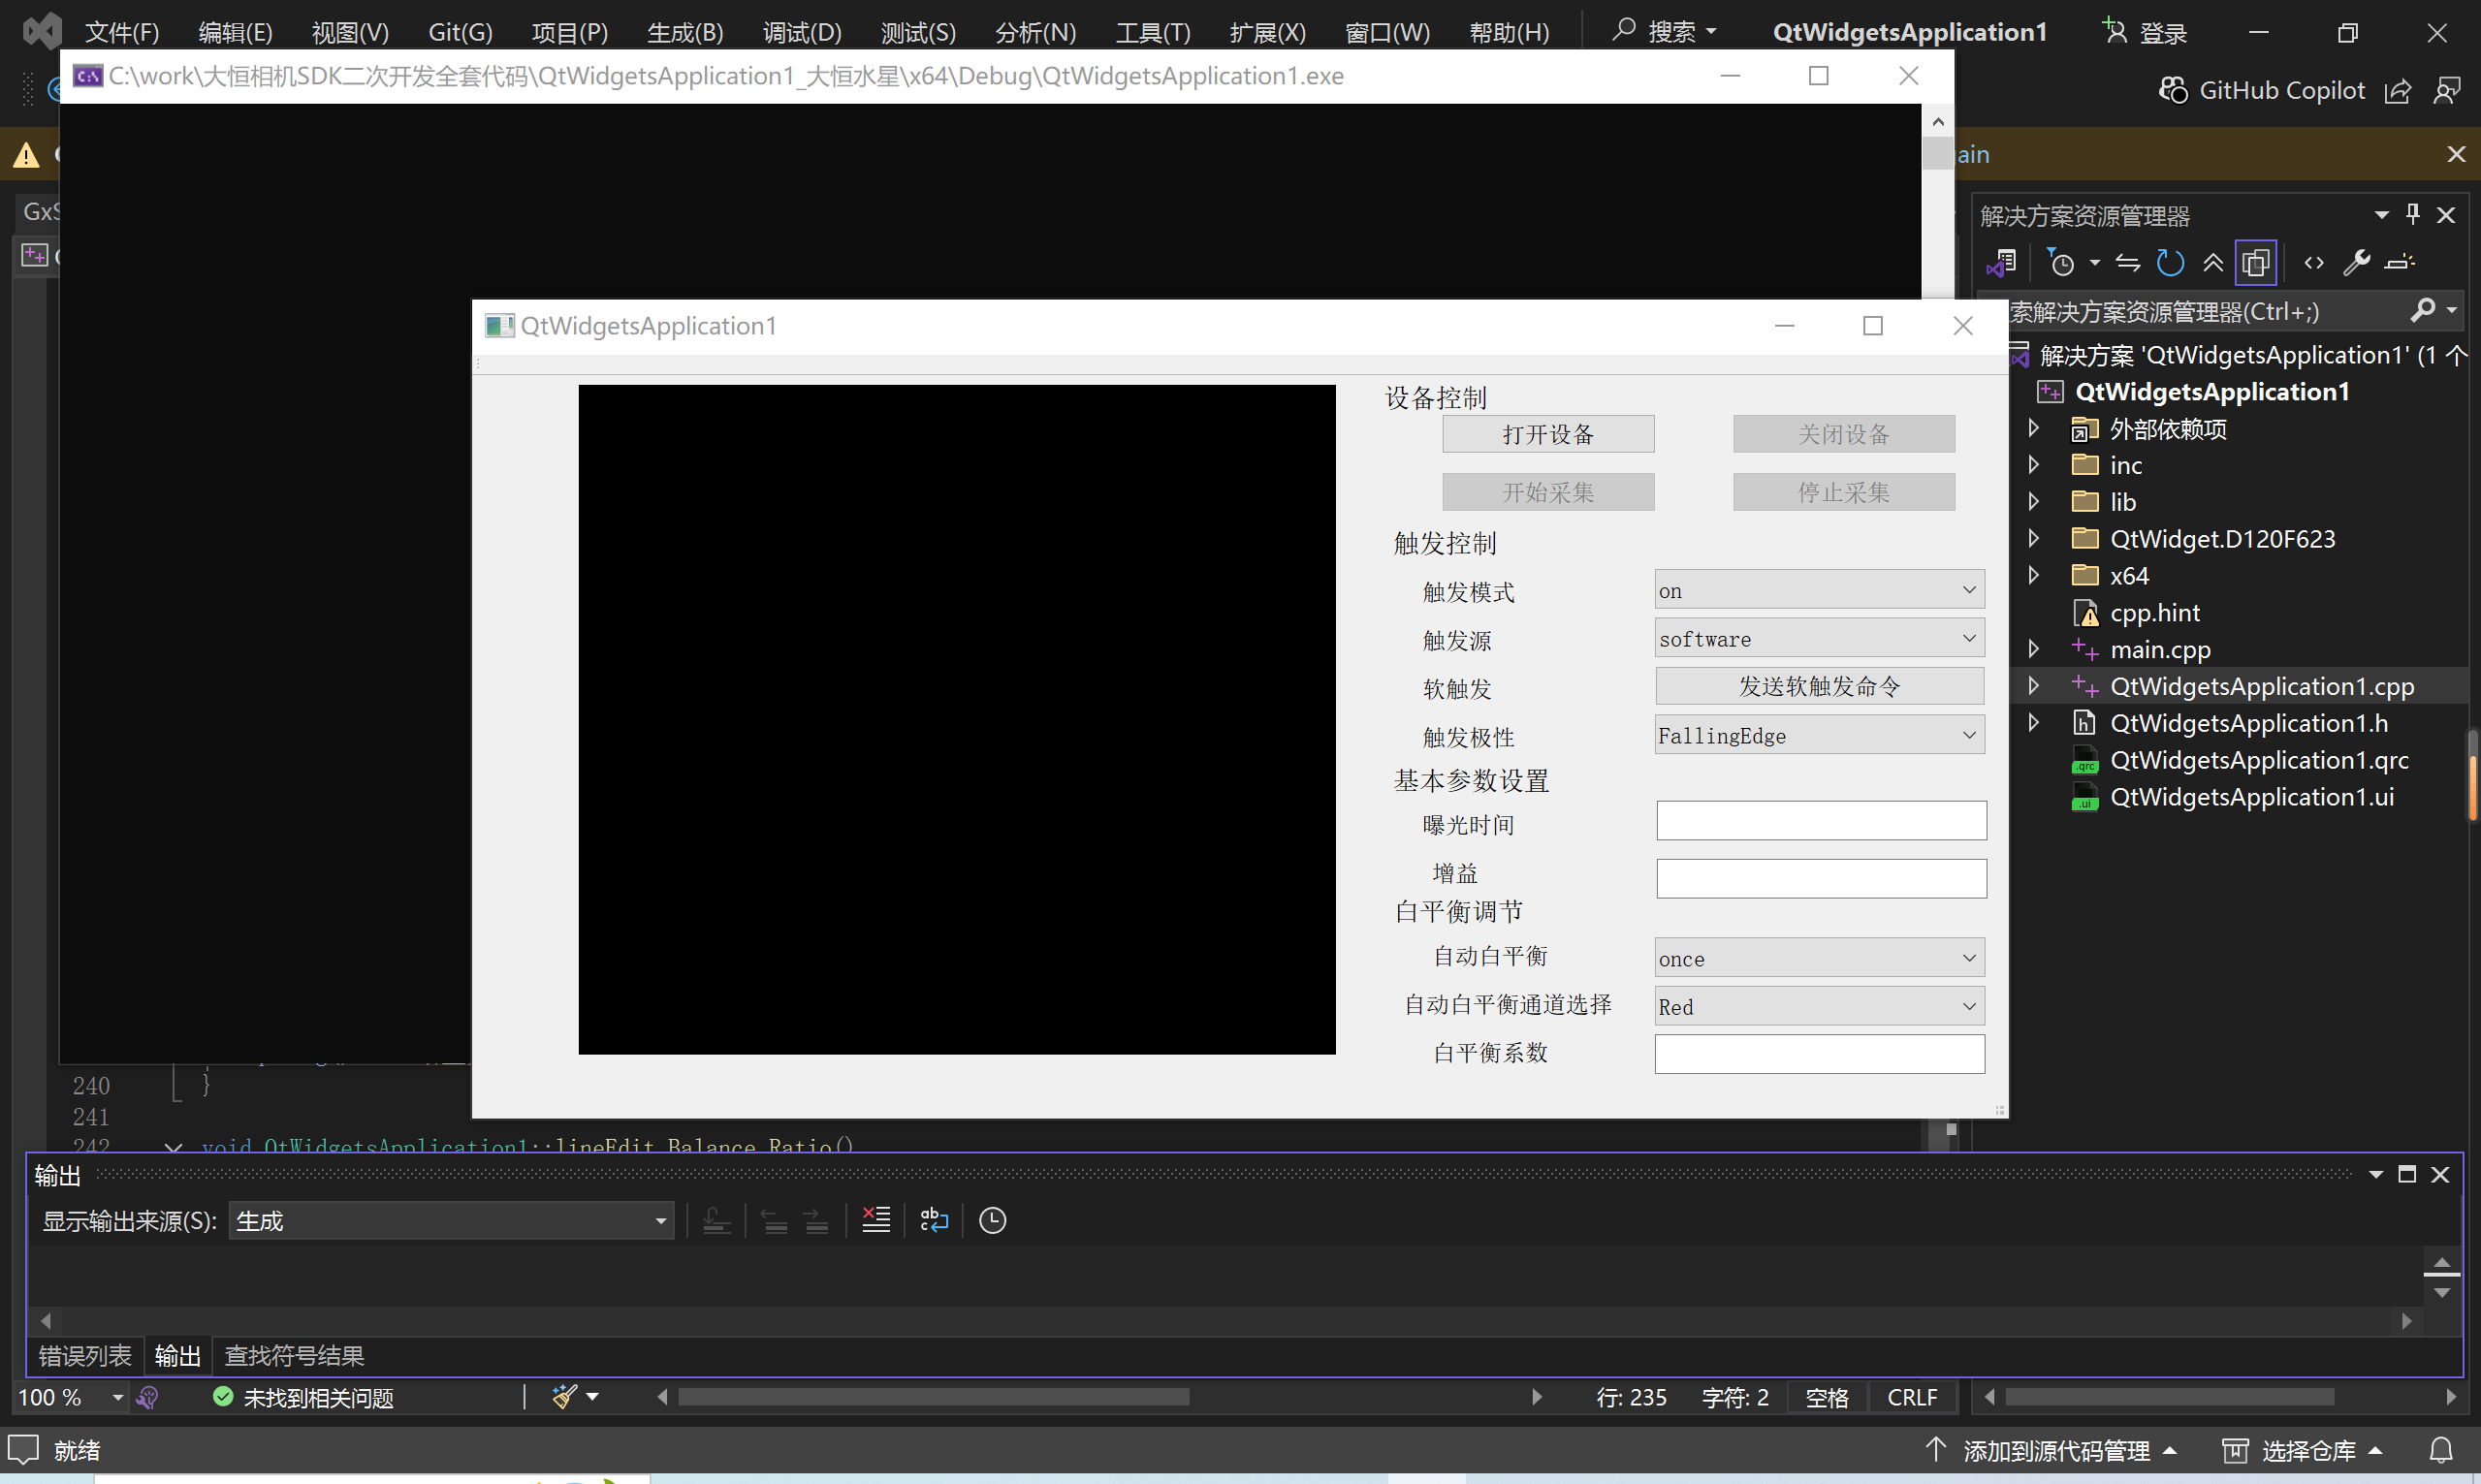
此内容为本人第一次项目经验分享有许多不足之处 欢迎批评指正与理性讨论。
该程序可以实现大恒USB3.0相机的实时采集以及基本参数的调节;但也有许多未解决的问题例如:在修改曝光时间‘增益等参数后界面会非常卡顿,目前也没找到很好的解决办法,欢迎大佬指导。
本项目大量参考了下面这篇文章并在此基础上进行修改,如inc和lib配置过程可参考该文章,万分感谢原作者 ,如有侵权请联系我删除。
大恒水星相机SDK(实时采集)基于QT与C++_大恒相机库-CSDN博客


 1248
1248

 被折叠的 条评论
为什么被折叠?
被折叠的 条评论
为什么被折叠?
 到【灌水乐园】发言


