


既有适合小白学习的零基础资料,也有适合3年以上经验的小伙伴深入学习提升的进阶课程,涵盖了95%以上大数据知识点,真正体系化!
由于文件比较多,这里只是将部分目录截图出来,全套包含大厂面经、学习笔记、源码讲义、实战项目、大纲路线、讲解视频,并且后续会持续更新
    point_img = image.copy()
    point_img = cv2.cvtColor(point_img, cv2.COLOR_GRAY2RGB)
    for point in vertices[0]:
        cv2.circle(point_img, (point[0],point[1]), 10, (0,0,255), 4)
    self.cv_show('point\_img',point_img)
    return self.filter_region(image, vertices)
这里这几个点是根据自己的项目而言的,我们目的就是用这六个点把整个停车场框起来,然后对框出来的图像进行一个提取。也称之为一个ROI区域。结果是这样。
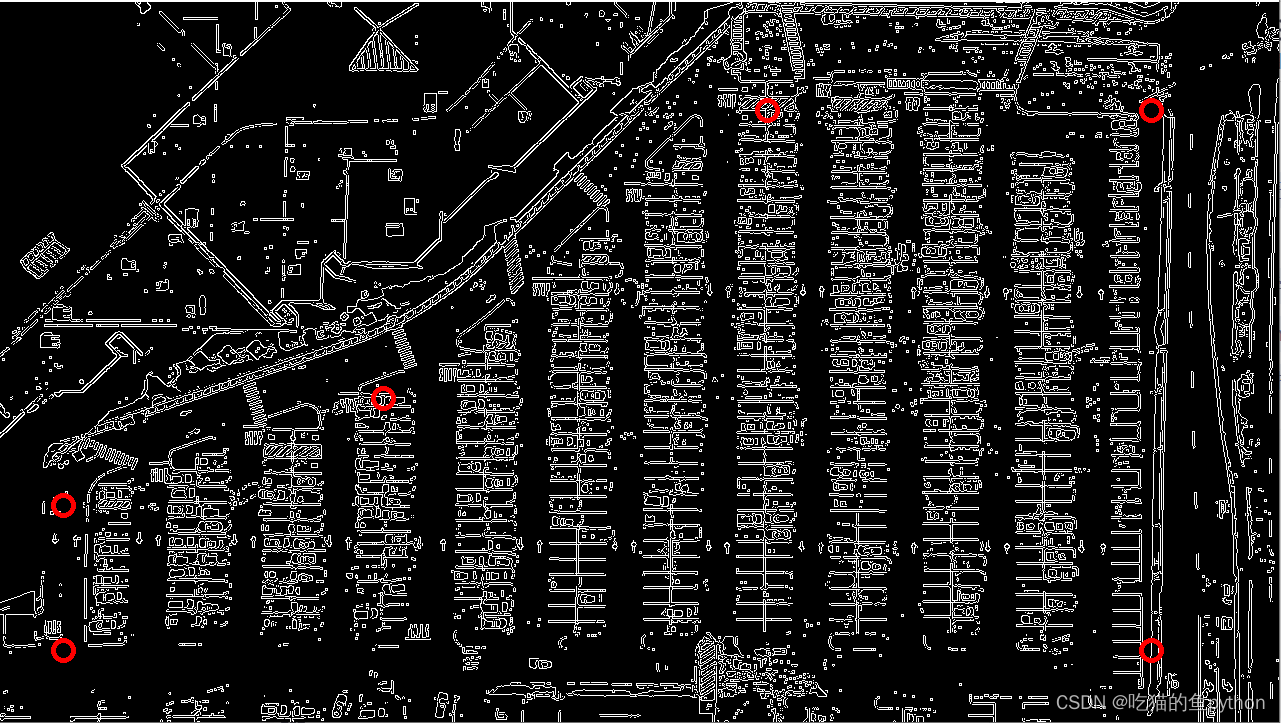
这里的坐标我们自己进行定位操作,然后我们制造一个掩码图像,就是把标记的这六个点规划成一个区域ROI region,然后把区域内设置成白色像素值,把区域外设置成全黑像素值。然后做一个相当于图像和掩码的与操作。得到的结果就是:
最后得到的ROI区域就是:
这里我们就得到了一个停车场的大致轮廓,然后我们开始对停车场车位进行具体操作,首先我们先要检测一个停车场直线的操作,使用霍夫直线检测来做这个项目。
def hough\_lines(self,image):
    return cv2.HoughLinesP(image, rho=0.1, theta=np.pi/10, threshold=15, minLineLength=9, maxLineGap=4)
这里霍夫直线检测是定义好的一个模型,我们直接调用就可以。这里的参数我们介绍一下。


>
> **image:表示要处理的图像。**
>  **rho:表示处理的精度。精度越小检测的直线越精确,精度值设置的数值越大,那么检测的线段就越少。**
>  **theta:检测的直线角度,表示直线的角度不能超过哪个数值。如果超过这个阈值,就不定义为一条直线。**
>  **threshold:线的点定义阈值为15,这个要根据实施项目而定,构成线的像素点超过15才可以构成一条直线。**
>  **minLineLength:最小长度,这个不用过多解释,线的长度最小就是9.**
>  **maxLineGap:线和线之间最大的间隔阈值,离得多近的都认为是一条直线。**
>
>
>


输入的图像需要是边缘检测后的结果,minLineLengh(线的最短长度,比这个短的都被忽略)和MaxLineCap(两条直线之间的最大间隔,小于此值,认为是一条直线)。rho距离精度,theta角度精度,threshod超过设定阈值才被检测出线段。
def draw\_lines(self,image, lines, color=[255, 0, 0], thickness=2, make_copy=True):
    # 过滤霍夫变换检测到直线
    if make_copy:
        image = np.copy(image)
    cleaned = []
    for line in lines:
        for x1,y1,x2,y2 in line:
            if abs(y2-y1) <=1 and abs(x2-x1) >=25 and abs(x2-x1) <= 55:
                cleaned.append((x1,y1,x2,y2))
                cv2.line(image, (x1, y1), (x2, y2), color, thickness)
    print(" No lines detected: ", len(cleaned))
    return image
这里面对检测到的霍夫直线继续做一个过滤的操作,如果直线的长度大于25,小于55,我们就添加到列表当中,并且设定一条直线的左右端点坐标的差值不能超过1.这样的直线我们通通过滤出来。
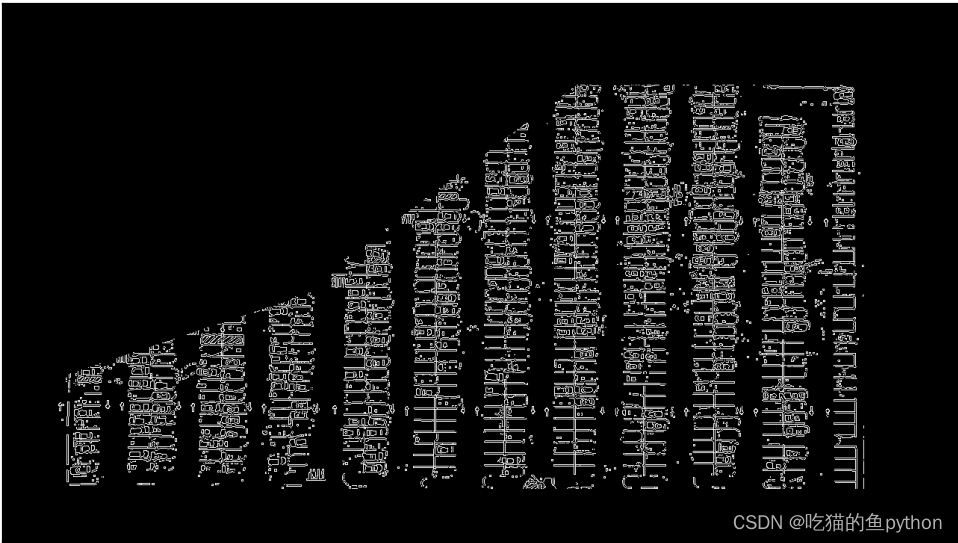
这里检测的结果如图,这里因为车厂里有很多车,如果是一个空车场的话,检测的结果会非常好。做完检测之后,我们想要的是对于停车场的12列,我们对每一列都进行一个提取操作,比如我们得到12列之后,然后我们在对每一列分出具体的一个一个车位。然后对于第一列和第十二列这种单车位,和其他列的双车位的处理方法还是不同的,具体的我们来看一下。
def identify\_blocks(self,image, lines, make_copy=True):
    if make_copy:
        new_image = np.copy(image)
    #Step 1: 过滤部分直线
    cleaned = []
    for line in lines:
        for x1,y1,x2,y2 in line:
            if abs(y2-y1) <=1 and abs(x2-x1) >=25 and abs(x2-x1) <= 55:
                cleaned.append((x1,y1,x2,y2))
首先我们还是过滤掉一些直线。
import operator
list1 = sorted(cleaned, key=operator.itemgetter(0, 1))
对于这十二列,每一列的左上角的坐标点我们是可以得到x1-x12的我们要对这些列进行一次排序操作。让计算机识别出哪一列是第一列,哪一列是第十二列。
    clusters = {}
    dIndex = 0
    clus_dist = 10

    for i in range(len(list1) - 1):
        distance = abs(list1[i+1][0] - list1[i][0])
        if distance <= clus_dist:
            if not dIndex in clusters.keys(): clusters[dIndex] = []
            clusters[dIndex].append(list1[i])
            clusters[dIndex].append(list1[i + 1])

        else:
            dIndex += 1
这里就是做了一下对于所有排序好的直线进行了一个归类操作,把哪些直线归为一列。并且进行添加。直到把每一列都进行分出来。
    rects = {}
    i = 0
    for key in clusters:
        all_list = clusters[key]
        cleaned = list(set(all_list))#一列中的所有直线的坐标信息
        if len(cleaned) > 5:
            cleaned = sorted(cleaned, key=lambda tup: tup[1])#对直线进行排序
            avg_y1 = cleaned[0][1]#这个对于一列来说是固定的
            avg_y2 = cleaned[-1][1]#这个对于一列来说是固定的
            avg_x1 = 0
            avg_x2 = 0
            for tup in cleaned:
                avg_x1 += tup[0]
                avg_x2 += tup[2]
            avg_x1 = avg_x1/len(cleaned)
            avg_x2 = avg_x2/len(cleaned)
            rects[i] = (avg_x1, avg_y1, avg_x2, avg_y2)
            i += 1

    print("Num Parking Lanes: ", len(rects))
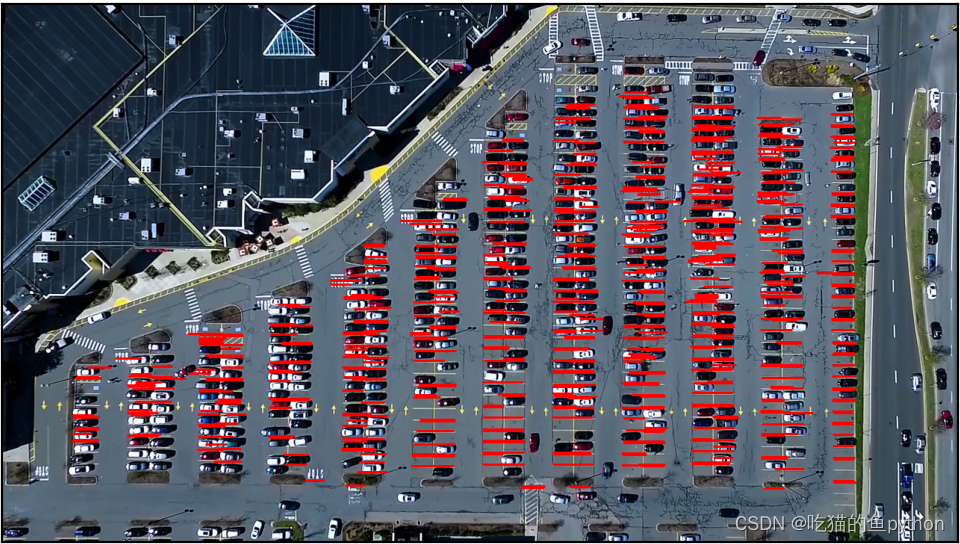
然后我们对每一列进行操作,把每一列的每一个车位的所有坐标信息提取出来。然后再通过得到的坐标及进行画出来这个矩形。
    buff = 7#微调数值
    for key in rects:
        tup_topLeft = (int(rects[key][0] - buff), int(rects[key][1]))
        tup_botRight = (int(rects[key][2] + buff), int(rects[key][3]))
        cv2.rectangle(new_image, tup_topLeft,tup_botRight,(0,255,0),3)
    return new_image, rects
我们在这个期间又对矩形进行了手动微调。
def draw\_parking(self,image, rects, make_copy = True, color=[255, 0, 0], thickness=2, save = True):
    if make_copy:
        new_image = np.copy(image)
    gap = 15.5#车位间的差距是15.5
    spot_dict = {} # 字典:一个车位对应一个位置
    tot_spots = 0
    #微调
    adj_y1 = {0: 20, 1:-10, 2:0, 3:-11, 4:28, 5:5, 6:-15, 7:-15, 8:-10, 9:-30, 10:9, 11:-32}
    adj_y2 = {0: 30, 1: 50, 2:15, 3:10, 4:-15, 5:15, 6:15, 7:-20, 8:15, 9:15, 10:0, 11:30}

    adj_x1 = {0: -8, 1:-15, 2:-15, 3:-15, 4:-15, 5:-15, 6:-15, 7:-15, 8:-10, 9:-10, 10:-10, 11:0}
    adj_x2 = {0: 0, 1: 15, 2:15, 3:15, 4:15, 5:15, 6:15, 7:15, 8:10, 9:10, 10:10, 11:0}
    for key in rects:
        tup = rects[key]
        x1 = int(tup[0]+ adj_x1[key])
        x2 = int(tup[2]+ adj_x2[key])
        y1 = int(tup[1] + adj_y1[key])
        y2 = int(tup[3] + adj_y2[key])
        cv2.rectangle(new_image, (x1, y1),(x2,y2),(0,255,0),2)
        num_splits = int(abs(y2-y1)//gap)
        for i in range(0, num_splits+1):
            y = int(y1 + i\*gap)
            cv2.line(new_image, (x1, y), (x2, y), color, thickness)
        if key > 0 and key < len(rects) -1 :
            #竖直线
            x = int((x1 + x2)/2)
            cv2.line(new_image, (x, y1), (x, y2), color, thickness)
        # 计算数量
        if key == 0 or key == (len(rects) -1):
            tot_spots += num_splits +1
        else:
            tot_spots += 2\*(num_splits +1)

        # 字典对应好
        if key == 0 or key == (len(rects) -1):
            for i in range(0, num_splits+1):
                cur_len = len(spot_dict)
                y = int(y1 + i\*gap)
                spot_dict[(x1, y, x2, y+gap)] = cur_len +1
        else:
            for i in range(0, num_splits+1):
                cur_len = len(spot_dict)
                y = int(y1 + i\*gap)
                x = int((x1 + x2)/2)
                spot_dict[(x1, y, x, y+gap)] = cur_len +1
                spot_dict[(x, y, x2, y+gap)] = cur_len +2

    print("total parking spaces: ", tot_spots, cur_len)
    if save:
        filename = 'with\_parking.jpg'
        cv2.imwrite(filename, new_image)
    return new_image, spot_dict
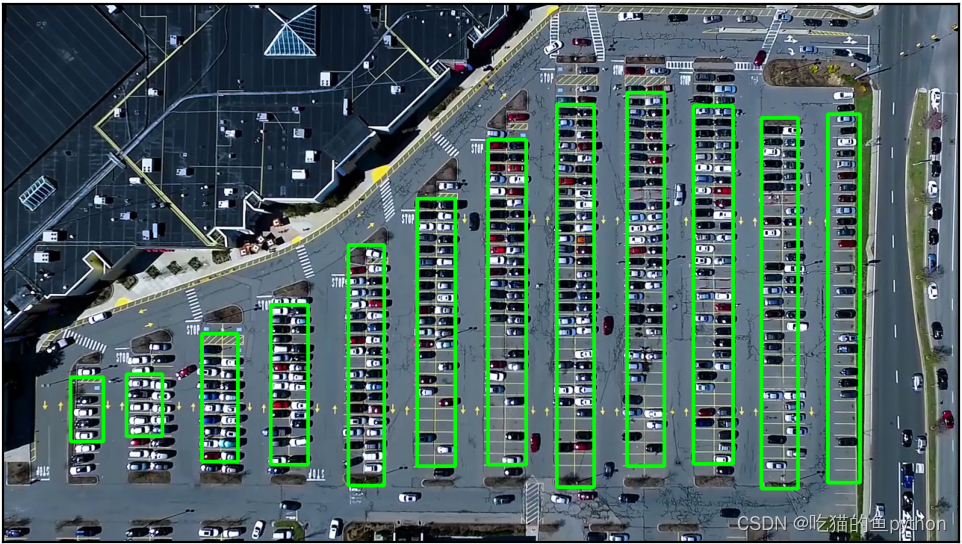
处理的结果是:

这里我们把所有车位都划分出来了。
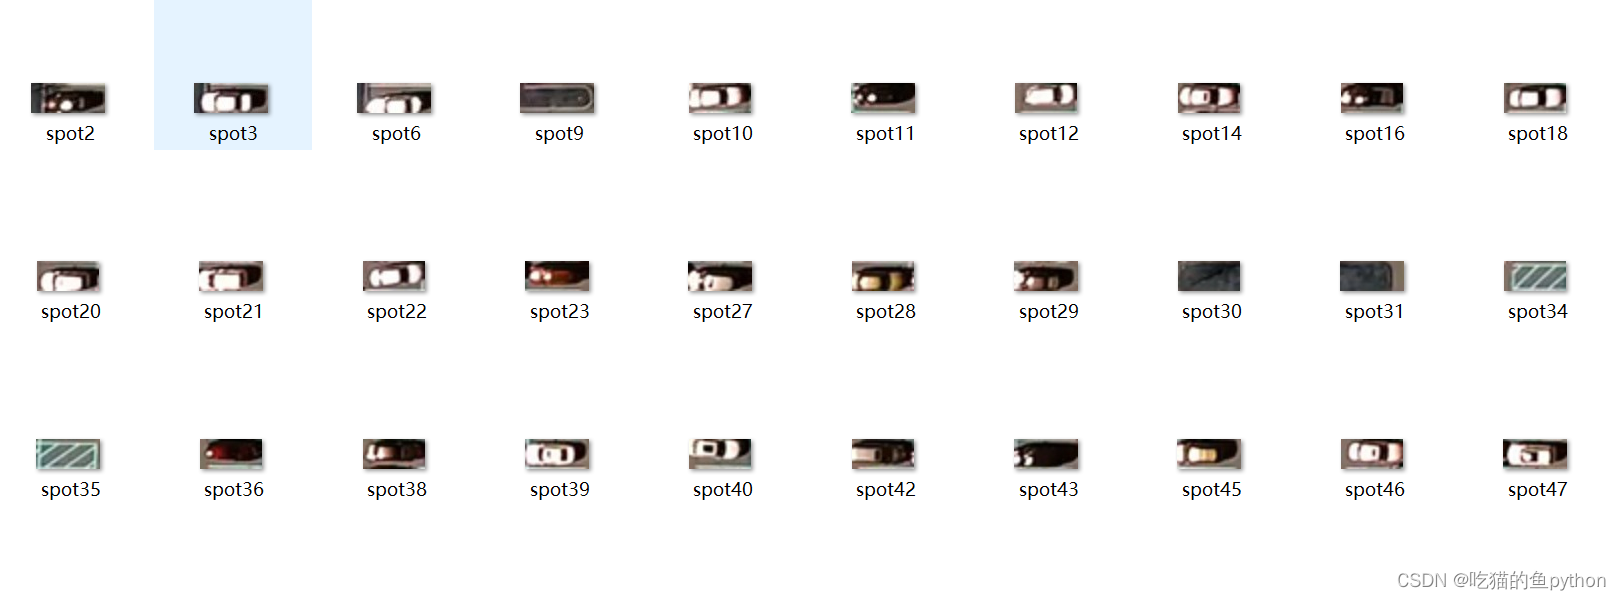
然后我们想要通过使用keras神经网络对车位有没有车进行一个学习!让神经网络预测到底车位到底有没有车。整个keras神经网络的训练过程如下。我们使用的是VGG16网络进行训练做一个二分类的任务,也就是车位有没有车。对于车位的训练图像我们可以看一下。通过这一代码我们对车位有无车进行提取。
def save\_images\_for\_cnn(self,image, spot_dict, folder_name ='cnn\_data'):
    for spot in spot_dict.keys():
        (x1, y1, x2, y2) = spot
        (x1, y1, x2, y2) = (int(x1), int(y1), int(x2), int(y2))
        #裁剪
        spot_img = image[y1:y2, x1:x2]
        spot_img = cv2.resize(spot_img, (0,0), fx=2.0, fy=2.0)
        spot_id = spot_dict[spot]

        filename = 'spot' + str(spot_id) +'.jpg'
        print(spot_img.shape, filename, (x1,x2,y1,y2))

        cv2.imwrite(os.path.join(folder_name, filename), spot_img)
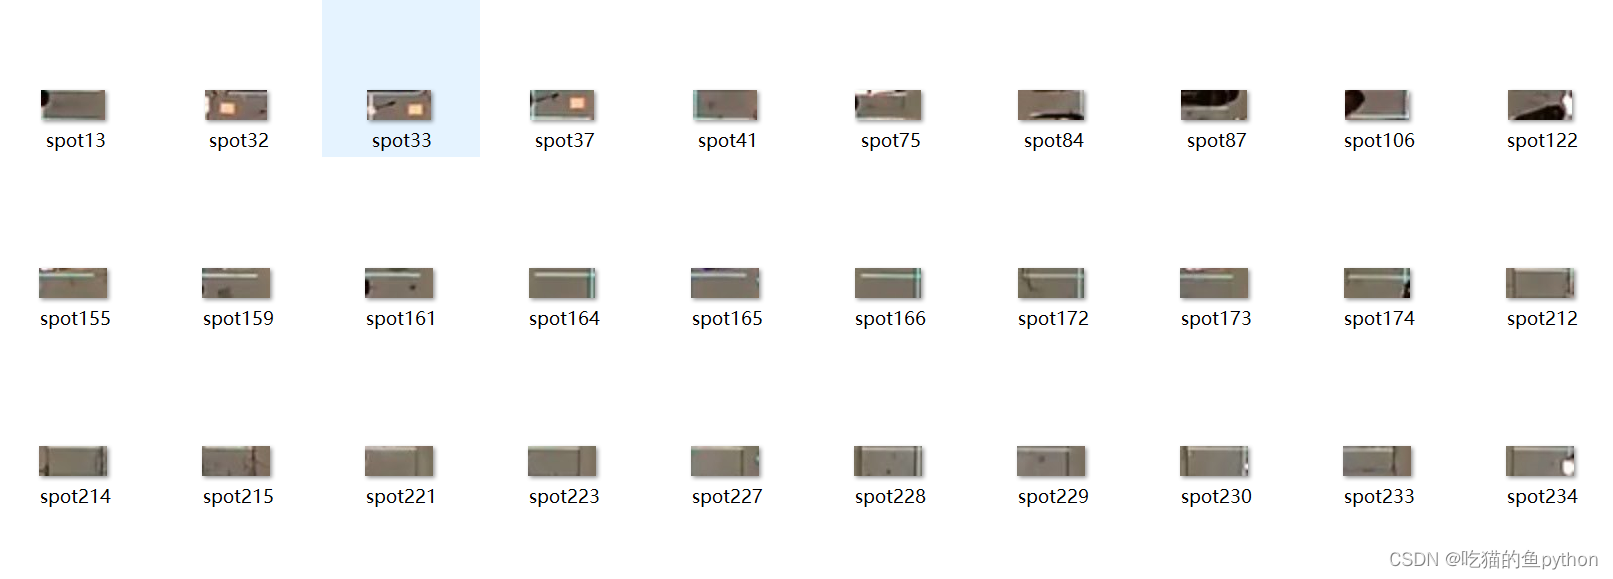
这里是车位没有车,那么有车的如下。
files_train = 0
files_validation = 0
cwd = os.getcwd()
folder = ‘train_data/train’
for sub_folder in os.listdir(folder):
path, dirs, files = next(os.walk(os.path.join(folder,sub_folder)))
files_train += len(files)
folder = ‘train_data/test’
for sub_folder in os.listdir(folder):
path, dirs, files = next(os.walk(os.path.join(folder,sub_folder)))
files_validation += len(files)
print(files_train,files_validation)
img_width, img_height = 48, 48
train_data_dir = “train_data/train”
validation_data_dir = “train_data/test”
nb_train_samples = files_train
nb_validation_samples = files_validation
batch_size = 32
epochs = 15
num_classes = 2
model = applications.VGG16(weights=‘imagenet’, include_top=False, input_shape = (img_width, img_height, 3))
for layer in model.layers[:10]:
layer.trainable = False
x = model.output
x = Flatten()(x)
predictions = Dense(num_classes, activation=“softmax”)(x)
model_final = Model(input = model.input, output = predictions)
model_final.compile(loss = “categorical_crossentropy”,
optimizer = optimizers.SGD(lr=0.0001, momentum=0.9),
metrics=[“accuracy”])
train_datagen = ImageDataGenerator(
rescale = 1./255,
horizontal_flip = True,
fill_mode = “nearest”,
zoom_range = 0.1,
width_shift_range = 0.1,
height_shift_range=0.1,
rotation_range=5)
test_datagen = ImageDataGenerator(
rescale = 1./255,
horizontal_flip = True,
fill_mode = “nearest”,
zoom_range = 0.1,
width_shift_range = 0.1,
height_shift_range=0.1,
rotation_range=5)
train_generator = train_datagen.flow_from_directory(
train_data_dir,
target_size = (img_height, img_width),
batch_size = batch_size,
class_mode = “categorical”)
validation_generator = test_datagen.flow_from_directory(
validation_data_dir,
target_size = (img_height, img_width),
class_mode = “categorical”)
checkpoint = ModelCheckpoint(“car1.h5”, monitor=‘val_acc’, verbose=1, save_best_only=True, save_weights_only=False, mode=‘auto’, period=1)
early = EarlyStopping(monitor=‘val_acc’, min_delta=0, patience=10, verbose=1, mode=‘auto’)


既有适合小白学习的零基础资料,也有适合3年以上经验的小伙伴深入学习提升的进阶课程,涵盖了95%以上大数据知识点,真正体系化!
由于文件比较多,这里只是将部分目录截图出来,全套包含大厂面经、学习笔记、源码讲义、实战项目、大纲路线、讲解视频,并且后续会持续更新
[外链图片转存中…(img-ubQg0YXc-1715834026484)]
[外链图片转存中…(img-WtiETbMu-1715834026484)]
[外链图片转存中…(img-W5I5ycQ6-1715834026485)]
既有适合小白学习的零基础资料,也有适合3年以上经验的小伙伴深入学习提升的进阶课程,涵盖了95%以上大数据知识点,真正体系化!
由于文件比较多,这里只是将部分目录截图出来,全套包含大厂面经、学习笔记、源码讲义、实战项目、大纲路线、讲解视频,并且后续会持续更新


 5952
5952

 被折叠的 条评论
为什么被折叠?
被折叠的 条评论
为什么被折叠?
 到【灌水乐园】发言


