


首先我们还是过滤掉一些直线。
import operator
        list1 = sorted(cleaned, key=operator.itemgetter(0, 1))
对于这十二列,每一列的左上角的坐标点我们是可以得到x1-x12的我们要对这些列进行一次排序操作。让计算机识别出哪一列是第一列,哪一列是第十二列。
        clusters = {}
        dIndex = 0
        clus_dist = 10

        for i in range(len(list1) - 1):
            distance = abs(list1[i+1][0] - list1[i][0])
            if distance <= clus_dist:
                if not dIndex in clusters.keys(): clusters[dIndex] = []
                clusters[dIndex].append(list1[i])
                clusters[dIndex].append(list1[i + 1])

            else:
                dIndex += 1
这里就是做了一下对于所有排序好的直线进行了一个归类操作,把哪些直线归为一列。并且进行添加。直到把每一列都进行分出来。
        rects = {}
        i = 0
        for key in clusters:
            all_list = clusters[key]
            cleaned = list(set(all_list))#一列中的所有直线的坐标信息
            if len(cleaned) > 5:
                cleaned = sorted(cleaned, key=lambda tup: tup[1])#对直线进行排序
                avg_y1 = cleaned[0][1]#这个对于一列来说是固定的
                avg_y2 = cleaned[-1][1]#这个对于一列来说是固定的
                avg_x1 = 0
                avg_x2 = 0
                for tup in cleaned:
                    avg_x1 += tup[0]
                    avg_x2 += tup[2]
                avg_x1 = avg_x1/len(cleaned)
                avg_x2 = avg_x2/len(cleaned)
                rects[i] = (avg_x1, avg_y1, avg_x2, avg_y2)
                i += 1

        print("Num Parking Lanes: ", len(rects))
然后我们对每一列进行操作,把每一列的每一个车位的所有坐标信息提取出来。然后再通过得到的坐标及进行画出来这个矩形。
        buff = 7#微调数值
        for key in rects:
            tup_topLeft = (int(rects[key][0] - buff), int(rects[key][1]))
            tup_botRight = (int(rects[key][2] + buff), int(rects[key][3]))
            cv2.rectangle(new_image, tup_topLeft,tup_botRight,(0,255,0),3)
        return new_image, rects
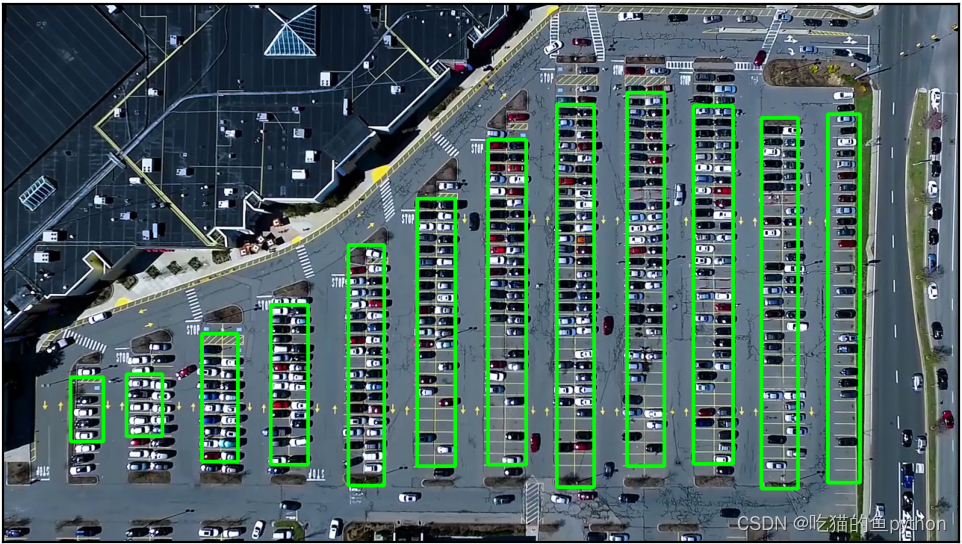
我们在这个期间又对矩形进行了手动微调。
    def draw\_parking(self,image, rects, make_copy = True, color=[255, 0, 0], thickness=2, save = True):
        if make_copy:
            new_image = np.copy(image)
        gap = 15.5#车位间的差距是15.5
        spot_dict = {} # 字典:一个车位对应一个位置
        tot_spots = 0
        #微调
        adj_y1 = {0: 20, 1:-10, 2:0, 3:-11, 4:28, 5:5, 6:-15, 7:-15, 8:-10, 9:-30, 10:9, 11:-32}
        adj_y2 = {0: 30, 1: 50, 2:15, 3:10, 4:-15, 5:15, 6:15, 7:-20, 8:15, 9:15, 10:0, 11:30}

        adj_x1 = {0: -8, 1:-15, 2:-15, 3:-15, 4:-15, 5:-15, 6:-15, 7:-15, 8:-10, 9:-10, 10:-10, 11:0}
        adj_x2 = {0: 0, 1: 15, 2:15, 3:15, 4:15, 5:15, 6:15, 7:15, 8:10, 9:10, 10:10, 11:0}
        for key in rects:
            tup = rects[key]
            x1 = int(tup[0]+ adj_x1[key])
            x2 = int(tup[2]+ adj_x2[key])
            y1 = int(tup[1] + adj_y1[key])
            y2 = int(tup[3] + adj_y2[key])
            cv2.rectangle(new_image, (x1, y1),(x2,y2),(0,255,0),2)
            num_splits = int(abs(y2-y1)//gap)
            for i in range(0, num_splits+1):
                y = int(y1 + i\*gap)
                cv2.line(new_image, (x1, y), (x2, y), color, thickness)
            if key > 0 and key < len(rects) -1 :
                #竖直线
                x = int((x1 + x2)/2)
                cv2.line(new_image, (x, y1), (x, y2), color, thickness)
            # 计算数量
            if key == 0 or key == (len(rects) -1):
                tot_spots += num_splits +1
            else:
                tot_spots += 2\*(num_splits +1)

            # 字典对应好
            if key == 0 or key == (len(rects) -1):
                for i in range(0, num_splits+1):
                    cur_len = len(spot_dict)
                    y = int(y1 + i\*gap)
                    spot_dict[(x1, y, x2, y+gap)] = cur_len +1
            else:
                for i in range(0, num_splits+1):
                    cur_len = len(spot_dict)
                    y = int(y1 + i\*gap)
                    x = int((x1 + x2)/2)
                    spot_dict[(x1, y, x, y+gap)] = cur_len +1
                    spot_dict[(x, y, x2, y+gap)] = cur_len +2

        print("total parking spaces: ", tot_spots, cur_len)
        if save:
            filename = 'with\_parking.jpg'
            cv2.imwrite(filename, new_image)
        return new_image, spot_dict
处理的结果是:

这里我们把所有车位都划分出来了。
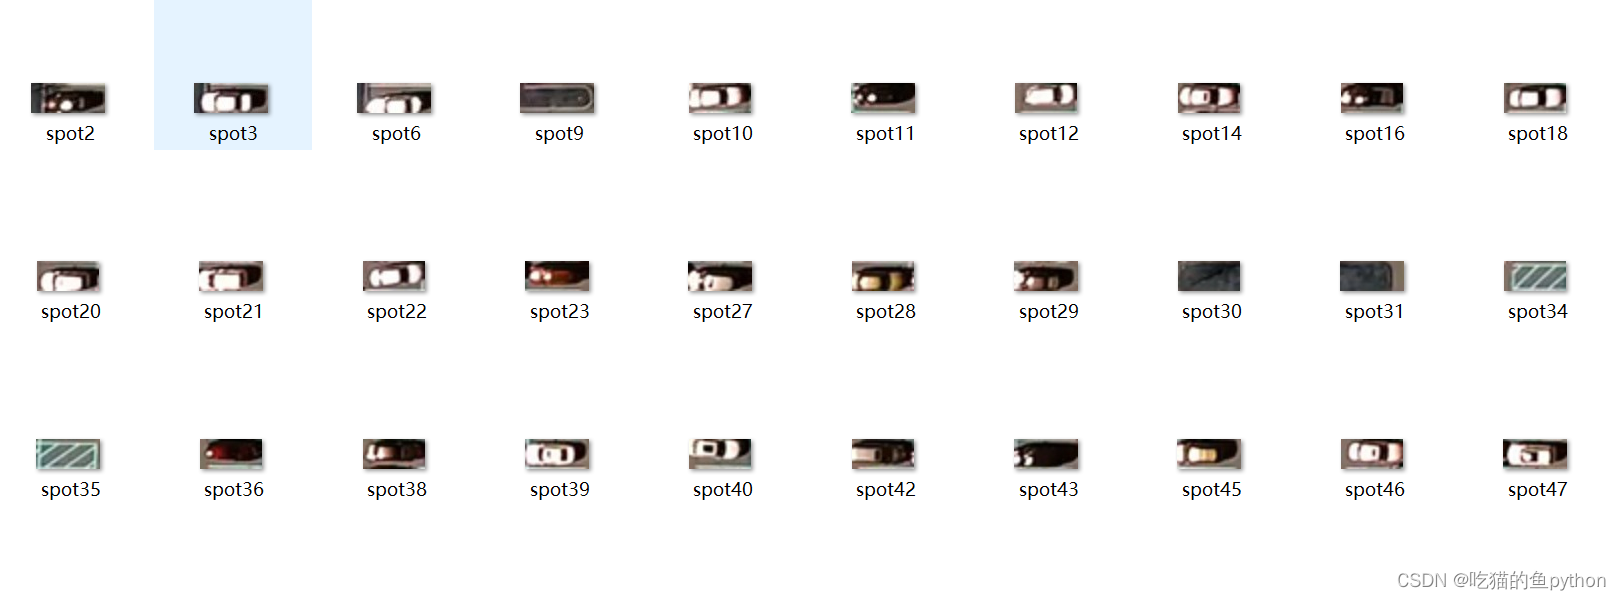
然后我们想要通过使用keras神经网络对车位有没有车进行一个学习!让神经网络预测到底车位到底有没有车。整个keras神经网络的训练过程如下。我们使用的是VGG16网络进行训练做一个二分类的任务,也就是车位有没有车。对于车位的训练图像我们可以看一下。通过这一代码我们对车位有无车进行提取。
    def save\_images\_for\_cnn(self,image, spot_dict, folder_name ='cnn\_data'):
        for spot in spot_dict.keys():
            (x1, y1, x2, y2) = spot
            (x1, y1, x2, y2) = (int(x1), int(y1), int(x2), int(y2))
            #裁剪
            spot_img = image[y1:y2, x1:x2]
            spot_img = cv2.resize(spot_img, (0,0), fx=2.0, fy=2.0)
            spot_id = spot_dict[spot]

            filename = 'spot' + str(spot_id) +'.jpg'
            print(spot_img.shape, filename, (x1,x2,y1,y2))

            cv2.imwrite(os.path.join(folder_name, filename), spot_img)
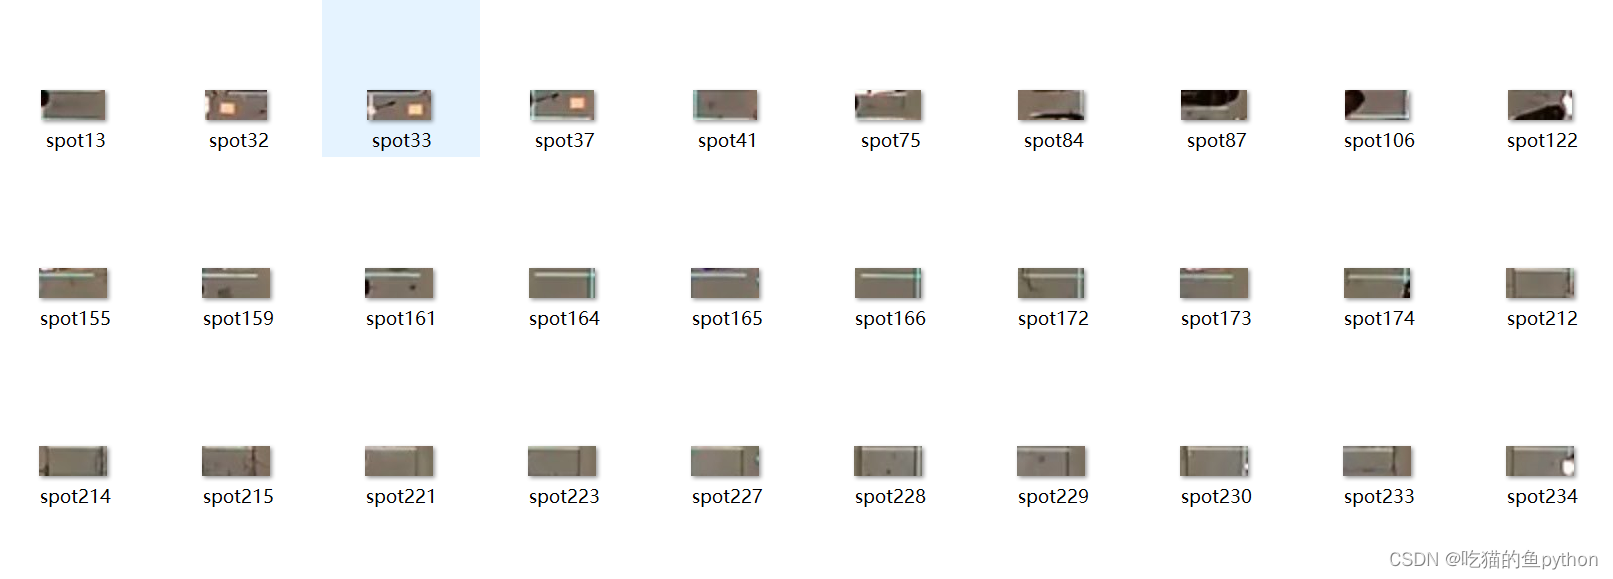
这里是车位没有车,那么有车的如下。
files_train = 0
files_validation = 0

cwd = os.getcwd()
folder = 'train\_data/train'
for sub_folder in os.listdir(folder):
    path, dirs, files = next(os.walk(os.path.join(folder,sub_folder)))
    files_train += len(files)


folder = 'train\_data/test'
for sub_folder in os.listdir(folder):
    path, dirs, files = next(os.walk(os.path.join(folder,sub_folder)))
    files_validation += len(files)

print(files_train,files_validation)

img_width, img_height = 48, 48
train_data_dir = "train\_data/train"
validation_data_dir = "train\_data/test"
nb_train_samples = files_train
nb_validation_samples = files_validation
batch_size = 32
epochs = 15
num_classes = 2

model = applications.VGG16(weights='imagenet', include_top=False, input_shape = (img_width, img_height, 3))


for layer in model.layers[:10]:
    layer.trainable = False


x = model.output
x = Flatten()(x)
predictions = Dense(num_classes, activation="softmax")(x)


model_final = Model(input = model.input, output = predictions)


model_final.compile(loss = "categorical\_crossentropy",
                    optimizer = optimizers.SGD(lr=0.0001, momentum=0.9),
                    metrics=["accuracy"])


train_datagen = ImageDataGenerator(
rescale = 1./255,
horizontal_flip = True,
fill_mode = "nearest",
zoom_range = 0.1,
width_shift_range = 0.1,
height_shift_range=0.1,
rotation_range=5)

test_datagen = ImageDataGenerator(
rescale = 1./255,
horizontal_flip = True,
fill_mode = "nearest",
zoom_range = 0.1,
width_shift_range = 0.1,
height_shift_range=0.1,
rotation_range=5)

train_generator = train_datagen.flow_from_directory(
train_data_dir,
target_size = (img_height, img_width),
batch_size = batch_size,
class_mode = "categorical")

validation_generator = test_datagen.flow_from_directory(
validation_data_dir,
target_size = (img_height, img_width),
class_mode = "categorical")

checkpoint = ModelCheckpoint("car1.h5", monitor='val\_acc', verbose=1, save_best_only=True, save_weights_only=False, mode='auto', period=1)
early = EarlyStopping(monitor='val\_acc', min_delta=0, patience=10, verbose=1, mode='auto')


history_object = model_final.fit_generator(
train_generator,
samples_per_epoch = nb_train_samples,
epochs = epochs,
validation_data = validation_generator,
nb_val_samples = nb_validation_samples,
callbacks = [checkpoint, early])
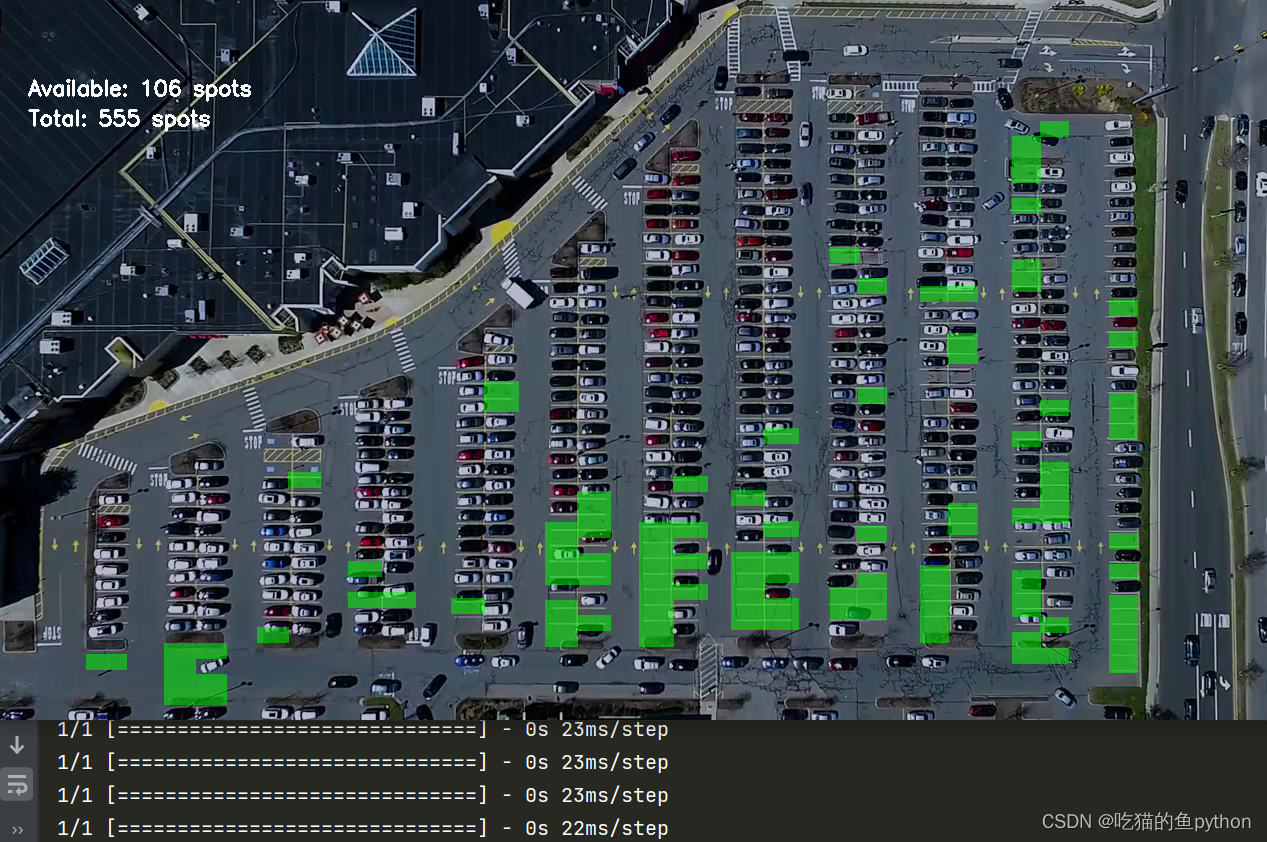
这里我们使用了卷积神经网络对有无车位进行训练,通过神经网络的训练我们就开始对一帧图像进行判断。得到的结果是:
    def make\_prediction(self,image,model,class_dictionary):#预测
        #预处理
        img = image/255.

        #转换成4D tensor
        image = np.expand_dims(img, axis=0)

        # 用训练好的模型进行训练
        class_predicted = model.predict(image)
        inID = np.argmax(class_predicted[0])
        label = class_dictionary[inID]
        return label
    def predict\_on\_image(self,image, spot_dict , model,class_dictionary,make_copy=True, color = [0, 255, 0], alpha=0.5):
        if make_copy:
            new_image = np.copy(image)
            overlay = np.copy(image)
        self.cv_show('new\_image',new_image)
        cnt_empty = 0
        all_spots = 0
        for spot in spot_dict.keys():
            all_spots += 1
            (x1, y1, x2, y2) = spot
            (x1, y1, x2, y2) = (int(x1), int(y1), int(x2), int(y2))
            spot_img = image[y1:y2, x1:x2]
            spot_img = cv2.resize(spot_img, (48, 48))

            label = self.make_prediction(spot_img,model,class_dictionary)
            if label == 'empty':
                cv2.rectangle(overlay, (int(x1),int(y1)), (int(x2),int(y2)), color, -1)
                cnt_empty += 1

        cv2.addWeighted(overlay, alpha, new_image, 1 - alpha, 0, new_image)

        cv2.putText(new_image, "Available: %d spots" %cnt_empty, (30, 95),
        cv2.FONT_HERSHEY_SIMPLEX,
        0.7, (255, 255, 255), 2)

        cv2.putText(new_image, "Total: %d spots" %all_spots, (30, 125),
        cv2.FONT_HERSHEY_SIMPLEX,
        0.7, (255, 255, 255), 2)
        save = False

        if save:
            filename = 'with\_marking.jpg'
            cv2.imwrite(filename, new_image)
        self.cv_show('new\_image',new_image)

        return new_image
这里做了一个在图像中训练的结果,我们来看一下。

预测结果是一共检测到555个车位,目前空闲车位一共有113个。然后我们对视频进行相同的操作,主要就是把视频进行分割成一帧一帧的图像,然后对每一帧图像进行下面对于图片的操作。这样我们就可以以视频流的形式进行输出了!这就是整个项目的流程。
这里就是利用keras卷积神经网络一直对图像进行训练测试,得到实时的车位信息。至此我们的这个项目就结束了。针对车来车往的停车场内停车效率问题提出了基于OpenCV的停车位空闲状态检测的方法,以视频中的每帧图像为单位,使用灰度化、霍夫直线检测等方法对数据进行预处理、最后将处理完的数据利用Keras神经网络模型训练和预测,来判断停车位中是否空闲。测试结果显示此方法可以快速完成实时监测停车场内车位状态的任务。来提高停车场内停车的效率,但由于停车场内的停车标位线存在维护不及时,仍然会存在停车位标线不清晰、遮挡严重等问题,会影响检测精度。虽然在图像预处理已经减少了计算量,但计算次数多、程序处理耗时长,后续将针对文中的不足进行进一步的研究与改进。在未来的研究工作中可以在图像预处理进程中计算量大的问题上尝试使用更快速的算法来进一步提高此方法耗时长的问题。
🔎支持:🎁🎁🎁如果觉得博主的文章还不错或者您用得到的话,可以免费的关注一下博主,如果三连收藏支持就更好啦!这就是给予我最大的支持!

既有适合小白学习的零基础资料,也有适合3年以上经验的小伙伴深入学习提升的进阶课程,涵盖了95%以上大数据知识点,真正体系化!
由于文件比较多,这里只是将部分目录截图出来,全套包含大厂面经、学习笔记、源码讲义、实战项目、大纲路线、讲解视频,并且后续会持续更新
链图片转存中…(img-bM0GFE2f-1714339192808)]
[外链图片转存中…(img-OSYqT2C8-1714339192809)]
[外链图片转存中…(img-0uRQEXlv-1714339192809)]
既有适合小白学习的零基础资料,也有适合3年以上经验的小伙伴深入学习提升的进阶课程,涵盖了95%以上大数据知识点,真正体系化!
由于文件比较多,这里只是将部分目录截图出来,全套包含大厂面经、学习笔记、源码讲义、实战项目、大纲路线、讲解视频,并且后续会持续更新


 885
885

 被折叠的 条评论
为什么被折叠?
被折叠的 条评论
为什么被折叠?
 到【灌水乐园】发言


