


网上学习资料一大堆,但如果学到的知识不成体系,遇到问题时只是浅尝辄止,不再深入研究,那么很难做到真正的技术提升。
一个人可以走的很快,但一群人才能走的更远!不论你是正从事IT行业的老鸟或是对IT行业感兴趣的新人,都欢迎加入我们的的圈子(技术交流、学习资源、职场吐槽、大厂内推、面试辅导),让我们一起学习成长!
注册过程我们需要完成的事:
- 打开摄像头获取画面图片
- 在图片中检测并获取人脸位置
- 根据人脸位置获取68个关键点
- 根据68个关键点生成特征描述符
- 保存
- (优化)展示界面,加入注册时成功提示等
1、基本步骤
我们首先进行前三步:
# 检测人脸,获取68个关键点,获取特征描述符
def faceRegister(faceId=1, userName='default', interval=3, faceCount=3, resize_w=700, resize_h=400):
    '''
    faceId:人脸ID
    userName: 人脸姓名
    faceCount: 采集该人脸图片的数量
    interval: 采集间隔
    '''

    cap = cv2.VideoCapture(0)
    # 人脸检测模型
    hog_face_detector = dlib.get_frontal_face_detector()
    # 关键点 检测模型
    shape_detector = dlib.shape_predictor('./weights/shape_predictor_68_face_landmarks.dat')
    # resnet模型
    face_descriptor_extractor = dlib.face_recognition_model_v1('./weights/dlib_face_recognition_resnet_model_v1.dat')

    while True:
        ret, frame = cap.read()

        # 镜像
        frame = cv2.flip(frame,1)

        # 转为灰度图
        frame_gray = cv2.cvtColor(frame,cv2.COLOR_BGR2GRAY)

        # 检测人脸
        detections = hog_face_detector(frame,1)

        for face in detections:
            # 人脸框坐标 左上和右下
            l, t, r, b = face.left(), face.top(), face.right(), face.bottom()

            # 获取68个关键点
            points = shape_detector(frame,face)

            # 绘制关键点
            for point in points.parts():
                cv2.circle(frame,(point.x,point.y),2,(0,255,0),1)

            # 绘制矩形框
            cv2.rectangle(frame,(l,t),(r,b),(0,255,0),2)

        cv2.imshow("face",frame)
        if cv2.waitKey(10) & 0xFF == ord('q'):
            break

    cap.release()
    cv2.destroyAllWindows


faceRegister()
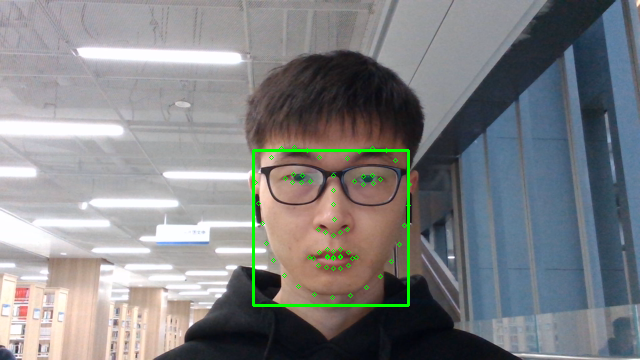
此时一张帅脸如下:
2、描述符的采集
之后,我们根据参数,即faceCount 和 Interval 进行描述符的生成和采集。
(这里我默认是faceCount=3,Interval=3,即每3秒采集一次,共3次)
def faceRegister(faceId=1, userName='default', interval=3, faceCount=3, resize_w=700, resize_h=400):
    '''
    faceId:人脸ID
    userName: 人脸姓名
    faceCount: 采集该人脸图片的数量
    interval: 采集间隔
    '''

    cap = cv2.VideoCapture(0)
    # 人脸检测模型
    hog_face_detector = dlib.get_frontal_face_detector()
    # 关键点 检测模型
    shape_detector = dlib.shape_predictor('./weights/shape_predictor_68_face_landmarks.dat')
    # resnet模型
    face_descriptor_extractor = dlib.face_recognition_model_v1('./weights/dlib_face_recognition_resnet_model_v1.dat')


    # 开始时间
    start_time = time.time()
    # 执行次数
    collect_times = 0


    while True:
        ret, frame = cap.read()

        # 镜像
        frame = cv2.flip(frame,1)

        # 转为灰度图
        frame_gray = cv2.cvtColor(frame,cv2.COLOR_BGR2GRAY)

        # 检测人脸
        detections = hog_face_detector(frame,1)

        for face in detections:
            # 人脸框坐标 左上和右下
            l, t, r, b = face.left(), face.top(), face.right(), face.bottom()

            # 获取68个关键点
            points = shape_detector(frame,face)

            # 绘制人脸关键点
            for point in points.parts():
                cv2.circle(frame, (point.x, point.y), 2, (0, 255, 0), 1)
            # 绘制矩形框
            cv2.rectangle(frame, (l, t), (r, b), (0, 255, 0), 2)

            # 采集:
            if collect_times < faceCount:
                # 获取当前时间
                now = time.time()
                # 时间限制
                if now - start_time > interval:
                    # 获取特征描述符
                    face_descriptor = face_descriptor_extractor.compute_face_descriptor(frame,points)
                    # dlib格式转为数组
                    face_descriptor = [f for f in face_descriptor]

                    collect_times += 1
                    start_time = now
                    print("成功采集{}次".format(collect_times))
                else:
                    # 时间间隔不到interval
                    print("等待进行下一次采集")
                    pass
            else:
                # 已经成功采集完3次了
                print("采集完毕")
                cap.release()
                cv2.destroyAllWindows()
                return

        cv2.imshow("face",frame)
        if cv2.waitKey(10) & 0xFF == ord('q'):
            break

    cap.release()
    cv2.destroyAllWindows()


faceRegister()
等待进行下一次采集
...
成功采集1次
等待进行下一次采集
...
成功采集2次
等待进行下一次采集
...
成功采集3次
采集完毕
3、完整的注册
最后就是写入csv文件
这里加入了注册成功等的提示,且把一些变量放到了全局,因为后面人脸识别打卡时也会用到。
# 加载人脸检测器
hog_face_detector = dlib.get_frontal_face_detector()
cnn_detector = dlib.cnn_face_detection_model_v1('./weights/mmod_human_face_detector.dat')
haar_face_detector = cv2.CascadeClassifier('./weights/haarcascade_frontalface_default.xml')

# 加载关键点检测器
points_detector = dlib.shape_predictor('./weights/shape_predictor_68_face_landmarks.dat')
# 加载resnet模型
face_descriptor_extractor = dlib.face_recognition_model_v1('./weights/dlib_face_recognition_resnet_model_v1.dat')
# 绘制中文
def cv2AddChineseText(img, text, position, textColor=(0, 255, 0), textSize=30):
    if (isinstance(img, np.ndarray)):  # 判断是否OpenCV图片类型
        img = Image.fromarray(cv2.cvtColor(img, cv2.COLOR_BGR2RGB))
    # 创建一个可以在给定图像上绘图的对象
    draw = ImageDraw.Draw(img)
    # 字体的格式
    fontStyle = ImageFont.truetype(
        "./fonts/songti.ttc", textSize, encoding="utf-8")
    # 绘制文本
    draw.text(position, text, textColor, font=fontStyle)
    # 转换回OpenCV格式
    return cv2.cvtColor(np.asarray(img), cv2.COLOR_RGB2BGR)
# 绘制左侧信息
def drawLeftInfo(frame, fpsText, mode="Reg", detector='haar', person=1, count=1):
    # 帧率
    cv2.putText(frame, "FPS:  " + str(round(fpsText, 2)), (30, 50), cv2.FONT_ITALIC, 0.8, (0, 255, 0), 2)

    # 模式:注册、识别
    cv2.putText(frame, "Mode:  " + str(mode), (30, 80), cv2.FONT_ITALIC, 0.8, (0, 255, 0), 2)

    if mode == 'Recog':
        # 检测器
        cv2.putText(frame, "Detector:  " + detector, (30, 110), cv2.FONT_ITALIC, 0.8, (0, 255, 0), 2)

        # 人数
        cv2.putText(frame, "Person:  " + str(person), (30, 140), cv2.FONT_ITALIC, 0.8, (0, 255, 0), 2)

        # 总人数
        cv2.putText(frame, "Count:  " + str(count), (30, 170), cv2.FONT_ITALIC, 0.8, (0, 255, 0), 2)
# 注册人脸
def faceRegiser(faceId=1, userName='default', interval=3, faceCount=3, resize_w=700, resize_h=400):
    # 计数
    count = 0
    # 开始注册时间
    startTime = time.time()

    # 视频时间
    frameTime = startTime

    # 控制显示打卡成功的时长
    show_time = (startTime - 10)

    # 打开文件
    f = open('./data/feature.csv', 'a', newline='')
    csv_writer = csv.writer(f)

    cap = cv2.VideoCapture(0)

    while True:
        ret, frame = cap.read()
        frame = cv2.resize(frame, (resize_w, resize_h))
        frame = cv2.flip(frame, 1)

        # 检测
        face_detetion = hog_face_detector(frame, 1)

        for face in face_detetion:
            # 识别68个关键点
            points = points_detector(frame, face)
            # 绘制人脸关键点
            for point in points.parts():
                cv2.circle(frame, (point.x, point.y), 2, (0, 255, 0), 1)
            # 绘制框框
            l, t, r, b = face.left(), face.top(), face.right(), face.bottom()
            cv2.rectangle(frame, (l, t), (r, b), (0, 255, 0), 2)

            now = time.time()

            if (now - show_time) < 0.5:
                frame = cv2AddChineseText(frame,
                                          "注册成功 {count}/{faceCount}".format(count=(count + 1), faceCount=faceCount),
                                          (l, b + 30), textColor=(255, 0, 255), textSize=30)

            # 检查次数

            if count < faceCount:

                # 检查时间
                if now - startTime > interval:
                    # 特征描述符
                    face_descriptor = face_descriptor_extractor.compute_face_descriptor(frame, points)

                    face_descriptor = [f for f in face_descriptor]

                    # 描述符增加进data文件
                    line = [faceId, userName, face_descriptor]
                    # 写入
                    csv_writer.writerow(line)

                    # 保存照片样本

                    print('人脸注册成功 {count}/{faceCount},faceId:{faceId},userName:{userName}'.format(count=(count + 1),
                                                                                                  faceCount=faceCount,
                                                                                                  faceId=faceId,
                                                                                                  userName=userName))

                    frame = cv2AddChineseText(frame,
                                              "注册成功 {count}/{faceCount}".format(count=(count + 1), faceCount=faceCount),
                                              (l, b + 30), textColor=(255, 0, 255), textSize=30)
                    show_time = time.time()

                    # 时间重置
                    startTime = now
                    # 次数加一
                    count += 1


            else:
                print('人脸注册完毕')
                f.close()
                cap.release()
                cv2.destroyAllWindows()
                return

        now = time.time()
        fpsText = 1 / (now - frameTime)
        frameTime = now
        # 绘制
        drawLeftInfo(frame, fpsText, 'Register')

        cv2.imshow('Face Attendance Demo: Register', frame)
        if cv2.waitKey(10) & 0xFF == ord('q'):
            break
    f.close()
    cap.release()
    cv2.destroyAllWindows()
此时执行:
faceRegiser(3,"用户B")
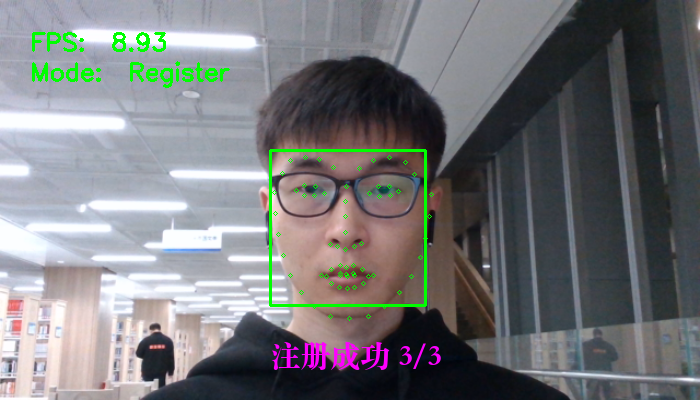
人脸注册成功 1/3,faceId:3,userName:用户B
人脸注册成功 2/3,faceId:3,userName:用户B
人脸注册成功 3/3,faceId:3,userName:用户B
人脸注册完毕
其features文件:

B. 识别、打卡
识别步骤如下:
- 打开摄像头获取画面
- 根据画面中的图片获取里面的人脸特征描述符
- 根据特征描述符将其与feature.csv文件里特征做距离判断
- 获取ID、NAME
- 考勤记录写入attendance.csv里
这里与上面流程相似,不过是加了一个对比功能,距离小于阈值,则表示匹配成功。就加快速度不一步步来了,代码如下:
# 刷新右侧考勤信息
def updateRightInfo(frame, face_info_list, face_img_list):
# 重新绘制逻辑:从列表中每隔3个取一批显示,新增人脸放在最前面
# 如果有更新,重新绘制
# 如果没有,定时往后移动
left_x = 30
left_y = 20
resize_w = 80
offset_y = 120
index = 0
frame_h = frame.shape[0]
frame_w = frame.shape[1]
for face in face_info_list[:3]:
name = face[0]
time = face[1]
face_img = face_img_list[index]
# print(face_img.shape)
face_img = cv2.resize(face_img, (resize_w, resize_w))
offset_y_value = offset_y * index
frame[(left_y + offset_y_value):(left_y + resize_w + offset_y_value), -(left_x + resize_w):-left_x] = face_img
cv2.putText(frame, name, ((frame_w - (left_x + resize_w)), (left_y + resize_w) + 15 + offset_y_value),
cv2.FONT_ITALIC, 0.5, (0, 255, 0), 1)
cv2.putText(frame, time, ((frame_w - (left_x + resize_w)), (left_y + resize_w) + 30 + offset_y_value),
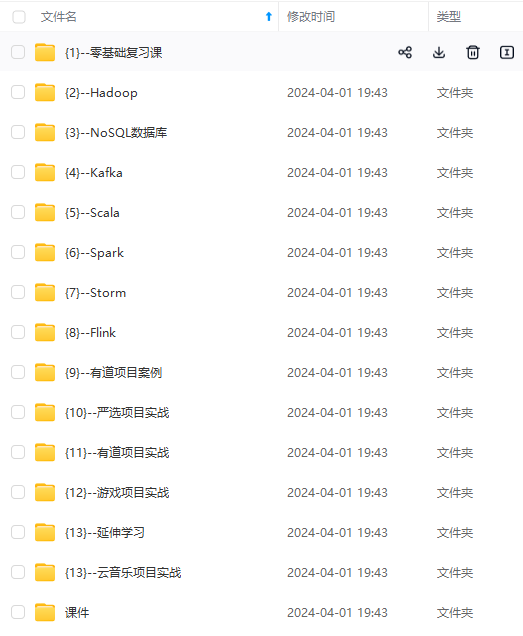
**既有适合小白学习的零基础资料,也有适合3年以上经验的小伙伴深入学习提升的进阶课程,涵盖了95%以上大数据知识点,真正体系化!**
**由于文件比较多,这里只是将部分目录截图出来,全套包含大厂面经、学习笔记、源码讲义、实战项目、大纲路线、讲解视频,并且后续会持续更新**
**[需要这份系统化资料的朋友,可以戳这里获取](https://bbs.csdn.net/forums/4f45ff00ff254613a03fab5e56a57acb)**
ame, time, ((frame_w - (left_x + resize_w)), (left_y + resize_w) + 30 + offset_y_value),
[外链图片转存中...(img-GIU8Xd5p-1715421930893)]
[外链图片转存中...(img-W51KLhAk-1715421930893)]
[外链图片转存中...(img-DHYiM2d7-1715421930894)]
**既有适合小白学习的零基础资料,也有适合3年以上经验的小伙伴深入学习提升的进阶课程,涵盖了95%以上大数据知识点,真正体系化!**
**由于文件比较多,这里只是将部分目录截图出来,全套包含大厂面经、学习笔记、源码讲义、实战项目、大纲路线、讲解视频,并且后续会持续更新**
**[需要这份系统化资料的朋友,可以戳这里获取](https://bbs.csdn.net/forums/4f45ff00ff254613a03fab5e56a57acb)**


 3080
3080

 被折叠的 条评论
为什么被折叠?
被折叠的 条评论
为什么被折叠?
 到【灌水乐园】发言


