


先自我介绍一下,小编浙江大学毕业,去过华为、字节跳动等大厂,目前阿里P7
深知大多数程序员,想要提升技能,往往是自己摸索成长,但自己不成体系的自学效果低效又漫长,而且极易碰到天花板技术停滞不前!
因此收集整理了一份《2024年最新网络安全全套学习资料》,初衷也很简单,就是希望能够帮助到想自学提升又不知道该从何学起的朋友。
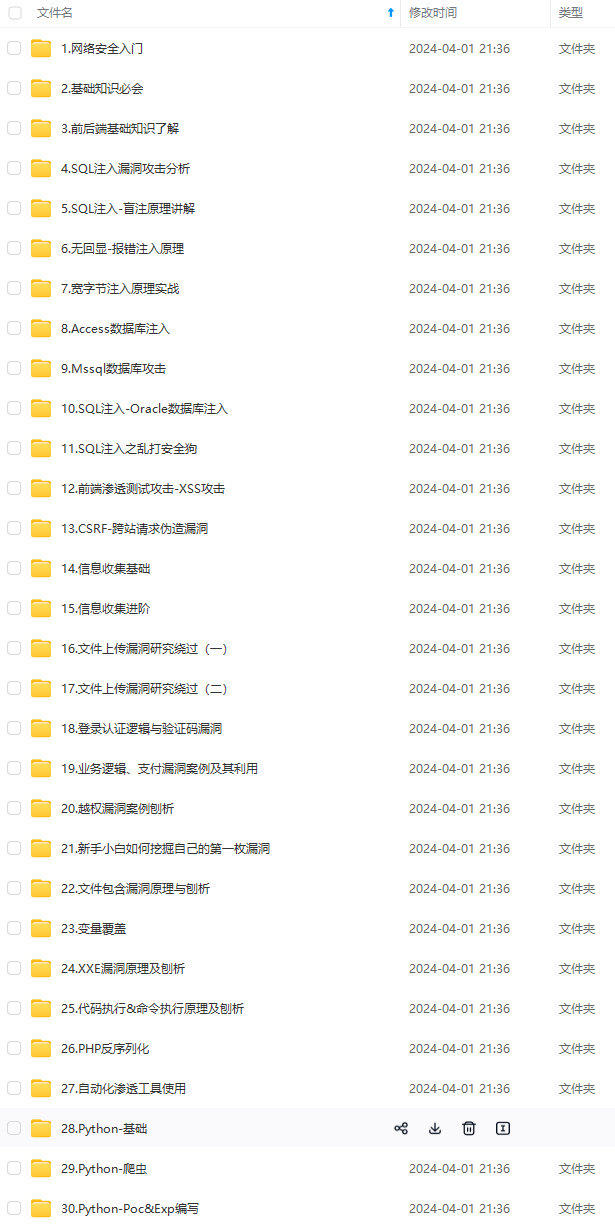
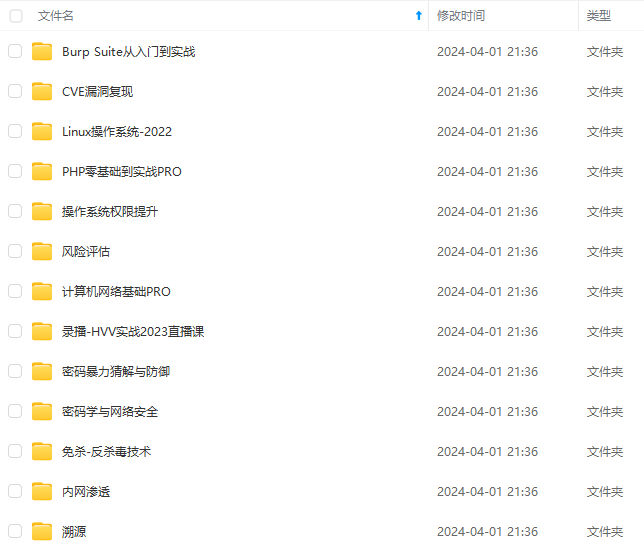
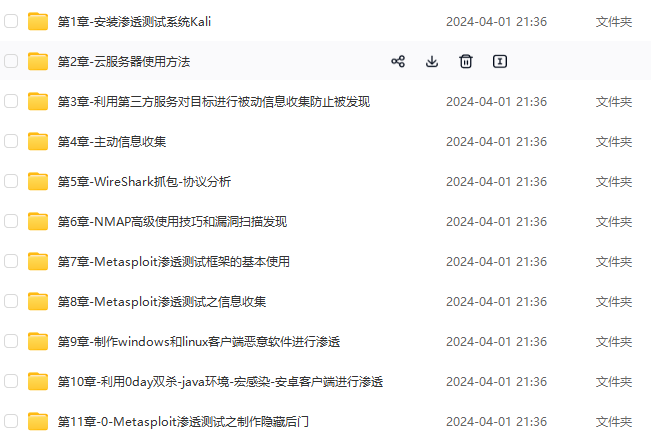
既有适合小白学习的零基础资料,也有适合3年以上经验的小伙伴深入学习提升的进阶课程,涵盖了95%以上网络安全知识点,真正体系化!
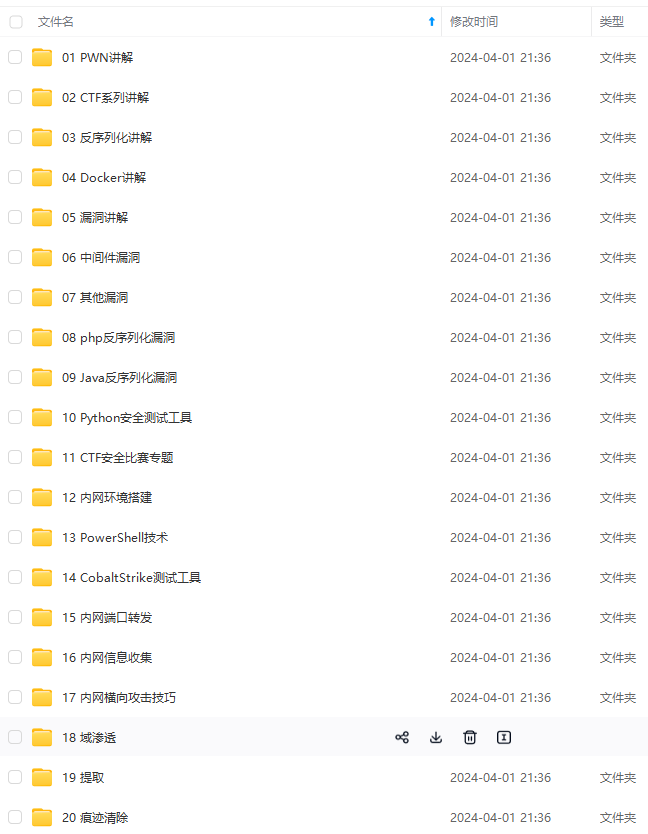
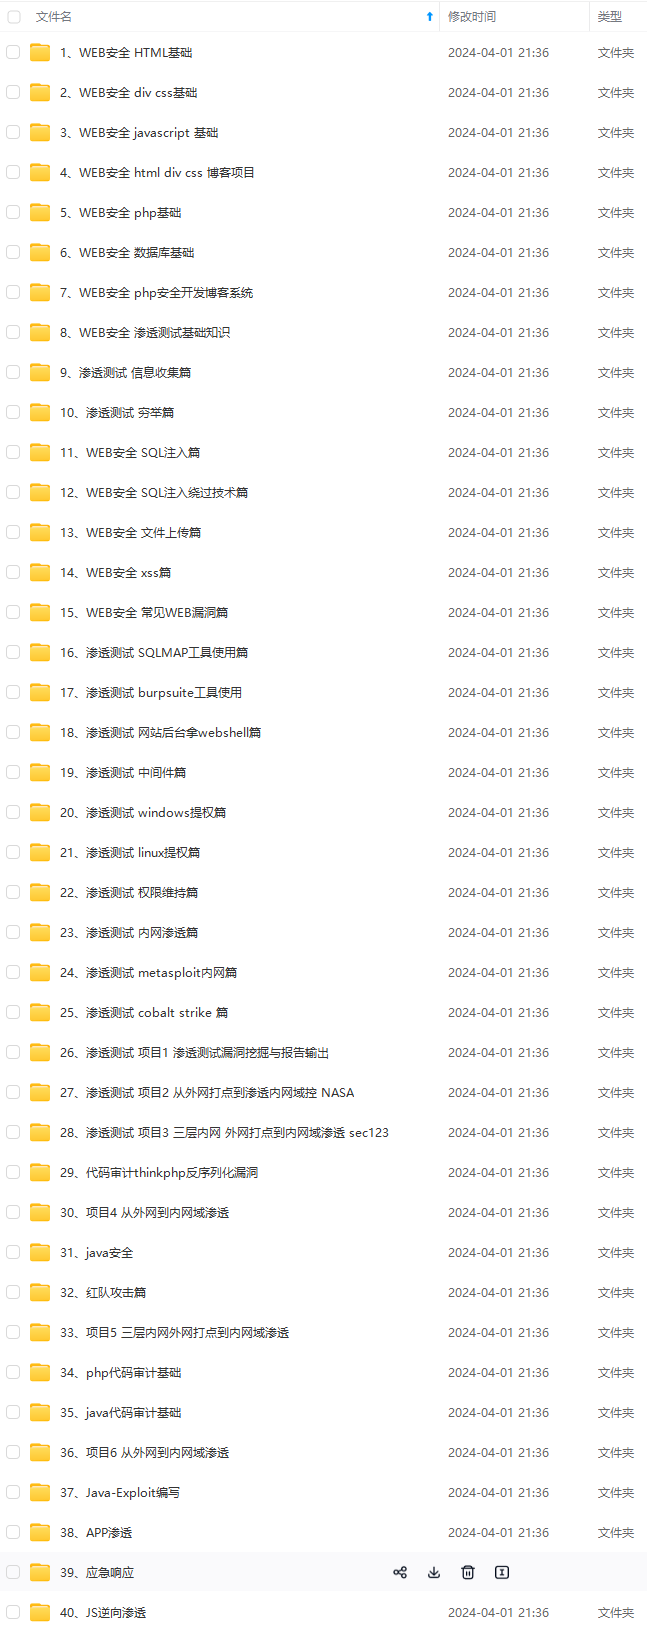
由于文件比较多,这里只是将部分目录截图出来,全套包含大厂面经、学习笔记、源码讲义、实战项目、大纲路线、讲解视频,并且后续会持续更新
如果你需要这些资料,可以添加V获取:vip204888 (备注网络安全)

正文
SpringSecurity简介
1、简介
2、Security适配器
SpringSecurity核心类
1、Authentication类
2、SecurityContextHolder类
3、UserDetails类
4、UserDetailsService类
5、GrantedAuthority类
6、DaoAuthenticationProvider类
7、PasswordEncoder类
SpringSecurity的验证机制
1、SpringSecurity的验证机制
搭建项目
1、新建Springboot项目
2、项目结构。
编写代码
1、登录页面
2、登录成功页面
3、Security配置类
4、认证成功处理类LoginSuccessHandle
5、测试控制器
6、测试应用
用户和权限保存在数据库中
1、修改后项目的目录结构。
2、添加依赖
3、配置基本属性。
4、创建用户类和角色权限实体类
5、创建数据访问接口
6、创建自定义服务类Service
7、修改配置类
8、测试应用
9、案例下载
SpringSecurity简介
1、简介
SpringSecurity是一个能够基于Spring的应用程序提供声明式安全保护的安全性框架,它提供了一组可以在Spring应用上下文中配置的Bean,充分利用了SpringIOC(控制反转)和AOP(面向切面编程)功能,为应用系统提供安全访问控制功能,减少了为系统安全控制编写大量重复代码的工作。
官网地址:https://spring.io/projects/spring-security
安全框架主要包含两个操作。
认证:确认用户可以访问当前系统。
授权:确定用户在当前系统中是否能够执行某个操作,即用户所拥有的功能权限。
2、Security适配器
创建一个自定义类继承WebSecurityConfigurerAdapter,并在改类中使用@EnableWebSecurity注解就可以通过重写config方法类配置所需要的安全配置。
WebSecurityConfigurerAdapter是SpringSecurity为Web应用提供的一个适配器,实现了WebSecurityConfigurerAdapter接口,提供了两个方法用于重写开发者需要的安全配置。
protected void configure(HttpSecurity http) throws Exception {
}
protected void configure(AuthenticationManagerBuilder auth) throws Exception {
}
configure(HttpSecurity http)方法中可以通过HTTPSecurity的authorizeRequests()方法定义那些URL需要被保护、那些不需要被保护;通过formLogin()方法定义当前需要用户登录的时候,跳转到的登录页面。
configure(AuthenticationManagerBuilder auth)方法用于创建用户和用户的角色。
用户认证
SpringSecurity是通过configure(AuthenticationManagerBuilder auth)完成用户认证的。使用AuthenticationManagerBuilder的inMemoryAuthentication()方法可以添加用户,并给用户指定权限。
@Override
protected void configure(AuthenticationManagerBuilder auth) throws Exception {
auth.inMemoryAuthentication().withUser(“aaa”).password(“{noop}1234”).roles(“USER”);
auth.inMemoryAuthentication().withUser(“admin”).password(“{noop}admin”).roles(“ADMIN”, “DBA”);
}
上面的代码中添加了两个用户,其中一个用户名是“aaa”,密码是“1234”,用户权限是“USER”;另一个用户名是“admin”,密码是“admin”,用户权限有两个,分别是“ADMIN”和“DBA”。需要注意的是SpringSecurity保存用户权限的时候,会默认使用“ROLE_”,也就是说“USER”实际上是“ROLE_USER”,“ADMIN”实际是“ROLE_ADMIN”,“DBA”实际上是“ROLE_DBA”。
当然,也可以查询数据库获取用户和权限。下面有写到。
用户授权
SpringSecurity是通过configure(HttpSecurity http)完成用户授权的。
HTTPSecurity的authorizeRequests()方法有多个子节点,每个macher按照它们的声明顺序执行,指定用户可以访问的多个URL模式。
-
antMatchers使用Ant风格匹配路径。
-
regexMatchers使用正则表达式匹配路径。
在匹配了请求路径后,可以针对当前用户的信息对请求路径进行安全处理。下表是SpringSecurity提供的安全处理方法。
| 方法 | 用途 |
| anyRequest | 匹配所有请求路径 |
| access(String) | Spring EL 表达式结果为true时可以访问 |
| anonymous() | 匿名可以访问 |
| denyAll() | 用户不能访问 |
| fullyAuthenticated() | 用户完全认证可以访问(非remember-me下自动登录) |
| hasAnyAuthority(String...) | 如果有参数,参数表示权限,则其中任何一个权限可以访问 |
| hasAnyRole(String...) | 如果有参数,参数表示角色,则其中任何一个角色可以访问 |
| hasAuthority(String...) | 如果有参数,参数表示权限,则其权限可以访问 |
| hasIpAddress(String) | 如果有参数,参数表示IP地址,如果用户IP和参数匹配,则可以访问 |
| hasRole(String) | 如果有参数,参数表示角色,则其角色可以访问 |
| permitAll() | 用户可以任意访问 |
| rememberMe() | 允许通过remember-me登录的用户访问 |
| authenticated() | 用户登录后可访问 |
示例代码如下:
@Override
protected void configure(HttpSecurity http) throws Exception {
http.csrf().disable(); //安全器令牌
http.authorizeRequests()
.antMatchers(“/login”).permitAll()
.antMatchers(“/”, “/home”).hasRole(“USER”)
.antMatchers(“/admin/**”).hasAnyRole(“ADMIN”, “DBA”)
.anyRequest().authenticated()
.and()
.formLogin()
.loginPage(“/login”)
.usernameParameter(“loginName”).passwordParameter(“password”)
.defaultSuccessUrl(“/main”)
.failureUrl(“/login?error”)
.and()
.logout()
.permitAll()
.and()
.exceptionHandling().accessDeniedPage(“/accessDenied”);
}
-
http.authorizeRequests() 开始请求权限配置。
-
antMatchers(“/login”).permitAll() 请求匹配“/login”,所有用户都可以访问。
-
antMatchers(“/”, “/home”).hasRole(“USER”) 请求匹配“/”和“/home”,拥有“ROLE_USER”角色的用户可以访问。
-
antMatchers(“/admin/**”).hasAnyRole(“ADMIN”, “DBA”) 请求匹配“/admin/**”,拥有“ROLE_ADMIN”或“ROLE_DBA”角色的用户可以访问。
-
anyRequest().authenticated() 其余所有的请求都需要认证(用户登录)之后才可以访问。
-
formLogin() 开始设置登录操作
-
loginPage(“/login”) 设置登录页面的访问地址
-
usernameParameter(“loginName”).passwordParameter(“password”) 登录时接收传递的参数“loginName”的值作为用户名,接收传递参数的“password”的值作为密码。如果不设置,默认“username”为用户名,“password”为密码
-
defaultSuccessUrl(“/main”) 指定登录成功后转向的页面。
-
failureUrl(“/login?error”) 指定登录失败后转向的页面和传递的参数。
-
logout() 设置注销操作
-
permitAll() 所有用户都可以访问。
-
exceptionHandling().accessDeniedPage(“/accessDenied”) 指定异常处理页面
SpringSecurity核心类
SpringSecurity核心类包括Authentication、SecurityContextHolder、UserDetails、UserDetailsService、GrantedAuthority、DaoAuthenticationProvider和PasswordEncoder。只要掌握了这些SpringSecurity核心类,SpringSecurity就会变得非常简单。
1、Authentication类
Authentication用来表示用户认证信息,用户登录认证之前,SpringSecurity会将相关信息封装为一个Authentication具体实现类的对象,在登录认证成功之后又会生成一个信息更全面、包含用户权限等信息的Authentication对象,然后把它保存在SecurityContextHolder所持有的SecurityContext中,供后续的程序进行调用,如访问权限的鉴定等。
SecurityContextHolder中的getContext()方法
public static SecurityContext getContext() {
return strategy.getContext();
}
2、SecurityContextHolder类
SecurityContextHolder是用来保存SecurityContext的。SecurityContext中含有当前所访问系统的用户的详细信息。默认情况下,SecurityContextHolder将使用ThreadLocal来保存SecurityContext,这也就意味着在处于同一线程的方法中,可以从ThreadLocal获取到当前的SecurityContext。
SpringSecurity使用一个Authentication对象来描述当前用户的相关信息。SecurityContextHolder中持有的是当前用户的SecurityContext,而SecurityContext持有的是代表当前用户相关信息的Authentication的引用。这个Authentication对象不需要我们自己创建,在与系统交互的过程中,SpringSecurity会自动创建相应的Authentication对象,然后赋值给当前的SecurityContext。开发过程中常常需要在程序中获取当前用户的相关信息,比如最常见的获取当前登录用户的用户名。
String username = SecurityContextHolder.getContext().getAuthentication().getName();
获取UserDetails类,该类中包含用户认证相关等信息。
UserDetails userDetails = (UserDetails) SecurityContextHolder.getContext().getAuthentication().getPrincipal();
3、UserDetails类
UserDetails是SpringSecurity的一个核心接口。其中定义了一些可以获取用户名,密码、权限等与认证相关的信息的方法。SpringSecurity内部使用UserDetails实现类大都是内置的User类,要使用UserDetails,也可以直接使用该类。在SpringSecurity内部,很多需要使用用户信息的时候,基本上都是使用UserDetails,比如在登录认证的时候。
通常需要在应用中获取当前用户的其他信息,如E-mail、电话等。这时存放在Authentication中的principal只包含认证相关信息的UserDetails对象可能就不能满足我们的要求了。这时可以实现自己的UserDetails,在该实现类中可以定义一些获取用户其他信息的方法,这样将来就可以直接从当前SecurityContext的Authentication的principal中获取这些信息。
UserDetails是通过UserDetailsService的loadUserByUsername()方法进行加载的,UserDetailsService也是一个接口,我们也需要实现自己的UserDetailsService来加载自定义的UserDetails信息。
新建用户表的Service类实现UserDetailsService接口,来重写UserDetailsService的loadUserByUsername()方法,根据用户名查询当前用户信息并返回,返回的类必须继承Security内置的User类。
@Service
public class SysUserService implements UserDetailsService{
@Override
public UserDetails loadUserByUsername(String username) throws UsernameNotFoundException{
}
}
4、UserDetailsService类
Authentication.getPrincipal() 的返回类型是Object。
Object getPrincipal();
但很多情况下返回的其实是一个UserDetails的实例。登录认证的时候SpringSecurity会通过UserDetailsService的loadUserByUsername()方法获取对应的UserDetails进行认证,认证通过后会将该UserDetails赋给认证通过的Authentication的Principal,然后在把该Authentication存入SecurityContext。之后如果需要使用用户信息,可以通过SecurityContextHolder获取存放在SecurityContext中的Authentication的principal,转为UserDetails类。
UserDetails userDetails = (UserDetails) SecurityContextHolder.getContext().getAuthentication().getPrincipal();
5、GrantedAuthority类
Authentication的getAuthorities()方法可以返回当前Authentication对象用户的所有的权限。
Collection<? extends GrantedAuthority> getAuthorities();
即当前用户拥有的权限。其返回值是一个GrantedAuthority类型的数组,每一个GrantedAuthority对象代表赋予给当前用户的一种权限。GrantedAuthority是一个接口,其通常是通过UserDetailsService进行加载,然后赋予UserDetails的。
GrantedAuthority中只定义了一个getAuthority()方法,该方法返回一个字符串,表示对应的权限,如果对应权限不能用字符串表示,则返回null
获取当前用户的所有权限,存放到List集合中。
UserDetails userDetails = (UserDetails) SecurityContextHolder.getContext().getAuthentication().getPrincipal();
List roleCodes=new ArrayList<>();
for (GrantedAuthority authority : userDetails.getAuthorities()) {
roleCodes.add(authority.getAuthority());
}
6、DaoAuthenticationProvider类
SpringSecurity默认了会使用DaoAuthenticationProvider实现AuthenticationProvider接口,专门进行用户认证的处理。DaoAuthenticationProvider在进行认证的时候需要一个UserDetailsService来获取用户的信息UserDetails,其中包括用户名,密码和所拥有的权限等。如果需要改变认证的方式,开发者可以实现自己的AuthenticationProvider。
7、PasswordEncoder类
在SpringSecurity中,对密码的加密都是由PasswordEncoder来完成的。在SpringSecurity中,已经对PasswordEncoder有了很多实现,包括md5加密,SHA-256加密等,开发者只需要直接拿来用就可以。在DaoAuthenticationProvider中,有一个就是PasswordEncoder熟悉,密码加密功能主义靠它来完成。
SpringSecurity的验证机制
1、SpringSecurity的验证机制
SpringSecurity大体上是由一堆Filter实现的,Filter会在SpringMVC前拦截请求。Filter包括登出Filter(LogoutFilter)、用户名密码验证Filter(UsernamePasswordAuthenticationFilter)之类。Filter在交由其他组件完成细分的功能,最常用的UsernamePasswordAuthenticationFilter会持有一个AuthenticationManager引用,AuthenticationManager是一个验证管理器,专门负责验证。但AuthenticationManager本身并不做具体的验证工作,AuthenticationManager持有一个AuthenticationProvider集合,AuthenticationProvider才是做验证工作的组件,验证成功或失败之后调用对应的Handler。
搭建项目
1、新建Springboot项目
创建一个SpringBoot项目,添加SpringSecurity和Thymeleaf依赖。

pom.xml完整代码。
<?xml version="1.0" encoding="UTF-8"?><project xmlns=“http://maven.apache.org/POM/4.0.0” xmlns:xsi=“http://www.w3.org/2001/XMLSchema-instance”
xsi:schemaLocation=“http://maven.apache.org/POM/4.0.0 https://maven.apache.org/xsd/maven-4.0.0.xsd”>
4.0.0
org.springframework.boot
spring-boot-starter-parent
2.2.2.RELEASE
com.mcy
security-demo
0.0.1-SNAPSHOT
security-demo
Demo project for Spring Boot
<java.version>1.8</java.version>
org.springframework.boot
spring-boot-starter-web
org.springframework.boot
spring-boot-starter-security
org.springframework.boot
spring-boot-starter-thymeleaf
org.thymeleaf.extras
thymeleaf-extras-springsecurity5
org.springframework.boot
spring-boot-starter-test
test
org.junit.vintage
junit-vintage-engine
org.springframework.security
spring-security-test
test
org.springframework.boot
spring-boot-maven-plugin
2、项目结构。

编写代码
1、登录页面
用于测试的HTML页面,用了bootstrap的样式文件。
login.html登录页面,主要有一个form表单和账号密码输入框,用于向login请求提交username和password,从而进行登录。Security默认登录地址login,退出地址为logout。代码如下。
用户名或密码错误!
注销成功!
//sec:authorize可以判断用户是否登录,用户权限,设置该菜单是否显示
未登录显示
登录显示
用于用户名或密码错误提示。
用户名或密码错误!
退出,注销提示。
注销成功!
注意这些提示都是SpringSecurity里边自带的。
sec:authorize用于判断用户是否登录,用户是否拥有哪些角色权限,一般在前台页面控制菜单是否显示。
2、登录成功页面
home.html是ROLE_USER用户登录之后显示的页面,同时提供了一个超链接到admin页面,代码如下。
Home页面
欢迎[用户名]访问Home页面!
您的权限是:权限
admin.html是ROLE_ADMIN用户登录之后显示的页面,同时提供了一个到dba页面的超链接,代码如下。
Admin页面
欢迎[用户名]访问Admin页面!
您的权限是:权限
dba.html页面只是显示简单的欢迎语句,代码如下。
dba页面
欢迎[用户名]访问dba页面!
您的权限是:权限
未登录显示
登录显示
权限包含ROLE_ADMIN显示
权限不包含ROLE_ADMIN登录显示
accessDenied.html是访问拒绝页面,如果登录的用户没有权限访问该页面,会进行提示,代码如下。
AccessDenied页面
欢迎[用户名],您没有权限访问页面!
您的权限是:权限
3、Security配置类
在项目中新建一个security包,在该包下新建一个WebSecurityConfig类,继承WebSecurityConfigurerAdapter类,用于处理SpringSecurity的用户认证和授权操作,设置页面访问权限。
configure(AuthenticationManagerBuilder auth)和configure(HttpSecurity http)两个方法中分别打印了一句话,用于启动项目时的跟踪调试。
successHandler(new LoginSuccessHandle())用于处理登出成功之后的操作,LoginSuccessHandle类用于处理不同用户跳转到不同页面。
具体代码如下。
import org.springframework.context.annotation.Configuration;
import org.springframework.security.config.annotation.authentication.builders.AuthenticationManagerBuilder;
import org.springframework.security.config.annotation.web.builders.HttpSecurity;
import org.springframework.security.config.annotation.web.configuration.WebSecurityConfigurerAdapter;
@Configuration
public class WebSecurityConfig extends WebSecurityConfigurerAdapter {
/**
-
用户认证操作
-
@param auth
-
@throws Exception
*/
@Override
protected void configure(AuthenticationManagerBuilder auth) throws Exception {
System.out.println(“WebSecurityConfig configure(AuthenticationManagerBuilder auth) 方法被调用。。。。。。”);
//添加用户,并给予权限
auth.inMemoryAuthentication().withUser(“aaa”).password(“{noop}1234”).roles(“USER”);
auth.inMemoryAuthentication().withUser(“admin”).password(“{noop}admin”).roles(“ADMIN”, “DBA”);
}
/**
-
用户授权操作
-
@param http
-
@throws Exception
*/
@Override
protected void configure(HttpSecurity http) throws Exception {
System.out.println(“WebSecurityConfig configure(HttpSecurity http) 方法被调用。。。。。。”);
http.csrf().disable(); //安全器令牌
http.authorizeRequests() //开始请求权限配置。
.antMatchers(“/login”, “/static/**”).permitAll()
.antMatchers(“/”, “/home”).hasRole(“USER”)
.antMatchers(“/admin/**”).hasAnyRole(“ADMIN”, “DBA”)
.anyRequest().authenticated() //其余所有的请求都需要认证(用户登录)之后才可以访问。
.and()
.formLogin() //开始设置登录操作
.loginPage(“/login”) //设置登录页面的访问地址
//.defaultSuccessUrl(“/main”) //指定登录成功后转向的页面。
.successHandler(new LoginSuccessHandle()) //登录成功跳转,LoginSuccessHandle处理不同权限跳转不同页面
.failureUrl(“/login?error”) //指定登录失败后转向的页面和传递的参数。
.and()
.logout().permitAll() //退出
.and()
.exceptionHandling().accessDeniedPage(“/accessDenied”); //指定异常处理页面
}
}
4、认证成功处理类LoginSuccessHandle
认证成功处理类LoginSuccessHandle,实现了AuthenticationSuccessHandler接口,是Spring用来处理用户认证授权并跳转到指定URL的。
重新onAuthenticationSuccess方法,获取当前用户的权限,根据权限跳转到指定的URL路径,代码如下。
import javax.servlet.Servlet;
import javax.servlet.http.HttpServletRequest;
import javax.servlet.http.HttpServletResponse;
import org.springframework.security.core.Authentication;
import org.springframework.security.core.authority.AuthorityUtils;
import org.springframework.security.web.authentication.AuthenticationSuccessHandler;
import java.io.IOException;
import java.util.Set;
public class LoginSuccessHandle implements AuthenticationSuccessHandler {
@Override
public void onAuthenticationSuccess(HttpServletRequest request, HttpServletResponse response, Authentication authentication)throws IOException {
//authentication.getAuthorities() 获取当前用户的权限
Set roles = AuthorityUtils.authorityListToSet(authentication.getAuthorities());
//获取到登陆者的权限,然后做跳转
if (roles.contains(“ROLE_ADMIN”)){
response.sendRedirect(“/admin”);
return;
}else if (roles.contains(“ROLE_USER”)){
response.sendRedirect(“/home”);
return;
}else {
response.sendRedirect(“/accessDenied”);
}
}
}
5、测试控制器
新建一个IndexController控制器,提供响应login,home,admin,dba,AccessDenied请求的方法。每个方法通过getUsername()方法获得当前认证用户的用户名,通过getAuthorith()方法获取当前认证用户的权限,并设置到ModelMap当中。
import org.springframework.security.core.Authentication;
import org.springframework.security.core.GrantedAuthority;
import org.springframework.security.core.context.SecurityContextHolder;
import org.springframework.stereotype.Controller;
import org.springframework.ui.ModelMap;
import org.springframework.web.bind.annotation.RequestMapping;
import org.springframework.web.bind.annotation.RequestMethod;
import java.util.ArrayList;
import java.util.List;
@Controller
public class IndexController {
@RequestMapping(value = {“/”, “/login”}, method = RequestMethod.GET)
public String index(){
return “login”;
}
@RequestMapping(“/home”)
public String homePage(ModelMap map){
map.put(“user”, getUsername());
map.put(“role”, getAuthority());
return “home”;
}
@RequestMapping(“/admin”)
public String admin(ModelMap map){
map.put(“user”, getUsername());
map.put(“role”, getAuthority());
return “admin”;
}
@RequestMapping(“/dba”)
public String dba(ModelMap map){
map.put(“user”, getUsername());
map.put(“role”, getAuthority());
return “dba”;
}
@RequestMapping(“/accessDenied”)
public String accessDenied(ModelMap map){
学习路线:
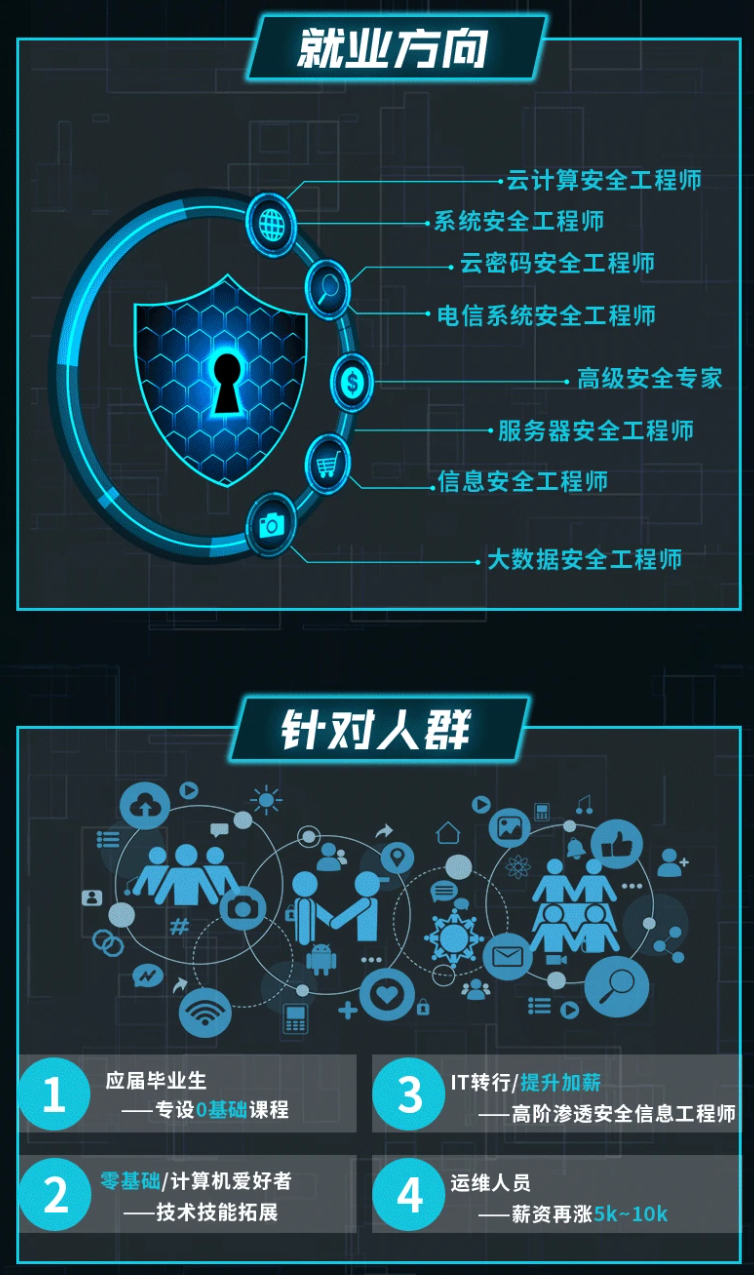
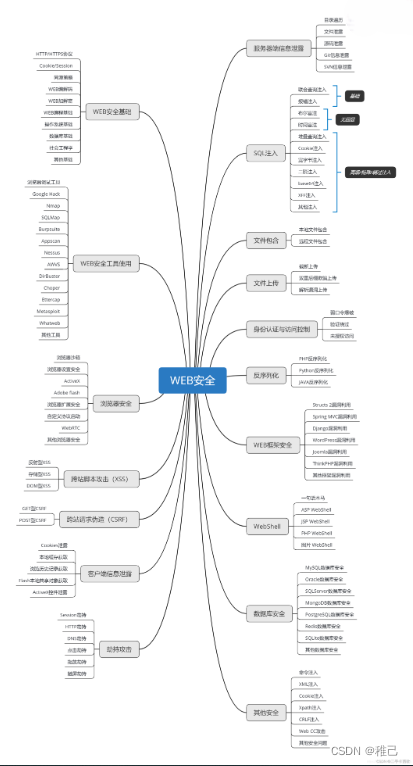
这个方向初期比较容易入门一些,掌握一些基本技术,拿起各种现成的工具就可以开黑了。不过,要想从脚本小子变成黑客大神,这个方向越往后,需要学习和掌握的东西就会越来越多以下是网络渗透需要学习的内容:
网上学习资料一大堆,但如果学到的知识不成体系,遇到问题时只是浅尝辄止,不再深入研究,那么很难做到真正的技术提升。
需要这份系统化的资料的朋友,可以添加V获取:vip204888 (备注网络安全)
一个人可以走的很快,但一群人才能走的更远!不论你是正从事IT行业的老鸟或是对IT行业感兴趣的新人,都欢迎加入我们的的圈子(技术交流、学习资源、职场吐槽、大厂内推、面试辅导),让我们一起学习成长!
import org.springframework.web.bind.annotation.RequestMapping;
import org.springframework.web.bind.annotation.RequestMethod;
import java.util.ArrayList;
import java.util.List;
@Controller
public class IndexController {
@RequestMapping(value = {“/”, “/login”}, method = RequestMethod.GET)
public String index(){
return “login”;
}
@RequestMapping(“/home”)
public String homePage(ModelMap map){
map.put(“user”, getUsername());
map.put(“role”, getAuthority());
return “home”;
}
@RequestMapping(“/admin”)
public String admin(ModelMap map){
map.put(“user”, getUsername());
map.put(“role”, getAuthority());
return “admin”;
}
@RequestMapping(“/dba”)
public String dba(ModelMap map){
map.put(“user”, getUsername());
map.put(“role”, getAuthority());
return “dba”;
}
@RequestMapping(“/accessDenied”)
public String accessDenied(ModelMap map){
学习路线:
这个方向初期比较容易入门一些,掌握一些基本技术,拿起各种现成的工具就可以开黑了。不过,要想从脚本小子变成黑客大神,这个方向越往后,需要学习和掌握的东西就会越来越多以下是网络渗透需要学习的内容:
网上学习资料一大堆,但如果学到的知识不成体系,遇到问题时只是浅尝辄止,不再深入研究,那么很难做到真正的技术提升。
需要这份系统化的资料的朋友,可以添加V获取:vip204888 (备注网络安全)
[外链图片转存中…(img-A5F201Fo-1713365137196)]
一个人可以走的很快,但一群人才能走的更远!不论你是正从事IT行业的老鸟或是对IT行业感兴趣的新人,都欢迎加入我们的的圈子(技术交流、学习资源、职场吐槽、大厂内推、面试辅导),让我们一起学习成长!


 836
836


 被折叠的 条评论
为什么被折叠?
被折叠的 条评论
为什么被折叠?
 到【灌水乐园】发言


