


网上学习资料一大堆,但如果学到的知识不成体系,遇到问题时只是浅尝辄止,不再深入研究,那么很难做到真正的技术提升。
一个人可以走的很快,但一群人才能走的更远!不论你是正从事IT行业的老鸟或是对IT行业感兴趣的新人,都欢迎加入我们的的圈子(技术交流、学习资源、职场吐槽、大厂内推、面试辅导),让我们一起学习成长!
将子盒子改为行内块模式,通过text-align和line-height来实现
		.wrapper{
            width: 600px;
            height: 600px;
            background-color: pink;
            text-align: center; // 左右居中
            line-height: 600px; // 上下居中
        }
        .box{
            width: 300px;
            height: 300px;
            background-color: skyblue;
            display: inline-block;
            vertical-align: middle;
        }
利用定位50%,加上负的margin实现
		.wrapper{
            width: 600px;
            height: 600px;
            background-color: pink;
            position: relative;
        }
        .box{
            width: 300px;
            height: 300px;
            background-color: skyblue;
            position: absolute;
            top: 50%;
            left: 50%;
            margin-left: -150px; /* 子元素一半*/
            margin-top: -150px;
        }
利用定位加margin:auto
		.wrapper{
            width: 600px;
            height: 600px;
            background-color: pink;
            position: relative;
        }
        .box{
            width: 300px;
            height: 300px;
            background-color: skyblue;
            position: absolute;
            top: 0;
            right: 0;
            bottom: 0;
            left: 0;
            margin: auto;
        }
利用定位加位移
		.wrapper{
            width: 600px;
            height: 600px;
            background-color: pink;
            position: relative;
        }
        .box{
            width: 300px;
            height: 300px;
            background-color: skyblue;
            position: absolute;
            top: 50%;
            left: 50%;
            transform: translate(-50%,-50%);
        }
利用flex盒子实现
		.wrapper{
            width: 600px;
            height: 600px;
            background-color: pink;
            display: flex;
            justify-content: center;
            align-items: center;
        }
        .box{
            width: 300px;
            height: 300px;
            background-color: skyblue;
        }
判断数据类型方式
Typeof
- typeof通常用来判断基本数据类型
- typeof用来判断null和引用数据类型都是’object’
const test=undefined;
console.log(typeof test)
// undefined
Instaceof
- a instanceof A 根据instanceof的定义:判断参照对象(大写字母A)的prototype属性所指向的对象是否在被行测对象a的原型链上
- instanceof 只能用来判断两个对象是否属于实例关系,而不能判断一个对象实例具体属于哪种类型
const arr=[1,2,2,3,3]
console.log(arr instanceof Array)
// true arr是数组实例
constructor判断
- 针对于instanceof的弊端,我们使用constructor检测,constructor是原型对象的属性指向构造函数
- 这种方式解决了instanceof的弊端,可以检测出除了undefined和null的9种类型(因为它两没有原生构造函数)
const arr=[1,2,2,3,3]
console.log(arr.constructor)
// [Function: Array]
通过Object下的toString.call()方法来判断
- 所有typeof返回值为"object"的对象,都包含一个内部属性[[Class]],我们可以把他看作一个内部的分类,而非传统意义上面向对象的类,这个属性无法直接访问,一般通过Object.prototype.toString(…)来查看
- 该方法可以对null和undifined进行判断
const arr=[1,2,2,3,3]
console.log(toString.call(arr))
// [object Array]
数组去重方法
双重for循环,利用splice方法
const arr=[1,2,2,3]
for (let i=0;i<arr.length;i++){
    for (let j=i+1;j<arr.length;j++){
        if(arr[i]=== arr[j]){ // 如果有相同,删除
            arr.splice(j,1)
        }
    }
}
console.log(arr) // [1,2,3]
建立新数组,利用indexof去重
const arr=[1,2,2,3]
const newArr=[]
for (let i=0;i<arr.length;i++){
    if(newArr.indexOf(arr[i])===-1){ // 判断新建数组中是否有这个元素,没有的话就添加
        newArr.push(arr[i])
    }
}
console.log(newArr) // [1,2,3]
利用ES6新特性去重
const arr=[1,2,2,3,3]
const newArr=Array.from(new Set(arr)) // Set去除相同元素,然后转化为真正的数组
console.log(newArr)
闭包
闭包3个特性
- 函数嵌套函数
- 函数内部引用函数外部的参数与变量
- 参数和变量不会被垃圾回收机制回收
写法
	function fun(){
        let num1=0;
        return function(){
            let num2=0
            console.log(++num1)
            console.log(++num2)
        }
    }
    const fun1=fun()
    fun1() // 1 1
    fun1() // 2 1 // 因为闭包num1被缓存了
闭包优点与缺点
- 优点
- 保护函数内变量安全,实现封装,防止变量流入其他环境中发生命名冲突
- 在内存中维持一个变量,可以做缓存
- 匿名只执行函数可以减少内存消耗
- 缺点
- 私有变量不能被销毁,增大了内存消耗,容易造成内存泄露;解决方法使用完后手动赋值为null
- 由于闭包涉及跨域访问,会导致性能损失;通过把跨域作用域变量存储在局部变量中,然后直接访问局部变量,来减轻对执行速度的影响
this指向
this概念
- 普通函数:谁调用就指向谁,没有调用者,就指向window对象
- 箭头函数:this指向函数作用域所用对象
this
全局this
- 在全局作用域下,this始终指向window
	var a=1
    console.log(this)
    console.log(this.a)
函数内的this
- 直接调用函数,指向window对象
- 被别的调用,指向调用对象
const btn=document.querySelector('.btn')
    function test(){
        console.log(this)
    }
    test() // window //注意这个在严格模式下为undefined
    window.test() // window
    btn.onclick=test // 指向<button class="btn"></button>节点
对象中的this
- 也是谁调用就指向谁
- 但得注意this丢失问题
	const obj={
        name:'obj',
        test:function(){
            console.log(this.name)
        }
    }
    obj.test() // 指向obj,显示obj
    const fun=obj.test
    fun() // 指向window,显示为空
构造函数中this
指向实例对象
	function Person(name){
        this.name=name;

    }
    const p1=new Person('jack')
    console.log(p1.name) // 指向实例对象,显示jack
原型链上this
会先在自己实例上找,没有的话,顺着原型链找
 	var oo = {
        f: function() {
            return this.a + this.b;
        }
    };

    var p = Object.create(oo);
    p.a = 1;
    p.b = 2;
    console.log(p.f()); // 3
箭头函数this
箭头函数中this是静态的,不会随着调用而改变,总是指向上一作用域中的this
var name = 'window'
    const obj = {
        name:'obj',
        fn:()=>{
            console.log(this.name)
        }
    }
    obj.fn() //window
原型链
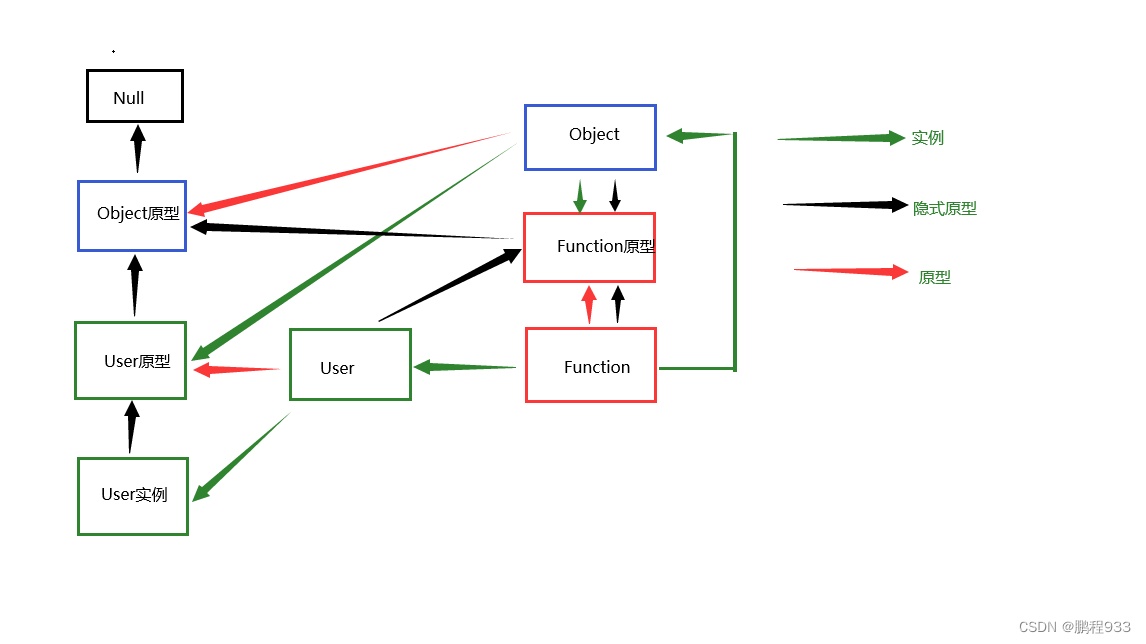
- Object的隐式原型为null
- 构造函数Function的原型和隐式原型都指向Function原型
- 原型链作用是在我们使用方法时,不仅会在实例上找,也会在原型链上查找
new函数过程发生了什么
- new时先创建一个新对象
let obj=new Object(); - 将空对象的__proto__成员指向了原函数对象prototype成员对象
obj.proto=Person.prototype - 修改this到obj上
Person.call(obj) - 返回一个对象
在地址栏输入url到页面出现,经历了那些过程
- DNS查询/解析(先看本地是否有缓存)
- 浏览器DNS缓存
- 计算机DNS缓存
- 路由器DNS缓存
- 网络运营商DNS缓存
- 递归查询查找 a.b.c.d.com
- TCP三次握手
- 浏览器告诉服务器我准备好发送请求了
- 服务器告诉浏览器我也准备好,需要再次确认一下
- 浏览器告诉给服务器确认完毕,马上发送请求
- 发送请求
- 返回响应
- 渲染页面
- 调用html解析器将HTML解析成DOM树
- 调用css解析器将CSS解析成CSSOM数
- 调用js引擎解析JS
- 如果修改了DOM节点,重新生成DOM树
- 如果修改了CSS节点,重新生成CSSOM树
- 将DOM树 + CSSOM树 = render树
- layout布局
- render渲染
- 断开连接TCP四次挥手
- 浏览器告诉服务器请求报文发送完毕
- 服务器告诉浏览器请求报文接受完毕,可以等待断开
- 服务器告诉浏览器响应报文发送完毕
- 浏览器告诉服务器响应报文接受完毕,可以断开
- 服务器断开连接,然后浏览器断开连接
Vue2数据响应式原理及缺陷
概述
当对象本身或对象属性被读和写的时候,我们需要知道该数据被操作了,并在这过程中执行一些函数,例如:render函数,而这一过程我把它定义为数据响应式
实现
Observer
- Observer通过Object.defineProperty将普通对象包装成一个带有getter\setter属性的特殊对象
- 对于对象,递归遍历对象的所有属性,以完成深度属性转换
- 对于数组,vue会重写数组的一些方法,更改Array的隐式原型
Dep
- Observe只是让Vue感觉读写操作了,具体干什么还需要Dep来做
- 主要负责在getter中收集依赖,在setter中通知依赖更新
Watcher
- 当Dep收集依赖后,当数据发生改变时,准备派发通知,不知道派发给谁,或者不知道谁用了该数据,这时就需要watcher
- 当数据发生改变时,vue不直接通知相关依赖更新,而是通知依赖对应的watcher实例去执行
Scheduler
- 当watcher收到派发的更新通知后,watcher不会立即执行,而是将自己交给一个调度器scheduler
- 调度器scheduler维护一个执行队列,同一个watcher在该队列中只会存在一次,队列中的watcher不会立即执行,而是通过nextTick的工具函数执行,nextTick是一个微队列,会把需要执行的watcher放到事件循环的微队列中执行
缺陷
- 浅度劫持,对于对象数组要进行处理
- 对象新增的属性没有响应式
- 数组的部分操作没有响应式(修改数组元素第一个的值,修改数组长度)
双向绑定原理
原理
- Vue双向绑定原理是通过数据劫持结合发布订阅者模式来实现的
- 数据和视图同步,视图变化,数据也就变化;数据变化,视图也就变化
	const obj={}
    Object.defineProperty(obj,'hello',{
        get:function(){
            console.log("调用get方法")
        },
        set:function(newVal){
            console.log("调用set方法"+newVal)
        }
    })
    obj.hello; // 调用get方法
    obj.hello='hi'; // 调用set方法hi
watch与computed,methods三者区别
作用机制上
- 侦听属性watch与计算属性computed都是以vue的依赖追踪机制(订阅者模式)为基础的,只有当一个函数变化时,才会调用相关的函数
- methods里面是用来定义函数的,需要手动调用才会执行
作用性质上
- methods中定义的是函数,你需要进行函数调用(func())
- computed是计算属性,他在使用了和data是对象中的数据类型是同一类
- watch类似于监听机制+事件机制
watch: {
   firstName: function (val) {  this.fullName = val + this.lastName }
}
/\*
\* 只有当firstName触发后才执行,而firstName对应的函数就相当于监听到事件发生后执行的方法
\*/
watch与computed异同
相同
- 他们都是在依赖数据发生改变的情况下,被依赖的数据根据预先定义好的函数,发生自动的变化
不同
- watch擅长处理
- 一个数据影响多个数据
- 当需要在数据变化时执行异步或开销较大的操作时
- watch可以监听新值与旧值
- watch属性还可以用来监听路由router的变化,只是这里的监听元素是固定的
- computed擅长处理(计算属性不能异步,异步函数return是没有任何意义的)
- 多个数据影响一个数据
- 当存在复杂逻辑、需要用到缓存时
methods
- methods与watch和computed是一种不同的概念,methods指的是方法也就是定义要用的函数,他不会主动触发需要在被调用时才会触发
- methods与computed看不出来差别,但要注意computed是存在缓存的
Vue组件为啥需要name属性
- 当项目使用keep-alive缓存时,可用组件name属性进行缓存过滤
- 当组件有name时,就可以组件自己调用自己(递归调用)
- 使用vue-tool时,工具中组件名就是name属性决定的
Vue传值方式
props与$emit(在封装的组件中很常用)
- 在父组件中通过属性传值与子组件,子组件在props接收
- 子组件通过this.$emit(‘事件名’,值),父组件通过@事件名="事件处理函数"接受父组件传递的值
Vue.prototype.$bus
- 在mian.js中定义
  new Vue({
  	......
  	beforeCreate() {
  		Vue.prototype.$bus = this //安装全局事件总线,$bus就是当前应用的vm
  	}
  })
- 要传值的组件定义this. b u s . bus. bus.emit(‘事件名’,值)
- 接收值的组件定义this. b u s . bus. bus.on(‘事件名’,回调函数),也可以通过this. b u s . bus. bus.off(‘事件名’)解绑事件
VueX
- state 用来存储数据
- mutation 用来对state进行成员操作
- getters 加工state成员给外界
- actions 也是用来对state进行成员操作不过是异步操作而且需要提交给mutation,在action中不能直接更改
- modules 模块化状态管理
ref传值
- 在父组件中在子组件上绑定ref,通过this.$refs.ref名字.子组件接受方法(数据)
 <Test ref="test"/>
 ...
 this.$refs.test.childMethod('val12343');
- 子组件定义方法接受子组件接受方法(val){ // val就是传过来的值}
methods: {
    childMethod(val) {
      console.log(val); // val就是传过来的值 val12343
    },
  },
LoaclStorage(存储于本地)
- 先将需要的值存储于本地localStorage.setItem(“存储名”,存储值)
- 获取值通过localStorage.getItem(“存储名”)
- 不需要时也可以删除localStorage.removeItem(“存储名”)
Vue-router路由实现原理
Hash路由模式
- hash虽然标记在url中,但他不会发送网络请求,对服务端完全无用
- 通过window.location.hash实现的
History路由模式
- 通过window.history实现的
- 分别通过调用history.pushState()和history.replaceState()方法来实现push和replace方法
- pushState和replaceState方法修改浏览器历史记录栈后,虽然当前URL改变了,但浏览器不会立即发送请求该URL,这为更新视图但不重新发送请求提供了基础
- Hash与History两种模式的go、back和forward三个方法都是通过window.history.go()来实现的
Abstract模式
vue-router为非浏览器环境准备了一个abstract模式,其原理为用一个数组stack模拟出浏览器历史记录栈的功能
Vue-router传参
router-link传参
params
<router-link :to="{name:'home',params:{id:1}}" />
<router-link :to="{path:'home',params:{id:1}}" />
// 取参 this.$route.params.id
query
<router-link :to="{name:'home',query:{id:1}}" />
<router-link :to="{path:'home',query:{id:1}}" />
// 取参 this.$route.query.id
this.$router.push()传参
params
this.$router.push({name:'home',params:{id:1,age:2}})
query
this.$router.push({path:'/home',query:{id:1,age:2}})
this.$router.push(`/home?id=1`);
Vue-router有那些守卫
全局前置守卫beforeEach
- 在router中进行配置
- router.beforeEach((to,from,next)=>{})
- to要到哪个路由去
- from从哪个路由来
- next下一步(无论失败与否都要调用,否则会阻止程序继续执行)
全局后置守卫 afterEach
- router.afterEach((to,from)=>{})
组件内守卫(相当于给组件增加生命周期)
beforeRouteEnter 进入组件之前
beforeRouterEnter(to,from,next){}
beforeRouteUpdate 组件被复用时调用
beforeRouterUpdate(to,from,next){}
beforeRouteLeave 离开组件时调用
beforeRouteLeave(to,from,next){}
移动端防止事件穿透
事件穿透原理
- 假如页面上有两个元素A和B,B元素在A元素之上,B为遮罩层mask。我们在B元素上绑定 touchstart事件,作用是隐藏B元素;A元素上绑定click事件。我们发现,当我们点击B元素,B元素被隐藏了,随后,也触发了A元素的click事件
- 事件执行的顺序是 touchstart >touchmove>touched ==>click,click事件有300ms的延迟,当 touchstart事件把B元素隐藏之后,隔了300ms,浏览器触发了click事件,但是此时B元素不见了,所以该事件被派发到了A元素身上。如果A元素是一个链接,那此时页面就会意外地跳转了
解决方案
禁用缩放
click事件的延迟300ms是为了移动端缩放
 <!-- 1.禁用缩放 user-scalable=no -->
 <meta name="viewport" content="width=device-width, initial-scale=1.0,user-scalable=no">
延迟上层元素消失
touchstart后延迟350ms后再隐藏,先把透明度设为0,解决视觉层面效果,在设置定时器延迟,让元素消失
$('.mask').on('touchstart',function() {
    console.log('mask-touchstart');
    $(this).css('opacity', 0); // 设置视觉层面消失
    setTimeout(function() {
        $('.mask').css('dispaly', 'none'); // DOM节点消失
    },350);
})
pointer-events,让被覆盖元素短时间内无法触发click
- pointer-events两个属性
- auto默认值,鼠标默认值不会穿透当前层
- none使元素无法触发事件
$('.mask').on('touchstart',function() {
    console.log('mask-touchstart');
    $(this).css('display', 'none');
    $('.box').css('pointer-events', 'none');   // 让被覆盖元素无法响应click
    setTimeout(function() {
        $('.box').css('pointer-events', 'auto');   // 恢复被覆盖元素
    },300);
})
使用fastclick库
使用fastclick库后,所有点击事件都使用click,没有350ms延时,也没有样式穿透问题
<script type='application/javascript' src='/path/to/fastclick.js'></script>
...
if ('addEventListener' in document) {
	document.addEventListener('DOMContentLoaded', function() {
		FastClick.attach(document.body);
	}, false);
}
针对安卓的,android:clickable=“true”
在上层的布局中增加android:clickable="true"的属性,这样下层的事件就不会被触发了
移动端适配
viewport适配
//获取meta节点
var metaNode = document.querySelector('meta[name=viewport]');

//定义设计稿宽度为375
var designWidth = 375;

//计算当前屏幕的宽度与设计稿比例
var scale = document.documentElement.clientWidth/designWidth;

//通过设置meta元素中content的initial-scale值达到移动端适配
meta.content="initial-scale="+scale+",minimum-scale="+scale+",maximum-scale="+scale+",user-scalable=no";
借助media实现rem适配
//对屏幕大小划分了html不同的font-size
@media screen and (min-width: 320px) {html{font-size:50px;}}
@media screen and (min-width: 360px) {html{font-size:56.25px;}}
@media screen and (min-width: 375px) {html{font-size:58.59375px;}}
@media screen and (min-width: 400px) {html{font-size:62.5px;}}
@media screen and (min-width: 414px) {html{font-size:64.6875px;}}
@media screen and (min-width: 440px) {html{font-size:68.75px;}}
@media screen and (min-width: 480px) {html{font-size:75px;}}
@media screen and (min-width: 520px) {html{font-size:81.25px;}}
@media screen and (min-width: 560px) {html{font-size:87.5px;}}
@media screen and (min-width: 600px) {html{font-size:93.75px;}}
@media screen and (min-width: 640px) {html{font-size:100px;}}
@media screen and (min-width: 680px) {html{font-size:106.25px;}}
@media screen and (min-width: 720px) {html{font-size:112.5px;}}
@media screen and (min-width: 760px) {html{font-size:118.75px;}}
@media screen and (min-width: 800px) {html{font-size:125px;}}
@media screen and (min-width: 960px) {html{font-size:150px;}}
JS配合修改配合rem适配
var designWidth = 375;  		// 设计稿宽度
var remPx = 100;               // 在屏幕宽度375px,的时候,设置根元素字体大小 100px
var scale = window.innerWidth / designWidth; //计算当前屏幕的宽度与设计稿比例
// 根据屏幕宽度 动态计算根元素的 字体大小
document.documentElement.style.fontSize = scale\*remPx + 'px';
JS动态修改配合CSS预处理器(less)
	// 计算屏幕宽度
var screen = document.documentElement.clientWidth;
	// 计算字体大小,取屏幕宽度的16分之一
var size = screen / 16;
	// 设置根元素字体大小
document.documentElement.style.fontSize = size + 'px';
js获取当前屏幕的宽度,将屏幕宽度的16分之一设置给html的font-size
// 此时设计稿的宽度为375,定义一个less变量等于16分之一的设计稿宽度
@rem: 375/16rem;
JS动态修改配合rem适配
	// 计算屏幕宽度
var screen = document.documentElement.clientWidth;
	// 设置根元素字体大小
document.documentElement.style.fontSize = screen + 'px';
借助插件适配
- 让不同设备的视口取得最佳CSS像素
<meta name="viewport" content="width=device-width, initial-scale=1, maximum-scale=1, minimum-scale=1, user-scalable=no">
- 安装 postcss,postcss-pxtorem,postcss-loader,postcss-import,postcss-url一系列插件
npm install postcss@8.2.6 --save
npm install postcss-import@14.0.0 --save
npm install postcss-loader@5.0.0 --save
npm install postcss-pxtorem@5.1.1 --save
npm install postcss-url@10.1.1 --save
- 在项目根目录下添加 .postcssrc.js 文件
module.exports = {
  plugins: {
    'postcss-pxtorem': {
      rootValue: 32, //根目录的字体大小设为32px
      propList: ['\*'], //proplist:是那些属性需要转换成rem,全部
      minPixelValue: 2 //最小转换单位.2px
    }
  }
};
- 在项目中index.html的头部添加下面这段js代码:
<script>(function () {
    function autoRootFontSize() {
      document.documentElement.style.fontSize = Math.min(screen.width, document.documentElement
        .getBoundingClientRect().width) / 470 \* 32 + 'px';
      // 取screen.width和document.documentElement.getBoundingClientRect().width的最小值;
      // 除以470,乘以32;意思就是相对于470大小的32px;
    }
    window.addEventListener('resize', autoRootFontSize);
    autoRootFontSize();
  })();</script>
注:设计师制作的效果图常为750px,为了方便直接读取UI标好的像素大小,根目录的字体大小就设置为32px;
详情


网上学习资料一大堆,但如果学到的知识不成体系,遇到问题时只是浅尝辄止,不再深入研究,那么很难做到真正的技术提升。
一个人可以走的很快,但一群人才能走的更远!不论你是正从事IT行业的老鸟或是对IT行业感兴趣的新人,都欢迎加入我们的的圈子(技术交流、学习资源、职场吐槽、大厂内推、面试辅导),让我们一起学习成长!
.postcssrc.js 文件
module.exports = {
  plugins: {
    'postcss-pxtorem': {
      rootValue: 32, //根目录的字体大小设为32px
      propList: ['\*'], //proplist:是那些属性需要转换成rem,全部
      minPixelValue: 2 //最小转换单位.2px
    }
  }
};
- 在项目中index.html的头部添加下面这段js代码:
<script>(function () {
    function autoRootFontSize() {
      document.documentElement.style.fontSize = Math.min(screen.width, document.documentElement
        .getBoundingClientRect().width) / 470 \* 32 + 'px';
      // 取screen.width和document.documentElement.getBoundingClientRect().width的最小值;
      // 除以470,乘以32;意思就是相对于470大小的32px;
    }
    window.addEventListener('resize', autoRootFontSize);
    autoRootFontSize();
  })();</script>
注:设计师制作的效果图常为750px,为了方便直接读取UI标好的像素大小,根目录的字体大小就设置为32px;
详情
[外链图片转存中…(img-T7bC2PEI-1715818872009)]
[外链图片转存中…(img-HBv9AU3c-1715818872009)]
网上学习资料一大堆,但如果学到的知识不成体系,遇到问题时只是浅尝辄止,不再深入研究,那么很难做到真正的技术提升。
一个人可以走的很快,但一群人才能走的更远!不论你是正从事IT行业的老鸟或是对IT行业感兴趣的新人,都欢迎加入我们的的圈子(技术交流、学习资源、职场吐槽、大厂内推、面试辅导),让我们一起学习成长!


 20万+
20万+


 被折叠的 条评论
为什么被折叠?
被折叠的 条评论
为什么被折叠?
 到【灌水乐园】发言


