


既有适合小白学习的零基础资料,也有适合3年以上经验的小伙伴深入学习提升的进阶课程,涵盖了95%以上物联网嵌入式知识点,真正体系化!
由于文件比较多,这里只是将部分目录截图出来,全套包含大厂面经、学习笔记、源码讲义、实战项目、大纲路线、电子书籍、讲解视频,并且后续会持续更新
用 TypeScript 写一个游戏
最后我们来切身体会一下TypeScript的柔软丝滑。
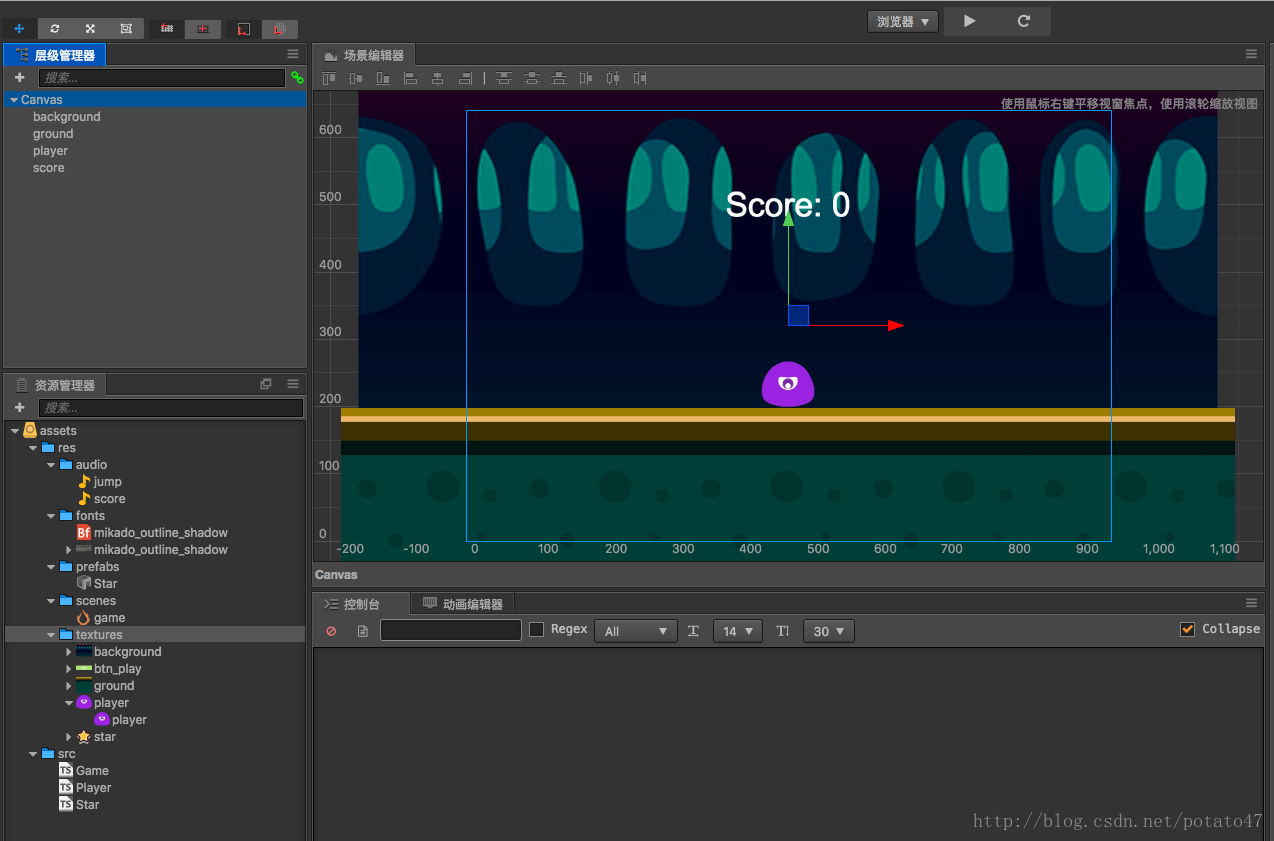
挑一个熟悉的游戏来写,官方文档里有一个摘星星的游戏,我们用Ts重新写一下。
第一步:新建一个工程
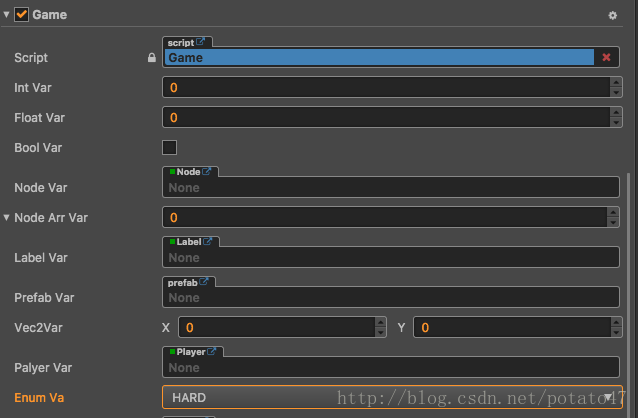
第二步:写几个脚本
Game.ts
import { Player } from "./Player";

const { property, ccclass } = cc._decorator;

@ccclass
export class Game extends cc.Component {
    // 这个属性引用了星星的预制资源
    @property(cc.Prefab)
    private starPrefab: cc.Prefab = null;
    // 星星产生后消失时间的随机范围
    @property(cc.Integer)
    private maxStarDuration = 0;
    @property(cc.Integer)
    private minStarDuration = 0
    // 地面节点,用于确定星星生成的高度
    @property(cc.Node)
    private groundNode: cc.Node = null;
    // player 节点,用于获取主角弹跳的高度,和控制主角行动开关
    @property(cc.Node)
    public playerNode: cc.Node = null;
    // score label 的引用
    @property(cc.Label)
    private scoreLabel: cc.Label = null;
    // 得分音效资源
    @property(cc.AudioClip)
    private scoreAudio: cc.AudioClip = null;

    // 地面节点的Y轴坐标
    private groundY: number;
    // 定时器
    public timer: number;
    // 星星存在的持续时间
    public starDuration: number;
    // 当前分数
    private score: number;

    protected onLoad() {
        // 获取地平面的 y 轴坐标
        this.groundY = this.groundNode.y + this.groundNode.height / 2;
        // 初始化计时器
        this.timer = 0;
        this.starDuration = 0;
        // 生成一个新的星星
        this.spawnNewStar();
        // 初始化计分
        this.score = 0;
    }

    // 生成一个新的星星
    public spawnNewStar() {
        // 使用给定的模板在场景中生成一个新节点
        let newStar = cc.instantiate(this.starPrefab);
        // 将新增的节点添加到 Canvas 节点下面
        this.node.addChild(newStar);
        // 为星星设置一个随机位置
        newStar.setPosition(this.getNewStarPosition());
        // 将 Game 组件的实例传入星星组件
        newStar.getComponent('Star').init(this);
        // 重置计时器
        this.starDuration = this.minStarDuration + cc.random0To1() * (this.maxStarDuration - this.minStarDuration);
        this.timer = 0;
    }

    // 新星星的位置
    public getNewStarPosition() {
        let randX = 0;
        // 根据地平面位置和主角跳跃高度,随机得到一个星星的 y 坐标
        let randY = this.groundY + cc.random0To1() * this.playerNode.getComponent('Player').jumpHeight + 50;
        // 根据屏幕宽度,随机得到一个星星 x 坐标
        let maxX = this.node.width / 2;
        randX = cc.randomMinus1To1() * maxX;
        // 返回星星坐标
        return cc.p(randX, randY);
    }

    // called every frame
    protected update(dt: number) {
        // 每帧更新计时器,超过限度还没有生成新的星星
        // 就会调用游戏失败逻辑
        if (this.timer > this.starDuration) {
            this.gameOver();
            return;
        }
        this.timer += dt;
    }

    // 得分
    public gainScore() {
        this.score += 1;
        // 更新 scoreDisplay Label 的文字
        this.scoreLabel.string = 'Score: ' + this.score.toString();
        // 播放得分音效
        // 不加as any就会报错,不信你试试
        cc.audioEngine.play(this.scoreAudio as any, false, 1);
    }

    // gg
    private gameOver() {
        this.playerNode.stopAllActions(); //停止 player 节点的跳跃动作
        cc.director.loadScene('game');
    }

}
Player.ts
const { ccclass, property } = cc._decorator;

@ccclass
export class Player extends cc.Component {
    // 主角跳跃高度
    @property(cc.Integer)
    private jumpHeight: number = 0;
    // 主角跳跃持续时间
    @property(cc.Integer)
    private jumpDuration: number = 0;
    // 最大移动速度
    @property(cc.Integer)
    private maxMoveSpeed: number = 0;
    // 加速度
    @property(cc.Integer)
    private accel: number = 0;
    // 跳跃音效资源
    @property(cc.AudioClip)
    private jumpAudio: cc.AudioClip = null;

    private xSpeed: number = 0;
    private accLeft: boolean = false;
    private accRight: boolean = false;
    private jumpAction: cc.Action = null;

    private setJumpAction() {
        // 跳跃上升
        let jumpUp = cc.moveBy(this.jumpDuration, cc.p(0, this.jumpHeight)).easing(cc.easeCubicActionOut());
        // 下落
        let jumpDown = cc.moveBy(this.jumpDuration, cc.p(0, -this.jumpHeight)).easing(cc.easeCubicActionIn());
        // 添加一个回调函数,用于在动作结束时调用我们定义的其他方法
        let callback = cc.callFunc(this.playJumpSound, this);
        // 不断重复,而且每次完成落地动作后调用回调来播放声音
        return cc.repeatForever(cc.sequence(jumpUp, jumpDown, callback));
    }

    private playJumpSound() {
        // 调用声音引擎播放声音
        cc.audioEngine.play(this.jumpAudio as any, false, 1);
    }

    private addEventListeners() {
        cc.systemEvent.on(cc.SystemEvent.EventType.KEY_DOWN, this.onKeyDown, this);
        cc.systemEvent.on(cc.SystemEvent.EventType.KEY_UP, this.onKeyUp, this);
        cc.find("Canvas").on(cc.Node.EventType.TOUCH_START, this.onScreenTouchStart,this);
        cc.find("Canvas").on(cc.Node.EventType.TOUCH_CANCEL, this.onScreenTouchEnd, this);
        cc.find("Canvas").on(cc.Node.EventType.TOUCH_END, this.onScreenTouchEnd,this);
    }

    private moveLeft() {
        this.accLeft = true;
        this.accRight = false;
    }

    private moveRight() {
        this.accLeft = false;
        this.accRight = true;
    }

    private stopMove() {
        this.accLeft = false;
        this.accRight = false;
    }

    private onScreenTouchStart(event: cc.Event.EventTouch) {
        if (event.getLocationX() > cc.winSize.width/2) {
            this.moveRight();
        } else {
            this.moveLeft();
        }
    }

    private onScreenTouchEnd() {
        this.stopMove();
    }

    private onKeyDown(event: cc.Event.EventKeyboard) {
        switch ((event as any).keyCode) {
            case cc.KEY.a:
            case cc.KEY.left:
                this.moveLeft();
                break;
            case cc.KEY.d:
            case cc.KEY.right:
                this.moveRight();
                break;
        }
    }

    private onKeyUp(event: cc.Event.EventKeyboard) {
        switch ((event as any).keyCode) {
            case cc.KEY.a:
            case cc.KEY.left:
                this.stopMove();
                break;
            case cc.KEY.d:
            case cc.KEY.right:
                this.stopMove();
                break;
        }
    }

    // use this for initialization
    protected onLoad() {
        // 初始化跳跃动作
        this.jumpAction = this.setJumpAction();
        this.node.runAction(this.jumpAction);

        // 加速度方向开关
        this.accLeft = false;
        this.accRight = false;
        // 主角当前水平方向速度
        this.xSpeed = 0;

        // 初始化输入监听
        this.addEventListeners();
    }

    // called every frame
    protected update(dt: number) {
        // 根据当前加速度方向每帧更新速度
        if (this.accLeft) {
            this.xSpeed -= this.accel * dt;
        } else if (this.accRight) {
            this.xSpeed += this.accel * dt;
        }
        // 限制主角的速度不能超过最大值
        if (Math.abs(this.xSpeed) > this.maxMoveSpeed) {
            // if speed reach limit, use max speed with current direction
            this.xSpeed = this.maxMoveSpeed * this.xSpeed / Math.abs(this.xSpeed);
        }

        // 根据当前速度更新主角的位置
        this.node.x += this.xSpeed * dt;
        if (this.node.x <= -this.node.parent.width / 2) {
            this.node.x = this.node.parent.width / 2;
        }
        if (this.node.x > this.node.parent.width / 2) {
            this.node.x = -this.node.parent.width / 2;
        }
    }

}
Star.ts
import { Game } from "./Game";

const {ccclass,property} = cc._decorator;

@ccclass
export class Star extends cc.Component {

    // 星星和主角之间的距离小雨这个数值时,就会完成收集
    @property(cc.Integer)
    private pickRadius: number = 0;
    private game: Game = null;

    public init(game:Game) {
        this.game = game;
    }

    getPlayerDistance() {
        // 根据 player 节点位置判断距离
        let playerPos = this.game.playerNode.getPosition();
        // 根据两点位置计算两点之间距离
        let dist = cc.pDistance(this.node.position, playerPos);
        return dist;
    }

    onPicked() {
        // 当星星被收集时,调用 Game 脚本中的接口,生成一个新的星星
        this.game.spawnNewStar();
        // 调用 Game 脚本的得分方法
        this.game.gainScore();
        // 然后销毁当前星星节点
        this.node.destroy();
    }

    // called every frame
    update(dt:number) {
        // 每帧判断和主角之间的距离是否小于收集距离
        if (this.getPlayerDistance() < this.pickRadius) {
            // 调用收集行为
            this.onPicked();
            return;
        }
        // 根据 Game 脚本中的计时器更新星星的透明度
        let opacityRatio = 1 - this.game.timer/this.game.starDuration;
        let minOpacity = 50;
        this.node.opacity = minOpacity + Math.floor(opacityRatio * (255 - minOpacity));
    }

}
第三步:可以玩了【github pages发布教程传送门】


既有适合小白学习的零基础资料,也有适合3年以上经验的小伙伴深入学习提升的进阶课程,涵盖了95%以上物联网嵌入式知识点,真正体系化!
由于文件比较多,这里只是将部分目录截图出来,全套包含大厂面经、学习笔记、源码讲义、实战项目、大纲路线、电子书籍、讲解视频,并且后续会持续更新
ges发布教程传送门](https://bbs.csdn.net/topics/618679757)】
[外链图片转存中…(img-eX30OILL-1715707691550)]
[外链图片转存中…(img-9aUCNuuH-1715707691553)]
既有适合小白学习的零基础资料,也有适合3年以上经验的小伙伴深入学习提升的进阶课程,涵盖了95%以上物联网嵌入式知识点,真正体系化!
由于文件比较多,这里只是将部分目录截图出来,全套包含大厂面经、学习笔记、源码讲义、实战项目、大纲路线、电子书籍、讲解视频,并且后续会持续更新


 726
726

 被折叠的 条评论
为什么被折叠?
被折叠的 条评论
为什么被折叠?
 到【灌水乐园】发言


