


收集整理了一份《2024年最新物联网嵌入式全套学习资料》,初衷也很简单,就是希望能够帮助到想自学提升的朋友。
需要这些体系化资料的朋友,可以加我V获取:vip1024c (备注嵌入式)
一个人可以走的很快,但一群人才能走的更远!不论你是正从事IT行业的老鸟或是对IT行业感兴趣的新人
都欢迎加入我们的的圈子(技术交流、学习资源、职场吐槽、大厂内推、面试辅导),让我们一起学习成长!
    map.put("msg","成功");
    map.put("result",list);
    return map;
}

@GetMapping("/GetName")
@ApiOperation(value = "获取信息",notes = "没啥留言的")
@ApiImplicitParams({
        @ApiImplicitParam(name = "nickName",required = true,paramType = "query",dataType = "String",value = "通过昵称模糊查询")
})
public Object GetName(HttpServletRequest request,Model model){
    String nickName = request.getParameter("nickName");
    List<Users> list=usersService.SelectName(nickName);
    HashMap<String,Object> map=new HashMap<String,Object>();
    map.put("state",true);
    map.put("msg","成功");
    map.put("result",list);
    return map;
}

/**
 * 添加信息
 * @param userName
 * @param pwd
 * @param nickName
 * @return
 */
@PostMapping(value = "/UserAddInfoApi")
@ApiOperation(value = "添加",notes = "没啥留言的")
@ApiImplicitParams({
        @ApiImplicitParam(name = "userName",required = true,paramType = "query",dataType = "String",value = "用户名"),
        @ApiImplicitParam(name = "pwd",required = true,paramType = "query",dataType = "String",value = "密码"),
        @ApiImplicitParam(name = "nickName",required = true,paramType = "query",dataType = "String",value = "昵称")
})
public Object UserAddInfoApi(String userName,String pwd,String nickName){
    HashMap<String,Object> map=new HashMap<String,Object>();
    if(
            StringUtils.isEmpty(userName)||
            StringUtils.isEmpty(pwd)||
            StringUtils.isEmpty(nickName)
    ){
        map.put("state",false);
        map.put("msg","参数不润许为空");
        map.put("result","");
        return map;
    }
    usersService.UsersAddInfo(userName, pwd, nickName);
    map.put("state",true);
    map.put("msg","成功");
    map.put("result","");
    return map;
}

/**
 * 单个查询
 * @param id
 * @return
 */
@GetMapping("/UsersSelectById")
@ApiOperation(value = "id查询",notes = "没啥留言的")
@ApiImplicitParams({
        @ApiImplicitParam(name = "id",required = true,paramType = "query",dataType = "String",value = "编号")
})
public Object UsersSelectById(String id){
    Users users = usersService.UsersSelectById(Integer.parseInt(id));
    HashMap<String,Object> map=new HashMap<String,Object>();
    map.put("state",true);
    map.put("msg","成功");
    map.put("result",users);
    return map;
}

/**
 * 修改api
 * @param id
 * @param pwd
 * @return
 */
@PostMapping(value = "/UserUpdateInfoApi")
@ApiOperation(value = "添加",notes = "没啥留言的")
@ApiImplicitParams({
        @ApiImplicitParam(name = "id",required = true,paramType = "query",dataType = "String",value = "编号"),
        @ApiImplicitParam(name = "pwd",required = true,paramType = "query",dataType = "String",value = "密码"),
})
public Object UserUpdateInfoApi(String id,String pwd){
    usersService.UsersUpdateInfo(pwd,Integer.parseInt(id));
    HashMap<String,Object> map=new HashMap<String,Object>();
    map.put("state",true);
    map.put("msg","成功");
    map.put("result","");
    return map;
}

/**
 * 删除api
 * @param id
 * @return
 */
@GetMapping(value = "/UsersDeleteById")
@ApiOperation(value = "根据id删除",notes = "没啥留言的")
@ApiImplicitParams({
        @ApiImplicitParam(name = "id",required = true,paramType = "query",dataType = "String",value = "编号")
})
public Object UsersDeleteById(String id){
    usersService.UsersDeleteById(Integer.parseInt(id));
    HashMap<String,Object> map=new HashMap<String,Object>();
    map.put("state",true);
    map.put("msg","成功");
    map.put("result","");
    return map;
}
}
### 4、启动效果:【[http://127.0.0.1:8088/swagger-ui.html](https://bbs.csdn.net/topics/618679757)】


这里为了看着方便,我将服务路径改为了【/】
服务路径
server.servlet.context-path=/

### 5、使用方法
###


POST的也类似


### 6、可能出现的异常总结:
**1、SwaggerConfig的配置文件中忘记写注解,就2个注解:**
@Configuration
@EnableSwagger2
**2、接口中的注解:**
@Api(“用户操作接口”)
@ApiOperation(value = “获取信息”,notes = “没啥留言的”)
@ApiImplicitParams({
@ApiImplicitParam(name = “nickName”,required = true,paramType = “query”,dataType = “String”,value = “通过昵称模糊查询”)
})
**3、没有明确接口的访问类型,导致出现一堆的同名不同访问类型的接口提示。**


使用@GetMapping或者@PostMapping就可以解决此问题。


###  springboot05、封装结果集


不可能一直用map写数据返回,很麻烦的,那么咱们就可以进行一次封装此次使用。


**目录**


[springboot05、封装结果集](#springboot05%E3%80%81%E5%B0%81%E8%A3%85%E7%BB%93%E6%9E%9C%E9%9B%86)


[创建【com.item.res】包](#%E5%88%9B%E5%BB%BA%E3%80%90com.item.res%E3%80%91%E5%8C%85)


[注意问题](#%E6%B3%A8%E6%84%8F%E9%97%AE%E9%A2%98%EF%BC%9A)


---


编辑一个SUCCESS类和ERROR类,他们都有state、msg、result,那么就创建一个公用的父类base。


### 创建【com.item.res】包


**Base:**
package com.item.res;
public class BASE {
private boolean state;
private String msg;
private Object result;
public BASE(boolean state, String msg, Object result) {
    this.state = state;
    this.msg = msg;
    this.result = result;
}

public boolean isState() {
    return state;
}

public void setState(boolean state) {
    this.state = state;
}

public String getMsg() {
    return msg;
}

public void setMsg(String msg) {
    this.msg = msg;
}

public Object getResult() {
    return result;
}

public void setResult(Object result) {
    this.result = result;
}
}
**ERROR:**
package com.item.res;
public class ERROR extends BASE {
public ERROR(String msg, Object result) {
    super(false, msg, result);
}
}
**SUCCESS:**
package com.item.res;
public class SUCCESS extends BASE {
public SUCCESS(Object result) {
super(false, “操作成功”, result);
}
}
**返回修改:**
package com.item.controller;
import com.item.model.Users;
import com.item.res.ERROR;
import com.item.res.SUCCESS;
import com.item.service.UsersService;
import io.swagger.annotations.Api;
import io.swagger.annotations.ApiImplicitParam;
import io.swagger.annotations.ApiImplicitParams;
import io.swagger.annotations.ApiOperation;
import org.apache.commons.lang3.StringUtils;
import org.springframework.beans.factory.annotation.Autowired;
import org.springframework.ui.Model;
import org.springframework.web.bind.annotation.*;
import javax.servlet.http.HttpServletRequest;
import java.util.HashMap;
import java.util.List;
@Api(“用户操作接口”)
@RestController
@CrossOrigin
public class UsersController {
@Autowired
private UsersService usersService;
/**
 * 获取所有信息
 * @return
 */
@GetMapping("/GetInfoApi")
@ApiOperation(value = "获取信息",notes = "没啥留言的")
public Object GetInfoApi(){
    List<Users> list=usersService.GetInfo();
    return new SUCCESS(list);
}

@GetMapping("/GetName")
@ApiOperation(value = "获取信息",notes = "没啥留言的")
@ApiImplicitParams({
        @ApiImplicitParam(name = "nickName",required = true,paramType = "query",dataType = "String",value = "通过昵称模糊查询")
})
public Object GetName(HttpServletRequest request,Model model){
    String nickName = request.getParameter("nickName");
    List<Users> list=usersService.SelectName(nickName);
    return new SUCCESS(list);
}

/**
 * 添加信息
 * @param userName
 * @param pwd
 * @param nickName
 * @return
 */
@PostMapping(value = "/UserAddInfoApi")
@ApiOperation(value = "添加",notes = "没啥留言的")
@ApiImplicitParams({
        @ApiImplicitParam(name = "userName",required = true,paramType = "query",dataType = "String",value = "用户名"),
        @ApiImplicitParam(name = "pwd",required = true,paramType = "query",dataType = "String",value = "密码"),
        @ApiImplicitParam(name = "nickName",required = true,paramType = "query",dataType = "String",value = "昵称")
})
public Object UserAddInfoApi(String userName,String pwd,String nickName){
    HashMap<String,Object> map=new HashMap<String,Object>();
    if(
            StringUtils.isEmpty(userName)||
            StringUtils.isEmpty(pwd)||
            StringUtils.isEmpty(nickName)
    ){
        return new ERROR("参数为空","参数错误");
    }
    usersService.UsersAddInfo(userName, pwd, nickName);
    return new SUCCESS("添加成功");
}

/**
 * 单个查询
 * @param id
 * @return
 */
@GetMapping("/UsersSelectById")
@ApiOperation(value = "id查询",notes = "没啥留言的")
@ApiImplicitParams({
        @ApiImplicitParam(name = "id",required = true,paramType = "query",dataType = "String",value = "编号")
})
public Object UsersSelectById(String id){
    Users users = usersService.UsersSelectById(Integer.parseInt(id));
    HashMap<String,Object> map=new HashMap<String,Object>();
    map.put("state",true);
    map.put("msg","成功");
    map.put("result",users);
    return map;
}

/**
 * 修改api
 * @param id
 * @param pwd
 * @return
 */
@PostMapping(value = "/UserUpdateInfoApi")
@ApiOperation(value = "添加",notes = "没啥留言的")
@ApiImplicitParams({
        @ApiImplicitParam(name = "id",required = true,paramType = "query",dataType = "String",value = "编号"),
        @ApiImplicitParam(name = "pwd",required = true,paramType = "query",dataType = "String",value = "密码"),
})
public Object UserUpdateInfoApi(String id,String pwd){
    usersService.UsersUpdateInfo(pwd,Integer.parseInt(id));
    HashMap<String,Object> map=new HashMap<String,Object>();
    map.put("state",true);
    map.put("msg","成功");
    map.put("result","");
    return map;
}

/**
 * 删除api
 * @param id
 * @return
 */
@GetMapping(value = "/UsersDeleteById")
@ApiOperation(value = "根据id删除",notes = "没啥留言的")
@ApiImplicitParams({
        @ApiImplicitParam(name = "id",required = true,paramType = "query",dataType = "String",value = "编号")
})
public Object UsersDeleteById(String id){
    usersService.UsersDeleteById(Integer.parseInt(id));
    HashMap<String,Object> map=new HashMap<String,Object>();
    map.put("state",true);
    map.put("msg","成功");
    map.put("result","");
    return map;
}
}
使用swagger访问测试返回效果如下:

设置完成。
### 注意问题:
每个人的习惯方式均不同,需要看看公司具体用什么方式:
也可能是这样返回:
{
“code”: -9999,
“message”: “Invalid Request”,
“data”:{ }
}
注意:无论是【ERROR】还是【SUCCESS】他们的返回结果都需要一致,否则前端在处理的时候就会很麻烦,对是一套解析,错又是一套解析,很麻烦。
**例如:**
正确返回:
{
“state”: true,
“message”: “访问成功”,
“data”:
[
{
“id”: 77,
“userName”: “子玉等于摸鱼”,
“pwd”: “074FD28EFF0F5ADEA071694061739E55”,
“nickName”: “高大上,牛逼吼吼吼吼吼”
}
]
}
错误返回:
{
“state”: false,
“message”: “访问失败”,
“data”:“失败”
}
这就没法玩了。。。。 会挨骂的。


**避免层级过深的URI**


/ 在url中表达层级,用于按实体关联关系进行对象导航,一般根据id导航。


过深的导航容易导致url膨胀,不易维护,如 GET /zoos/1/areas/3/animals/4,尽量使用查询参数代替路劲中的实体导航,如GET /animals?zoo=1&area=3。


结果过滤,排序,搜索


url最好越简短越好,对结果过滤、排序、搜索相关的功能都应该通过参数实现。


过滤:例如你想限制GET /tickets 的返回结果:只返回那些open状态的ticket, GET /tickets?state=open 这里的state就是过滤参数。


排序:和过滤一样,一个好的排序参数应该能够描述排序规则,而不和业务相关。复杂的排序规则应该通过组合实现。排序参数通过 , 分隔,排序参数前加 - 表示降序排列。


###  springboot06、log4j2日志配置


**目录**


[前言:](#%E5%89%8D%E8%A8%80%EF%BC%9A)


[1、pom配置](#1%E3%80%81pom%E9%85%8D%E7%BD%AE)


[2、log4j2-spring.xml配置文件](#2%E3%80%81log4j2-spring.xml%E9%85%8D%E7%BD%AE%E6%96%87%E4%BB%B6)


[3、在application.properties中引入log4j2的配置](#3%E3%80%81%E5%9C%A8application.properties%E4%B8%AD%E5%BC%95%E5%85%A5log4j2%E7%9A%84%E9%85%8D%E7%BD%AE)


[4、log4j使用](#4%E3%80%81log4j%E4%BD%BF%E7%94%A8)


---


### 前言:


>
> 日志接口(slf4j)
>
>
> slf4j是对所有日志框架制定的一种规范、标准、接口,并不是一个框架的具体的实现,因为接口并不能独立使用,需要和具体的日志框架实现配合使用(如log4j、logback)。
>
>
> 接口用于定制规范,可以有多个实现,使用时是面向接口的(导入的包都是slf4j的包而不是具体某个日志框架中的包),即直接和接口交互,不直接使用实现,所以可以任意的更换实现而不用更改代码中的日志相关代码。
>
>
>
> 日志实现(log4j、logback、log4j2)
>
>
> Log4j:Apache的一个开源项目,可以控制日志信息输送的目的地是控制台、文件、GUI组件等,可以控制每一条日志的输出格式,这些可以通过一个配置文件来灵活地进行配置,而不需要修改应用的代码。虽然已经停止维护了,但目前绝大部分企业都是用的log4j。
>
>
> LogBack:logback同样是由log4j的作者设计完成的,拥有更好的特性,用来取代log4j的一个日志框架,是slf4j的原生实现。
>
>
> Log4j2:Log4j2是log4j 1.x和logback的改进版,据说采用了一些新技术(无锁异步、等等),使得日志的吞吐量、性能比log4j 1.x提高10倍,并解决了一些死锁的bug,而且配置更加简单灵活。
>
>
>


### 1、pom配置
2、log4j2-spring.xml配置文件
我精简了配置,只输出到控制台。
<?xml version="1.0" encoding="UTF-8"?>
<!--日志级别以及优先级排序: OFF > FATAL > ERROR > WARN > INFO > DEBUG > TRACE > ALL -->
<!--Configuration后面的status,这个用于设置log4j2自身内部的信息输出,可以不设置,当设置成trace时,你会看到log4j2内部各种详细输出-->
<!--monitorInterval:Log4j能够自动检测修改配置 文件和重新配置本身,设置间隔秒数, 不设置默认5s
-->
<Configuration status="debug">
    <!-- 配置日志信息输出 -->
    <Appenders>
        <!-- 输出到控制台, target属性一般为SYSTEM_OUT,也可以是 SYSTEM_ERR, -->
        <Console name="Console" target="SYSTEM_OUT">
            <!--配置日志信息的格式 -->
            <PatternLayout pattern="%d{HH:mm:ss} [%t] %-5level %logger{36} - %msg%n" />
        </Console>
    </Appenders>
    <!-- 定义logger,只有定义了logger并引入了appender,appender才会有效 -->
    <Loggers>
        <!-- 将业务dao接口所在的包填写进去,并用在控制台和文件中输出 此处配置的是mybatis的输出 level记得设置为debug -->
        <logger name="com.item.dao.*" level="debug" additivity="false">
            <AppenderRef ref="Console" />
        </logger>
        <Root level="info">
            <AppenderRef ref="Console" />
        </Root>
    </Loggers>
</Configuration>
3、在application.properties中引入log4j2的配置
# 引入log4j
logging.config=classpath:log4j2-spring.xml
# 控制台打印sql
mybatis.configuration.log-impl=org.apache.ibatis.logging.stdout.StdOutImpl
4、log4j使用
包:
import org.slf4j.Logger;
import org.slf4j.LoggerFactory;
声明:
private final Logger log = LoggerFactory.getLogger(this.getClass());
使用:
log.info("访问模糊查询");
效果:

springboot07、task定时任务
定时任务的概述
在项目中开发定时任务应该是一种比较常见的需求,在Java中开发定时任务主要有三种方案:一是使用JDK自带的Timer,二是使用第三方组件Quartz’,三是使用Spring Task。
Timer是JDK自带的定时任务工具,其简单易用,但是对于复杂的定时规则无法满足,在实际项目开发中也很少使用到,Quartz功能强大,但是使用起来相对笨重,而Spring Task则具备了前两者之间的优点,使用起来简单,除Spring 相关的包外不需要额外的包,而且支持注解和配置文件两种形式。
所以咱们这里使用springboot的task,相对方便、快捷、高效。
1、启动类上添加@EnableScheduling
package com.item;

import org.mybatis.spring.annotation.MapperScan;
import org.springframework.boot.SpringApplication;
import org.springframework.boot.autoconfigure.SpringBootApplication;
import org.springframework.boot.builder.SpringApplicationBuilder;
import org.springframework.boot.web.servlet.support.SpringBootServletInitializer;
import org.springframework.scheduling.annotation.EnableScheduling;

@MapperScan("com.item.dao")
@SpringBootApplication
@EnableScheduling
public class Action extends SpringBootServletInitializer {
    @Override
    protected SpringApplicationBuilder configure(SpringApplicationBuilder application) {
        return application.sources(Action.class);
    }
    public static void main(String[] args) {
        SpringApplication.run(Action.class,args);
    }
}
2、创建测试包【com.item.task】
2.1fixedRate定时
package com.item.task;

import org.springframework.scheduling.annotation.Scheduled;
import org.springframework.stereotype.Component;

import java.util.Date;

/**
 * 任务类
 */
@Component
public class TaskTest {
    /**
     * 每2秒执行1次
     */
    @Scheduled(fixedRate = 2000)
    public void fixedRateMethod() throws InterruptedException {
        System.out.println("task-fixedRate,每2秒执行1此:" + new Date());
        Thread.sleep(1000);
    }
}
2.2cron定时
package com.item.task;
import org.springframework.scheduling.annotation.Scheduled;
import org.springframework.stereotype.Component;

import java.text.SimpleDateFormat;
import java.util.Date;

/**
 * 任务类
 */
@Component
public class TaskCron {
    private SimpleDateFormat simpleDateFormat=new SimpleDateFormat("yyyy-MM-dd HH:mm:ss");

    /**
     * 在每分钟的00秒执行
     */
    @Scheduled(cron = "0 * * * * ?")
    public void oneMin() throws InterruptedException {
        System.out.println("cron每分钟执行:" + simpleDateFormat.format(new Date()));
    }
    /**
     * 每5秒执行
     */
    @Scheduled(cron = "*/5 * * * * ?")
    public void fiveS() throws InterruptedException {
        System.out.println("cron每5秒执行:" + simpleDateFormat.format(new Date()));
    }
}
Cron表达式
cronExpression表达式有至少6个由空格分隔的时间元素,从左往右,这些元素的定义如下:
秒,分,时,月份中的日期,月份,星期,年份
字段 允许值 允许的特殊字符
秒 0-59 , - * /
分 0-59 , - * /
小时 0-23 , - * /
日期 1-31 , - * ? / L W C
月份 1-12 或者 JAN-DEC , - * /
星期 1-7 或者 SUN-SAT , - * ? / L C #
年(可选) 留空, 1970-2099 , - * /* 表示所有值;
? 表示未说明的值,即不关心它为何值;
- 表示一个指定的范围;
, 表示附加一个可能值;
/ 符号前表示开始时间,符号后表示每次递增的值;
常用定时:
每隔5秒执行一次任务: “*/5 * * * * ?”
每隔1分钟执行一次任务: “0 */1 * * * ?”
每天23点执行一次任务: “0 0 23 * * ?”
每天凌晨1点执行一次任务: “0 0 1 * * ?”
每月1号凌晨1点执行一次任务: “0 0 1 1 * ?”
每月1号凌晨2点执行一次任务: “0 0 2 1 * ? *”
每月最后一天23点执行一次任务: “0 0 23 L * ?”
每周星期天凌晨1点执行一次任务: “0 0 1 ? * L”
每隔5秒执行一次任务:  "*/5 * * * * ?"

每隔1分钟执行一次任务:  "0 */1 * * * ?"

每天23点执行一次任务:  "0 0 23 * * ?"

每天凌晨1点执行一次任务:  "0 0 1 * * ?"

每月1号凌晨1点执行一次任务:  "0 0 1 1 * ?"

每月1号凌晨2点执行一次任务:  "0 0 2 1 * ? *"

每月最后一天23点执行一次任务:  "0 0 23 L * ?"

每周星期天凌晨1点执行一次任务:  "0 0 1 ? * L"
效果:

springboot08、拦截器HandlerInterceptor
前言
拦截器这个名词定义的非常形象,就像导弹要攻击目标的时候,可能会被先进的反导系统拦截,此处的反导系统就是一种拦截器。
我们开发的应用,对外暴露的是控制器中定义的 API 方法,我们可以在 API 方法的外围放置拦截器,所有对 API 的访问都可以通过拦截器进行过滤。
OK,那么这样的拦截有什么意义吗,其实已经很明显了,反导系统可以保护目标的安全并识别对目标的攻击行为。同理,拦截器可以跟踪对应用的访问行为,对合法访问行为予以放行,对非法访问行为予以拒绝。怎么样,是不是很牛,接下来咱们就在 Spring Boot 项目中具体实现下。
1、创建拦截器【com.item.handler】
通过【request】可以获取任何值
package com.item.handler;

import org.springframework.web.servlet.HandlerInterceptor;
import org.springframework.web.servlet.ModelAndView;

import javax.servlet.http.HttpServletRequest;
import javax.servlet.http.HttpServletResponse;
import java.util.Date;

/**
 * 自定义拦截器类
 */
public class MyInterceptor implements HandlerInterceptor {// 实现HandlerInterceptor接口
	/**
	 * (1) preHandle方法是进行处理器拦截用的,顾名思义,该方法将在Controller处理之前进行调用。
	 */
	@Override
	public boolean preHandle(HttpServletRequest request, HttpServletResponse response, Object handler)
			throws Exception {
		System.out.println(new Date() + "--preHandle:" + request.getRequestURL());
		StringBuffer url = request.getRequestURL();
		if(url.substring(url.lastIndexOf("/")+1,url.length()).equals("GetName")){
			System.out.println("------模糊查询方法------");
			String nickName = request.getParameter("nickName");
			System.out.println("获取的是nickName:"+nickName+",我可以根据获取的值判断是否是sql注入等操作");
		}
		return true;
	}

	/**
	 * 这个方法只会在当前这个Interceptor的preHandle方法返回值为true的时候才会执行。
	 */
	@Override
	public void postHandle(HttpServletRequest request, HttpServletResponse response, Object handler,
			ModelAndView modelAndView) throws Exception {
		System.out.println(new Date() + "--postHandle:" + request.getRequestURL());
	}

	/**
	 * 该方法将在postHandle请求完成之后,也就是DispatcherServlet渲染了视图执行
	 */
	@Override
	public void afterCompletion(HttpServletRequest request, HttpServletResponse response, Object handler, Exception ex)
			throws Exception {
		System.out.println(new Date() + "--afterCompletion:" + request.getRequestURL());
	}
}
在上面的实例中,我们定义了一个拦截器类 MyInterceptor ,通过实现 HandlerInterceptor 接口,该类具备了拦截器的功能。
MyInterceptor 中的方法执行顺序为 preHandle – Controller 方法 – postHandle – afterCompletion ,所以拦截器实际上可以对 Controller 方法执行前后进行拦截监控。
最后还有一个非常重要的注意点, preHandle 需要返回布尔类型的值。 preHandle 返回 true 时,对控制器方法的请求才能到达控制器,继而到达 postHandle 和 afterCompletion 方法;如果 preHandle 返回 false ,后面的方法都不会执行。
2、生效配置【com.item.handler】内创建【WebConfig】
如果想让配置器生效,还需要通过配置类进行相应配置。
package com.item.handler;

import org.springframework.context.annotation.Configuration;
import org.springframework.web.servlet.config.annotation.InterceptorRegistry;
import org.springframework.web.servlet.config.annotation.WebMvcConfigurer;

/**
 * Web配置类
 */
@Configuration
public class WebConfig implements WebMvcConfigurer {
	/**
	 * 添加Web项目的拦截器
	 */
	@Override
	public void addInterceptors(InterceptorRegistry registry) {
		// 对所有访问路径,都通过MyInterceptor类型的拦截器进行拦截
		registry.addInterceptor(new MyInterceptor()).addPathPatterns("/**");
	}
}
3、拦截器效果:

4、拦截器作用
主要完成请求参数的解析、将页面表单参数赋给值栈中相应属性、执行功能检验、程序异常调试等工作,例如:登录校验、Token验证等。
springboot09、监控
前言
因为公司开发的项目多、为客户部署的项目实例多。工作中我们都会经常遇到,由于某个客户的项目突然无法访问,一堆研发、售后部门的同事火急火燎处理问题的场景。
- 能够有一个界面,监控所有关注的项目实例运行状态。
- 对于某个项目实例来说,可以监控该实例的各项运行参数,例如内存占用情况、磁盘使用情况、数据库连接情况。
利用 Spring Boot Admin 实现可视化监控,此时至少需要两个项目实例,一个是监控的管理端,一个是被监控的客户端。
注:会与swagger冲突。这个功能是在上线后使用,所以注意关闭swagger。
目录
1、pom配置
<!-- Spring Boot Admin 管理端依赖项 -->
<dependency>
    <groupId>de.codecentric</groupId>
    <artifactId>spring-boot-admin-starter-server</artifactId>
    <version>2.2.3</version>
</dependency>
2、启动项配置
package com.item;

import de.codecentric.boot.admin.server.config.EnableAdminServer;
import org.mybatis.spring.annotation.MapperScan;
import org.springframework.boot.SpringApplication;
import org.springframework.boot.autoconfigure.SpringBootApplication;
import org.springframework.boot.builder.SpringApplicationBuilder;
import org.springframework.boot.web.servlet.support.SpringBootServletInitializer;
import org.springframework.scheduling.annotation.EnableScheduling;

@MapperScan("com.item.dao")
@SpringBootApplication
@EnableScheduling
@EnableAdminServer
public class Action extends SpringBootServletInitializer {
    @Override
    protected SpringApplicationBuilder configure(SpringApplicationBuilder application) {
        return application.sources(Action.class);
    }
    public static void main(String[] args) {
        SpringApplication.run(Action.class,args);
    }
}
3、访问主页
根据端口号访问就行【http://127.0.0.1:8088/】

4、客户端pom依赖:
<!-- Spring Boot Admin监控客户端依赖 -->
<dependency>
    <groupId>de.codecentric</groupId>
    <artifactId>spring-boot-admin-starter-client</artifactId>
    <version>2.2.3</version>
</dependency>
5、修改客户端配置
# 修改端口号避免冲突
server.port=8081
# 配置监控管理端地址
spring.boot.admin.client.url=http://127.0.0.1:8088
# 客户端的名称,用于区分不同的客户端
spring.boot.admin.client.instance.name=CLIENT1
# 配置客户端展示哪些信息,*表示展示全部信息
management.endpoints.web.exposure.include=*

启动client_test,可以看到应用是1了,可以多启动几个,都能看到

点击进去:


多弄几个效果还是很明显的。
springboot10、AOP
前言
Spring 最重要的两个功能,就是依赖注入和面向切面编程(AOP)。
AOP 为我们提供了处理问题的全局化视角,使用得当可以极大提高编程效率。
Spring Boot 中使用 AOP 与 Spring 中使用 AOP 几乎没有什么区别,只是建议尽量使用 Java 配置代替 XML 配置。
目录
1、pom依赖
<!-- AOP -->
<dependency>
    <groupId>org.springframework.boot</groupId>
    <artifactId>spring-boot-starter-aop</artifactId>
</dependency>
2、AOP控制器【com.item.aop】
package com.item.aop;

import org.aspectj.lang.JoinPoint;
import org.aspectj.lang.annotation.Aspect;
import org.aspectj.lang.annotation.Before;
import org.aspectj.lang.annotation.Pointcut;
import org.springframework.stereotype.Component;

import org.slf4j.Logger;
import org.slf4j.LoggerFactory;

import java.util.Date;

/**
 * 日志切面
 */
@Component
@Aspect // 标注为切面
public class LogAspect {
	private Logger logger = LoggerFactory.getLogger(this.getClass());

	// 切入点表达式,表示切入点为控制器包中的所有方法
	@Pointcut("within(com.item.controller..*)")
	public void LogAspect() {
	}

	// 切入点之前执行
	@Before("LogAspect()")
	public void doBefore(JoinPoint joinPoint) {
		logger.info("访问时间:{}--访问接口:{}", new Date(), joinPoint.getSignature());
	}
}
3、测试apo效果
可以根据返回的路径进行接口控制

4、使用 AOP 监控性能
在研发项目的性能测试阶段,或者项目部署后,我们会希望查看服务层方法执行的时间。以便精准的了解项目中哪些服务方法执行速度慢,后续可以针对性的进行性能优化。
此时我们就可以使用 AOP 的环绕通知,监控服务方法的执行时间。
package com.item.aop;

import org.aspectj.lang.ProceedingJoinPoint;
import org.aspectj.lang.annotation.Around;
import org.aspectj.lang.annotation.Aspect;
import org.aspectj.lang.annotation.Pointcut;
import org.springframework.stereotype.Component;
import org.slf4j.Logger;
import org.slf4j.LoggerFactory;
/**
 * 服务层方法切面
 */
@Component
@Aspect // 标注为切面
public class ServiceAspect {
	private Logger logger = LoggerFactory.getLogger(this.getClass());

	// 切入点表达式,表示切入点为服务层包中的所有方法
	@Pointcut("within(com.item.controller..*)")
	public void ServiceAspect() {
	}

	@Around("ServiceAspect()") // 环绕通知
	public Object deAround(ProceedingJoinPoint joinPoint) throws Throwable {
		long startTime = System.currentTimeMillis();// 记录开始时间
		Object result = joinPoint.proceed();
		logger.info("接口层方法:{}--执行时间:{}毫秒", joinPoint.getSignature(), System.currentTimeMillis() - startTime);
		return result;
	}
}

springboot11、redis
前言
redis可以说是现在最火的非关系型数据库,主要是它处理数据的能力是真的很强。就说win环境的处理能力一般的机器也能在每秒3万次以上,已经很厉害了。我们一般的几万用户的APP根本不需要集群,一个Redis即可搞定几乎所有的小规模并发性问题了。
资源地址:redis服务(windows版)&redis可视化工具.rar_asp.netcoreredis-.Net文档类资源-CSDN下载&redis可视化工具.rar_asp.netcoreredis-.Net文档类资源-CSDN下载")
目录
2、配置声明(application.properties中)
6、创建测试接口【com.item.controller】内
8、启动测试http://127.0.0.1:8088/swagger-ui.htm
1、pom依赖
<!-- Redis 依赖 -->
<dependency>
    <groupId>org.springframework.boot</groupId>
    <artifactId>spring-boot-starter-data-redis</artifactId>
</dependency>
<dependency>
    <groupId>redis.clients</groupId>
    <artifactId>jedis</artifactId>
    <version>3.1.0</version>
</dependency>
2、配置声明(application.properties中)
#---------------------------------
# Redis数据库索引(默认为0)
spring.redis.database=0
# Redis服务器地址
spring.redis.host=localhost
# Redis服务器连接端口
spring.redis.port=6379
# Redis服务器连接密码(默认为空)
spring.redis.password=
#连接池最大连接数(使用负值表示没有限制)
spring.redis.pool.max-active=8
# 连接池最大阻塞等待时间(使用负值表示没有限制)
spring.redis.pool.max-wait=-1
# 连接池中的最大空闲连接
spring.redis.pool.max-idle=8
# 连接池中的最小空闲连接
spring.redis.pool.min-idle=0
# 连接超时时间(毫秒)
spring.redis.timeout=0
#---------------------------------
3、编写配置文件【com.item.redis】
中间有输出语句就是为了表现配置成功,可以删掉。
package com.item.redis;

import org.springframework.boot.context.properties.ConfigurationProperties;
import org.springframework.context.annotation.Bean;
import org.springframework.context.annotation.Configuration;
import org.springframework.data.redis.connection.jedis.JedisConnectionFactory;
import org.springframework.data.redis.core.RedisTemplate;
import org.springframework.data.redis.serializer.StringRedisSerializer;
import redis.clients.jedis.JedisPoolConfig;

/**
 * 完成对Redis整合的配置
 */
@Configuration
public class RedisConfig {
    /**
     * 1.创建 JedisPoolConfig 对象。在该对象中完成一些链接池配置
     */
    @Bean
    @ConfigurationProperties(prefix = "spring.redis.jedis.pool")
    public JedisPoolConfig JedisPoolConfig() {
        JedisPoolConfig config = new JedisPoolConfig();
        System.out.println("redis默认值:" + config.getMaxIdle());
        System.out.println("redis默认值:" + config.getMinIdle());
        System.out.println("redis默认值:" + config.getMaxTotal());
        return config;
    }

    /**
     * 2.创建 JedisConnectionFactory 对象,配置Redis连接属性
     *
     * @param config
     * @return
     */
    @Bean
    @ConfigurationProperties(prefix = "spring.redis")
    public JedisConnectionFactory jedisConnectionFactory(JedisPoolConfig config) {
        System.out.println("redis配置完毕:" + config.getMaxIdle());
        System.out.println("redis配置完毕:" + config.getMinIdle());
        System.out.println("redis配置完毕:" + config.getMaxTotal());
        JedisConnectionFactory factory = new JedisConnectionFactory();
        factory.setPoolConfig(config);//关联连接池的配置对象
        return factory;
    }

    /**
     * 3.创建RedisTemplate,用于执行Redis操作的方法
     *
     * @param factory
     * @return
     */
    @Bean
    public RedisTemplate<String, Object> redisTemplate(JedisConnectionFactory factory) {
        RedisTemplate<String, Object> template = new RedisTemplate<>();
        //关联JedisConnectionFactory
        template.setConnectionFactory(factory);
        //为key序列化器
        template.setKeySerializer(new StringRedisSerializer());
        //为value设置序列化器
        template.setValueSerializer(new StringRedisSerializer());

        return template;
    }

}
4、操作提示
//通过依赖注入使用redis
@Autowired
private RedisTemplate redisTemplate;

redisTemplate.opsForValue();//操作字符串
redisTemplate.opsForHash();//操作hash
redisTemplate.opsForList();//操作list
redisTemplate.opsForSet();//操作set
redisTemplate.opsForZSet();//操作有序set
5、RedisBase编码(只包含字符串处理)
package com.item.redis;

import com.item.Base.RedisUrl;
import org.springframework.beans.factory.annotation.Autowired;
import org.springframework.data.redis.core.RedisTemplate;
import org.springframework.data.redis.core.StringRedisTemplate;


public class RedisBase {
    /**
     * 返回的是Object
     */
    @Autowired
    private RedisTemplate redisTemplate;
    /**
     * 返回String
     */
    @Autowired
    private StringRedisTemplate stringRedisTemplate;
    /**
     * 添加值
     * @param key
     * @param value
     * @return
     */
    public boolean redisSet(String key,String value){
        key= RedisUrl.url+key;
        stringRedisTemplate.opsForValue().set(key,value);
        String o = stringRedisTemplate.opsForValue().get(key);
        return o==null?false:true;
    }

    /**
     * 存储带倒计时的字符串
     * @param key
     * @param value
     * @param second
     * @return
     */
    public boolean redisSetTime(String key,String value,long second){
        key= RedisUrl.url+key;
        stringRedisTemplate.opsForValue().set(key,value,second);
        String s = stringRedisTemplate.opsForValue().get(key);
        return s==null?false:true;
    }

    /**
     * 获取key的value
     * @param key
     * @return
     */
    public String redisGet(String key){
        key= RedisUrl.url+key;
        return stringRedisTemplate.opsForValue().get(key);
    }


}
6、创建测试接口【com.item.controller】内
package com.item.controller;
import com.item.model.Users;
import com.item.redis.RedisBase;
import com.item.res.SUCCESS;
import io.swagger.annotations.Api;
import io.swagger.annotations.ApiImplicitParam;
import io.swagger.annotations.ApiImplicitParams;
import io.swagger.annotations.ApiOperation;
import org.springframework.beans.factory.annotation.Autowired;
import org.springframework.data.redis.core.RedisTemplate;
import org.springframework.data.redis.serializer.Jackson2JsonRedisSerializer;
import org.springframework.data.redis.serializer.JdkSerializationRedisSerializer;
import org.springframework.web.bind.annotation.CrossOrigin;
import org.springframework.web.bind.annotation.GetMapping;
import org.springframework.web.bind.annotation.RequestMapping;
import org.springframework.web.bind.annotation.RestController;
@Api("用户操作接口")
@RestController
@CrossOrigin
@RequestMapping("Redis/")
public class RedisController extends RedisBase {
/**
* 测试Redis添加
*/
@GetMapping("SetRedis")
@ApiOperation(value = "添加key_value",notes = "没啥留言的")
@ApiImplicitParams({
@ApiImplicitParam(name = "key",required = true,paramType = "query",dataType = "String",value = "redis_key"),
@ApiImplicitParam(name = "value",required = true,paramType = "query",dataType = "String",value = "redis_value")
})
public Object testRedisSet(String key,String value){
redisSet(key,value);
return new SUCCESS("写入成功");
}
/**
* 测试Redis查询
*/
@GetMapping("GetRedis")
@ApiOperation(value = "获取key信息",notes = "没啥留言的")


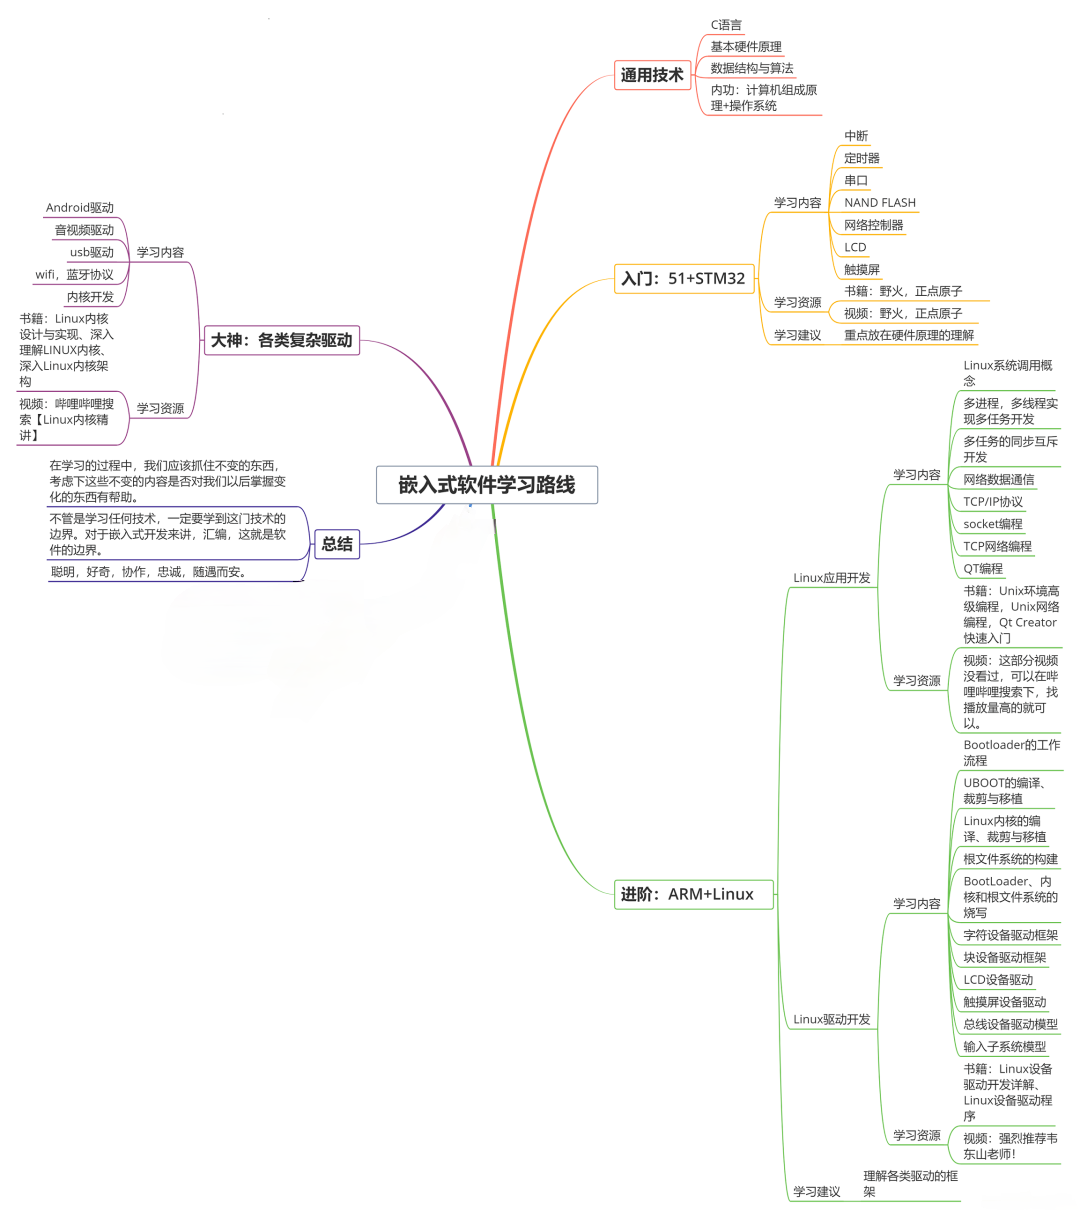
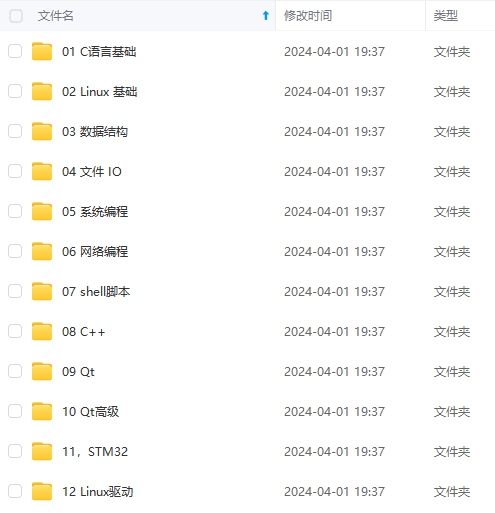
**既有适合小白学习的零基础资料,也有适合3年以上经验的小伙伴深入学习提升的进阶课程,涵盖了95%以上物联网嵌入式知识点,真正体系化!**
**由于文件比较多,这里只是将部分目录截图出来,全套包含大厂面经、学习笔记、源码讲义、实战项目、大纲路线、电子书籍、讲解视频,并且后续会持续更新**
**需要这些体系化资料的朋友,可以加我V获取:vip1024c (备注嵌入式)**
**[如果你需要这些资料,可以戳这里获取](https://bbs.csdn.net/topics/618679757)**
org.springframework.beans.factory.annotation.Autowired;
import org.springframework.data.redis.core.RedisTemplate;
import org.springframework.data.redis.serializer.Jackson2JsonRedisSerializer;
import org.springframework.data.redis.serializer.JdkSerializationRedisSerializer;
import org.springframework.web.bind.annotation.CrossOrigin;
import org.springframework.web.bind.annotation.GetMapping;
import org.springframework.web.bind.annotation.RequestMapping;
import org.springframework.web.bind.annotation.RestController;
@Api("用户操作接口")
@RestController
@CrossOrigin
@RequestMapping("Redis/")
public class RedisController extends RedisBase {
/**
* 测试Redis添加
*/
@GetMapping("SetRedis")
@ApiOperation(value = "添加key_value",notes = "没啥留言的")
@ApiImplicitParams({
@ApiImplicitParam(name = "key",required = true,paramType = "query",dataType = "String",value = "redis_key"),
@ApiImplicitParam(name = "value",required = true,paramType = "query",dataType = "String",value = "redis_value")
})
public Object testRedisSet(String key,String value){
redisSet(key,value);
return new SUCCESS("写入成功");
}
/**
* 测试Redis查询
*/
@GetMapping("GetRedis")
@ApiOperation(value = "获取key信息",notes = "没啥留言的")
[外链图片转存中...(img-UGIYffQn-1715906002523)]
[外链图片转存中...(img-eqo3F0Kq-1715906002524)]
**既有适合小白学习的零基础资料,也有适合3年以上经验的小伙伴深入学习提升的进阶课程,涵盖了95%以上物联网嵌入式知识点,真正体系化!**
**由于文件比较多,这里只是将部分目录截图出来,全套包含大厂面经、学习笔记、源码讲义、实战项目、大纲路线、电子书籍、讲解视频,并且后续会持续更新**
**需要这些体系化资料的朋友,可以加我V获取:vip1024c (备注嵌入式)**
**[如果你需要这些资料,可以戳这里获取](https://bbs.csdn.net/topics/618679757)**


 2404
2404

 被折叠的 条评论
为什么被折叠?
被折叠的 条评论
为什么被折叠?
 到【灌水乐园】发言


